A loose handbrake cable usually occurs due to two reasons:
- Pulling the cable itself from constant strong tension
- Most often - due to wear on the rear brake pads
If you compare the Largus handbrake adjustment design with other domestic cars, you can feel a strong difference. Yes, this is understandable, because in Largus from a Russian manufacturer there is only one assembly and a name. Now let's get down to business.
Features of handbrake adjustment
The question of proper cable tightening is quite relevant. Before directly performing the procedure, it is recommended to first check the functioning of the system. Note that the experts recommend carrying out the inspection procedure after every 30,000th run of the Renault Logan.
We perform a performance check using the following algorithm:
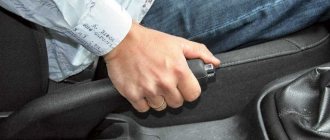
- tighten the handbrake lever until it stops;
- start the engine, activate first gear in the transmission unit and slowly release the clutch pedal;
- If the engine has not stalled and the car is moving, then the parking brake is ineffective or broken.
Lada Largus. Adjusting the parking brake drive
We adjust the parking brake drive after replacing the rear wheel brake pads, cables or parking brake lever. We hang the rear wheels and securely fix the car on factory-made stands. Lifting the parking brake lever...
Remove the lever trim cap that covers the adjusting nut
parking brake drive (for clarity, shown with the floor tunnel lining removed).
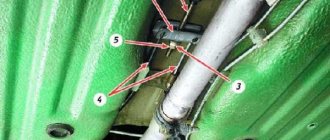
To adjust the position of the brake pads, press the brake pedal several times. We hold it down and then repeatedly raise and lower the parking brake lever (while moving the lever, you must keep the parking brake release button on the lever depressed at all times so that the ratchet mechanism does not work). In this case, clicks will be heard in the brake mechanisms of the rear wheels from the operation of the mechanism for automatically adjusting the gaps between the pads and brake drums. If you do not hear clicks when moving the parking brake lever, then increase the tension of the cables by tightening the nut on the threaded end of the front cable. We raise the parking brake lever and lower it until the clicking in the brake mechanisms stops. After this, we check the stroke of the lever, which should be 7-8 clicks (teeth along the sector of the ratcheting device of the lever). If the number of clicks does not correspond to the specified one, then...
... use a wrench or a high 10-point socket to rotate the nut on the threaded end of the front cable (increasing or decreasing its tension), thereby adjusting the travel of the parking brake lever (for clarity, shown with the floor tunnel lining removed). When the parking brake lever is fully lowered, the suspended rear wheels should rotate freely, and when the lever is raised, they should be locked. A properly adjusted parking brake should hold the vehicle on a slope of up to 23% inclusive.
Video on the topic “Lada Largus. Adjusting the parking brake drive"
Repair and adjustment of the Renault Logan hand brake
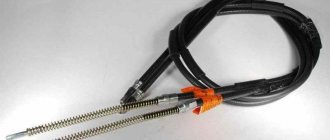
Replacing handbrake cables on Renault Logan
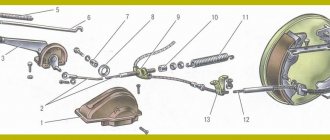
Spacer bar with clearance adjuster, rear brake mechanism Lada-Largus.
Parking brake device
Before replacing the handbrake cable or tightening it, you need to understand the design of the mechanism. It is designed quite simply and consists of the following main parts:
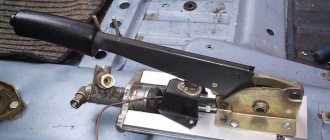
- Lever with spring-loaded button and latch. Located in the cabin on the right hand of the driver.
- A metal rod with a pin at the end and a rocker arm for installing the cable is located under the bottom of the car and attached to the lever. This is the “handbrake” tensioning device.
- The ends of the cable (or two cables), installed on the rocker arm, are attached to the brake levers of the rear wheels - disc or drum.
The parking brake works like this: when the driver lifts the lever in the passenger compartment, the rocker moves forward and acts on the pads through a cable drive. In drum mechanisms, the brake pads move apart, and in disc mechanisms, they converge. The “handbrake” holds only the rear wheels and functions independently of the main brake system, which is activated when the pedal is pressed.
Do-it-yourself replacement of rear brake pads on a Lada Largus
Safety comes first. Motorists should drive with this motto. For Lada Largus, the rear brake pads are replaced if they have been damaged for several reasons. The choice of pads should be made carefully, and according to the catalog numbers given by the manufacturer.
Video of replacing rear brake pads on Lada Largus:
Brake pad replacement process
To replace the rear brake pads of the Lada Largus, you need to prepare tools. For work you will need: a jack, a wheel wrench, pliers and a flat-head screwdriver. When everything is prepared, you can proceed directly to the process:
- Engage 1st or 3rd gear at the gearbox.
- Place wheel chocks under the front wheels.
- Raise the rear of the car, where the pad will be changed, using a jack.
- We dismantle the wheel.
- Remove the cap from the brake reservoir.
- We dismantle the top cover of the brake drum.
- We move the working piston inward and fix it in this position.
- We squeeze the sliding parking brake levers inward.
- Compress the spring and unhook the handbrake cable.
- Turn the pressure spring a quarter. In this case, it is worth holding the support stand.
- Now, you can remove the cup, spring and support post.
- All operations described below must be done with the second block in the same drum.
- By stretching the upper spring, we remove the pads from the slots.
- Now, stretch the lower spring and remove the pads from the restrictor plate.
- Next, we dismantle the pads along with the springs.
- We unhook the springs from the pads, first the upper one, and then the lower one.
- Now, it is necessary to dismantle the spacer strips.
- Next, we inspect the drum for defects: chips, grooves, grooves.
- Now that everything is ready, install everything in reverse order.
- If necessary, add fluid to the brake reservoir.
Before using the handbrake, right in the garage, it must be gently pulled and released several times. This will help the new pads adjust.
Pad selection
The choice of rear brake pads for Largus should be approached carefully, because not only braking while driving, but also how the parking brake will work depends on them.
Analogues of brake pads for Lada Largus
There are quite a lot of manufacturers that produce analogues, but we will consider only those that, based on experience, are installed by car owners.
| Manufacturer's name | vendor code | Average price in rubles in the Russian Federation |
| Master-sport | 03-0137-0496-2-SET-MS | 1300 |
| Japan Parts | GF-015AF | 1600 |
| ABS | 9268 | 2000 |
| Meyle | 16-14 533 0016 | 2100 |
| Starline | BC 09890 | 2200 |
| Kraft Automotive | 6025064 | 2300 |
| Pilenga | BS-P 8455 | 2300 |
| TRW | GS 8780 | 2400 |
| Bosch | 0 986 487 754 | 2400 |
| Fenox | BP53009 | 2600 |
| Delphi | LS2022 | 3300 |
| Ferodo | FSB 4031 | 3600 |
| Otto Zimmermann | 10990.154.5 | 3700 |
| FiT | FT3255 | 3800 |
| Valeo | 564 104 | 5000 |
| Ate | 03.0137-0496.2 | 6600 |
All the manufacturers presented in the table produce high-quality spare parts that fit perfectly into the standard Largus seats.
Causes of malfunction
The causes of rear brake pad failure are no different from the front ones. But it’s worth dwelling on them to know them:
- Wear of the friction part. It can only be seen if you take the drum apart. According to the manufacturer's recommendations, the friction part should not be less than 2 mm.
For comparison: on the left is a new brake pad, on the right is an old front brake pad
Tuning
Many car enthusiasts want to improve the rear brake; to do this, they replace the standard drums with ventilated disc brakes. This operation is done quite simply, but in frequent cases, the hub needs to be replaced.
Installing rear disc brakes
The old rear drums are thrown out and replaced with brake discs, calipers and front pads. This significantly improves the car's braking. These and Sparko offer a full set of rear ventilated brake discs.
As practice shows, disc brakes are 30% more efficient in use, and replacement is carried out in the same way as front brakes. In this case, you do not need to buy separate pads for the rear and front parts. It is enough to buy 4 sets of front pads (each set contains 2 pads).
Replacing the rear brake pads of a Lada Largus is a little more difficult than replacing the front ones. But at the same time, it is more than possible to change the elements yourself
Particular attention should be paid to the choice of pads, because braking efficiency depends on them
When adjustment is required
Experienced motorists are advised to diagnose the current condition of the handbrake once a month, or after every 30 thousand kilometers traveled.
If there is a suspicion of a malfunction, under no circumstances should the inspection be postponed. Moreover, diagnostics are quite easy. There is no need to go to the service center.
The proposed instructions provide 2 methods for diagnosing the handbrake, which is done by hand.
- First method. Drive your car onto a fairly steep slope and do not press the handbrake all the way. If the car is stationary and does not roll, the system works normally. If the car starts to move, tighten the cable all the way and observe the behavior. If the car still drives, the handbrake needs to be adjusted or even changed;
- Second method. Pull the handbrake fully, engage 1st gear, carefully and slowly release the clutch pedal. Here it would be logical to remember the principle of operation of the clutch on a car. If everything is fine with the handbrake, the engine should stall. If there is a problem with the handbrake, the car will move. Here you need to repair or adjust the unit.
Most often, the parking brake stops performing its tasks normally due to weakened tension, wear of the brake pads, or due to an increase in the gap between the pad and the drum.
Need to adjust the handbrake
I would like to focus on several situations when it is strongly recommended to adjust the parking brake yourself or even with the help of specialists. This is also done in the following cases:
This is also done in the following cases:
What kind of UAZ Patriot tuning can you do yourself?
- brake pads were changed;
- brake discs or drums were changed;
- brake pads were adjusted;
- the cable was repaired;
- the handbrake cable was changed;
- an adjusting unit was installed;
- the lever stroke has increased;
- diagnostics showed a malfunction.
Anyone can adjust a mechanical parking brake. This is much easier than doing a wheel alignment yourself, and is also noticeably easier compared to adjusting the low beam headlights on a car.
When to tighten and when to change?
During operation of the machine, the steel cable gradually stretches and begins to sag. Then part of the lever stroke is used to remove this slack (the first 2-3 clicks), and only then the force is transferred to the brake pads of the rear wheels. As a result, they are weakly pressed against the surface of the discs or drums and the car does not brake reliably.
The first sign of a malfunction is that the handbrake stops working on the first two clicks of the handle and is raised by hand without any effort. In this case, it is definitely necessary to tighten the hand brake, or rather the cable drive.
But the operation of the mechanism also depends on other factors:
Abrasion of the linings does not have much effect on the operation of the main system, since the stroke of the hydraulic pistons is quite large. But the effect of the mechanical “handbrake” gradually weakens. To return it to working condition, it is necessary to compensate for the wear of the elements by tensioning the drive. If the cable itself is in satisfactory condition, the extension of the tension pin will be enough to ensure the operation of the parking brake at any degree of wear on the linings.
The cable is replaced in the following situations:
- The element has stretched to such an extent that at maximum tension the pads do not grip the discs and the car rolls away on any slope.
- Due to the constant ingress of water under the cable casing, it rusted and became tightly jammed. This happens when a motorist rarely uses the handbrake.
Cable jamming also occurs in winter, when water trapped under the casing freezes inside. In this situation, do not rush to change it; first warm up the car in the garage, and then drive out the moisture using WD-40 aerosol lubricant.
Adjusting the parking handbrake yourself
Good day, dear car enthusiasts! Probably there is no driver who started driving, forgetting to release the car's handbrake? At this moment we “spit” and think about why we need this parking brake, if it is more convenient to fix the position of the car while stopping in a downshift.
Although, we understand perfectly well that there are times when we again start the engine, forgetting that the car is locked in gear. It’s good if we just jerk and stall, but what if there’s someone else’s car in front (behind)? What if, while parked, another driver drives into us (according to the “law of meanness”)? In addition to repairing the bumper, you will have to repair the transmission of your car.
In general, you can come up with a lot of these “ifs”. And really, why do we need a parking brake (“handbrake”)? After all, if a handbrake is included in the design of a car, then it is assigned some functions.
What is a hand brake and why is it needed?
Adjusting the hand (parking) brake
The hand (parking) brake performs the function of holding the vehicle stationary in parking lots and on slopes.
In addition to its main purpose, the handbrake is also used when starting from a stop while stopping on a hill, to enter a controlled skid (of course, with experience and skills in use), if the pedal of the main brake system fails.
In the latter case, handbrake braking is performed by means of a sharp and strong jerk of the handbrake lever.
The principle of operation, as well as the design of the hand brake, are simple. The parking brake is mechanically driven (handbrake cable). In some models, the handbrake cable acts on the rear brake pads, and in some models, the handbrake acts on the transmission (driveshaft) and is called the central brake.
The driver pulls the handbrake handle, thus tightening the handbrake cable. Thanks to the rocker arm, the cables are evenly tensioned on the brake pads of both rear wheels.
The parking brake sensor located on the instrument panel signals the driver that the car is on the handbrake. Therefore, do not forget to make sure that the handbrake light is not on before starting to drive.
How to adjust the handbrake
Adjusting the handbrake - video Adjusting the parking brake begins with checking its functionality. The handbrake should be checked and adjusted every 30 thousand km. mileage It is advisable even if, in your opinion, it works without interruption.
Checking functionality is simple. Having tightened the handbrake all the way, engage first gear and smoothly release the clutch pedal. If the parking brake is in order, the car engine should stall. If the car begins to move, albeit slowly, then it’s time for adjustment, or the hand brake needs repair.
As a rule, repairing a hand brake involves replacing the cable. In most cases, you just need to tighten the handbrake. How? In principle, it is simple, and any driver can do it.
Procedure for adjusting the handbrake
Adjustment of the parking brake should be carried out on an inspection pit, overpass or on a lift. If such conditions do not exist, then after jacking up the rear part of the body, be sure to install support “goats”.
For some car brands, the handbrake drive is adjusted directly in the cabin. Therefore, before you start servicing the parking brake system, check in the manual which handbrake system you have.
- raise the parking brake lever 1-3 clicks;
- loosen the equalizer locknut;
- tighten the equalizer adjusting nut. This should tighten the handbrake cable. If tension does not occur, then the parking brake cable needs to be replaced;
- check the cable tension by tightening the handle to the number of clicks required for your car model;
- If everything is in order and the cable is tensioned, then in order to turn the rear wheel by hand, considerable effort will be required. Tighten the equalizer locknut;
- then release the handbrake lever and turn the rear wheels. They should rotate smoothly and evenly. All. Order.
- Having lowered the rear of the car to the ground, check the effectiveness of the handbrake in first gear.
Have fun driving with your parking brake adjusted.
Instructions for tensioning and replacing the drive
Since the parking brake system mechanism is located under the bottom of the car, an inspection ditch, overpass or lift is needed to perform the work. In extreme cases, you can do without them, but then you will have to hang out the back of the car and lie under it, which is not only inconvenient, but also dangerous. Before tightening the cable, securely secure the front wheels of the vehicle with wheel chocks.
Then act in the following sequence:
- Set the handbrake lever to the down position.
- Jack up any of the rear wheels.
- Armed with two open-end wrenches that fit the tensioner nuts, go down into the inspection hole.
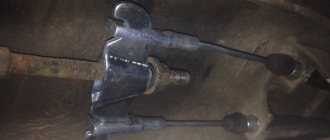
- While holding the main nut located on the stud near the rocker arm, loosen the locknut.
- Tighten the tension nut, periodically checking the rotation of the suspended wheel by hand. To prevent the pin from spinning, it must also be held with pliers or a wrench.
- Stop tightening the cable as soon as the pads begin to grip the wheel. Make 1-2 turns of the nut back and check the operation of the handbrake. It should fire after the second click.
- Tighten the locknut, lower the jack and test the handbrake on a slope.
Payment via PayPal
After selecting payment via PayPal, the PayPal payment system will launch, where you need to select the payment method: bank card or PayPal account.
If you already have a PayPal account, then you need to log into it and make a payment.
If you do not have a PayPal account and you want to pay using a bank card via PayPal, you need to click on the “Create an Account” button - shown with an arrow in the picture.
PayPal will then prompt you to select your country and provide your credit card information.
After specifying the information required to make the payment, you must click on the “Pay Now” button.
A necessary tool for tightening the handbrake.
Head for 8 for ratchet Set of keys for 13 Partner (preferably the coolest car mechanic)
- Two keys for 13. It is advisable that one of them be a socket.
- Head 8.
- A partner, but you can do without him. The truth is it’s more difficult without him.
The principle of adjusting the handbrake
- Fully lower the handbrake lever in the cabin.
Lower the handbrake handle
- Place the car on a pit or lift it on a lift. Some car owners manage to adjust the handbrake “from the curb” - but this is inconvenient and dangerous.
- Find the resonator from the bottom of the car and remove it from the rubber brackets.
Remove the muffler from its mounting to the body
Using a ratchet, unscrew the 4 bolts securing the protection of the handbrake adjustment mechanism (protective screen).
Remove and set aside the protective screen
Next, you can either remove the protective screen, but it seems to me that it is easier to move it forward behind the muffler, which will free up space that is enough for free work.
Adjusting the hand brake on Lada Largus
The first step is to unscrew the bolt securing the plastic casing under the handbrake lever, which is clearly shown in the photo below:
Then remove this cover completely so that it does not interfere.
Then, under the lever itself, we bend the so-called cover to the side, and there we see a nut on the rod. You need to tighten it clockwise if you want to tighten the handbrake. After several revolutions, it is advisable to check the operation of the handbrake so that it is not overtightened.
It is most convenient to tighten using not a regular open-end wrench, but a socket wrench or a deep socket with a crank.
When the adjustment is completed, you can put all the removed interior parts back in place.
Typically, adjustment is required very rarely and it is possible that during the first 50,000 km you will never even do this once, since it will not be necessary.
Repair of hand brake of Lada Vesta car
Removing and installing the hand brake lever
We prepare the car for work and turn off the ignition.
Remove the floor tunnel lining.
Disconnect the wiring harness connector from the handbrake lever warning light switch.
| Rice. 1 |
Using a 10mm wrench, loosen the adjusting nut 2, Figure 1, of the manual brake lever equalizer cable and disconnect both cables 1, Figure 2, from the equalizer 2.
| Rice. 2 |
Lever Installation
We install the manual brake lever on the mounting studs and secure it with three nuts 3, Figure 2. The tightening torque of the nuts is 18 - 24 Nm (1.8 - 2.4 kgf.m).
Install the cables 1 of the manual brake drive into the holes of the equalizer 2.
We tighten the adjusting nut 2, Figure 1, of the equalizer cable so that the size from the upper end of the adjusting nut to the end of the threaded part of the equalizer cable is 16 ± 0.3 mm.
We connect the wiring harness block to the handbrake lever warning light switch.
We install the floor tunnel lining.
Adjusting the hand brake
We place the car on the lift, apply the parking brake and turn off the ignition.
Lower the handbrake lever.
We tighten and lower the manual brake lever five times to its original position to bring the drive cables into working condition.
Raise the car until the wheels leave the ground and make sure that the rear wheels rotate. If this is not the case, we check the following elements and, if necessary, repair or replace them:
— manual brake cables;
— rear brake wheel cylinders;
— automatic gap adjustment mechanisms.
Using a 10mm wrench, loosen adjusting nut 2, Figure 1, cable tension.
We install the manual brake lever on the second cutout of the gear sector.
Tighten the adjusting nut so that the rear wheels stop rotating by hand.
We tighten and lower the manual brake lever 2-3 times and check the rotation of the rear wheels. If the wheels do not rotate, gradually loosen the adjusting nut until the wheels begin to rotate freely. Local contact of the friction lining with the working surface of the drum is allowed.
We check the effectiveness of the service brake system.
Replacing the hand brake cable
We prepare the car for the job. We place the car on the lift, apply the handbrake and turn off the ignition.
Remove the floor tunnel lining.
Lower the manual brake lever all the way down.
| Rice. 3 |
Using a 10mm wrench, loosen the adjusting nut 2, Figure 1, of the manual brake lever and disconnect both cables 2, Figure 3, from the equalizer 3.
Using pliers and a screwdriver, remove the ends 1, Figure 3, of the cable sheaths 2 from the holes in the floor tunnel.
Remove the rear wheels.
Using a 24mm socket, unscrew the three nuts 1, Figure 4, fastenings and remove the protective screen 2 of the body floor.
| Rice. 4 |
Using a flat-head screwdriver, release the sheaths of 3 cables from the brackets 4 fastening to the underbody of the car.
We remove the brake pads of the rear brake, as indicated in the article - “Repair of the brake mechanisms of the rear wheels of a Lada Vesta car.”
Using a screwdriver and pliers, disconnect the cables from the pad drive levers and remove the ends 1, Figure 5, of cables 2 from the holes in the brake shields.
| Rice. 5 |
We remove the cables from the guide holes in the brackets on the rear suspension arms and in the brackets securing the rear suspension arms to the body.
We remove the cables.
Installing handbrake cables
We install the cables into the guide holes in the brackets for attaching the rear suspension arms to the body and in the brackets on the rear suspension arms.
We install the ends of the cable sheaths into the holes of the brake shields.
We install the ends of the cable sheaths into the holes in the body floor tunnel and secure the cable sheaths in the fastening brackets to the bottom of the body.
We install the rear brake pads as described in the previous article.
Install the rear wheels.
We connect the cables to the equalizer of the manual brake lever.
We adjust the manual brake lever as described above.
We install the floor tunnel lining.
We check the effectiveness of the service brake system.
avtomechanic.ru
How to tighten the handbrake on the Lada Largus video
Place the vehicle in the work station, apply the parking brake and turn off the ignition.
Cut the floor mat at the rear of the arm and move the mat pieces to the sides.
1 — manual brake lever; 2 — equalizer cable for the manual brake lever; 3 — adjusting nut of the equalizer cable; 4 — manual brake cable equalizer; 5 — manual brake cables; X - adjustment dimension for cable tension, X = 16 ± 0.3 mm
Loosen adjusting nut 3, Figure 17-1, of the handbrake lever equalizer cable
. and disconnect both cables 5 from the equalizer 4.
Unscrew the two nuts securing the lever to the floor tunnel studs,
Move the front seats all the way forward, lift the lever and disconnect the wiring harness block from switch 2, Figure 17-2, warning light of the manual brake lever (replaceable head 13, extension and knob).
1 — lever attachment points; 2 - warning lamp switch
Remove the handbrake lever.
Unscrew the adjusting nut from the end of the front cable and disconnect the short cable from the lever.
Remove the handbrake warning lamp switch by unscrewing the screw securing it.
Connect the wiring harness block to the warning light switch of the manual brake lever, install the lever on the mounting studs and secure with two nuts. The tightening torque of the nuts is 8 N.m (0.8 kgf.m) (replaceable head 13, extension and wrench, torque wrench).
Install the handbrake cables into the holes in the equalizer.
Tighten the adjusting nut of the manual drive lever so that dimension X, Figure 17-1, from the upper end of the adjusting nut to the end of the threaded part of the equalizer cable is 16 ± 0.3 mm (spanner 10, caliper).
Adjusting the hand (parking) brake drive
Note: The parking brake adjustment is shown here in more detail.
Place the vehicle on a two-post lift, apply the parking brake and turn off the ignition.
Sources
- https://avtovestie.ru/info/kak-podtjanut-ruchnik-na-larguse/
- https://avtotop.info/kak-otregulirovat-ruchnik-na-larguse/
- https://rezina48.ru/novosti/regulirovka-ruchnogo-tormoza-largus.html
- https://largus-mcv.ru/html/rychag-ruchnogo-tormoza.html
- https://mvpclub.ru/kak-podtjanut-ruchnik-na-lada-largus-video/
Pull up the handbrake
But if you really know how to tighten the handbrake on a Lada Granta standard, this procedure will not take you much time and effort. The only thing that is required for its implementation is a jack or an inspection hole, because access to adjustable components and assemblies occurs from below and you will have to work under the car. To tighten (adjust) the handbrake you will need 3 tools:
- two open-end wrenches for 13, one of them is preferably a socket one;
- one key head for 8;
- a faithful assistant (although in desperate situations you can get by alone).
The process of directly adjusting the manual braking system of a Lada Granta car is carried out in nine main stages:
- We lower the handbrake lever inside the car.
- We climb under the car, unscrew the rubber cushions (brackets) from the resonator, and remove the muffler from its attachment to the body.
- We remove the protective screen of the parking brake adjustment mechanism. To do this, use a socket wrench to unscrew the 4 nuts from the fastening bolts.
- We remove the protective screen or move it to the side behind the muffler - in this case, the necessary space for work is also quite enough. In this case, the muffler can be pulled back with something, for example, by pushing a block of wood under it.
- We take two 13mm wrenches - the first one is to slightly loosen the locknut, holding the adjusting nut. Then vice versa - hold it, and secondly turn (also loosening) the adjusting nut.
- Actually, we adjust the hand brake as follows: tighten the handbrake cable, for which we tighten the adjusting nut (move the key clockwise).
- Next, you should check the travel of the handbrake lever - this is why you need a partner, or you will have to do it yourself. The lock nut can be tightened when the handbrake stroke is 2-4 clicks (see above).
- Then we test the operation of the parking brake mechanism as a whole. To do this, lift the rear wheels and check how freely they rotate when the handbrake is lowered and how completely they lock when fully raised (in this case they should not rotate at all!).
- If the handbrake is working properly, tighten the locknut and replace the protective screen and muffler. The handbrake adjustment is complete!
As the mileage and life of the vehicle increases, the handbrake becomes less and less adjustable. It happens that even after adjustment, the manual braking system does not work properly and does not “hold” the car. This indicates that the wear on the brake pads is too high or the cable stretch is irreversible.
Tools:
- Ratchet wrench
- Extension
- 10 mm head
- 13 mm high head
- Open-end wrench 13 mm
Parts and consumables:
Aerosol lubricant type WD-40
Notes:
The parking brake should hold the vehicle on a 23% grade. The full travel of the parking brake lever should be from 2 to 4 teeth (clicks) of the lever ratchet device.
1. To adjust the parking brake, place the vehicle on an inspection ditch or overpass and lower the parking brake lever.
2. Using a 10 mm socket, unscrew the four nuts securing the rear heat shield of the additional muffler, having previously treated them with WD-40 lubricant.
3. Remove the rubber cushion from the front suspension bracket of the additional muffler.
4. Slide the heat shield forward to expose the parking brake adjustment assembly.
5. Holding the adjusting nut of the cable end with a 13 mm wrench, use a socket of the same size to unscrew the lock nut.
6. Turn the adjusting nut clockwise to tighten the cables.
Note:
It is convenient to adjust the tension of the cables with a high head with a ratchet and an extension. In this case, do not unscrew the lock nut completely, but, aligning its edges with the edges of the adjusting nut, put on a 13 mm high socket and rotate both nuts at once.
7. Use the locknut to secure the adjusting nut. When the lever is lowered, the suspended rear wheels should rotate freely.
The article is missing:
Photos of parts and consumables
Adjusting the handbrake lever on the Lada Grant is necessary if its stroke is more than 6 clicks. The optimal stroke is 2-4 clicks, but during operation it is allowed to increase its stroke to 8 clicks.
An increase in the travel of the parking brake lever occurs for several reasons, the main ones being stretching of the handbrake cable and wear of the brake pads.
The principle of operation of the handbrake on Grant
Why does it need to be tightened frequently?
This is the peculiarity of the mechanism, which is why you often have to tighten the handbrake. Plus low-quality spare parts from the beginning, and a design that has not changed since the time of Tsar Pea!
In foreign cars (not all of course), the rear brake mechanism (drum or disc) has self-tensioning springs, which are tightened depending on the wear of the pads.
How a properly configured handbrake should work
The handbrake movement in a Lada Granta car should be no more than 6 clicks from the moment it is raised. It is possible to increase the handbrake stroke to 8 clicks, but it is not recommended.
It shouldn’t be like this (the brakes don’t grab the rear wheels)
Ideally, of course, 3-4 clicks. With this setting of the handbrake, you will have a reserve of movement when the cable weakens and the wheels begin to grip later.
If you experience a situation where the handbrake is “pulled out” to its fullest extent, but the wheels do not grab, then the following reasons are possible:
- rear brake pads are worn out;
- the handbrake cable is broken or stretched/