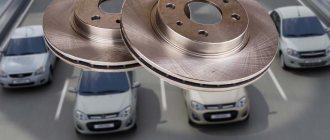
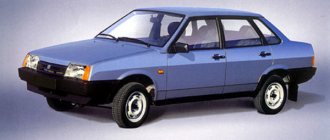
The brake discs on a Priora car, like any other, are an important part of the front suspension, which is the first to begin braking. There are two options for wheels on Priora - regular factory ones and ventilated ones.
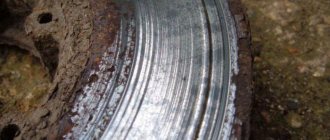
The design of the Lada Priora brake system is such that “drums” are installed at the rear, and calipers at the front. This has been going on since 2101. However, it is possible to modify the rear brakes - that is, install brake discs with calipers and backwards, instead of drums. Spare parts for the brake system on Priora must be purchased and installed by the owner on time - the safety of travel depends on their “freshness”. The ventilated front disc has an advantage over a regular one; it is lighter and has plenty of holes, which means it cools down faster! The Priora, of course, brakes well in stock, but until you have driven a Ford or Kia, disc brakes are better there. The price of ventilated brake discs for a Lada Priora car starts from 4,000 thousand rubles and above, standard ones are cheaper than 1,100. In three years, my factory production has reached 2 millimeters.
Remember that the price of these spare parts is incomparable to the damage that you may incur if the braking time increases due to wear and tear of the components. Replacement must be done on time. On the Priora, front brake discs are installed in all trim levels, but the rear ones are a subject of tuning for daring car owners.
How much do standard brake discs cost on Priora - article number and price
The front braking system of the Lada Priora car consists of several parts - very close to the discs there are several more parts that are also important for proper braking, and the other part of the suspension is responsible for a smooth ride and minimizing jumps when passing obstacles. Before buying brakes for a Priora, inspect all the parts so that they do not wear out - if they are worn out, new rotors may not save you.
The standard part for the VAZ-2170 “migrated” from the tenth family, and therefore you can often find it in stores with the inscription “for the VAZ-2112”. Its catalog number is 2112-3501070-02, the price is from 1100 to 1500 rubles.
Description of design
The service brake system is hydraulic, dual-circuit, with diagonally separated circuits. In normal mode, when the system is working properly, both circuits operate. If one of the circuits fails (depressurizes), the other circuit provides braking to the vehicle, although with less efficiency.
Elements of the brake system : 1 — front wheel brake disc; 2 — front wheel brake tube; 3 — front wheel brake hose; 4 — hydraulic drive reservoir; 5 — main brake cylinder; 6 — vacuum booster; 7 — brake pedal; 8 — rear wheel brake tube; 9 — pressure regulator; 10 — rear wheel brake mechanism; 11 — rear wheel brake hose; 12 - floating bracket
The service brake system includes wheel brakes, a pedal assembly, a vacuum booster, a master cylinder, a hydraulic reservoir, a pressure regulator in the rear wheel brakes, as well as connecting tubes and hoses.
The brake pedal is a suspended type. A brake signal switch is installed in the pedal bracket - its contacts close when the brake pedal is pressed. Pedal assembly with vacuum booster and main brake cylinder : 1 - brake pedal;
2 — brake pedal bracket; 3 - vacuum booster; 4 — hydraulic drive reservoir; 5 - main brake cylinder The vacuum brake booster is located between the brake pedal and the main brake cylinder and is attached with two nuts to the brake pedal bracket, which, in turn, is attached to the body.
The vacuum amplifier is non-separable; if it fails, it is replaced with a new one. The brake master cylinder is attached to the vacuum booster housing with two studs. On top of the cylinder there is a reservoir for the hydraulic drive of the brake system, which contains a supply of fluid. There are markings for the maximum and minimum liquid levels on the tank body, and a liquid level sensor is installed in the tank lid, which, when the liquid level drops below o, turns on the alarm in the instrument cluster. When you press the brake pedal, the pistons of the master cylinder move, creating pressure in the hydraulic drive, which is supplied through tubes and hoses to the working cylinders of the wheel brake mechanisms. Front wheel brake mechanism : 1 - shoe guide;
2 — caliper; 3 — brake pads; 4 — brake disc; 5 — brake shield; 6 — locking plate; 7 — screw securing the cylinder body to the caliper; 8 — hydraulic brake bleeder fitting; 9 — wheel cylinder; 10 — bolt securing the cylinder to the guide pin; 11 — guide pin; 12 — guide pin cover The front wheel brake mechanism is a disk one, with a floating caliper, which includes a caliper and a single-piston wheel cylinder, tightened together with two screws.
The brake shoe guide is attached to the steering knuckle, and the bracket is attached with two bolts to the guide pins installed in the shoe guide holes. Protective rubber covers are installed on the fingers. Grease is placed in the holes for the pins of the pad guide. The brake pads are pressed against the guide grooves by springs. When braking, the fluid pressure in the hydraulic brake mechanism increases, and the piston, moving out of the wheel cylinder, presses the inner brake pad against the disc. Then the bracket (by moving the guide pins in the holes of the pad guide) moves relative to the disc, pressing the outer brake pad against it. In the cylinder body, attached to the caliper, there is a piston with a rubber sealing ring of rectangular cross-section. Due to the elasticity of this ring, a constant optimal gap is maintained between the disc and the brake pads. Elements of the front wheel brake mechanism : 1 - bolt securing the cylinder to the guide pin with a locking plate; 2 — screw securing the cylinder to the caliper; 3 - cylinder; 4 - block; 5 — caliper; 6 - guide pin; 7 — guide pin cover; 8 — shoe guide Rear wheel brake mechanism : 1 — lower tension spring;
2 — front block; 3 - pressure spring; 4 — spacer bar; 5 - working cylinder; 6 — upper tension spring; 7 — parking brake drive lever; 8 — rear block; 9 — tip of the parking brake cable. The rear wheel brake mechanism is drum-type, with a two-piston wheel cylinder, two brake pads and a device for automatically adjusting the gap between the pads and the drum.
The automatic clearance adjustment device is located in the wheel cylinder. The main element of the device is a steel split thrust ring mounted on the piston with an axial clearance of 1.25–1.65 mm. The thrust rings (two per cylinder) are inserted into the cylinder with tension, providing a shear force along the cylinder surface of at least 350 N, which exceeds the force of the brake shoe tension springs. When the brake linings wear, the thrust rings shift under the action of the pistons by the amount of wear. Elements of the rear wheel brake mechanism : 1 - front block;
2 - pressure spring; 3 - spacer bar; 4 - upper tension spring; 5 - finger; 6 — washer; 7 - cotter pin; 8 — rear block; 9 — parking brake drive lever; 10 - lower tension spring If the cylinder mirror is damaged due to mechanical impurities in the brake fluid, or due to corrosion (presence of water in the brake fluid), the rings may “sour” in the cylinder and one or even both pistons will lose mobility. In this case, the cylinders must be replaced.
Main faults and signs of wear
You need to listen carefully to your suspension - sometimes it is the sounds that are the first signs of wear, and only after them is followed by “sluggishness” of braking and passing obstacles. Any extra sound is a reason to think carefully and start diagnosing. Don’t put off the problem - as soon as you have free time, try to inspect the chassis of your Priora.
Signs of wear on the VAZ-2170 brake discs may appear as follows:
- When braking hard (almost pressing the pedal to the floor), you can hear a sharp grinding or squeaking sound. This is not always normal behavior, but it can occur if the pads are installed incorrectly or simply do not fit the Priora. A grinding noise may occur if dirt or sand appears under the pad - upon contact, it will wear down the surface of the disc.
- The brake pedal feels soft, as if falling down, and feels bad.
- The car's braking distance has increased. It is measured, of course, during everyday travel, but it is advisable to compare its duration under equal weather conditions.
- Squealing pads. This sound clearly indicates that they have been erased - they, like a musical record, will produce a similar sound.
- When braking, you feel a bump in the steering wheel. If there were no bumps, it means that the pads “stumbled” in that sector of the discs, which was worn out and caused the pads to “sag” a little.
- Car skidding to the side when braking at speed. This is direct evidence of uneven wear. If it skids to the right, check the left brakes, and if it goes to the left, then check the right brakes.
- One side simply doesn't stop the wheel and it continues to roll.
- The brake pedal does not rise after being pressed. The pads are simply stuck to the wheel - the brakes will not work.
- One of the wheels is blocked. This is a serious enough problem that it is impossible to continue moving forward. A fairly wide crack can be found on the disk.
If you find one of these signs and then disassemble the front part of the chassis, you need to inspect the brake system. One part may interfere with the movement of another, and dirt may become clogged (after an off-road trip). Any malfunction should be corrected in a timely manner. The nature of these damages can indicate several facts:
- If the metal turns blue, it means it has oxidized;
- The surface should not be strewn with cracks, bumps, or pits. Riding with such brakes is dangerous for your life - the brakes can jam;
- Spin the rim after removing the wheel. If it moves in a figure eight, it means its fastening has become deformed.
When do pads need to be replaced?
Replacement is required if:
- When braking there is an unpleasant squeaking noise.
- There is a lot of oil on the surface of the pads.
- The friction lining moves away from the base.
- The thickness of the pads is less than 1.5 mm.
- Chips and deep grooves appeared on the surface of the linings.
Remove the rubber plug and inspect the pads.
To check, roll the Priora into the inspection hole. We need to find a special hole located on the brake shield. It should be covered with rubber. Remove the plug and inspect the brake pads. You can measure the thickness, which should be at least 1.5 mm. Cracks, scratches, chips and other defects are also visible through the inspection hole.
You can find a more detailed review of the front brake pads on the CS20 company website at the link - https://cs20.ru/articles/stati/perednie-tormoznye-kolodki-kakie-vybrat/. The article describes the technical characteristics and appearance of the pads.
Manufacturers and prices of analogues - which brake discs are better to install on Priora
The owners want to improve their Priora, including in terms of safety. Therefore, when choosing spare parts for a car, you can pay attention to several manufacturers who create analogues. As you know, the best brands are those whose products have been tested by other drivers. These include:
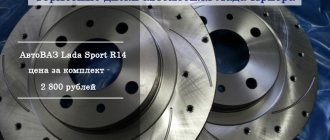
- Brembo R14 ventilated (set) price – 5700-5800 rubles;
- “Avtosporttekhnika” R14 (set) – 3,500 rubles;
- ATE R14 ventilated (set) – 6,200 rubles;
- ATS R14 ventilated (set) – 4,040 rubles;
- AvtoVAZ Lada Sport R14 (set) price - 2,800 rubles;
- Tornado R14 (set) – 5,300 rubles;
- Allied Nippon R14 ventilated (set) – 2,800 rubles;
- BM - BD V 220 (set) price - 2,100 rubles.
All models presented in the list come without ABS support. An exception is the BM - BD V 220 kit, which can work with ABS. Of all the above, the version for the sports Priora is especially praised, with components from the manufacturer Brembo in second place. As for the rear drums on the Priora, they differ from the front ones in that they have a technological window - it is necessary so that the ABS sensor can be connected.
Why do rear pads wear out rapidly?
Several factors influence the wear rate of the rear pads. In the first place here is the driver’s illiterate work with the brake system. Considering the fact that the Priora is equipped with a fairly powerful engine, most drivers prefer aggressive driving with rapid acceleration and sharp braking. With this type of driving, the operation of the car’s braking system leads to the fact that the rear pads wear out very intensively. Many inexperienced car owners, due to ignorance, practically do not use engine braking.
The second factor is the replacement of the rear pads on the Priora with low-quality spare parts. Questionable manufacturers of cheap elements may use low-quality and sometimes simply unsuitable materials to produce the friction layer of linings. This can not only reduce the manufacturer's recommended replacement schedule, but also render the brake drums unusable. Let's look at the main signs that require urgent replacement of the rear brake pads on a Priora.
Sources
- https://VAZremont.com/zamena-zadnih-perednih-tormoznyih-kolodok/
- https://CarsUp.ru/hodovaya-chast/kak-pomenyat-zadnie-tormoznye-kolodki-na-priore.html
- https://mashintop.ru/to/zamena-zadnih-tormoznyh-kolodok-lada-priora-s-abs-i-bez-abs.html
- https://ladafakt.ru/zamena-zadnih-kolodok-na-priore.html
- https://enginehack.ru/zamena-zadnih-tormoznyh-kolodok/
- https://FB.ru/article/466644/zamena-zadnih-kolodok-na-priore-poshagovaya-instruktsiya-osobennosti-sovetyi
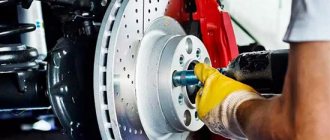
Replacement: removal and installation of brake discs of a Priora car
Replacing front discs on a Lada Priora car is relatively simple. Despite the fact that the front part of the chassis has a greater number of functions - from turning to starting to move, there are also more complex operations. It is much more difficult to change the drums to caliper ones.
To replace brake discs on a Priora, prepare:
- wheel wrench;
- jack, two supports;
- head "14";
- wire or cord;
- spanner "10"
By the way, it’s worth installing good – no, but high-quality front brake discs on the Priora, for example Brembo, as in the video. To be fair, it should be noted that those who install spare parts from Lada Sport usually do not stop there. To modernize the front part of the chassis, they acquire other elements for the sports version and make a real tailor-made for the sports version.
How to remove and change brake discs on a Priora - watch this Video
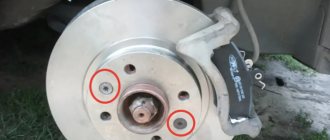
To remove a brake disc on a Priora car, use the following instructions:
- Drive the car onto a flat surface and place wheel chocks under the rear wheels.
- Jack up the front end and support it.
- Remove the wheels: use a wheel wrench to turn the bolts, moving from one to the other, and then pull the wheel towards you. The bolts should be folded separately.
- Work first on one side, then on the other. Turn the steering wheel in the direction from which you are removing the rotor.
- Using a socket, unscrew the screws securing the caliper and remove it together with the bracket.
- Remove the pads.
- Tie the caliper by the bracket with a wire to the shock absorber spring - this way the brake hose will definitely not be damaged.
- Using a "7" wrench, remove the pins holding the brakes in place.
- We remove the disk.
- Before installing new parts, take a closer look at the caliper and pads, and check the hose for leaks. All of them must be intact to ensure a safe trip.
- Install a new spare part. Check that it is on the same plane as the hub - it should be held by the caliper. The distance to the pads should not be too small or large.
THE BETTER DISC BRAKES VS. DRUM MODIFICATIONS
The effectiveness of disc brakes versus drum brakes has been proven many times when installed on sports car models. They are installed on “foreign cars” not only because of effective braking. They are able to ensure simultaneous activation of the brake mechanisms on all wheels, and this allows improving the vehicle's handling in any road conditions.
The advantages of rear disc brakes include the following:
- Reducing the braking distance of the car several times;
- Reducing the time for brake mechanisms to operate;
- The time required to replace brake pads is reduced. the ease of their replacement is noted;
- Increases the safety of driving a vehicle;
- Uniformity is observed when the brake mechanisms of all wheels are activated;
- Reduced unsprung masses of the rear axle;
- Good removal of excess heat under extreme driving conditions;
- There is no need to periodically tighten the handbrake cable;
- The problems of pads freezing to discs in the cold season disappear.
Disc or drum brakes?
The list shows an impressive list of advantages, but there are also specific disadvantages to installing them. When manufacturing the car, the Volzhsky plant does not install the ZDT on the Priora; it’s hard to say why this is, probably to reduce production costs. By installing rear disc brakes on the Priora, technical changes are made to the design of the vehicle. This may cause problems during technical inspection.
Any design receives a comprehensive assessment during test trips at the test site. The vehicle is equipped with well-balanced and properly adjusted brake systems.
If suddenly a car gets into an accident, even if the accident was completely innocent, the owner will have problems due to unauthorized changes in the design features of the car.
Installing rear disc brakes on a Priora with your own hands is quite possible. But after its installation is completed, careful fine-tuning and configuration of the system is necessary. Doing it yourself is difficult, but possible.
It is best to contact a specialized auto center, where they will not only install it, but also issue a certificate of conformity for the new system. In some cases it does not help owners.