Suspension elements are the most vulnerable parts of a car, which during operation are constantly exposed to mechanical damage and external factors. Among all suspension components, hub bearings are considered the most significant, because they are responsible for rotating the wheel and absorbing the load that occurs when the car is moving. It is important to keep them in perfect condition, and at the first sign of trouble, the wheel bearings need to be replaced.
Timely and, most importantly, high-quality replacement will allow you to avoid emergency situations, as well as extend the life of other suspension elements. The first signs indicating wear of parts include wheel play and noise in the suspension. How to identify a malfunction and how to replace the wheel bearings - all this will be discussed in this article.
Hub unit design
It is important to understand the design of the hub itself in order to safely replace the bearings. Popularly, the hub assembly is often called the steering knuckle, because mechanical energy is transmitted through it to the wheels. The bearing plays an important role in the operation of the unit, since if it breaks, it will cease to function normally.
The device of the car hub unit
Note! There are several types of wheel bearings (ball, tapered and others). But the replacement occurs according to the same algorithm for all types of parts.
Wheel bearing structure
The bearing consists of several parts: the outer and inner ring, the cage, and the rolling element. To reduce the coefficient of friction, grease is used. During operation of the part, rotation is transmitted through the rolling body. The inner and outer bearings have no connection with each other, since the outer one is connected to the steering knuckle, and the outer one is connected to the car hub. The transmission of torque to the wheels occurs thanks to splines located inside the hub assembly.
Be sure to use hub lube
Brake discs of the correct diameter
Another reason for the accelerated destruction of bearings is that the car is equipped with discs of increased diameter, the maximum allowed by the car manufacturer. This does not take into account the shift of the center of gravity of the part to the outer edge. This leads to an imbalance of dynamic loads and uneven wear of component elements.
Also, do not forget that the wheel rim is designed to take on all the negative impacts from bad roads. Due to frequent impacts on bumps and potholes in the asphalt, the disc is subject to deformation and its center of gravity shifts to the side. This is called loss of center balance.
When driving at high speeds, the centrifugal force of an unbalanced disc will transfer increased load to the wheel bearing. This will undoubtedly lead to its accelerated destruction.
What is needed for replacement
Since the wheel bearing is a small part, to replace it the car must be driven into a well-lit room. The replacement can be carried out in an inspection hole or on a flat surface. Then you need to prepare tools and materials.
Wheel Bearing Replacement Tools
On a note! Replacing the rear hub bearings is an easier procedure when compared to the front elements, so experts recommend starting work from the front unit.
List of tools needed to successfully replace wheel bearings:
- wrench for 17 and 19;
- flat screwdriver;
- work gloves;
- a clean rag for wiping parts;
- head 30 with knob;
- mandrel for knocking out the hub;
- puller (a tool for removing a bearing).
Rear wheel bearing replacement tool
In addition to tools, you also need to buy bearings. When choosing parts, it is advisable to give preference to originals , at worst to a Russian manufacturer. It is better to abandon Chinese analogues - experiments are not appropriate here. Poor quality parts can damage the vehicle's chassis.
How to choose a wheel bearing
Checking status
I think there is no point in talking about what a bearing is and what it consists of. Despite its rather modest size and simple design, it remains an extremely important element in the hub and entire chassis of the vehicle.
You can check the current condition of the hub bearing or wheel bearing with your own hands. Moreover, this procedure is carried out in the same way for many cars, including:
Daewoo Lanos;
But first, the driver must have a reason to check the element. The primary sign of possible problems is considered to be extraneous noise in the area of the front wheel.
If there are certain suspicions, and the noise indirectly confirms your theory, a mandatory check is required.
Moreover, self-diagnosis does not involve any particularly complex manipulations. This is easier than dealing with the knocking of valves on a hot engine, but at the same time more difficult than pumping the shock absorbers yourself.
Noises are produced by already worn bearings, to check which you should perform a few simple manipulations:
- Place the machine on a flat, horizontal surface;
- Secure the wheels using anti-roll bars;
- Put the car on the handbrake;
- Using a jack, lift the front wheel;
- Install additional supports under the car to transfer the main weight;
- Firmly grasp the hanging wheel;
- In a horizontal plane, swinging toward and away from you, move the wheel;
- If the bearing is in good condition, there will be no extraneous noise;
- If the wheel bearing is in good working order, there should be no play;
- Then remove the handbrake and simply spin the wheel.
During checks, no noises, creaks or knocks should occur. Otherwise, we are dealing with problematic and probably worn bearings.
How to replace a wheel bearing
You need to start the replacement by securing the vehicle - put the car in first gear, and install wheel chocks under the wheels. It's more reliable. Now you can proceed directly to the replacement. Below are step-by-step instructions that will make replacing a wheel bearing possible even for a beginner.
Replacing the hub bearing
Step 1: Prepare a torque wrench. To replace the bearing, it is advisable to use a double-sided tool.
Prepare a torque wrench
Step 2: Jack up the side of the vehicle being repaired.
Jack up the car
Step 3. Unscrew the fasteners and remove the wheel.
Remove the wheel
Step 4 . Bend back the lock washers to remove the caliper. This can be done using a flat-head screwdriver.
Unbend the lock washers
Step 5 . Remove the bolts that secure the brake caliper. As a rule, you only need to unscrew two bolts.
Unscrew the brake caliper mounting bolts
Step 6. Carefully remove the caliper, first disconnecting the brake hoses so that they do not tear.
Disconnect the brake hoses and remove the caliper
Important! If, when replacing the bearing, you notice that the brake disc is worn out, then before removing the caliper, you need to release the pads.
Step 7. Unscrew the two wheel guides and remove the spacer washer.
Remove the spacer washer
Step 8. Carefully prying up the brake disc with a pry bar or flat-head screwdriver, remove it. Do not use a hammer at this stage to avoid damaging the surface of the disc.
Remove the brake disc
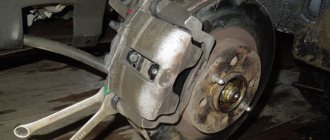
Step 9. This is what the hub looks like after removing the brake disc.
Hub before removal
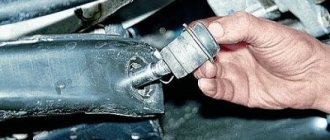
Step 10. Using a thin chisel, carefully remove the hub cap by tapping it in a circle.
Carefully remove the hub cap
Step 11: Remove the cap to gain access to the hub nut.
You have gained access to the hub nut
Step 12: Unscrew the hub nut. On the left side the thread is normal, and the nut unscrews counterclockwise.
Unscrew the hub mounting nut
Step 13: Carefully remove the hub from the steering knuckle.
Remove the hub
Step 14. Remove the hub on the second wheel in the same way.
Repeat the procedure on the second wheel
Step 15: After removing the two hubs, begin replacing the bearings.
Once the hubs are removed, you can begin replacing the bearings
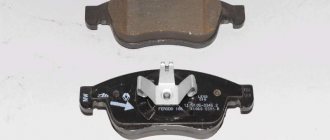
Step 16. For replacement, you also need to prepare a set of wheel bearings and nuts.
Prepare a set of wheel bearings with nuts
Step 17. Remove the outer bearing and anything that will interfere with the repair.
Remove the outer bearing
Step 18. Remove the oil seal from the hub using any available method, while being careful not to damage the hub itself.
Remove the oil seal from the hubs
Step 19. Remove the inner bearing and spacer ring, which is located under the oil seal.
Remove the spacer ring
Step 20: After disassembling the hub, perform a visual inspection. Pay attention to the condition of the lubricant.
Carefully inspect the hub
Step 21 Remove any remaining lubricant from the hub using a regular screwdriver.
Remove any remaining grease
Step 22: Use a special hub repair kit. It will allow you to easily remove the internal parts of the hub without damaging other elements.
Use a hub repair kit
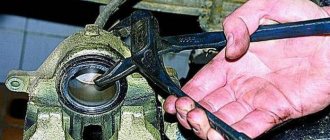
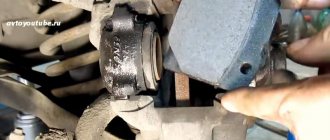
Step 23. Carefully knock the races out of the hub using a special tool. First, the outer bearing race, and then the inner one. Do the same with the second hub.
Press the races out of the hub
Step 24: Inspect the bearing races for damage.
Assess the condition of the clips
Step 25. Assess the condition of the bearings themselves. In our case, the lubricant is so caked that the separator does not even rotate.
Inspect the wheel bearings
Step 26: Clean the hub of any accumulated dirt and grease. The surface should be as clean as possible - this will extend the life of the new bearings.
Remove any remaining grease and dirt from the hub surface
Step 27. Press in the races - first the outer bearing race, then the inner one.
Press the clips into place
Important! When pressing, you will feel the moment when the clip sits in place. The sounds of hitting with a hammer will change greatly.
Step 28. After hammering the clips, wipe the part well with a clean rag and blow with a stream of air.
Wipe the pressed-in clips
Step 29. Apply grease to the surface of the bearing, ensuring that its rubbing parts are well lubricated.
Lubricate the bearing surface
Step 30: Reinstall the inner bearing and spacer.
Reinstall the inner bearing
Step 31 Now replace the oil seal. Make sure that the oil seal sits evenly and without distortions.
Put the oil seal in its place
Step 32. Rotate the hub in your hands to evaluate the quality of the oil seal installation.
Evaluate the quality of the oil seal installation
Step 33. This is what a pressed bearing and oil seal look like.
Pressed bearing and seal
Step 34: Install the hub cap. Now the hub is completely ready for installation on the car.
Screw on the hub cap
Step 35: Take this opportunity to clean everything on the car, removing any accumulated dirt and rust.
Remove accumulated dirt and rust
Step 36: Pay attention to the steering knuckles. It happens that the bearing seat on them turns out to be worn out. If the parts are very worn, then it is advisable to replace them too.
Inspect the steering knuckles for wear
Step 37 . Be careful when installing the hub. If you miss the outer bearing, it may be pushed out of the cage by the axle. In this case, you will need to remove the part and wash it.
Carefully install the hub
Step 38: Using a torque wrench, adjust the position of the installed hub.
Adjust the hub with a torque wrench
Step 39: Lock the retaining nut.
Lock the fixing nut
Step 40. Pour approximately 20-25 g of lubricant into the protective cap, and then screw it on.
Pour grease into the protective cap
Step 41: Install the assembled hub onto the second wheel. But here it is necessary to remember that the threads on the left and right sides are different.
Install the second hub in the same way
Step 42 Now it's time to install the brake discs. Also install the spacer washer, which has been previously cleaned of dirt.
Install the brake discs
Install the spacer washer
Step 43: Reinstall the brake caliper using two bolts. The bolts themselves must be locked. Now put the wheels back in place. At this point, the replacement of wheel bearings can be considered complete.
Secure the brake caliper into place
Screw the wheel back
Adaptation kit for wheel bearing 2108 for VAZ 2101-2107
- Engine Crankshaft
- Flywheel
- VAZ cylinder head
- Sports camshafts
- Sport timing valves
- Cylinder head components
- Belts | Timing gears
- Gaskets | Oil seals
- Intake system
- Throttle valve
- Clubturbo pistons
- TDMK pistons
- Federal Mogul pistons
- Piston rings
- Connecting rods
- Engine mounts
- Inserts for VAZ engines
- ACL earbuds
- Oil catchers
- Oil crankcase
- Oil pump
- Miscellaneous
- Turbo Turbo kit
- Turbochargers
- Turbo manifold
- Bypass valves
- Westgates
- Intercooler for VAZ
- Intercooler kit
- Piping kit (air ducts)
- Turbo parts
- Adapters for installing an oil cooler | sensors
- Straight pipes
- Blocking
- Vacuum booster
- Clubturbo suspension
- Silencers for VAZ
- Control units | Wiring
- Filler necks
- Moto kits Turbo
- Adapters for installing sports steering wheels
- Keychains
- Bumpers tuning for VAZ
- Hoses | tubes
- Thermal insulation
- home
- Catalog
- Transmission
- VAZ drive
- Adaptation kit for wheel bearing 2108 for VAZ 2101-2107
If the bearing breaks in the hub
The replacement does not always go smoothly and without incidents. The most common problems include bearing failure in the seat. As a rule, the bearing breaks during pressing out, especially if not a special tool is used for this, but a hammer and chisel . In such cases, the best option would be to remove the clip using a puller. But such tools cost a lot of money, so not all drivers can afford such a puller.
How to replace a wheel bearing
Craftsmen get out of this situation in several ways:
- removing the clip using a small chisel;
- trimming the remains with a grinder and removing them with a chisel.
How to press out a conical wheel bearing race
These traditional methods are effective, but at the same time dangerous for the wheel bearing seat. Therefore, if you decide to use a chisel, proceed carefully so as not to damage the seat. Even if there is minor damage to the landing site, it is recommended to replace the part immediately, since new parts on damaged hubs will not “work” for long.
Car after replacing the wheel bearing