The most common car brand on the roads of our country is definitely everyone’s favorite VAZ. The “ten” generation is especially widespread, being the standard of budget cars. Like any mechanism, VAZ cars break down periodically and require repairs. Due to the poor condition of Russian roads, the car's suspension suffers the most, in which the greater impact falls on connecting elements such as silent blocks.
Do-it-yourself replacement of front silent blocks on a VAZ 2110
As many car owners know, silent blocks have a direct impact on wheel alignment angles. Therefore, a beginner needs to understand how important it is to monitor the condition of these elements. Replacing the silent blocks of the front levers of a VAZ 2110 is quite simple, but today we will reveal some of the repair features to you.
When replacement is required
It will not be difficult for a more or less experienced driver to understand that the silent blocks are out of order and they need to be replaced. First of all, you will feel a certain discomfort while driving, you will hear the impact of iron in the suspension. But that's not all.
If you do not replace the front silent blocks on a VAZ 2110 in time, the fasteners and connecting elements will be destroyed, play will appear, and the wheel alignment angles will change. This does not entail anything good.
Determining the need to replace silent blocks is not difficult if you pay attention to the characteristic signs of their wear:
- While driving, strong or minor rubber squeaks are observed. It all depends on the degree of wear. Loud noise is a very bad sign;
- A noise similar to a knock is heard in the wheel area. This indicates that the silent blocks are poorly fixed and they are gradually destroyed;
- Cracks form on the surface of the elements, after which the process of disintegration of the silent block begins. In such a situation, it will be impossible not to hear a knock.
Why do the rear beam silent blocks fail?
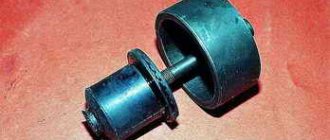
During operation, the rubber part peels off from the metal bushing.
The rubber of the parts itself, which is cast with metal bushings, must withstand enormous loads, but time destroys the rubber.
In addition, if the parts are installed skewed, or the quality of the ohms turns out to be low, which often happens, then the silent blocks can quickly fail. In addition, the following factors affect the durability of parts:
In order to avoid problems and expensive suspension repairs, it is recommended to inspect the condition of the silent blocks at least once every six months. This will help to identify and eliminate problems in a timely manner.
What to consider when replacing
The silent blocks of the VAZ-2108 and VAZ-2110 visually seem exactly the same, but in fact their mounting dimensions are different.
There are several secrets and recommendations, taking into account which you can achieve more durable operation of the rear suspension hinges:
High-quality repair of the rear suspension on a VAZ-2110 depends on the skills of the car owner. At the same time, it is quite simple. It is enough to do it yourself once to acquire the necessary skills. In order for everything to work out right the first time, it is recommended to involve more experienced colleagues in the work for the first time.
Repairing the suspension yourself, or contacting a specialized service station is everyone’s personal choice. If you decide to entrust the work to specialists, it is better to control the entire process yourself, so that next time you can do everything yourself.
Replacement of silent blocks of front levers of VAZ 2110
Some car owners are afraid to replace the silent blocks of the front beam on a VAZ 2110 on their own. But in vain. Contacting a service station entails serious financial costs. Plus, it’s far from a fact that the service station will do your job better than you would have done yourself.
Zapisovka
The only thing is that you may need the help of a car service friend. All service stations have a special puller in their tool arsenal. There is no point in purchasing it, since it is expensive and is rarely needed by a car owner. Some craftsmen even make their own puller using a homemade method. There are many drawings and diagrams according to which it is made. So you can try it if you have free time.
The design of the puller is quite simple - the puller legs are about 20 centimeters long, a pair of washers and two tubes.
There are two silent blocks in the front beam - in the front upper and front lower arm . The procedure for replacing them is somewhat different from each other, so we will consider the processes separately.
Front upper control arm silent block
Broken
Let us immediately note that it is easier to work with it than with the second element. The entire procedure involves performing several sequential operations.
- Raise the car on a jack and secure it in a stationary position. Turn on the handbrake, put stoppers under the wheels.
- Remove the front wheel.
- Unscrew and remove the support. To do this, you will need to turn the wheel out and hit the bipod with a hammer. It is better to do this through some kind of insert.
- By knocking out the support, you can remove the upper front control arm without serious problems.
- There is a bolt on the side, it is quite long. Unscrew it. Inspect the end play. Most likely, it is quite serious and is easily felt when checking. Therefore, you absolutely correctly decided to change the silent blocks.
- You can remove the silent block with a hammer and chisel. Just don't hit it too hard, or you'll damage other suspension components.
- In some cases, the silent block sits very firmly, so you can’t do without a drill and drilling it. After making the holes, you can safely remove the element.
- Now use the smaller bushing to press the new silent block into place. The part must fit firmly and securely into the socket.
about axial play . To eliminate it, you can go in two ways:
- The first is to replace the entire pole. The option is so-so, since its cost is very high, but the quality is quite low;
- The second is to tighten a couple of washers from the sides. They will not allow the mounting bolt to dangle.
The disadvantage of the second option is that installing washers sometimes leads to a situation where the silent block does not fit on the lever. Therefore, you have to reduce it with a hacksaw. Unfortunately, this leads to a reduction in the service life of the silent block.
Front lower control arm silent block
This procedure is rightly considered more complicated. Although even every motorist can handle it on his own.
Recording method
- Remove the stabilizer. This will give you the ability to move the lever laterally.
- Next, remove all the nuts holding the silent block stationary.
- Remove the lower arm silent blocks. To do this, you will have to carry out all the activities that we described in the previous section when we removed the parts of the upper arm.
- After this, new elements are pressed in.
- Please note that the new silent blocks of the lower arm are fixed when the car is loaded. If you do this while the suspension is hanging, after a fairly short period of time the new components will break and you will have to do the whole job again.
As you can see, the work is difficult, but relatively so. If you first study our instructions, be sure to look at the instruction manual for your VAZ 2110, and also watch some visual videos, for example, the task will not be as difficult to complete as you thought at first glance.
One way or another, you need to be ready for work. If you don’t have the time, energy or the banal desire to spend often weekends in the garage, do it easier. Entrust the replacement of silent bands to specialists from a service station. But these must be proven professionals, in whose professionalism and honesty you are confident.
That's why it's so useful to have good friends at the service station. They will not deceive and will do everything efficiently, as if for themselves. If there are no such comrades, there is always a certain risk of becoming a victim of deception. They have more than enough schemes. This is one of the good reasons why 10 owners try to do the repairs themselves.
Silent blocks: purpose and condition diagnosis
Silent blocks are vibration-isolating parts used in the suspension structure of any modern car . Such vibration isolators consist of metal and rubber (elastomer). Thanks to the use of vulcanized processing technology, silent blocks are excellent dampers and insulators from external vibrations received by the machine when moving.
These parts, familiar to every car enthusiast, need to be changed from time to time. Therefore, our resource decided to highlight in today’s material the question of how to replace VAZ-2112 silent blocks with your own hands. Having familiarized yourself with it, the repair process itself and preparation for it will become a fairly simple task for you.
The main function of these parts is to connect the suspension units in which torsional, radial and axial vibrations are the strongest, and subsequently dampen them.
Thus, silent blocks provide not only comfort when driving a car, but also increase the service life of some other suspension parts for a considerable period.
Lifetime
On average, manufacturers of silent blocks set their service life to 100,000 kilometers. But, as noted earlier, due to the not very good condition of Russian roads, vibration isolators often wear out ahead of time. Many auto mechanics advise checking the condition of the VAZ-2112 suspension silent blocks every 15-20,000 kilometers , and replacing them every 60-80,000 .
In any case, you can finally make sure that parts require replacement only by inspecting them. This can be done at a service station by lifting the car using a lift, or by using an inspection pit.
The most difficult option is to dismantle all the levers or beams and check the silent blocks directly on them. If there are noticeable defects on the vibration isolator (severe scratches, chips, cracks, etc.), then they must be replaced.
Symptoms of faulty silent blocks
Worn silent blocks
In addition to all this, the behavior of the car while driving , or more precisely:
- spontaneous pulls of the car to the side;
- “dull” sounds (knocking, grinding) from under the car;
- the appearance of difficulties in driving your VAZ-2112, that is, a sluggish reaction to turning the steering wheel.
Important! All of the above is complemented by the inability to set the normal wheel angle during a wheel alignment event.
Do-it-yourself replacement of front silent blocks on a VAZ 2110
As many car owners know, silent blocks have a direct impact on wheel alignment angles. Therefore, a beginner needs to understand how important it is to monitor the condition of these elements. Replacing the silent blocks of the front levers of a VAZ 2110 is quite simple, but today we will reveal some of the repair features to you.
When replacement is required
It will not be difficult for a more or less experienced driver to understand that the silent blocks are out of order and they need to be replaced. First of all, you will feel a certain discomfort while driving, you will hear the impact of iron in the suspension. But that's not all.
If you do not replace the front silent blocks on a VAZ 2110 in time, the fasteners and connecting elements will be destroyed, play will appear, and the wheel alignment angles will change. This does not entail anything good.
Determining the need to replace silent blocks is not difficult if you pay attention to the characteristic signs of their wear:
- While driving, strong or minor rubber squeaks are observed. It all depends on the degree of wear. Loud noise is a very bad sign;
- A noise similar to a knock is heard in the wheel area. This indicates that the silent blocks are poorly fixed and they are gradually destroyed;
- Cracks form on the surface of the elements, after which the process of disintegration of the silent block begins. In such a situation, it will be impossible not to hear a knock.
Polyurethane silent blocks, what is the advantage
The service life of the hinge is influenced by a number of other circumstances. For example, the rubber used in the silent block design is very badly affected by petroleum products and chemicals used to treat the road surface in winter. Temperature changes also have an extremely negative effect on the part - in the summer the rubber softens, and in the winter it begins to freeze and becomes too hard. Under conditions of severe mechanical loads, rubber begins to wear out, “age”, lose elasticity, delaminate, and fail.
Silent blocks with elastic elements made of polyurethane performed much better under equal conditions.
Polyurethane hinges have much better performance characteristics than their counterparts with rubber inserts. They are less destroyed by chemicals, retain elasticity regardless of the ambient temperature, and polyurethane is practically unaffected by petroleum waste. Of course, a polyurethane silent block will last much longer than a rubber one. However, like any part, over time it requires replacement because it begins to age and delaminate.
Replacement of silent blocks of front levers of VAZ 2110
Some car owners are afraid to replace the silent blocks of the front beam on a VAZ 2110 on their own. But in vain. Contacting a service station entails serious financial costs. Plus, it’s far from a fact that the service station will do your job better than you would have done yourself.
Zapisovka
The only thing is that you may need the help of a car service friend. All service stations have a special puller in their tool arsenal. There is no point in purchasing it, since it is expensive and is rarely needed by a car owner. Some craftsmen even make their own puller using a homemade method. There are many drawings and diagrams according to which it is made. So you can try it if you have free time.
The design of the puller is quite simple - the puller legs are about 20 centimeters long, a pair of washers and two tubes.
There are two silent blocks in the front beam - in the front upper and front lower arm . The procedure for replacing them is somewhat different from each other, so we will consider the processes separately.
Front upper control arm silent block
Broken
Let us immediately note that it is easier to work with it than with the second element. The entire procedure involves performing several sequential operations.
- Raise the car on a jack and secure it in a stationary position. Turn on the handbrake, put stoppers under the wheels.
- Remove the front wheel.
- Unscrew and remove the support. To do this, you will need to turn the wheel out and hit the bipod with a hammer. It is better to do this through some kind of insert.
- By knocking out the support, you can remove the upper front control arm without serious problems.
- There is a bolt on the side, it is quite long. Unscrew it. Inspect the end play. Most likely, it is quite serious and is easily felt when checking. Therefore, you absolutely correctly decided to change the silent blocks.
- You can remove the silent block with a hammer and chisel. Just don't hit it too hard, or you'll damage other suspension components.
- In some cases, the silent block sits very firmly, so you can’t do without a drill and drilling it. After making the holes, you can safely remove the element.
- Now use the smaller bushing to press the new silent block into place. The part must fit firmly and securely into the socket.
about axial play . To eliminate it, you can go in two ways:
- The first is to replace the entire pole. The option is so-so, since its cost is very high, but the quality is quite low;
- The second is to tighten a couple of washers from the sides. They will not allow the mounting bolt to dangle.
The disadvantage of the second option is that installing washers sometimes leads to a situation where the silent block does not fit on the lever. Therefore, you have to reduce it with a hacksaw. Unfortunately, this leads to a reduction in the service life of the silent block.
Front lower control arm silent block
This procedure is rightly considered more complicated. Although even every motorist can handle it on his own.
Recording method
- Remove the stabilizer. This will give you the ability to move the lever laterally.
- Next, remove all the nuts holding the silent block stationary.
- Remove the lower arm silent blocks. To do this, you will have to carry out all the activities that we described in the previous section when we removed the parts of the upper arm.
- After this, new elements are pressed in.
- Please note that the new silent blocks of the lower arm are fixed when the car is loaded. If you do this while the suspension is hanging, after a fairly short period of time the new components will break and you will have to do the whole job again.
As you can see, the work is difficult, but relatively so. If you first study our instructions, be sure to look at the instruction manual for your VAZ 2110, and also watch some visual videos, for example, the task will not be as difficult to complete as you thought at first glance.
One way or another, you need to be ready for work. If you don’t have the time, energy or the banal desire to spend often weekends in the garage, do it easier. Entrust the replacement of silent bands to specialists from a service station. But these must be proven professionals, in whose professionalism and honesty you are confident.
That's why it's so useful to have good friends at the service station. They will not deceive and will do everything efficiently, as if for themselves. If there are no such comrades, there is always a certain risk of becoming a victim of deception. They have more than enough schemes. This is one of the good reasons why 10 owners try to do the repairs themselves.
Tools for work
Replacement parts are highlighted in red: hinge, bolt, nut and spring washer.
In order for the replacement of the rear beam silent blocks to be successful, you will need the following tools:
- Liquid soap or special lubricant. Previously, they used ordinary soap solution.
- A set of keys. It is better to prepare end and cap ones. There must be keys for 17, 19 and 24.
- Ratchet for heads.
- Hammer and chisel for knocking out old parts.
- To make the disassembly process easier, it is better to use WD-40 liquid, which must be applied to all rusty nuts.
It is best to apply the penetrating agent to rusty nuts the night before.
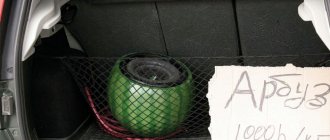
As for new parts, branded spare parts from AvtoVAZ have the article number 21100291405400 . You can buy reinforced VTR silent blocks made of polyurethane. Their article number is LADA0401RP , although they cost several times more.
Replacement process without removing the beam
This replacement process occurs as follows:
- The machine is installed on the pit and raised on a jack. If you have to work on the ground, then you must install not only wheel chocks, but also a support to secure the jack.
We drive the “ten” into the inspection hole and jack up the first wheel.
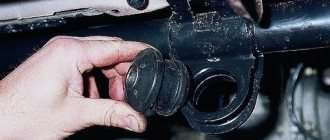
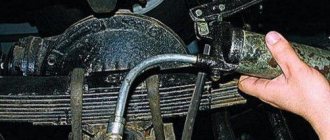
Unscrew and remove the old bolt.
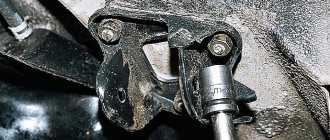
This is what the beam with the old silent block looks like when it goes down a little.
For pressing out, it is more convenient to use a puller.
All that remains is to screw the rear beam back and insert the brake sorcerer into its place.
Standard replacement, with rear beam removed
If you remove the rear beam, it will be much easier to get the silent block. The procedure itself goes as follows:
- It is highly recommended to drive the car into the inspection hole. You can work on the ground, but it is very dangerous.
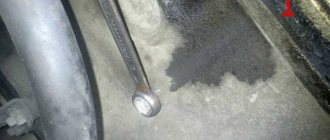
- The beam is disconnected from the bracket. To do this, use a 19mm wrench. It often happens that the disconnection process is very difficult, and even a ratchet and WD-40 do not help. In such cases, it is better to use a special lever pipe, which will create enormous force. The length of the pipe directly affects the force. The main thing is not to break the thread, otherwise you will have to cut everything off with a grinder.
It is more convenient to twist the beam fastening nuts with a slightly shortened spanner.
Purpose of silent blocks
Set of silent blocks for front levers
Their purpose is simple: to make the car move as smoothly as possible. It is because of the silent blocks that the car’s suspension has the ability to “play”, softening the shocks that occur when the car overcomes uneven roads. There are silent blocks in both the front and rear suspension arms, not far from the wheels. They are tightly pressed into these levers, so you won't be able to see them. And in order to replace the silent blocks, you will first have to remove the suspension arms. There is no other way to reach them.
How to know when it's time to change
There are several signs that the silent blocks have become unusable.
- The first sign is a characteristic knocking or grinding noise that is heard when the car is moving and which intensifies significantly when the road is uneven.
- The second sign is that if one or more silent blocks are broken, then the car becomes much more difficult to control, especially when turning.
- Even if none of the above is observed, a problem with silent blocks can still emerge, for example, at the moment when the car owner arrives at a car service center and decides to adjust the wheel alignment. It is at this moment that service employees can tell him unpleasant news.
Installing rear independent suspension on a car
When operating a vehicle on which a standard rear suspension is installed, the vehicle beam shifts towards the arch when cornering by approximately 1 cm. If the vehicle is equipped with a rear independent suspension, then such a beam displacement is not observed under similar operating conditions. The rear independent suspension is attached rigidly to the body, without using silent blocks in mounting the rear suspension on the Priora, which avoids lateral displacement of the beam.
Silent blocks, which are part of the design of the rear and front suspensions, perform the function of damping all torques and bending moments that may occur during movement, thereby ensuring a stable position of the vehicle on uneven road surfaces and when turning.
Silent blocks are mounted on a car as an element of the chassis and suspension, since this structural element is one of the most reliable and economical ways to prevent the influence of various types of deformations and loads that can occur during the operation of the car on the car body. Installation and replacement of silent blocks on Priora is provided for in some vehicle suspension components:
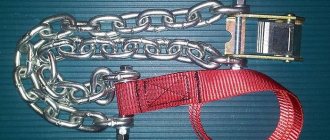
Making a puller with your own hands
As mentioned above, silent blocks are tightly pressed into the levers and into the so-called “stretch” on the suspension. You can press the new silent block into the extension using a regular chisel and hammer. But pressing the silent block into the suspension arm is a very labor-intensive procedure and cannot be done without a special device (puller). You can look for a puller in a car dealership, or you can skip wasting time on searching and make it yourself; fortunately, it’s not difficult. To make a puller, we need a bolt (M12), the length of the bolt is at least 180 mm. You should select a nut for it, and it should be high - at least 20 mm. You will also need a bushing. Length - at least 60 mm, internal diameter - 39 mm (such a sleeve can be made from a piece of pipe suitable in diameter) and two or three wide washers. What should happen in the end can be seen in the photographs below.
Homemade puller option
Sequence of actions when replacing a VAZ 2110
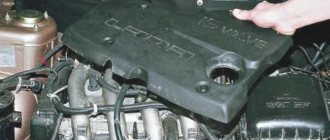
- The car is installed above the inspection hole, then the lower protective cover of the VAZ 2110 engine compartment is removed.
- The fastening nuts on the front arms are unscrewed, then the nuts of the front stabilizers are unscrewed (this is done using a 17 wrench).
Mounting nut removed
Unscrewing the nut on the extension
Unscrewing the second nut by 24
Removing the old block with a chisel
Stripping the eyelet with a knife
Pressing in the silent block with a vice
Video example of replacing silent blocks of front control arms
Removing front suspension elements
First, we will describe the sequence of actions to restore the front suspension.
It is better to perform all work in an inspection hole, so you need to place the car on it and immediately loosen the front wheel fastenings.
The front of the car is jacked up on both sides. First, they lift one side, install supports under it, and then lift the second side with a jack and also fix it with supports, after which the wheels are removed.
The first control arm to be removed from the car is the lower control arm. To do this, unscrew the nuts securing the extension, stabilizer strut and ball joint from it.
The lever is removed from the ball joint using a puller.
The last thing to unscrew is the nut securing the lever to the bracket on the body, the bolt is pulled out, and the lever is removed.
Next, the stretch is removed. Since it is already disconnected from the lever, all that remains is to unscrew the nut securing it to the cross member.
The last thing to be removed from the car is the stabilizer.
The stabilizer is attached through the struts to the levers on both sides, so you can either first dismantle it on the other side and start removing the stabilizer, or simply unscrew the nut securing its strut, and dismantle the lever itself and the brace later.
Important points
Unscrewing nuts with a 24 mm spanner can be a very difficult task. To move such a nut out of place, as a rule, enormous force is required. And not only that, each next revolution will also require considerable effort. Therefore, it is best to use a long tube mounted on a spanner as a lever.
To make the nuts even easier to unscrew, you can pour plenty of oil on them and wait 10 minutes.
The silent blocks should be pressed in with a hammer blow (or a sledgehammer blow) only after placing the lever on a flat metal surface. In this case, the blow must be very accurate; at the slightest misalignment of the hammer, there is a risk of damage to the silent block.
In order to avoid the above damage, it makes sense to press the silent block into the extension using a vice. A vice will be needed in any case, since new blocks rarely fit completely into the eye after one blow. They almost always need to be “added.”
In order for the new silent block to fit into the eye as deeply as possible, it should be lubricated. An ordinary dishwashing gel, liquid soap or plain soapy water is suitable as a lubricant.
As can be seen from this article, it is quite possible to replace silent blocks yourself, the main thing is to be careful when pressing them. If the car owner is not confident in the strength and accuracy of the blow, there is no point in taking risks with a hammer; it is better to gradually press the block into the eye with a vice, having previously lubricated it. If this operation also causes difficulties, then there is only one way out: going to a car service center for the help of qualified auto mechanics.
How to determine the malfunction?
Finding out whether silent blocks are doing their job correctly is not at all difficult.
To do this, you should pay attention to the following things:
- Do you hear the squeaking of the rubber of the front wheels during travel? It should be taken into account that driving can also be for short distances. The creaking should not be heard even if the trip occurs over a very short distance. Please note that the creaking is not always distinct - it may well be barely audible.
- Look to see if there are any defects on the tires. Often, with faulty silent blocks, small cracks and tears appear on the tires.
- Listen for any extraneous sounds, similar to knocking, in the front wheels.
How to make a puller yourself?
A three-jaw puller is best suited for removing silent blocks. To make it you will need the following:
- Sheet metal, the thickness of which is 10 mm.
- Metal round timber with a diameter of 30 mm.
- Screw.
When making a tool, you can follow the following instructions:
- Create a drawing of the puller legs, taking into account that their length is about 20 cm.
- Transfer the design to sheet metal.
- We cut out the paws and sand them.
- At the top of the resulting legs, make two holes for the bolts.
- After this, make a core using a metal round timber. Drill a hole for the threads and weld the holders for the paws.
- The last part on the list is the screw. You need to drill through holes in its upper part.
- After this, all that remains is to assemble the puller. To do this, insert the core into the screw and attach the tabs to it.
Replacing the silent blocks of the upper arm
Now that we have the puller ready, let's return directly to replacing the silent blocks.
To make a replacement, you need to perform certain actions:
- Raise the car on a jack and secure it.
- Remove the front wheel from the car.
- Remove the upper arm. At the same time, carefully ensure that the silent blocks in the lever do not slip off. Their state should be motionless.
?
- In order to make it easier for yourself to remove the upper arm, you need to knock out the upper support. To do this, you need to unscrew the support nut. It should be said that this will be quite difficult, but it is necessary, since otherwise the support will simply remain in place.
- The wheel should be turned out by hitting the bipod with a hammer so that the support can pop out.
- After this, you need to unscrew the lever bolt, which is located on top. Since the bolt is quite long, unscrewing it can take a lot of time.
- Once the bolt is pulled out, the machine arm can be removed.
- Then you can start replacing.
Please note that the problem may lie not only in the silent blocks, but also in the lever. You can check its serviceability by screwing the bolt into place and seeing if the axial play is too large. If the play is large, the problem with the silent blocks may make itself felt again soon enough. For this reason, you first need to ensure that the lever is in full working order.
Press-fitting instructions
At the initial stage, it is necessary to visually assess whether the new silent block is suitable for a particular case. This condition must not be neglected, so that later it will not be too late. There are often cases when the outer part fits perfectly, but the inner part does not, and vice versa. Once you determine that the parts will fit exactly, you can proceed to the next step. To do this, you should use a vice to help press it correctly. This method is safer and more accurate.
You can also use hammers and sledgehammers, but you need to be more careful and carefully monitor the accuracy of the process.
Thus, you will need to land several hits. If after this the broken silent block is firmly held in the hole, you need to knock it out. For this work, special mandrels are used for pressing silent blocks or two pieces of pipe. The diameter of one of these parts must correspond to the parameters of the outer joint bushing. When knocking out a part, you do not need to worry about damaging it, since it is faulty. This process is carried out with a regular hammer.
After knocking out is completed, the eyelet in which the hinge was located must be cleaned of dust, dirt, and so on. The seat for the new part must be perfectly smooth and even. There should be no mechanical damage or various scratches on it. In addition, there should also be no sharp edges.
After cleaning the seat, its surface must be treated with lubricant. If this is not available, you can use a regular soap solution. A device such as a metal polyurethane bushing must also be lubricated. Having completed the lubrication of the seat, you can begin to clamp the lever in a vice. In this case, it will be necessary to install a silent block perpendicular to it. This work is done as smoothly as possible. The further normal functioning of your machine depends on this.
Next, you will need to choose how to press in the silent block - press it in or drive it in with a sledgehammer. To reproduce this process, you will need metal tubes or mandrels for pressing silent blocks, one of which will need to hold the lever. And the other tube must be leaned against the side to avoid damage to the hinge when working with a vice or hammer.
The main difficulty with this work may be the difficulty of pressing the hinges into their original place. To perform this procedure, I recommend using a special press to press them in and out with the levers, as well as a mandrel for pressing in the silent blocks. You can also use improvised means, such as pieces of pipe and a sledgehammer, but you should be very vigilant and attentive, since this process requires high precision and dexterity so that the result is a whole polyurethane insert.
You can press in silent blocks with your own hands only on the front and rear parts of the suspension. If you need to replace rubber-metal joints in engine or gearbox components, you should contact a specialist. This is necessary precisely because replacing parts in such units is a labor-intensive process. To implement it correctly, you must have repair experience and a good knowledge of the main components of the car's structure. If you lack experience and knowledge, it is better not to test your luck and entrust your car to specialists. Because, in addition to the time spent, you will spend a lot on replacing silent blocks.
Replacing silent blocks on the front beam of a VAZ 2110
You can remove the silent blocks using a hammer or chisel. It must be said that they fall out quite easily, sometimes even with the first blow. The most important thing here is not to damage the car.
Then you need to insert a new working silent block in the place where the old one was located. The part should be pressed in so that it does not dangle. This is not difficult to do. If you press it with a smaller bushing, it can easily fit into the lever.
Repair of axial play
If the axial play breaks, repair can be carried out in two ways.
- You can completely change the entire pole. However, its cost is very high, and the quality is far from the best.
- Another way is to simply screw two washers on the sides so that the bolt cannot wobble.
Please note that tightening the washers may result in the silent blocks simply not fitting into the lever. In this case, they will have to be shortened somewhat using a hacksaw. As you might guess, such actions can shorten the life of silent blocks.
Replacing the lower arm silent block
Here you will have to act somewhat differently and the procedure itself is more difficult.
- The first step is to remove the stabilizer, which will make it possible to move the lever left and right.
- Now unscrew each nut that holds the silent block stationary.
- Remove the silent blocks of the lower arm, following the same steps as in the case of the upper one.
- After this, you can start pressing in new parts.
Remember that they can only be fixed if the car is loaded. If you start fixing them on a suspended suspension, then very soon they will fail.
Be careful when performing the replacement yourself so as not to damage your car. The cost of home repairs is much lower than that of specialists, but the desire to save money may lead to you having to pay double the price.
Removing the rear block
Replacement of the rear beam is carried out after transporting the car to an inspection ditch or lift. To begin, remove the brake pads located at the rear of the VAZ 2110. Disconnect the steel ropes that secure the parking brake to the underside of the beam attached to the rear of the bracket.
Now disconnect the thin brake hoses leading to the brake cylinders located at the rear of the car. Disconnect the brake pipes attached to the beam. In addition, you will need to disconnect the elastic lever from the beam, which is located on the drive responsible for regulating the pressure.
Using a size 17 wrench, unscrew the 4 mounting bolts holding the hub axle together with the rear suspension beam. Remove the axle itself along with the brake mechanism shield and, if necessary, separate them by unscrewing the two fastening screws using a Phillips screwdriver. Bend the bracket and remove the brake pipe.
It is necessary to disconnect the lower ends of the shock absorbers and the nuts attaching the beams to the brackets from the beam. After this, you need to remove the bolts from the beam and carefully remove it. Using a size 17 socket, remove the 3 nuts securing the bracket to the body.
Rear suspension structure: 1 — rubber-metal hinge; 2 — suspension arm mounting bracket; 3 — shock absorber casing; 4 — compression stroke buffer; 5 — casing cover; 6 — support washer; 7 — shock absorber cushion; 8 — spacer sleeve; 9 — shock absorber; 10 - insulating gasket; 11 — rear suspension spring; 12 — lever connector; 13 — rear suspension beam arm; 14 — shock absorber mounting bracket; 15 - flange; 16 — lever bushing