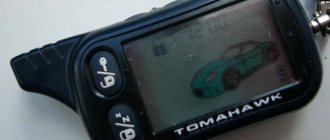
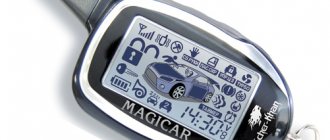
5BTX925LCD is not an alarm model, but the name of the sheriff's security system remote control. The key fob is used in the Sheriff ZX-925 anti-theft systems. On the main body of the pager there is a display and five keys for using the functions:
- insert (ARM) - symbol of a closed lock;
- disarming (DISARMING) - open lock emblem;
- programmable channel control key - standard CH2;
- additional channel control button - written CH3;
- turning off the light and sound alarm on the key fob - sign F.
Sheriff 5BTX925LCD instructions will be given below.
Download the complete instructions.
How to open and close a car
The main functions of the Sheriff 5BTX925LCD remote control are arming and disarming the vehicle. To arm your car, proceed as follows.
- Briefly press button 1.
- This will be followed by a one-time activation of the side lights and siren.
- The LED on the antenna module will flash slowly.
To disarm the vehicle, press button 2.
- The LED will go off.
- The side lights will flash twice.
- The siren will sound twice.
In addition, the following functions can be controlled from the remote control:
- turning on and off the panic mode;
- car search;
- “Silent firmware” and disarmament;
- Anti-high-jack, etc.
Valet Push Button Switch
The Valet key makes it possible to briefly deactivate the alarm system, so as not to hand over the remote control to a service station or parking attendant. While the alarm is in the Valet state, all security systems are turned off, except for remote control of the “Panic” mode and unlocking the door locks.
Deactivate the security system from the key fob button or Valet key, you can also do this by entering your personal code. Turn on and then turn off the ignition system. Within five seconds, press and throw the Valet key. The LED on the panel will turn on continuously. The system switched to Valet mode.
Turning off Valet mode
- Turn the ignition system on and then off.
- Within five seconds, press the Valet key.
- The LED on the panel will go off.
- The system returns to normal mode.
Alarm systems "Sheriff" have a high-quality service base, their repair will not cause difficulties for specialists, and the extensive service network will not force you to send a spare part or go to another city. Expert technicians will carry out repairs, check compatibility and quickly fix the problem. Sheriff systems are very reliable and most often repairs are simply not necessary.
The American Sheriff alarm system will reliably protect your vehicle from theft and other criminal attacks. An expanded set of functions will make driving more comfortable. The main drawback is the range of the main communicator, which in practice turns out to be less than stated.
Programming a new key fob pager
If the anti-theft transponder code is to be registered, turn off its power before proceeding. To attach a key fob to the security alarm control unit, disarm the car using a command from the key fob or by entering the code using the “Jack” button. When using a secret password, the pager is paired using the following algorithm.
- Turn the ignition on and off. Turn it on again.
- By pressing the “Jack” button, enter the first digit of the personal code (the number of presses is the first value of the password).
- Turn the ignition off and on again.
- Using the Jack key, enter the second code value.
- Turn the ignition off and on again. A beep will sound.
- Click on Jack three times. There will be a long squeak of the siren.
- Press the 1st button of the first switch. A squeak will follow.
- Repeat the previous step for the remaining remote controls.
- Turn on the transponder. A siren will sound indicating successful actions. Turn off the device.
- To exit programming mode, turn off the ignition or do nothing for eight seconds. A long and short beep will sound. The LED indicator will turn off.
- Check the transponder.
If the button on your key fob...
Page 5
- Image
- Text
If the button on your transmitter key fob is pressed more than 30 times while it is outside
control limits of the security system (for example, children are playing with it), the system will not
respond to the call of the key fob transmitter when you decide to use it again.
You need to synchronize your key fob transmitter with the security system receiver.
To do this, simply press the system arming button twice within one second.
arm/disarm the system on the transmitter key fob. After this the system will again be
respond to all remote control commands.
System arming button (ARM) System disarming button (DISARM) Programmable channel control button
CH2, control system modes when arming/disarming the system
Programmable channel control button
SNZ, control additional channels
Button for changing pager signal parameters, turning off sound and light
pager alarm
LCD display indicator combinations
3+(4) Control signal transmission (in/out of range). 5+6+7 Security mode: locking/unlocking. 8+9 Bypass the main shock sensor area.
9+10 (flashing) “Alarm triggered by strong impact” or
“arming by bypassing a faulty shock sensor.”
11 (flashing) Anti-Hi-Jack. 11 Anti-violence function enabled
car seizure.
12 (flashing) “System triggered by limit switch
door" or "arming with bypass of faulty
door zones."
13 Vibrate mode is turned on. 16+15 (flashing) Battery full/battery low. 14 Set/cancel switching on CH6 by timer. 14(flashing) Output CH6 is activated. 17 (flashing) Pager call. 18 Power saving mode (if the main system is removed from
protection, its current consumption is zero).
22 Valet mode is enabled - the icon is always shown on the display while the system is in Valet mode. 24+23 Standard alarm mode. 24+25 Silent alarm/night mode. 23+24+19 (flashing) Arming when the car engine is running. 26 (flashing) “The system is activated when the ignition is turned on.” 27+21 (flashing) “Trunk/hood open” or “system triggered by limit switch
hood/trunk" or "arming by bypassing the faulty hood/trunk area".
28 (flashing) Indication of vehicle side lights. 29 Set the CH6 installation time.
LCD display
— 5 —
Rice.
1
Prepared by AutoSet. Car alarms and car electronics.
www.AutoSet.ru
Flashing an old 5BTX 925 LCD switch
Each action must be completed within five seconds. If this time is not met, the system will exit setup mode. Start registering key fobs by disabling the anti-theft transponder. So, keep an eye on specific points.
- Disarm the car. Turn on the ignition.
- Click "Jack" three times. A beep will sound.
- Press and hold the 1st button on the first remote until you hear a long beep to confirm registration. The LED flashes rarely.
- Repeat the previous step for the remaining remote devices.
- Check the transponder. The siren will sound. Turn off the switch.
- Exit setup mode by turning the ignition off or without pressing anything for eight seconds. A short and long siren sound will be heard. The LED will go off.
- Turn on the transponder.
Attention: In order to increase the battery life of the two key fobs...
Page 6
- Image
- Text
Attention
In order to increase the battery life of the two-way communication key fob, the presence of communication between it and the central unit of the system is controlled manually. There is no confirmation sound signal from the two-way key fob if it is found -
is outside the system's coverage area or does not receive a command confirmation signal. To check the presence of communication with the key fob-pager and the system, issue a command by pressing any button (the arming button is best suited), except F. If communication is present, the system will “return” confirmation of the command with the corresponding sound signal
Otherwise, after 3 seconds an icon indicating no connection.
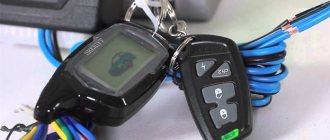
Low battery indicator, battery replacement
The low battery indicator is presented on the LCD display in the form of an icon with a three-element indicating
body of the state. As the battery discharges, the number of visible elements decreases, and you may also notice a decrease in the range of the transmitter. To replace the batteries in a five-button transmitter key fob:
• set the lock to the OPEN position and remove the battery compartment cover; • remove the discharged battery; • install a new battery (type GP23A/GP24A), making sure that the polarity is correct; • carefully place the cover in its original place; • set the lock to the LOCKED position.
To replace the batteries in a four-button transmitter key fob:
• unscrew the small screw on the back of the transmitter housing and separate the halves
transmitter housing with a 10 kopeck coin;
• remove the discharged battery; • install a new battery (type CR-2032), making sure that the polarity is correct; • Carefully install the cover without damaging the LED or switches on the mounting panel.
board, tighten the small screw on the back of the transmitter housing.
— 6 —
Prepared by AutoSet. Car alarms and car electronics.
www.AutoSet.ru
Why doesn't the alarm remote control work?
You notice that the keychain has stopped responding to your actions. One solution to this problem is to reprogram the remote device. But I can't flash the remote control. Let's look at the reasons preventing this:
- low battery. Replace the battery;
- damage to the contacts inside the remote control. Repair it yourself or contact a service center;
- exposure to interference that interrupts the connection between the remote control and the control panel. Move the machine to another location.
Specifications
Technical parameters of the Sheriff ZX-925 system:
- supply voltage - from 9 to 15 V;
- current in the power circuit during standby mode is not higher than 20 mA;
- permissible switching current - up to 2 A;
- communicator range – up to 700 m;
- signal transmission distance by the auxiliary remote control - no more than 20 m;
- range of reception of signals from the car - up to 1600 m;
- frequency range - 433.92 MHz;
- code type - dynamic Super KeeLoq Pro II.
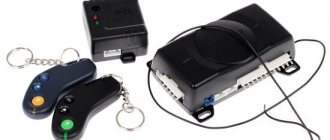
Equipment
The security complex includes the following components:
- head unit;
- 5-button communicator;
- additional 4-key control panel;
- small-sized siren;
- 2-zone shock sensor;
- antenna unit with signal receiver and transmitter;
- Valet switch;
- connecting cables;
- technical documentation.
How to remove the body of the Sheriff 5btx925lcd key fob
To disassemble the keychain, you will need: a small Phillips screwdriver, a small napkin, a knife or a thin plate. Follow the instructions to remove the remote control housing.
- Return the keychain to you.
- Open the battery compartment cover. Remove the battery.
- There is a self-tapping screw in the battery niche. Unscrew it.
- Use a knife or narrow plate to pry up the center of the casing.
- Carefully separate the pager in half.
- When finished, reassemble the keychain in reverse order.
Remote engine start. Commands and functions
Engine start control in the ZX 1070 system
The automatic engine start function is built into the safety system and is not a removable part. All connections must be made to start the engine cables to the vehicle's on-board circuit that control the engine starting function according to the diagram in the installation instructions.
When using engine tachometer control mode, do not forget to program
hot engine idling!
General enable/disable remote boot
The engine start command is performed by pressing button 3 (CH2) on the system remote control twice for 2 seconds. If all conditions are met to allow the engine to start, it will start. Forced shutdown of engine starting is carried out by repeatedly pressing the button twice 3 (CH2) of the remote control transmitters. Engine operation indicator: key fob - flashing indie smoke rollers, wrench and steering wheel; system - dimensions are constantly active.
Setting the system operating time in automatic startup mode (SF3 function)
Installed with remote control or programming functions according to the table.
Press the F button twice. Switch to selection mode, when the LED flashes, press the button
with F, only the selected flashing indicator will remain on the screen. The blinking speed of the indicator is equal to the engine operating time previously selected in automatic start mode.
Using buttons 1 and 2 you can select the desired time. Flashes steadily - 10 minutes Two flashes, pause - 20 minutes Three flashes, pause - 30 minutes Four flashes, pause - 60 minutes Press the F button again to activate the selected hour. If the mode was programmed successfully, the indicator will go out and the remote control will blink twice
autograph pictograms.
Cyclic start control (SF6 function)
Installed with remote control or programming functions according to the table.
The system offers the ability to automatically start the engine at certain intervals
time (1, 2, 4 or 12 hours) within 48 hours, as well as remote start, stop and adjustment to increase the engine starting frequency using the remote control or transmitter program commands by changing the intervals in the SF6 function. The engine operating time is determined by the set temperature in SF3 or the stop temperature in SF5.
In manual transmission engine control mode, start the engine and follow the correct exit procedure.
Sheriff security systems that contain numbers starting from 1000 in the model name always have an automatic start function. According to reviews from car owners, there are no questions about the functioning of the functions and their correctness.
The exception is automatic execution. All Sheriff alarms are complex programmable devices that monitor and store events from various inputs and channels.
How much are
The Sheriff security system is relatively inexpensive compared to other manufacturers.
Table 2. Sheriff’s pricing policy by region of the Russian Federation
| Name | Price, rub |
| 1. Sheriff ZX-925 | 6845 |
| 2. Sheriff ZX-757 | 8650 |
| 3. Sheriff ZX-945PRO | 5340 |
| 4. Sheriff ZX-1070PRO | 9800 |
| 5. Sheriff APS-2400 | 4375 |
| 6. Sheriff ZX-750PRO | 7000 |
| Prices are relevant for three regions: Moscow, Chelyabinsk, Krasnodar. | |
Starting and stopping the engine using the key fob
ATTENTION! I found a completely simple way to reduce fuel consumption! You do not believe me? Even a mechanic with 15 years of experience didn’t believe it until he tried it. Now save 35,000 rubles a year on gasoline! Know more"
Once the alarm is installed and connected, it's time to ask questions. Considering what the Sheriff autostart is capable of, it’s worth starting with the simplest. When using for the first time, you need to know that most sheriff models activate the passive operating mode by pressing the CH2 button. For this you will need:
- Stay;
- There is no need to lock the car;
- Put it on the handbrake;
- Press the CH2 button twice.
A short beep will indicate that the engine can be turned off, and a flashing icon will also appear on the key fob. The key is then removed from the ignition (this anti-theft system sets the starter timing to 0.6 seconds, which is important for automatic starting), and you can leave the car.
Once out, press the door lock button, pressing this button again will turn off the car. Some car owners recommend setting the furnace to the lowest temperature to make remote starting easier, and then driving the already warmed car, reducing warm-up time.
You can now start the car by double clicking CH2. It is also convenient that the listed operations can be performed from both the main and additional remote control. The automatic execution time is approximately two seconds. To force autostart to be disabled by pressing CH2 twice when starting the engine, press the same button two more times.
Instructions for use
Detailed operating instructions are included with the alarm.
basic settings
- To turn on the protective mode, you need to briefly press and release key 1 on the control key fob. The same button is used to disable security, lock doors and ignition switch.
- To activate the security function when the engine is running, button 1 on the remote control must be pressed and held for three seconds. To disable the mode, the key is briefly pressed and released.
- Activation of the “panic” mode is carried out by simultaneously pressing buttons 1 and 2; the keys must be pressed and held for two seconds. After turning on, the siren and turning lights of the car will begin to work.
- If the siren is activated while the security mode is on, then to turn it off you need to simultaneously press keys 1 and 2 for one second. To turn on the siren, similar steps are performed.
- To activate the second data transmission channel, you must hold down key 2 for more than one second.
- To enable silent arming mode, click button 2, and then immediately button 1. To disable the function, similar actions are performed.
- If you need to activate the security mode by disabling the controllers, then click button 1, and then immediately button 2.
Activating and disabling security with the Valet button
If you need to arm your car, but for some reason you don’t have a key fob, you can activate the function using the Valet service button:
- Quickly press, release, and then press and hold the service key again for more than three seconds. One siren beep will sound as confirmation.
- The LED light will blink quickly, indicating activation of the standby mode for closing the last open door. If the door is locked, the driver needs to open it and close it again. If it is open, then it must be locked.
- After the last door is locked, the security mode will turn on.
To disable security without a key fob, you need to do the following:
- Use the key to open the car door.
- This will automatically trigger the siren.
- Place the key in the lock and turn on the ignition.
- Within ten seconds after installing the key, briefly click on the Valet key.
Vladimir Taraban spoke about the capabilities and functionality of the Sheriff 2500 anti-theft installation.
https://youtube.com/watch?v=lco21V1OIBo
Deactivation by PIN code
To disable the “alarm”, a personal code can be used (standard password is 11), it can be changed as follows:
- The vehicle's security mode is disabled.
- The ignition turns on, turns off, and then turns on again.
- Within ten seconds, the car owner must press the Valet service button as many times as the first digit of the code. If the password has not been changed, the key is pressed once.
- The car's ignition turns off and turns on again.
- After this, again within ten seconds you must have time to press the Valet service key as many times as the second digit of the password combination. In our case it is 1.
- The vehicle's ignition is switched off and reactivated.
- If you entered the code incorrectly, the siren should emit one beep.
- You must turn off the ignition within five seconds. The procedure for recording a new password is in progress. To do this, the Valet service button is clicked five times. One short and extended siren signal should sound. This indicates that the car alarm has successfully entered the mode of setting a new password.
- Then, within five seconds after the signals are heard, you need to press button 1 of the control key fob (this key is larger in size). The siren will sound once to confirm the action.
- Within ten seconds, use the Valet service button to set the first digit of the code. If you press it four times, the siren will emit 4 beeps.
- Then, within ten seconds, press the second button of the remote control, which is smaller in size. If everything is done correctly, the siren will emit two beeps. Within ten seconds you need to have time to set the second digit of the code; to do this, the Valet button is pressed the appropriate number of times. The siren will emit sound signals in confirmation.
- Then the ignition is turned off. There will be two siren signals - one short, the other longer. This indicates that the programming procedure was successfully completed.
If you lose or forget the password, you will not be able to fully use the alarm.
Andrey Tarakanov in his video spoke about the features of the Sheriff ZX-1095 anti-theft installation.
Autostart at time intervals or at specified temperature
If you want to regulate engine starting at certain intervals, you must:
- Press F twice;
- Switch to indicator flashing mode;
- After pressing the same button again, only the selected indicator will remain;
- The frequency of its flickering indicates a previously established cycle:
- No blinking indicates that the function is disabled;
- Regular flashing: cycle lasts one hour;
- Two flashes and a pause - a two-hour cycle;
- Three flashes and a pause - four hours;
- Four flashes and a pause - twelve hours.
Using the lock button, you can activate this function and continue pressing to adjust the time interval value. Using the door open button, you can disable the option, which will be indicated by the indicator stopping blinking. To make the selected state active, press F. Correct programming of the mode will be reflected in the permanent presence of the indicator icon. The option can be enabled or disabled in any state: ARM or DISARM.
Automatic temperature start has an absolutely identical algorithm, with the only difference being that the cycle corresponds to +5, 0, -5, -10, -15 and -20 degrees Celsius. As in the case of one-time autorun, the system state is not affected.
Possible problems with autorun
- A situation arises when the engine does not start.
When the start signal is given, the engine does not start. This could be due to startup requirements not being met. The system will respond with light and sound signals, and the error that occurs will be stored in its memory. You can identify this problem in diagnostic mode.
Error signal decoding table.
- Refusal to start the engine or stop immediately after starting.
If all starting requirements are met, but a malfunction is received or the engine runs for up to 5 minutes. In this case, the system will try to boot automatically. In total, the system makes four attempts, after which an error code is sent to the system memory, which corresponds to it and can be detected when working in diagnostic mode. Repeating the remote engine start will initiate a new starting procedure.
- Panel clicks and flashes when machine is muted
Indicates an incorrect installation of the security alarm; To solve this problem, it is best to seek qualified help. This may not be a characteristic of the alarm model or vehicle.
- Inability to activate automatic start
The car does not autostart if the alarm installation was performed incorrectly or the autostart conditions were not met.