If a problem with the window regulator on a VAZ-2114 occurs while the car is moving, and the driver himself cannot correct the situation on the spot, you need to call a tow truck. The movement of a car when the window has stopped going up or down due to a breakdown, from the point of view of traffic regulations, threatens the safety of passengers and the driver himself. Why does the VAZ-2114 window lifter not work? There are many reasons: lowering is difficult because the fuse has blown, there is a malfunction in the door, etc. This article contains information about the types of failures of window regulators on the VAZ-2114, about methods for adjusting and dismantling the mechanism.
Window lifters on the VAZ-2114 are standard for other models of the Samara series. They are classified by drive type into:
- mechanical;
- electric.
The latter are divided depending on the method of transmission of the motor impulse:
- lever;
- rack and pinion;
- cable
By type of construction:
- collapsible;
- whole.
Each model has its own advantages, disadvantages and price. Standard configurations of window lifting mechanisms on the VAZ-2114 consist of two types. Electric drive mechanisms are installed in front, while the rear doors are equipped with mechanical devices.
There is no point in arguing that power windows significantly increase the operating comfort of a car. But most drivers also know that they cause a lot of trouble. By the way, when it comes to the breakdown of the mechanism, we must not forget that the problem may not be in it, but in the glass itself. Over time, the holder or seals wear out, which often leads to a banal misalignment, which significantly impedes the freedom of movement of the glass.
The design of the window lifting mechanism is quite simple, but not reliable. And the fact that the safety block is placed in a place where moisture and dirt can easily get in is also not a plus. As you know, the slightest wear of the insulation can lead to a short circuit and breakdown of the entire system.
The most common reasons why a window regulator fails are the following:
- Damage to the components of the control unit.
- The contacts have oxidized and the circuit has opened.
- Disconnecting the power supply.
- The control button has stopped performing its functions.
Yes, most often car enthusiasts are faced with the fact that this component of the window regulator fails.
Why does the VAZ-2114 window lifter not work? A very common reason for this is that its buttons fail. If the mechanism begins to work at a slow speed after a certain time, the plates inside it may have oxidized. This caused a breakdown in contact: it appears intermittently or disappears completely.
It makes sense to check the version with a broken button, replacing it with a working one. Just swap them. The part is dismantled using a knife or screwdriver. Use the tip to pry it from below and remove it from the chip.
If after installation it turns out that the non-working window regulator began to move the glass, and the working one began to move, on the contrary, then it is worth purchasing a new part and replacing it. If the problem is not with the button, then you need to continue searching for the causes of the breakdown.
One of the reasons for the breakdown of the glass door lift mechanism may be that the relay does not work or the fuse has blown.
- Find the safety block under the hood of the car.
- According to the diagram, determine the location of the relay itself and the fuse, which make up the links of the electric glass lifting mechanism (ESM) chain.
- The legs of the elements must be clean, with a pronounced metallic sheen.
- If traces of oxidation, dirt deposits, etc. are found, you need to clean them off. Mechanically or using special means, for example, WD-40.
- You can check the relay for functionality in the same way as a button. The working element should be removed from another unit and mounted into the ESP system.
- If newly installed parts fail again within a short period of time, then the problem is in the wiring itself.
A breakdown may occur with the lift motor. It either burns out completely, or the worm mechanism inside it fails. In the latter case, the device makes a characteristic sound when the button is pressed, but the glass remains motionless.
The reason for the breakdown of the ESP may be that it has a common power source and the external lighting. And if the fuse for the foglights is blown out, the window regulator will not work.
There are situations where power windows stop working under repeated circumstances. For example, after driving on a dirt road or bumps, the mechanism begins to move the glass in jerks. When opening the casing, it is sometimes discovered that the wire has come out of the chip or from the connector, or after visiting a car wash, incidents begin with the glass. Perhaps the depressurization of the insulation contributed to the fact that moisture penetrated into the electrical components of the system and short circuits or disruption of communication between contacts began.
Chafing of the insulating layer of the wiring is one of the most common causes of problems with ESP. To facilitate diagnosis, it is worth observing what causes the standard fuse F6 to blow.
- If this moment is the activation of the lift itself, then, most likely, this place is somewhere under the door trim.
- If then, when you turn on the ignition, then it is worth checking the insulation of the wires from the door to the safety assembly block.
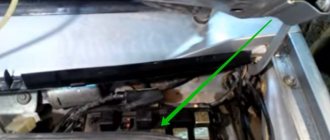
One of the weak points is where the bundle of wires goes from under the hood to the door trim.
If the electrical elements have been more or less decided, then the mechanical part of the problem is much more complicated. The described VAZ models have non-separable ESP structures. They are characterized as the most reliable, but in case of breakdown they require a complete replacement from the owner.
How the structure is dismantled.
- Remove the handle and rod.
- Lowering the glass, remove the holder.
- The glass is raised to the maximum and secured with tape.
- Unscrew all the nuts holding the mechanism to the door.
- Dismantling is complete and the device can be completely removed for diagnostics.
Next, you will decide whether to repair or replace with a new device.
As standard, on a VAZ-2114 car, only two window lifters are installed on the right and left sides of the front doors. If a malfunction is identified due to the failure of both power windows, you will first have to check the thirty-amp fuse F6, located in the mounting block under the hood of the car.
If it is burnt out, then it needs to be replaced with a new one. Well, the driver will have to look for the reason for the failure of this fuse, because if this is not done, then the new fuse will burn out in the same way. When searching for a short circuit, it is necessary to take into account at what point the fuse blows. If this happens when the power window is turned on, then most likely there is a short circuit under the door trim, and if the fuse burns out immediately after the ignition is turned on, then most likely the wiring is shorted to ground, somewhere from the mounting block to the door trim.
The weak point that leads to chafing of the insulation of the wires going to the electric window lifter motor is the transition of the bundle of wires from the passenger compartment under the door trim. Therefore, this place needs to be checked first.
If the fuse is intact, then you will have to remove the door trim and check the voltage at the contacts in the plug connectors of the wires suitable for the window lift motor. This can be done very simply using a test light (one wire to the contact, the second to ground, if the light is on, it means there is voltage). If there is voltage and the window lift motor is not working, it will have to be replaced.
In addition to the fuse, the cause of the window regulator not working can be the failure of the K5 relay located in the mounting block. A relay that is not working is usually replaced with a new one. Sometimes, the window lift motor stops working as a result of warping of the thermobimetallic fuse built into the motor to protect it from overloads.
Also, the cause of a non-functioning window lifter can be mechanical faults. These include: failure of the worm gear, which serves to reduce the rotational speed of the electric motor shaft, and problems associated with the cable drive. During operation, the window lift cable stretches and increases in length, which leads to incomplete lowering of the side window. In addition, the extended cable can jump off the guide rollers and then there is nothing to move the side window.
- If you checked the fuse and relay, and they are in order, then do not rush to remove the trim and look for a break. I have the same 14th, and I recently encountered this problem. The VAZ 2114 (probably like many) has a very confusing electrical wiring diagram; power to the electric lifts is transmitted through the external lighting and a problem with it can lead to the electric lifts. I had that one too, the fuse for the fog lights, which I don’t have, blew out. So first check all fuses and then draw conclusions.
- First, you need to check the thirty-amp fuse F6, located in the mounting block under the hood of the car. In addition to the fuse, the cause of the window regulator not working can be the failure of the K5 relay located in the mounting block. If these measures do not lead to success, it is necessary to remove the door trim and check the voltage using a test lamp. Often the wires fray at the junction of the door and the body.
- If the fuse is normal, then you should check relay K5 ; it is located in the mounting block. If this does not lead to success, then it is worth removing the door trim and using a lamp to check the voltage of the doors. It happens that the wires fray and this may be the reason for the power windows not working.
- I will have to remove the casing and examine the entire mechanism in detail, since once due to one wiring, the entire system as a whole stopped functioning. The check should be carried out using a test lamp, since sometimes it is simply not possible to detect anything with your own eyes.
Good day to all.
Almost immediately after I switched to 2114, I encountered the problem of the window regulator on the passenger side not working at times.
It looked something like this:
Due to the fact that this happened mainly after washing.
I began to sin because the door was somehow miraculously flooding. I start the car, the window lifter doesn’t work, I drive it, I press it... it’s just miracles. A Google/drive search revealed several possible reasons: 1. A broken wire or a short to ground at the point where the wires pass from the passenger compartment to the door, 2. Failure of the window lift motor/wear of the gear on the mechanism. 3. Malfunction of the button The blown fuse was dismissed immediately - everything was fine on the driver’s side. Yesterday I had a free evening and started disassembling the casing. I examined all the possible wires in the door and was ready to look further, in the corrugation, but... There are two wires in the door connected through a white connector (the wires themselves are white and blue, the photo shows what they look like.
The white and blue wires are connected with a white connector
It was discovered that one of the wires on one side had come out of the chip, so, apparently, while jumping on bumps, the contact appeared and disappeared.
Therefore, if you encounter a problem of this kind, first check all connections, this way you can get by with little damage)
The 2113 had a tuned radiator grille. It so happened that before selling it, I installed the factory one I had bought at a disassembly, but this one remained gathering dust + was not in excellent condition, with broken fasteners.
I began to make a blank lattice out of it (and possibly with holes, and possibly with a mesh).
Stretched vertically. to give it a more even shape. I covered it with fabric and doused it with epoxy. Let's see what happens.
Peace for everyone.
Lattice. Due to the fact that it lacked rigidity, the top was crooked
Lada 2114 SnowMan › Logbook › Window lifters without ignition
You stop, turn off the engine, take the key out of the ignition, press the power window button to close the window, BUT IT WAS NOT THERE
. When the ignition is turned off, the window switches do not work. Now, in order to close the window, you have to reinsert the key into the ignition...
I think you are all familiar with this situation.
I overcame this “disease” in the first days of using the car, long before I registered to drive. Due to the fact that during the drive I was asked more than once how I did it, I decided to post a detailed report.
And then I started by studying the materiel.
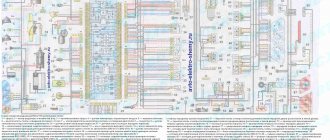
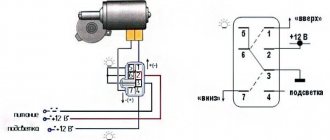
Electrical wiring diagram for VAZ 2114 electric windows
A little theory:
From the diagram it can be seen that the positive power window power wire passes through the K5 window relay and is open (pins 30 and 87). When you turn the ignition key, a plus is applied to the 85th contact of the K5 relay, the relay electromagnet turns on and closes the 30th and 87th contacts, after which a plus appears on the power window buttons.
Conclusion:
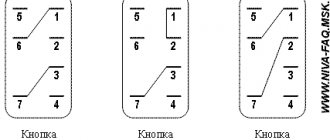
In order for the power windows to work without an ignition key, you need to bridge contacts 30 and 87 of relay K5 as in the figure below.
The red line indicates the jumper.
Let's move on to practice:
I will not impose on you any specific method of making a jumper; I will describe only the most common ones; you can choose any of these methods that seems most simple and convenient to you.
Method No. 1
In the VAZ 2108-09 mounting blocks from the factory, instead of the K6 relay (high beam), a metal jumper was installed (the jumper was installed between 30 and 87 contacts). Provided that you can find this jumper somewhere (lying in the garage, in a friend’s garage, at a disassembly site) and it is not in demand, you can install it in your mounting block instead of the K5 power window relay. Or borrow this jumper from someone and, in its image and likeness, make exactly the same one from sheet metal.
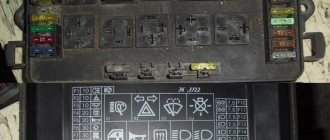
Mounting block VAZ 2108-09 AVAR 173.3722
Method No. 2
Here I will describe another method of making a jumper. We will need: - 6.4mm MALE detachable terminal - 2 pcs - 5cm wires We strip 5-7mm of insulation from each edge of the wire. Using a crimper, we crimp the connector terminals at the ends of the wire.
This is what should happen
We insert the resulting jumper instead of the K5 power window relay in the mounting block (the jumper is inserted between contacts 30 and 87).
Method No. 3
In this version, the role of the jumper will be performed by the K5 window relay itself with minor modifications. We take out the K5 relay from the mounting block, turning the relay over we will see the markings of its contacts. We take a piece of wire without insulation and wind it around relay contacts 30 and 87 (see figure below). We return relay K5 to its place in the mounting block.
Wire marked in red
Mileage: 28336 km
Electric windows of the front doors of VAZ 2115, VAZ 2114 (connection diagram): 1 – mounting block; 2 – power window switch for the right front door; 3 – gear motor for the electric window of the right front door; 4 – motor reducer for the electric window lifter of the left front door; 5 – power window switch for the left front door; 6 – ignition switch; K5 – relay for turning on electric windows; A - to power supplies; B - to the external lighting switch
Many cars produced recently are equipped with electric windows . Often, power windows are installed only on the front doors. But previously, VAZ 2114 and VAZ 2115 were not equipped with electric windows at all. Such cars were equipped with conventional mechanical
lifts for both front and rear windows.
In the window lift mechanism, instead of a gear reducer used in mechanical window lifters, there is only a drum into the hole of which the output shaft of the gear motor is inserted. The gearmotor consists of a worm gearbox and a DC electric motor with excitation from permanent magnets. Its design is similar to that of the windshield wiper gearmotor. The gearmotor is reversible, the direction of rotation of the output shaft depends on the direction of the current in the armature winding. To protect against overloads, it has a built-in thermobimetallic fuse.
Above is a diagram for switching on electric windows on VAZ 2114 and VAZ 2115 cars. Gearmotors 3 and 4 are switched on by switches 2 and 5 located on the armrest handles. The supply voltage is supplied to the switches when the ignition is turned on through fuse F6 and the power window relay K5, located in mounting block 1. If the power windows do not work, then it is necessary to remove the door trim and check whether voltage is supplied to the gearmotors, check the fuse and the power window relay, and restore broken connections in the wires, replace the faulty gearmotor with a new one.
Add a comment to the article
Shendys › Blog › Mounting block 2110
| Relay no. | vendor code | Purpose |
| K1 | lamp health monitoring relay | |
| K2 | windshield wiper relay | |
| K3 | relay-interrupter for direction indicators and hazard warning lights | |
| K4 | low beam headlight relay | |
| K5 | headlight high beam relay | |
| K6 | additional relay | |
| K7 | rear window heating relay | |
| K8 | backup relay (not installed on VAZ-2110 family vehicles) |
Circuit breakers
| No. prev. | Ampere | Purpose |
| F1 | 5 A | Lighting lamps: license plates, instruments, dimensions on the dashboard, left dimensions, trunk lighting |
| F2 | 7.5 A | Low beam in the left headlight |
| F3 | 10 A | High beam in the left headlight |
| F4 | 10 A | Right front fog lamp |
| F5 | 30 A | Door windows |
| F6 | 15 A | Portable lamp, cigarette lighter |
| F7 | 20 A | Radiator fan, horn |
| F8 | 20 A | Heated rear window |
| F9 | 20 A | Windshield washer and cleaner |
| F10 | 20 A | Reserve |
| F11 | 5 A | Dimension on the right side |
| F12 | 7.5 A | Low beam in the right headlight |
| F13 | 10 A | High beam in the right headlight |
| F14 | 10 A | Fog lamp, left |
| F15 | 20 A | Seat heating |
| F16 | 10 A | Hazard signal, turn signals |
| F17 | 7.5 A | Brake light, ignition switch illumination, interior lighting |
| F18 | 25 A | Cigarette lighter, glove compartment light, interior heater |
| F19 | 10 A | Reversing lamp, brake light monitoring |
| F20 | 7.5 A | Rear fog lights |
Additional fuse diagram
We install power windows on a VAZ 2109
Not all VAZ 2109 cars are equipped from the factory with electric windows (ESP). And if at a time when the serial production of the “nine” was just beginning, electric windows were more of a luxury for the domestic car enthusiast, today “oars” on the car doors are the exception rather than the rule. Fortunately, the domestic industry produces electric windows for Russian cars that were not originally equipped with them, including the VAZ 2109. These are the electric windows we will install on our Lada Samara with our own hands.
Removing a standard window regulator
If you plan to install rear electric windows on the car, you will have to disassemble all the doors. Therefore, at the first stage, remove the trim from all the doors, and then begin disassembling the mechanisms. Having opened access to the cable mechanism and glass fasteners, you can begin dismantling. First, push the glass all the way up and secure it with tape.
After this, unscrew all the fastening bolts that are on the glass carriages. Moreover, you need to unscrew them both on the mechanism and on the glass. After this, you can pull the entire mechanism out of the door and begin installing the electrical one.
Types of electric windows and which ones are better for the VAZ 2109
ESPs come in various types.
- cable-type (weak and very slow, with the advantage of being cheap and being able to replace the motor separately if it suddenly burns out);
- rack and pinion (a bit weak, based on operating experience - require regular lubrication);
- articulated-lever (work quickly, make little noise, are quite powerful: they can easily cope with frozen glass).
We opt for the latter, called “Pomegranate”. Moreover, the kit of these ESPs includes everything necessary for installation - electrical wiring, buttons, plugs, all the necessary fasteners, rubber cuffs for pulling the wiring from the rack into the door.
There are also “Katran” and “Berkut”, they have a slightly different device and installation is a little more complicated, but according to reviews they are also not bad.
What are fog lamps for?
The first prototype of the hatchback was assembled back in the year. And in combination with high-quality manufacturing materials, it ensured reliable operation. Many PTF kits contain special decorative plugs that add attractiveness and neatness to the installed headlights and facilitate the installation process. To summarize, we can say that in the first case, the qualifications of the work are minimal, and it can be done by yourself, without having specific knowledge, while working with an electrician requires a specialist who needs to be paid. When purchasing a bumper with holes for fog lights, you will need to purchase the lights themselves and all the necessary components for connection. Self-installation of PTF is the most common installation method, since it requires minimal financial investment. Otherwise, the clip fastening can be broken, and during subsequent installation the casing will not sit tightly in place.
There is a gear on the motor shaft that meshes with the teeth of the rack.
It should fit between the door clip and the door frame. Driver's door switch button. Installation of the VAZ 2114 engine start button. Do-it-yourself installation.
Diagram of window regulators on a VAZ-2107
On the automotive goods market for old mechanical VAZ models there are sets of electric windows from different manufacturers, the most popular of which are “GRANAT” and “FORWARD” rack-and-pinion type. The window lifter rack is a housing in which the glass movement device is located - a toothed chain drive. A stationary electric motor is already attached to the rack, driving the entire mechanism to work.
To connect power windows, you need to determine the place where you will get the power from. In the VAZ-2107, this is most conveniently done from the cigarette lighter. If this option is not suitable, then the electrical wiring will have to be done from the battery.
Power rack-and-pinion windows
Rack and pinion window lifters are considered one of the most “long-lasting” compared to others. Rack-type ESPs operate on the principle of transmitting rotational motion from an electric motor to gears, with its subsequent transformation into linear movement of racks that perform lifting. In addition to reliability, window lifts of this type lift windows much faster and quieter than cable counterparts.
But, like everything in this world, rack and pinion windows are not perfect and have their drawbacks. The main disadvantage is that the gears need lubrication; without it, they very soon begin to wear out, and the power windows themselves cease to function normally. The second drawback especially concerns those devices whose manufacturers decided to “save” on metal parts and gave preference to plastic. The fact is that this material is fragile and is noticeably inferior in strength to aluminum, as a result of which the service life of such ESPs is reduced. Among other things, the rack and pinion mechanism is more bulky, so they are installed mainly in “large” car doors.
Cable-type electric windows
The main advantage of cable window lifters is their high maintainability. In the event of a malfunction, you can easily repair the mechanism, and spare parts can be found in almost any auto store
This advantage, at first glance, is insignificant, but as practice shows, most motorists choose this type of ESP without paying attention to the disadvantages of the cable mechanism. The fact is that the cable wears out or stretches over time; in addition, due to the low strength of the plastic guides, they often fail, and the electric motor is very prone to overheating
Lever type electric windows
Lever-type ESP successfully combines compact dimensions and a high degree of reliability. In such power windows, the motor turns a gear, which transmits rotation to one or more levers. In turn, the levers move the plate on which the glass is mounted. The main disadvantage of this mechanism is the uneven speed of glass movement; the higher it is, the slower the lifting will occur.
As for glass, regardless of the type of mechanism, it moves along guide channels or special rails.
Impulse and non-impulse windows?
In addition to the type of lifting mechanism, ESPs are divided into pulsed and non-pulse. The former are capable of operating in pulsed as well as normal mode. By “normal” we mean that the power window operates only when you directly press and hold your finger on the control key. The term “pulse” means a short touch, after which the glass itself will completely lower or rise.
Pulse power windows are most often equipped with five-position control keys; the lever is set in neutral mode, from which there are two speeds of lifting up and down. By moving the slider up one position, the window lifter will operate in “normal” mode, and the glass will rise exactly as long as you hold your hand on the key. The second position will allow you to fully raise or completely lower the window.
Apr 14, 2015
Connecting power windows VAZ-2109
Owners of a VAZ 2109 car can replace power windows with electric windows. On 2109 cars, electric windows can be connected via standard wiring, which already has everything provided for connecting an ESP.
This circuit is used to connect ESP on more “rich” configurations of the nine and it is advisable to use it when connecting independently. Below are diagrams for connecting an ESP with fuse blocks of new and old models.
Wiring diagram for power windows on a VAZ 2109 with an old-style mounting block (17.3722):
- 1 - Mounting block
- 2 - Ignition relay
- 3 — Ignition switch
- 4 — Right door electric window motor
- 5 — Left door electric window motor
- 6 - Right door power window switch
- 7 - Left door power window switch
- K7 - Power window power relay
- A - To terminal “30” of the generator
- B - To the wiring harness block connected to the heater lever illumination display
- B - to the heater lever illumination display
- G - conventional numbering of plugs in the gear motor block
Recommendations
Comments 26
It’s not easier to open Google and write this question there. You'll do it much faster
Murzilka to help on the Internet there are a lot of wiring diagrams, take from 113-115 the diagram there is a pinout where and where
It can’t be any other way.
I connected 3 AA batteries, attached wires to the poles and looked for where + where -. and if you are going to install diodes instead of light bulbs, then to find + and - on the diode you will need current
the test will work too
also an option, but I simply don’t have it)))
I connected 3 AA batteries, attached wires to the poles and looked for where + where -. and if you are going to install diodes instead of light bulbs, then to find + and - on the diode you will need current
And I have a 12V pinatius block from St. tapes anado.ru/images/anado-cat…200_1/item/y08pbs7p0j.png (250 rubles) or you can buy a 12V battery, it costs 25 rubles.
Listen, I think I’m a little different
Listen, I think I’m a little different
How could it be different, if it were something else, then the stock backlight of the switches would not work.
but it’s easy, the button manufacturers are different, whose buttons even manage to turn on the ignition instead of the dimensions)
Everything with him is identical s011.radikal.ru/i317/1408/ed/87dc21eb059a.jpg. How will the switches manage to turn on the ignition if they do not close the circuit in parallel? If only someone climbed into the standard wiring and messed with it, then yes, but the wiring installed from the factory will not work.
everything just works out, read the forum, there are a lot of such complaints) and here on the drive there were some. because The headlights only light up when the ignition is on, apparently hence the connection that the plus button does not receive from the ignition, but feeds it back, and it turns on. so you can steal another 10s using the headlights/dimensions button
It won't go far, the steering wheel lock will work.
everything just works out, read the forum, there are a lot of such complaints) and here on the drive there were some. because The headlights only light up when the ignition is on, apparently hence the connection that the plus button does not receive from the ignition, but feeds it back, and it turns on. so you can steal another 10s using the headlights/dimensions button
and why the hell would you forgive me for this? I say that our headlight switches have different manufacturers, some of them work like factory ones, others turn on the ignition)
Yes, at least stick the jumpers in, but what the guy does in the video needs to be proven, half of the actions are not visible.
and why the hell would you forgive me for this? I say that our headlight switches have different manufacturers, some of them work like factory ones, others turn on the ignition)
People just came across or bought wiring on the market that has a discrepancy.
you did not understand. here in Samara2, the button WITHOUT ALTERATIONS does this kind of garbage, you don’t need any jumpers there, nothing. I bought a marker button (usually the one that is cheaper than from another manufacturer), you plug it in, turn on the markers, and instead of the marker the ignition turns on. That's it, no tricks or attempts to break into/steal. what the guy showed, there are no tricks there either, this is a factory jamb of the mounting block diagram in the 10th family
People just came across or bought wiring on the market that has a discrepancy.
Dear Drivers, yesterday I purchased a Euro panel. And the first thing that arose was how I could use my old wiring to install a panel on which there are buttons from a VAZ 211415. Having scoured the entire Internet in search of adapters from my old buttons to new ones, I couldn’t find anything and surrounded myself with a bunch of reference books and began to reinvent the wheel. Using information from the Internet and electrical circuits, I created something amazing =)
1) External lighting switch from VAZ 211415
2) Anti-fog button for front VAZ 211415.
3) Anti-Fog button for rear headlights VAZ 211415.
All other buttons will be standard. Good luck everyone! It may be useful to someone, otherwise there is not enough information on the Internet to replace the old panel with a euro =)
ESP diagram VAZ 2110, 2111, 2112
- 1 – mounting block
- 2 – ignition switch
- 3 – right front door power window switch
- 4 – right rear door power window switch
- 5 – electric window motor reducer of the right front door
- 6 – electric window motor reducer of the right rear door
- 7 – electric window motor reducer of the left rear door
- 8 – electric window motor reducer of the left front door
- 9 – left rear door power window switch
- 10 – left front door power window switch
- 11 – relay for turning on electric windows
- A – to power supplies
- B – to the instrument lighting switch
- C – conventional numbering of plugs in power window blocks
The power window relay for this car is located in the mounting block. On the left under the panel in the fuse box on the additional connector.
Drive unit
Drive shaft, CV joint (grenade), Outer CV joint, Inner CV joint, Right CV joint, Left CV joint, CV boot, Tripoid, CV joint nut, Retaining ring, Cardan, Crosspiece, Suspension bearing, Cardan bearing, Elastic coupling, Axle, Front axle, Rear axle, Axle reducer, Gearbox bearing, Gearbox oil seal, Differential, All-wheel drive sensor, Haldex coupling, Differential bearing, Differential oil seal, Planetary gears, Axle bearing, Axle shaft, Axle shaft bearing, Axle oil seal, Axle shank, Shank bearing, Axle bearing, Transfer case, Transfer case, Transfer case oil seal, Transfer case bearing, Transfer case chain
Serial connection - diagram
We connect the output of additional button 1 in the driver's door to input 6, and output 7 to input 3 of the main button on the passenger door. We cut the wires in the block connecting contacts 5-6 and 6-3. The minus of contact 5 now goes only to the backlight, and contacts 6 and 3 now take output from additional buttons 1 and 7 of the driver's door. Installation in parallel will result in short-circuiting during lifting and lowering. Power wires are highlighted in bold.
When using trigger buttons, connect all ESP motors only through a relay. When using a conventional door closer, relays are also needed, since they are not in the long-press closer block and all the current flows through the buttons and wires from them.
Troubleshooting electrical problems
During the operation of the vehicle, problems may arise due to malfunctions of electrical components.
- at the operation of the power unit, preventing it from developing its rated power;
- on the operation of devices, not allowing control of engine systems and other components;
- on the operation of lighting devices and comfort mechanisms (heating systems, interior lighting, window lifts, etc.)
Ignition system malfunctions
The main signs of a malfunctioning ignition system are:
- Difficulties in engine operation when accelerating the car;
- Loss of engine power during operation;
- Unstable or erratic idle;
- Malfunction of one or more cylinders.
Do-it-yourself troubleshooting should begin by checking sparking.
- Turn on the ignition;
- Remove the wire tip from the spark plug of the first cylinder;
- We bring it to the metal part of the motor at a distance of 4-5 mm;
- Turn on the starter;
- Let's see if a spark jumps between the wires;
- Similarly, we check the wires from spark plugs 2, 3 and 4 of cylinders.
Advice: If the spark discharge was stable in all cases, then the reason for the interruption in engine operation lies in the spark plugs. If there was no spark, the cause of the failure should be sought in the primary circuit from the generator to the ignition coil.
The search starts with:
- Directly ignition coils;
- Ignition module;
- ECU - on cars with VAZ-11183-1000260 engine
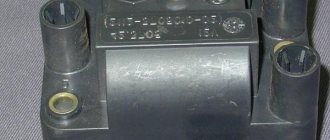
To check the ignition coil, you need to use a tester, with which you should measure the resistance of the primary and secondary windings.
Checking the performance of the ignition coil with an ohmmeter
Advice: If the readings obtained do not correspond to the data given in the car's passport, then the coil must be replaced. The probable cause of coil failure is a breakdown in the winding.
The ignition module is also checked using a tester. To do this, measure the resistance at its paired high-voltage terminals of the ignition module. The resistance should correspond to 5.4 kOhm.
The cause of module failure may be increased resistance between the terminals
Advice: if the cause of engine interruptions lies in the ignition module, then it needs to be replaced. The asking price is no more than 1000 rubles.
Sensor malfunctions
The injection engine is equipped with a fairly large number of sensors. And their failures and breakdowns can also lead to unstable operation of the power unit or control devices.
Tip: Underhood wiring can also cause the engine to run rough. Before using radical methods, you can try moving the connectors and terminal blocks. If operation returns to normal, the pad should be replaced with a new one.
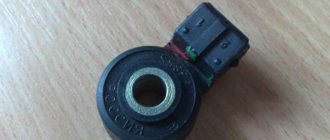
Terminal block of the mass air flow sensor (MAF)
Most sensors are analyzed by the scan tool and if there is a problem, the CHECK ENGINE light will illuminate on the instrument panel.
However, some such as:
- Mass air flow sensor;
- Idle speed sensor;
do not have such functions. This means that their failure and malfunction can be found out only after inspection. Diagnostics of such sensors responsible for engine operation can be carried out by disconnecting them.
CHECK ENGINE lamp on the instrument panel
Tip: If after removing the wire from the sensor the engine operation does not change, then the sensor is faulty. It should be replaced with a new one.
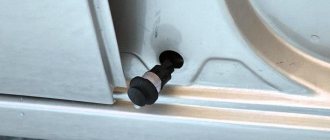
DPKV installation location
If the engine does not start at all, then the most likely cause of the failure is a breakdown of the crankshaft position sensor.
Without it, the ECM cannot determine the engine operating phases and, accordingly, will not give a signal:
- Fuel injectors about the start and cycle of operation;
- The ignition module knows when the discharge is applied to the spark plugs;
- Throttle valve drive about opening angle, etc.
Conclusions: as you can see, the VAZ 2114 has absorbed not only the best from its predecessor, but also inherited some problems with the electrical part. But if you know the principles of operation, troubleshooting will not turn into an unsolvable task. On the contrary, having visual diagrams in front of you, you can easily eliminate the cause of the interruptions and can continue to use the car.
Glass closer Pandora DWM
Connection diagram for the passenger door button in series through a duplicate button on the driver's door. Contacts 1-6 and 7-3 are always normally closed. When you press the up button, contacts 1-6 open and 1-2 close (window rises). When you press the down button, contacts 7-3 open and 7-2 closes (window down). The 30th contact of a 5-pin relay, without supplying voltage to the winding contacts, is constantly shorted to contact 88, which gives us the necessary negative contact (works like a switch). If voltage is applied to the winding, then contact 30 is disconnected from contact 88 and connected to contact 87. Contact 86 of the winding is connected to ground.
Components of the window lift system
What should I do if the right one does not work or both electronic devices fail? The window regulators may break, leaving them unable to lower or raise the windows. It is possible that the electronic device is jamming or sticking, but before you repair and disassemble the system yourself, you need to understand its structure. The unit itself works by controlling electric motors installed in the vehicle doors and designed to raise and lower the windows.
The system itself includes the following components:
- electric motors;
- switches located in the doors;
- wiring;
- glass
General structure of the ED system
Installation process of electric windows
In addition, it is necessary to install the power windows themselves. The procedure is performed in the following sequence:
- temporarily remove the glass seal located on the inside of the door;
- remove the glass, and then dismantle the window regulator fastening mechanism;
- we install devices that will operate from an electric drive;
- connect the negative terminal to the battery and check the operation of the new window regulator;
- We install the glass in place and trim the door.
Our instructions in pictures will help you understand the installation procedure in more detail.
Principle of operation
Why do the power windows not work or only the right window does not go up? To understand exactly why the malfunction occurred, it is advisable to familiarize yourself with the operating principle of the unit. Typically, such a system has a trapezoidal design, which allows the windows to be raised and lowered by pressing switches. The buttons themselves can be located in all car door cards or located only in the driver’s door. It is also worth noting that an electric motor is mounted in each door, which operates in two directions.
In addition, each system is equipped with a special relay, the purpose of which is to control the voltage supplied to the electric motors of the structure. Depending on the vehicle, some car models may be equipped with automatic switches that are installed separately for each electric motor. The use of such structural elements makes it possible to ensure normal operation of the entire system if the window regulator is poor on only one door.
Features of the new model
The electrical wiring of the VAZ 2114 has a different design than its predecessor:
- Inside the car;
- In the engine compartment;
- In the rear of the body.
The new engines were equipped with a more powerful ignition system, as a result of which the wiring diagram of the VAZ 2114 to the injector had some peculiarities.
- A wiring harness was added to connect to the terminal of the ignition module, which supplied impulses to the spark plugs;
- A wiring harness has been added for connecting to the electronic switch;
- Wiring has been added to connect the adsorber valve to the injection system controller.
Photo of the ignition module pinout
For reference: there is a misconception that the ignition module replaces the coil. In fact, the ignition module has 2 coils and 2 switches at once. The first coil supplies an impulse to the 1st and 4th cylinders, and the second - to the 2nd and 3rd cylinders.
The wiring for the VAZ 2114 has undergone changes not only due to the addition of new electronic devices, but also due to the automaker's further plans to modernize the functionality of the car.
- It is possible to connect heated exterior mirrors;
- It is possible to install heated front seats;
- It is possible to install front fog lights, etc.
Connection diagram for fog lights: instructions for VAZ 2114
Engine compartment
The first thing that owners of a carburetor power system pay attention to is the modified wiring diagram of the VAZ 2114 to the injector.
To operate on a lean mixture, the vehicle is equipped with:
- Forced fuel injection system directly into each cylinder;
- Installation of an increased power ignition system on the vehicle;
- Self-learning ECM - electronic engine control system.
The ignition module on the VAZ 2114 allows you to increase spark generation power
For reference: a feature of EURO 3 standards is the low content of unburned fuel components in the exhaust gases. To this end, the car's fuel system reduces the amount of gasoline in the air-fuel mixture, compensating for this by better filling the cylinders due to forced fuel injection.
To ignite a lean air-fuel mixture in the engine cylinders, it is necessary to provide a more powerful spark at the moment when the piston is at TDC (top dead center).
This is realized by installing an ignition module, the operating principle of which is implemented:
- The generator produces alternating electric current;
- It is supplied to the ECU, which converts it to direct current;
- From the control unit, current is supplied to the windings of the ignition module coils;
- High voltage is generated in the secondary winding (according to the law of induction) of the coils;
- It is supplied to the spark plugs at the start of the ignition phase.
Advice: if you want to understand the operation of a car’s ignition and power system, it would be a good idea to watch video materials from a school physics course. Or find videos on automotive websites.
Vehicle interior
For the VAZ 2114 model, the automaker developed and installed a new dashboard, which differed from its predecessor:
- the absence of a glove compartment in the upper part - it was moved lower;
- new instrument panel;
- the advent of an on-board computer
For reference: the on-board (trip) computer gave readings about the outside air temperature, the voltage in the vehicle's on-board network, current fuel consumption, power reserve and other parameters.
Torpedo VAZ 2114 with a new instrument panel, better known as “Europanel”
The emergence of new electronic components has led to a change in the wiring diagram of the VAZ 2114 panel.
- a wiring harness with a connector for the on-board computer was added;
- an outside air temperature sensor has appeared, installed in front of the radiator;
- The voltmeter relay appeared.
Wiring diagram for power windows on a VAZ 2114
In addition, a wiring harness was added to the front door panels, which were equipped with electric windows.
The diagram below shows:
- mounting block with terminal “A” to the power source and “B” to the external lighting switch;
- relay for turning on electric windows “K5”;
- switch for the right front door “2” and “5” for the left door;
- gearmotor of the right door “”3” and “4” - left door;
- ignition switch "6".
The wiring for the VAZ 2114 window regulators was also completed with an actuator unit
Causes of malfunction
So, we gradually approached the issue of malfunctions. What if the window regulator cannot go down or up? Before you remove the window regulator, disassemble and repair it in your car, let's look at the main reasons. If the rear or front windows do not work, the reason may be either electrical or mechanical.
Detailed design of the EP system
Electrical faults
First of all, if the window regulator has stopped working, it is necessary to diagnose the safety element responsible for the functionality of the system. If you realize that the power window is not working due to a fuse, then you just need to replace it. But if the fuse is working, then you will need to measure the voltage at the electric motor terminals. This task can be accomplished using a regular 12-volt lamp or using a tester.
If you find that the driver's window or any other door does not work due to voltage, then you need to further check:
- wiring;
- relay;
- system control unit.
Sometimes a car owner thinks that the window regulator is broken if, after opening the window, it automatically begins to close until the key is turned in the ignition. As a rule, in this case the problem lies in the contacts, which should be cleaned. Much less often, but it still happens that repair of electric windows includes replacing or repairing a button.
Mechanical defects of the mechanism
If, after measuring the voltage, you realize that there is current in the system, but it does not go down or the window regulator does not work at all, most likely the problem is mechanical. As a rule, in this case, something is interfering with the device, so you will have to disassemble the door and look for the reason. Much less often, the reason lies in a failed electric motor (the author of the video is the channel In Sandro’s Garage).
How to raise the glass if the electric seal is broken - there are several options:
- Purchase a window regulator repair kit and repair the device, after which you can fully use the system.
- Try to grab the glass on both sides with your hands and pull it up. If the glass falls after being lifted, you will have to disassemble the door and place a support of the appropriate size under it.
- If you can’t lift the glass with your hands, you can take a fishing hook on a fishing line and lower it into the door card. You need to try to pry the glass and lift it.
Heater design and circuit
Structurally, the rear window heater is presented in the form of conductive strips through which current flows. This current causes these strips to heat up, resulting in heating of the entire glass, which means defrosting the ice and eliminating fogging.
The heating circuit includes not only conductive strips, but also relays, wiring and a fuse. To turn on the device, a button is installed in the interior of the VAZ 2107 car. To understand how the design of this device works, below is a diagram that shows in detail all the components.
In the diagram, each element has its own purpose:
- A mounting block or relay and fuse block is a device that houses a relay with two fuses inside.
- Relay - helps to reduce the current in the circuit, thereby eliminating overheating of the wiring and failure of the power button.
- Ignition switch - a positive contact comes from the lock, which eliminates the possibility of turning on the rear window heater when the engine is not running.
- The button is dual-mode - turns the device on and off.
- The warning light is an indicator indicating the operation of the system and is located on the dashboard.
- Heater - has the form of conductive strips or threads that are glued to the glass on the inside.
Knowing the circuit diagram of the device, it will not be difficult to eliminate various malfunctions. We will consider below what types of malfunctions most often occur in the rear window heating system of the VAZ 2107.
For what reasons does the heating not work?
Owners of sevens know all the “sores” of this domestic vehicle, so when a malfunction occurs with the rear window heater, you don’t have to look for a breakdown for long. However, beginners and those who have not yet encountered such a malfunction are wondering how to check the system to find the cause and the faulty part.
The following reasons are identified for the inoperability of the heated rear window of the VAZ 2107:
- The fuse is faulty - if, when you turn on the rear window heating button, you find that it does not light up, then the first thing you need to check is the serviceability of fuse F7. It is he who most often burns out, which leads to the inoperability of the system. The reasons for its burnout are known - the passage of a large amount of current.
- Malfunction of the rear window heating relay - the relay, the main purpose of which is to reduce the current supplied to the power button, can also fail. If it malfunctions, it will need to be replaced.
- Malfunction of the power button - the reason for its failure is oxidation or carbon deposits on the contacts that occur when turned on. After all, it is known that when the rear window heating is turned on, a current is generated whose value is ten times the nominal value. This phenomenon contributes to the formation of carbon deposits on the button contacts.
- Damage to conductive threads. The cause of their malfunction is a broken contact. However, any breakdown in the system can be eliminated if the cause and location of the damage are correctly identified.
So, if a fuse, relay or button fails, then these parts cannot be repaired and must be replaced. Damage to wiring is extremely rare, so it can only be called when all of the above elements have been checked.
Heating restoration
The reasons for the rear window heater not working on the VAZ 2107 are known, but many do not know why the conductive strip may break. The reason is somewhat trivial - too zealous washing of the glass surface or incorrect application of the tint film. Even if this happens, you should not despair, because you can always repair the heated rear window of a VAZ 2107.
First you need to find the location of the damage, as sometimes this is very difficult to do. If the location of the damage is visually traced, then such damage can be eliminated using a special “Kontaktol” repair kit from Keller or analogues. Its cost is about 400-600 rubles, and you can find it in any auto store.
Instructions for replacing the electric motor
Repairing a window regulator may include different stages depending on the breakdown. In this case, we will tell you how to repair a window regulator by replacing its electric motor; as mentioned above, this problem is one of the most common.
The replacement process is considered using the example of a Lada Kalina car:
- First you need to buy a new electric motor, which is sold in a housing with a gearbox. The door trim is dismantled - this operation cannot be performed in the cold, since the trim is fixed using plastic pistons, which will quickly break.
- Unscrew all screws and other fasteners securing the inner handle.
- All wires must be disconnected; for greater convenience, you can remove the speakers. After these steps, the glass, which is fixed in the guides, is unscrewed. In order for the glass to sink to the bottom, you need to unscrew four more screws; to do this, use a 10 key. There is a curtain at the bottom of the glass unit, which must be removed.
- The window regulator itself is mounted on nuts and guides, the electric motor itself is secured with three more nuts. The block can be pulled out through the technological holes in the door. If you disassemble the gearbox, the electric motor will fall apart into two parts. In general, the gearbox must be dismantled and replaced with a new one, further reassembling in the reverse order. The gear cable should be lubricated before use.
How to disassemble a side mirror
Sometimes a complete replacement of the side view mirror of a VAZ-2114 is required. It is quite possible that everything can be done by installing a separate element on the left or right side.
Let's see how we can disassemble the structure as carefully as possible. First you need to press the plastic case from the inside. The holders are carefully snapped off using a flat-head screwdriver. This method is not very reliable - there is a considerable chance that the mirror element or other parts will break.
The second option carries even greater risks - here you need to quickly hit the glass on the surface (but it is better if it is soft). This is a quick option for dismantling and replacing the element. The blow should be light and fast. To replace the plastic housing or main fastener, remove the adjusting rods and pin. The assembly is done exactly the opposite.
Window lifter key connection diagram
This element is controlled by buttons, and since over time they stop functioning or begin to jam, you need to know how to fix it. Breakdowns can occur, for example, due to the following:
- glass freezes in winter;
- The lift breaks down.
It is unlikely to determine exactly what the problem is; you need to remove the casing and disassemble the device. At the same time, when removing parts, you need to carefully inspect them all. Here you can find a problem in the power supply or (which happens less often) a reason that is not electrical.
Recent Entries
After releasing the door trim, there is no need to rush to remove it. In this case, when you press the control button, you can hear the electric motor running, but the glass does not move.
Black and white - to hole number 3. American statistics literally record dozens of accidents associated with a simple situation: a baby left in a stationary car stuck its head out the window, and with some paw - front or back - accidentally pressed a button on the armrest lifting the glass.
Window lifter button, troubleshooting methods The window lifter button fails If problems arise due to the power supply, first of all you need to check the fuses. This option occurs much less frequently.
Trouble-shooting
If the failure is in the power supply, it is necessary to inspect the power window fuse. If this is not the reason, you need to check its motor and the voltage it transmits to the clamps. This is done with a 12-volt lamp or multimeter. If there is no voltage, the relay, wiring and power supply are checked.
In a situation where a key sticks or works only once in a while, the cause of the malfunction is most likely in the key itself. You need to disassemble the window regulator, remove it, and if the contacts are oxidized, clean them.
Key repair
If the driver is convinced that the cause of the malfunction is in the button, he can fix the problem himself as follows:
- The first step is to disassemble the door panel.
- Then the connector is disconnected, the fastener holding the button board, on which 4 contacts are located, is unscrewed. If they are oxidized, they need to be cleaned.
- It would also be useful to inspect the springs and check the functioning of all elements.
- The next step is to apply conductive glue to the surface of the rubber shell at the point of contact between the contacts and the printed circuit board.
When it dries, all components are assembled and installed back.
Removing a standard window regulator
If you plan to install rear electric windows on the car, you will have to disassemble all the doors. Therefore, at the first stage, remove the trim from all the doors, and then begin disassembling the mechanisms. Having opened access to the cable mechanism and glass fasteners, you can begin dismantling. First, push the glass all the way up and secure it with tape.
After this, unscrew all the fastening bolts that are on the glass carriages. Moreover, you need to unscrew them both on the mechanism and on the glass. After this, you can pull the entire mechanism out of the door and begin installing the electrical one.