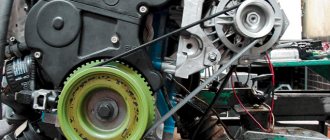
Most Renault Logan owners, while operating their car, neglect to pay attention to such an important vehicle system as the wheel drive. This model has a front-wheel drive layout, which is very vulnerable. This is due to the imposition of several functions on this node at the same time.
This article will shed light on the features that left-hand drive and right-hand drive have, and will also tell you how to correctly select and replace these parts in the French Renault Logan model.
Replacing the drive on Renault Logan
Replacing the Renault Logan drive may be required to solve the following problems:
- In case of damage to the device.
- For the purpose of installing new hinge elements.
- For installing anthers.
- For the purpose of performing work related to other nodes.
If you decide to do the work yourself, you must clearly understand how to dismantle the left and right drive of a Renault. We will consider these issues in the article.
“Please note that the hinge elements of the drives have structural differences, so the units on the left and right sides are changed according to an individual algorithm.”
- head at thirteen, sixteen, seventeen, thirty
- knob
- extension
- penetrating lubricant
- wheel bolt wrench
- jack
- hammer
- brush
Rice. 6.8. Right internal constant velocity joint RC 462: 1 — retaining ring; 2 — hinge body; 3 — three-spike hub roller; 4 — clamps for securing the cover; 5 — hinge cover; 6 - spring.
To repair the right inner joint
Spare parts are supplied with two repair kits: a large one, which includes all the hinge parts, and a small one, similar to the outer hinge repair kit.
The left internal hinge consists of three rollers b (Fig. 6.9) on needle bearings, mounted on the axles of a three-spike hub. The function of the hinge housing is performed by the left semi-axial gear of the complex-shaped gearbox. Its internal grooves for the rollers are made similar to the grooves of housing 2 (see Fig. 6.8) of the right
internal hinge . The three-spike hub is fixed on the drive shaft 8
( see Fig. 6.9) with a retaining ring
7 . The rollers allow the hub to move axially in the slots of the side gear, so the drive can be lengthened or shortened to compensate for the mutual movements of the suspension and power unit. The sealing of the hinge is ensured by a cover 5 , fixedly fixed using a holder 4 on the gearbox housing. drive shaft , rotating inside the cover in bearing 3 , is sealed with an oil seal 2 installed under the cover in a removable unit common with the bearing.
Rice. 6.9. Left internal constant velocity joint GL 69: 1 — mud deflector; 2 — oil seal; 3 - bearing; 4 — cover holder; 5 — hinge cover; 6 — three-spike hub roller; 7 - retaining ring; 8 - drive .
To repair the left inner hinge, spare parts are supplied with two repair kits: a large one, which includes all the hinge parts except the side gear, and a small one, which includes the hinge boot and the bearing assembly with oil seal.
To lubricate the outer joints and the right inner joint, use a special lubricant with molybdenum disulfide MOBIL CVJ 825 BLACK STAR (supplied with a joint repair kit, the domestic equivalent is CV joint-4). The splines of the inner joint are lubricated with MOLYKOTE BR2 grease, and the left inner joint is lubricated with transmission oil for the gearbox.
Step-by-step instruction
1. Clean off any dirt, spray with penetrating lubricant and loosen the hub nut. Loosen the nut while the car is on wheels.
2. Loosen the wheel bolts and jack up the car.
3. Remove the wheel and unscrew the hub nut completely.
4. To make it easier to remove the left drive, you need to unscrew the nut securing the steering tip pin. You can unscrew the nut using a sixteen socket and a wrench. If the tip is changed, the nut will fit the head at seventeen.
We press the tip finger out of the fist using a puller. If there is no puller, then we hit the fist with a hammer in the place where the finger is inserted and it will fly out.
5. Unscrew the bolt securing the ball joint pin and remove the pin from the fist. We will not explain in detail how to do this; we showed this earlier.
Before installation, make sure that the bolt has no loose threads. If the bolt is bad, buy only the original one. You can find the article here.
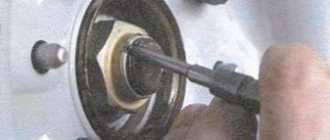
6. Remove the grenade from the fist. Usually it comes out easily. If it gets stuck, take a punch to the size and knock a little.
We take the grenade out of the fist, turn it and put the drive on the lever. If you have a car with ABS, first remove the sensor (you just need to pull it towards you) and release the wires from the fasteners. If you do not do this, then when you turn your fist you can break the wires.
We remove the ABS sensor and wires
7. Drain the oil from the box. We showed this earlier.
8. Unscrew the three bolts that secure the drive boot to the gearbox. The bolts must first be cleaned of dirt.
9. Remove the drive from the gearbox.
10. We clean the landing part for the new boot from dirt and debris. After cleaning, check that there are no shells or chips in the groove.
11. Install the drive. The drive can only be in one position. On one side of the boot mount there is the widest distance from bolt to bolt.
The drive can be tied with wire to make it easier to attach the bolts.
12. We attach three boot bolts. Immediately tighten the top bolt, then the side bolts.
13. Tighten the top bolt immediately, then right and left. Take your time and do not fully tighten the bolts right away. Pull them in a circle 2-3 times, and then finally tighten them.
14. Fill the gearbox with oil and check for oil leaks around the boot. I recommend turning the drive a little.
15. We insert the drive into the fist, having previously cleaned the splines from dirt.
16. Further, there are no special nuances, we just do the reverse assembly:
- insert the ball pin into the fist
- insert the ball pin fastening bolt and tighten
- tighten the hub nut
- insert the tip finger into the fist and tighten
- insert the ABS sensor and secure the wire
- install the wheel
- tighten the hub nut
What tools should I stock up on?
To replace the drive shaft on any side of the Renault Logan, you will need the following list of tools.
- A lifting device for hanging a Renault Logan car (in extreme cases, you can use a jack with a safety support).
- A set of ring and open-end wrenches, as well as heads with a handle (ratchet).
- You will also need an extended wrench that will allow you to overcome the high tightening torque of the hub nut.
- Pliers for removing the retaining ring from the shaft groove and a device for dismantling boot clamps.
- Medium sized hammer.
This is just a minimum list. Other instrumental components may be required at the discretion of the owner.
All steps from start to finish
If the steering knuckle is free of all hoses and wires, and it is held only by the shock absorber strut, then it remains to remove it from this strut. You need two 18" wrenches, which are used to unscrew the nuts on the screws. Then the fun begins. The wheel hub must be pulled off the splined shaft.
Separate the splined shaft and hub
Access to the "grenade" is now open. The anther can be cut immediately. Try knocking the CV joint off the shaft and then removing the retaining ring.
As you can see, we managed to remove the CV joint
The internal element of the CV joint is struck through a block with a hammer. There is no other way to disconnect it from the axle.
Installation of a new grenade and boot
When installing a new CV joint, first put on the boot. Don't forget about the retaining ring - it's better if it's new. The CV joint cavity is filled with a special lubricant before installation.
Preparation for installation
Installation cannot be completed without using a hammer and a block. This is the reality.
If the CV joint is already secured, you need to compress the clamp onto the boot. But first you can add a little more lubricant.
Here the boot is installed and secured
It turns out that not only the CV joint should be present in the repair kit.
How to choose a new part and what tools to stock up on?
The original oil seal is difficult to buy separately. Usually the element is sold with anther included. In addition, it is expensive - about 600 rubles. But you can buy a similar cuff that is installed on the compressor of a GAZ-66 car or a KAMAZ fuel injection pump. Dimensions: 28.5x46.5 (Pazovsky, with one side) and 28x45 (KAMAZ, two sides). Components of different sizes are needed for car modifications 1.4 or 1.6 with a number of valves 8 or 16. To check, before installation, try to insert the oil seal into the inner and outer races of the drive. You can pre-lubricate the rubber with oil to make the outer edges fit easier.
As for the tools, you need to prepare:
- a puller for removing the tripoid, which is a device with threads and grips;
- set of screwdrivers and keys;
- pliers, mandrels, hammer;
- a chisel, or better yet, a drift made of soft metal;
- mount;
- heads of different sizes and knobs for twisting the hinge;
- container for draining transmission fluid.
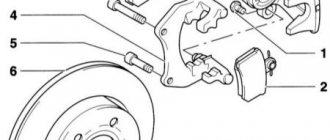
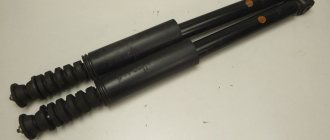
Front shock absorber strut
Note
: — The following describes the removal and installation (disassembly and assembly) of the shock absorber strut on the right side. Removal and installation (disassembly and assembly) on the left side are carried out in the same way. — If necessary, replace shock absorbers, as well as strut springs, in pairs (left and right). — The strut springs differ in stiffness and are marked with paint depending on the stiffness class. There should be springs with the same stiffness on both sides of the car.
Removal
1. Loosen the wheel bolts. We lift the car on a lift or use a jack to lift the front part of the car and place it on reliable supports (to do this, first brake the car with the parking brake and install wheel chocks under the rear wheels).
2. Unscrew the wheel bolts and remove the front wheel.
3. Using a metal brush, clean all threaded connections that will be unscrewed below; if necessary, apply a penetrating liquid (such as WD-40) to them.
4. Holding the upper bolt of the shock absorber strut with one 18mm wrench, use a second 18mm wrench to unscrew the upper nut securing the shock absorber strut to the steering knuckle.
5. In the same way, unscrew the lower bolt and nut securing the shock absorber strut to the steering knuckle.
6. Using a 13mm wrench, unscrew the upper brake caliper mounting bolt, holding the guide pin by the hexagon with a second 17mm wrench. Remove the brake caliper mounting bolt.
7. Then we turn the caliper relative to the lower guide pin forward so much that you can then remove the lower bolt securing the shock absorber strut to the steering knuckle.
8. Remove the bolts securing the shock absorber strut to the steering knuckle.
Note
: Before removing, try to remember the installation position of the mounting bolts.
9. We remove the steering knuckle from the eye of the shock absorber strut bracket.
Logan wheel drive device
The Renault Logan car has two drive shafts - right and left, at the ends of each of them there are external and internal CV joints (they are also called “grenades”). The external hinges have the same design, the internal hinges differ:
- the left three-pin is located directly in the gearbox housing;
- The balls of the right inner CV joint are located in the housing (clip).
The right drive shaft is significantly longer than the left; it has a rubber-metal damper, which is designed to dampen resonant vibrations while the car is moving. Anthers are installed between the shafts and constant velocity joints; they prevent dirt, dust and moisture from entering the joints; for tightness, clamps are attached to each side of the anther.
Types of faults
Regardless of the side of the drive shaft, its layout looks identical, except that the length of the axle shafts differs. The edges of the shafts have splined sections, due to which engagement with the CV joints (external and internal) occurs.
Most Renault Logan cars have a special balancer in the center of one of their drive shafts. Operation makes its negative contribution to the condition of this unit, since the ingress of a salt-mud mixture in winter provokes corrosion. Mostly, owners neglect this point and continue to operate the car until the moment when the specified unit breaks down. The malfunction is quite common and is also typical for Renault Logan.
An equally well-known malfunction is wear of the splined section on the edge of the axle shaft. The breakdown is accompanied by an unpleasant crunching sound, and the car refuses to move when the owner tries to start moving. The cause may be either progressive corrosion or excessive load on the drive itself.
Advice. To minimize the risk of occurrence of the indicated malfunction, try not to resort to sudden starts with slipping.
Causes and signs of Renault Logan drive failure
The main symptoms of a malfunction are the following:
- systematic knocking during control;
- creaking when turning the steering wheel left or right;
- vibration in the steering wheel when driving over uneven and rough terrain;
- constant oil leaks in the area where the gearbox, front axle, and CV joints are located;
- knocking sound when starting from a standstill.
The main causes of breakdowns are:
- long-term operation of the part without intermediate preventive maintenance and replacement of worn elements;
- depressurization, lubricant leakage, dry operation;
- defect factor, violation of manufacturing technology;
- poor quality previous repairs;
- violation of the basic rules for using a car;
- features of the style and manner of operating a technical device;
- mechanical damage to the drive due to an accident, traffic accident, collision.
My account
The design of the external Renault Logan grenade is not collapsible, so it will not be possible to pull the shaft out of the CV joint, although this is possible on other models of other brands. As soon as the grenade reaches approximately the middle of the seat, then hammer it in with a hammer or hand until it clicks.
Replacing the external grenade on Renault Logan (from 2011)
The stopper expands inside the grenade, releasing like a spring as we hear the click of the metal ring. Useful video from Renault Repair technicians: Experienced Renault Repair technicians noted an important thing about the spare part, which not everyone knows about and I didn’t know either.
The situation is this: there are 28 splines on the drive shaft, and on the shaft of the external grenade, if the 8-valve engine has 21 splines, and the valve engine has 23 splines. Well, here's the thing: external grenades with a 21 spline shaft and a 28 spline drive shaft are rarely found and supplied to the market.
Site navigation
How to replace the right drive of Renault Logan? If the drive on the right side is faulty, replacement is carried out as follows: Perform operations one through nine described in the previous section.
Move the inner hinge casing; here your right hand will come in handy, the force of which will be sufficient. Once the housing comes off the spline type shank, remove the right wheel drive from the front.
How to change the drive on Renault Logan on the left side
After performing repair work or replacing the device, return all elements using the reverse algorithm. Which side to shoot from?
When trying to figure out whether to remove the right or left drive of a Renault Logan wheel, it is enough to remember what actions you will have to perform. It’s not difficult to find the oil seal, but it’s not worth wasting time - why disassemble the entire chassis when you can quickly get to the part. If the oil seal on a Renault Logan is being replaced, the required drive is removed.
The part is installed on both sides, so the driver should know in advance which one to work with. In principle, the cost of the drive is low, and many motorists prefer paired repairs.
- head at thirteen, sixteen, seventeen, thirty
- knob
- extension
- penetrating lubricant
- wheel bolt wrench
- jack
- hammer
- brush
Final points
Due to the simplicity of the design of most components in Renault Logan, owners are given the opportunity to independently replace system elements that have become unusable. As you can see, the process of replacing axle shaft seals is not characterized by special labor costs and can be done by any Loganovod. This approach inevitably leads to cost savings.
During work, we take effective measures to preserve the integrity of the anthers of the internal hinges. We select new spare parts taking into account their article numbers.
You should not neglect the opportunity to change the oil in the Renault Logan gearbox, which will only extend the “life” of this complex unit.
We use rags in sufficient quantities to ensure thorough cleaning of the surfaces requiring this manipulation. This will save the transmission unit from foreign particles entering the crankcase.
How is the front chassis arranged?
The front suspension of the family Renault Logan is structurally implemented on the well-known McPherson model. The basis of its structure is shock absorbers and springs combined into single struts. The transverse arms are stamped triangular structures, which are attached to the steering knuckle by means of a ball joint and to the subframe by brackets with silent blocks.
To keep the Renault Logan car from rolling on the road, a transverse stabilizer is used, represented by a metal rod, which, through its own struts, rests on other elements of the chassis. Direct contact of the stabilizer with the subframe occurs through bushings. This is a suspension device.