We carry out the work on an inspection ditch or overpass. We carry out work to replace the external and internal joints of wheel drives, their dirt-proof covers, drive seals, as well as when dismantling the gearbox or power unit. Remove the middle mudguard of the engine compartment (see “Removing the mudguards of the engine compartment”). Drain the oil from the gearbox (see “Changing the oil in the gearbox”). We unscrew the front wheel hub bearing nut (see “Replacing the front wheel hub bearing”) from the side of the drive being removed. We hang up the front of the car and remove the wheel. We unscrew the two screws securing the ball joint to the steering knuckle (see “Removing the ball joint”). When removing the right drive, turn the steering wheel to the extreme left position (when removing the left drive, to the extreme right position) so that the steering rod output has its maximum value. This will allow the outer joint housing shank to be removed from the wheel hub without disconnecting the tie rod end from the steering knuckle. When removing the right drive...
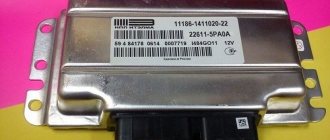
… using a wrench or a socket “10” we unscrew the nut securing the heat shield of the protective cover of the inner CV joint... . and two bolts securing it to the rear support bracket of the power unit (see “Removing the catalytic converter”).
We move the steering knuckle with the shock absorber strut to the side and remove the splined shank of the outer joint housing from the wheel hub. We place the drive on a stretcher. We install an adjustable stop under the gearbox housing by placing a wooden block under the housing.
Using a 19mm head, unscrew the top two...
...and with a “17” head one lower bolt securing the rear support bracket of the power unit to the clutch housing.
We press the bracket of the rear support of the power unit down and insert the mounting blade between the housing of the internal drive joint and the clutch housing...
...push the shank of the hinge housing out of the spline hole of the drive gear.
Do not damage the protective ring of the drive oil seal located on the inner joint housing. We remove the right drive, being careful not to damage the oil seal. When removing both drives, after dismantling the first one, it is necessary to insert a clamp, for example, a wooden or soft metal roller with a diameter of 20 mm and a length of 150 mm, into the hole of the drive gear. Otherwise, the differential drive gears may become misaligned and the drives may not be able to be installed. When dismantling the left drive...
…it is convenient to rest the mounting blade through the spacer onto the gearbox housing.
Remove the left drive. Before installing the drive...
... use a screwdriver to pry up the retaining ring of the shank of the internal joint housing, which secures the drive in the gearbox.
Lada Granta front suspension device
An option for reducing noise or hum from wheel arches is a non-trivial method, i.e.
in a way that is not usual for everyone (additional sound insulation of the arch area of the Lada Granta and Lada Kalina 2 with our own hands), we use vibration dampers. This technology for reducing structural noise is used on some business class cars. Let's look at the design of the front suspension of the LADA Granta
. The front suspension is independent with telescopic hydraulic shock absorbers, coil springs, wishbones, two braces and a stabilizer bar. The basis of the suspension is a telescopic hydraulic shock absorber strut, which serves as a guide and load-bearing device for the front suspension. The transverse arms of the suspension are connected to each other by a stabilizer bar through struts with rubber and rubber-metal hinges.
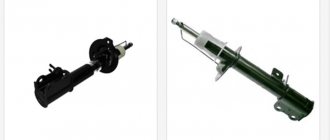
Theoretically and experimentally, it was found that the effect of the vibration damper should most effectively be applied to the shock absorber and to the areas where the levers are attached to the body. The photo shows a vibration damper used for installation on the front suspension side member brackets and a support cup for the shock absorber spring, weighing 350 g. The dimensions are selected to optimally fit into the space. Attached to the existing front spar bracket and directly through the existing hole onto the shock absorber suspension spring cup (depending on the model and brand of shock absorber, wheel offset, tire width - through an existing hole or a newly drilled one with a diameter of 8 mm).
Appearance of the vibration damper on the front suspension shock absorber (on the left is a new-style vibration damper, on the right is an old-style damper):
Appearance of the installed vibration damper on the front spar brackets:
Vibration dampers must be used on a car with a technically sound suspension; they do not eliminate all noise, but only reduce their negative influence and impact.
List of useful accessories
for: ✔Kia Rio 3 - link; ✔Kia Rio 4 - link; ✔Hyundai Solaris - link; ✔Hyundai Solaris 2 - link; ✔Lada Vesta - link; ✔Jetta 6 - link;
The mileage at the moment is a little more than 87 thousand km, it's time to update the front suspension. The struts held the blow when hitting large holes, but on the ridge and a series of small holes it was felt that the wheels were losing contact with the road (the wheel bounces due to the fact that the shock absorbers are no longer able to dampen small vibrations), especially on the right, and there were knocks I'm pretty tired of lights out. Before compiling a list of everything needed, I considered three options: 1. Don’t change anything in the suspension, just buy everything new for the Kalina1 suspension. 2. Buy a Kalina1 stand and install a better-designed support from Granta. 3. Install both the stand and support from Granta. After much deliberation, the third option was finally chosen. Since I have a car with a 16kL engine, the so-called “barrel” spring was installed from the factory; the same ones are installed on the Grant. Below is a list of part numbers for the Grant suspension assembly. Taken from Lada Kalina Club.
My list turned out to be as follows (prices are indicated for both sides): 1. Nut M14x1.5...21080-2901056-00 - Installed from an old rack. 2. Compression (rebound) stroke limiter...21700-2902834-00 - 80 rub. 3. Cup reinforcement (protection of the rack support)…SS20 SS50108 — 757 rub. 4. Telescopic support support...SEVI EXPERT assembled with bearing art. 1130 - 1338.90 rub. 5. Bearing support strut 1118 Kalina... Was complete with supports. 6. Compression stroke limiter ...21700-2902834-00 - 80 rub. 7. Front spring cup ...21700-2902760-00 - 400 rub. 8. Upper spring insulating gasket...Rosteco 20082 - 106 rub. 9. Front suspension spring (so-called barrel)…11196-2902712-00 (or equivalent) - Has not been changed. 10. Compression stroke buffer...SS20 SS74103 - 420 rub. 11. Protective casing for the pillar...Rosteco 20277 - 338 rub. 12. Telescopic stand ...SS20 SS20194 Granta - 5813 rub. Also additionally purchased: — BelMag Conveyor steering tips VM9519 — 554 rubles. — front suspension arms Rosteco 20337 — RUB 1,423. — stabilizer cushions SEVI EXPERT art. 2208 - 50 rub. — braiding of the spring coil SS20 SS64107 — 448 rub.
Lada Granta is one of the cheapest and most affordable cars on the Russian market. The vehicle is built on a common platform with Kalina and has similar technical characteristics. However, as for the suspension, the Lada Granta has been slightly modified. Read more in our article about how the chassis on the VAZ 2190 is designed and what its malfunctions are.
Features of the Granta front suspension
The front suspension is independent, which means that when one of the front wheels falls into a hole, the second one maintains its position. So that when driving on a flat road, both wheels are in the same plane and rotate evenly and parallel to each other, a stabilizer is installed between them. On the front part of the Granta suspension system, the mounting bearing is installed between the shock absorber spring and the body support. As a result, the weight of the machine is completely concentrated on it and keeps it in a compressed position. With this design, the backlash is reduced to zero - extraneous noise disappears.
The independent circuit consists of hydraulic shock absorbers and two wishbones, which are complemented by anti-roll bars. To strengthen the levers, so-called extensions of the upper supports of the front struts are used. They are not installed from the factory, so car owners are forced to install them themselves. The spring has a conical shape, a hydraulic shock absorber is located inside, the pitch of the coils is variable.
The lower part of the rack rests on the steering knuckle. The front suspension is designed in such a way that when the steering wheel rotates, the wheels are turned by the steering knuckle, and the spring and shock absorber turn with them. In this case, the stand of the latter remains in a stationary position. Thanks to this feature, it is possible to increase the service life of shock absorbers.
The designers modernized the block of front strut supports, which made it possible to increase their strength and eliminate squeaks, vibrations and rattling. The anti-roll bar remains unchanged. It is made of hardened steel, attached to the lower arms on the right and left, and rigidly attached to the body in the middle.
Another feature of the updated chassis of the Lada Granta is the increased castor. This is the angle of rotation of the steering wheels, which on Grant is 2° 45`. This solution has both advantages and disadvantages. On the one hand, handling improves; at high speed the car shows a higher level of directional stability. On the other hand, it takes a little more effort to rotate the steering wheel. The steering has also been updated:
- the installed electric power steering has a greater compensating effect;
- a steering rack with a lower gear ratio (short) is used.
The updates have significantly improved the car's handling at different speeds. The steering wheel has become more sensitive, and the number of its revolutions to the full angle of rotation of the steered wheels has decreased due to the short steering rack.
The owners were outraged by the return to using the standard suspension system from Kalina. The steering angle remains the same and no power steering is used. However, this is observed only in minimal configurations.
Removing the shock strut assembly with the steering knuckle
We carry out the work on a lift or inspection ditch.
Loosen the front wheel mounting bolts.
We remove the hub cap, unscrew the hub mounting nut with a 30mm socket and remove the washer.
Remove the front wheel.
We unscrew the nine screws and two bolts securing the engine mudguard and remove the middle engine mudguard.
Using pliers, undo the cotter pin and use a 19mm wrench to unscrew the nut 3 (Figure 2) securing the ball pin of the outer tie rod end 1.
We press the ball pin out of the swing arm 2 of the front suspension strut.
Using a 19mm socket, unscrew nut 3, Figure 3, securing the ball pin to the lower arm of the front suspension and press ball pin 2 out of lever 4 (article - Repair, removal of the ball joint).
Using a TORX E8 socket, unscrew the bolt securing the speed sensor (if the car has ABS) to the bracket on the steering knuckle and remove the sensor from the bracket.
We remove the sensor harness from the guide bracket on the front suspension strut.
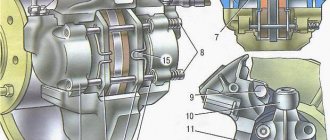
Unscrew and remove the pad guide with the caliper and cylinder assembly.
We tie the bracket to the brake hose bracket (Figure 4).
We remove the outer CV joint from the wheel hub and fix it in a suspended state using a wire or a technological hook.
If after removing the shock strut you need to disassemble it, then use a 22mm spanner to loosen the tightening of the rod nut (Fig. 5), holding the rod from turning with a 6mm hexagon.
Using a 13 socket, unscrew the three nuts 2, Figure 5, securing the upper support of the telescopic strut 1 to the mudguard 3 of the body and remove the washers.
Remove the strut assembly with the steering knuckle and ball pin.
Remove the lower support from the upper support 1, Figure 6.
Installing the shock strut assembly with the steering knuckle
Install the speed sensor bracket onto the steering knuckle and secure it with a bolt. Bolt tightening torque 7 – 15 Nm.
We install the lower support on the upper support of the rack.
When installing the lower support, the direction of the arrow on it must coincide with the arrow on the upper support. On the left support to the right of the hole, on the right - to the left.
When installing the rack into the car body, the arrow on the support should be oriented in the direction of travel of the car.
We install the strut assembly with the steering knuckle, brake and ball pin into the car body, install the washers and tighten the three nuts securing the strut to the body mudguard. Nut tightening torque 20…24 Nm (2.0…2.4 kgf.m)
We insert the splined part of the outer drive joint into the wheel hub, put on the washer and tighten, without tightening, the new wheel hub nut.
We press the ball pin into the suspension arm and tighten the nut securing the ball pin. The tightening torque of the nut is 67…82 Nm (6.7…8.2 kgf.m).
We thread the front wheel speed sensor harness into the guide bracket of the front suspension strut, install the sensor in the sensor bracket and secure it with a bolt. The bolt tightening torque is 6…9 Nm (0.6…0.9 kgf.m).
Before installing the speed sensor, apply lubricant (LSTs-15 lubricant) to the surface of the mating hole.
We press the ball pin of the tie rod end into the swing arm of the front suspension strut and tighten the nut securing the ball pin. The tightening torque of the nut is 28…34 Nm (2.8…3.4 kgf.m).
We tighten the nut. If the cutout of the nut does not coincide with the hole in the ball pin, retighten the nut to an angle of no more than 60˚ to ensure cotter pinning.
Install the wheel and tighten it without tightening the front wheel mounting bolts.
We lower the car, tighten and lock the front wheel hub fastening nut, deforming the locking belt of the nut into the grooves of the shank of the outer drive joint housing. We install wheel caps. The tightening torque of the nut is 230 - 250 Nm (23 - 25 kgf.m).
Tighten the front wheel mounting bolts. The tightening torque of the bolts is 76 – 92 Nm. Install the engine splash guard.
How to adjust your wheel alignment yourself
In most cases, wheel alignment is adjusted on special stands with computer calculation of these angles. However, it is possible to perform a wheel alignment in a garage, but to do this you will need to know how to perform the installation correctly, as well as have the equipment to perform this procedure. To adjust the angles you will need:
- A set of keys;
- Special measuring ruler;
- Chalk;
- Cord with weight;
- Ruler (regular):
Wheel camber adjustment
When adjusting wheel alignment with your own hands, the first thing to do is measure the camber of the wheels. Although this angle is measured in degrees, it can be converted into a millimeter value. The sequence of actions for calculating camber is as follows:
- The car is placed on a flat surface. It is advisable to carry out the test in a garage with an inspection hole. In this case, there must be space to move the car, which will be needed during measurements.
- After installing the car on the site, you need to align the wheels so that they “look” straight. After aligning the wheels, you need to put small marks on the wheel with chalk. Marks are placed at the top and bottom of the wheel.
- Next, take a cord with a weight. It must be attached to the fender of the car so that the cord has a strictly parallel position relative to the applied marks. For convenience, the cord can be glued to the wing with tape.
- A regular ruler with millimeter divisions measures the distance from the wheel to the cord at the top and bottom. To avoid error, this distance is measured not from the tire, but from the wheel rim.
- Afterwards, the car needs to be rolled forward so that the applied marks rotate 90 degrees. Two more marks are applied to the wheel again at the top and bottom parallel to the cord and the distance between the cord and the rim in its upper and lower parts is again measured.
- Then the car is rolled again, but this time so that the wheels turn 180 degrees. That is, the last two marks should change location. The top one will move down, and the bottom one will move up and measurements are taken again.
- The difference in the three measurements should not be significantly different. Also, with a normal camber angle, the difference between the distances in the upper and lower parts of the wheel for all three measurements should be 1 mm for a car with front-wheel drive, and 1-3 mm for a rear-wheel drive model.
- If the indicators differ, adjustments need to be made. To do this, the car is jacked up and the wheel is removed.
- After removing the wheel, you will need to disconnect the strut bracket from the steering knuckle. To do this, you will need to use a prepared set of keys.
- By turning the eccentric bolt on the steering knuckle, it moves in one direction or another, thereby making adjustments. Early measurements will tell you how much you need to move the steering knuckle.
- After this, the strut bracket is connected to the fist and the car wheel is put in place. After installing the wheel camber, you will need to take measurements again to make sure the adjustment is correct.
Adjusting the wheel toe angle
Having finished with the camber, you can move on to checking and adjusting the second angle - toe.
The sequence of checking and adjusting this angle is as follows:
- The car is placed on the platform, the wheels are aligned.
- Two marks are applied on the inside of the wheels in the front part; they need to be applied closer to the rim.
- A telescopic ruler for measuring toe-in is prepared by creating a preload on it. The ends of the ruler need to rest against the existing marks. The moving scale of the ruler must be moved so that it coincides with the fixed pointer.
- After installing the ruler, the car needs to be rolled forward so that the ruler is at the rear of the wheel. When rolling, it is important to make sure that the ruler does not catch on anything.
- Next you need to see if there is a deviation on the scale and by how much. For front-wheel drive cars, the toe value should be “0/+-1”. If the ruler readings are like this, then no adjustment is needed.
- If the readings are greater, then the toe-in is adjusted. This operation is performed by changing the length of the steering rods. You need to loosen the lock nut on the rod and, depending on whether you need to lengthen it or shorten it, you need to either unscrew it a little or screw it in. Then tighten the locknut again.
- Having finished with the adjustment, you need to take measurements again.
Replacement of front wheel drive parts of Lada Granta
Page 1 of 3
Removing the front wheel drives
We carry out the work on an inspection ditch or overpass.
Drain the oil from the gearbox.
Unscrew the front wheel hub bearing nut from the side of the drive being removed.
Unscrew the two bolts securing the ball joint. We hang up the front of the car and remove the wheel. To remove the right drive, remove the lower cover of the clutch housing. An assistant will be required when removing the right drive.
1. Move the steering knuckle with the stand to the side and remove the splined shank of the outer hinge housing from the hub.
2. Place the drive on the stretcher.
We insert a chisel (preferably not sharpened) into the hole made in the bracket of the rear support of the power unit, so that the wedge of its working part falls on the beveled surface of the internal joint housing. To do this, you can turn the drive by hand.
From the flywheel side, we place the mounting blade under the housing of the internal drive joint.
3. Using a hammer, hitting the chisel, and squeezing the inner joint housing away from the gearbox with a mounting blade, we push the shank of the hinge housing out of the spline hole of the drive gear.
4. Remove the right drive.
When removing both drives, after dismantling the first one, it is necessary to insert a retainer into the hole of the drive gear, for example, a roller made of wood or soft metal, or an old internal CV joint. Otherwise, the differential drive gears may become misaligned and the drives may not be able to be installed.
5. When dismantling the left drive, it is convenient to rest the mounting blade through the spacer on the gearbox housing.
6. Remove the left drive.
7. Before installing the drive, use a screwdriver to pry up the retaining ring of the shank of the internal hinge housing, which
the drive is fixed in the gearbox.
8. Remove the retaining ring.
We install a new ring into the groove of the shank of the internal joint housing. Reuse of retaining rings is not permitted. We insert the splined shank of the outer joint housing into the hole in the wheel hub, install the washer and tighten (without tightening) the hub bearing nut. Then we insert the shank of the internal joint housing through the hole in the drive oil seal and, by turning the shaft, align the splines of the shank with the splines of the drive gear. Moving the suspension arm downwards, with a sharp movement of the rack with the steering knuckle towards the gearbox, we send the drive to its place.
By pulling the internal hinge housing towards you or prying it with a mounting blade, we make sure that the housing shank is fixed in the drive gear. We carry out further assembly in reverse order.
External CV joint (CV joint) Datsun, Lada Granta 21902-2215012 with ABS, automatic transmission, 22 splines
| Brand | HQ-mech |
| Cat N | HQ-21902-2215012 |
| OEM N | 21902-2215012 |
| Applicability | Lada Granta (2010- ) |
| vendor code | 4603741760514 |
Show all characteristics
Today, the auto parts market in Russia and the CIS offers several dozen, or even hundreds, of CV joints and wheel drive assemblies from various manufacturers - from “famous” suppliers to the AvtoVAZ conveyor, to completely unknown brands and, unfortunately, obvious counterfeit “basement” assemblies." With such a wide selection of auto parts, the difference in price can be very significant. How not to run into a fake and buy a good “Outer CV joint (CV joint) Lada Granta 21902-2215012 without ABS AT gearbox, 22 splines”
?
How to choose a truly high-quality spare part for a car that will serve reliably and for a long time? How not to overpay and get a part with an optimal price-quality ratio?
It's simple!
Buy CV joints of the HQ-mech brand
from Vistaservice LLC.
Why here?
- More than 10 years of experience in auto parts production and sales
- Working only with proven factories and using only high-quality materials and raw materials (we place orders for the production of hinges and drives at factories focused on the European auto parts market and manufacturers of famous European brands)
- All CV joints and drives are equipped with boots, hub nuts, clamps and lubricant
- Use of modern high-tech equipment in production and mandatory quality control in production
- Well-thought-out and streamlined logistics (we do not overpay for storing goods at the port or in temporary storage warehouses)
- No bloated advertising budgets or overly large staff
- AND THE MOST IMPORTANT THING
: we place orders, import to Russia and sell car parts without intermediaries.
Applicability of hinge OEM No. 21902-2215012
| Brand | Model | Engine | Year |
| Datsun | mi-DO (15-) | 1.6i |
Lada (VAZ)
| Granta (10-) | 1.6i | 2010 — 2019 |
We invite wholesale organizations, service stations and stores to cooperate on an ongoing basis. We provide a full package of accompanying documents and a warranty from the manufacturer. We work with VAT, availability of all auto parts in the warehouse, delivery throughout Russia. Experience in the production of auto parts - more than 10 years.
Grant's interior
The inside of the car looks more presentable than the outside, but still loses aesthetically and in terms of convenience to cheap Chinese cars. The owner can be pleased with a spacious trunk of 240-360-440 - 500 liters (depending on the body: hatchback, station wagon, sedan and liftback). There is a lot of free space in the cabin, it’s not for nothing that the car is so long.
Lada Granta hatchback
Where to place the phone:
- space above the audio center in the minimum configuration,
- shelf in the glove compartment,
- shelf under the center console,
- under the handbrake,
- on top of the instrument panel in the box,
- There are also cup holders.
FakeHeader
Comments 21
Gentlemen! By the way: Stopping at a crossing (RAILS) is strictly prohibited and is punishable by DEprivation of your licence! Where are the moderators looking? ) PS And do you want a like? )))
I already answered below that I work as a railway worker, this is a fire crossing, so there were no trains there)))
I liked it... it looks good... maybe even better. than with chrome... a lot of chrome is not for everybody... I also somehow don’t like a lot of chrome-nickel inserts and goodies...
thank you, I agree. Not all cars are decorated with chrome...)
I looked and didn’t see a single like from you, sir?! As a result, you don’t view the FEED at all!
Accordingly, what kind of likes are you waiting for?!
Are you saying that I didn’t like any of your posts? That’s strange...
Steering
The steering mechanism has not undergone any changes. The same rail is installed, which is highly reliable. It serves for a long time, does not make extraneous knocks, and does not become loose, like on Kalina.
If we compare it with the Vesta, which steers very well, the steering on the Lada Grant is more blurred. On Vesta, the steering rack is mounted on a subframe, and on Grant it is installed on the body panel. Therefore the structure is less rigid.
Lada Granta remains the most affordable domestic car, simple, without any innovations. But the cost of its ownership and maintenance will be low and quite adequate. Let's be honest - Granta is not bought for its consumer properties and technical solutions. They buy it based on their income.
Now the situation is such that for many, 400-500 thousand rubles for a car is a huge amount. Many people cannot afford anything more. Lada Granta is bought as a workhorse, a car for every day, based on the desire to have a new car, and not a pig in a poke on the capital's market.
At the moment, the Lada Granta can be safely called a quite worthy budget car. If earlier AvtoVAZ products were actively criticized, and deservedly so, today these cars have become better. This is evidenced by statistics on defects and positive reviews from car owners.
Recommendations
- As a rule, the clutch “disappears” when the clutch fork breaks or the cable breaks. In such a situation, you can drive your car to the service center without using the clutch pedal. To do this, turn off the engine, engage first gear, then start with the gear engaged. To upshift, you need to re-gear, and to downshift, you need to wait until the engine speed drops to suitable values.
- If the Grant clutch is being replaced, the gearbox or engine is being removed, experienced car enthusiasts recommend replacing the clutch cable if the cable has traveled more than 30-40 thousand km. Also on the Granta, clutch adjustment and inspection are necessary if even minor problems appear with the clutch pedal or difficulties with gear shifting.
Lada Granta suspension diagnostics
To identify and eliminate the cause of the rattling, I decided to inspect the entire suspension of the Lada Grant for the presence of play and “tired” elements (bushings, rubber bands, etc.), since I thought that the problem lay somewhere there. So, let's begin.
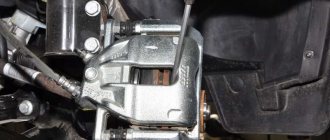
Checking the front struts
The first thing I did was check the front struts. While rocking the car from side to side, I simultaneously kept one hand on one of the racks. If the knocks were coming from the front shock absorbers, I would have felt them. However, there were no knocks.
Photo 2: Is there a knocking noise in the front struts of the Lada Granta?
I also looked under the front wheel arches to make a visual inspection of the front shock absorbers - I didn’t see anything special there, the struts were dry.
Photo 3: A-pillars are “dry”.
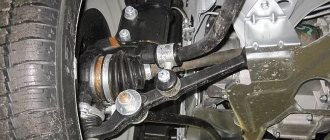
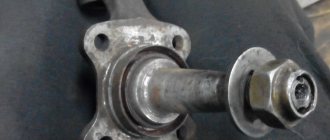
Checking the tie rod ends
An examination of the steering tips also showed that everything is normal: the anthers are intact, there is no play in the body (checked with a pry bar).
Photo 4: Checking the play of the Lada Granta steering tips
And when driving on uneven roads, when rattling appeared, there was no “recoil” in the steering wheel. As a rule, if the steering tip is broken, then on bumps a muffled knock can be felt directly on the steering wheel. I especially listened when I was driving on a dirt road, but I didn’t feel any characteristic knocks “through the steering wheel.” Well, let's look further.
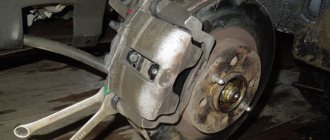
Checking wheel bearings
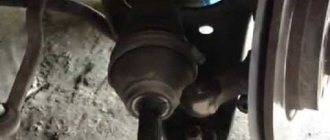
To check the condition of the wheel bearings on my Grant, I alternately jacked up the right and left sides of the front to spin the wheels. When the hub bearings fail, mechanical noise appears during wheel rotation (humming, crunching, clicking, etc.). Also, when the bearing wears out, the wheel may “dangle” on the hub, and the greater the wear, the greater the play. You can easily feel the play if you rock the wheel from side to side, as if trying to turn it left or right with your hands. In this case, the wheel must be suspended and rotate freely. In my case, the hub bearings were in good condition.
Photo 5: Checking the wheel bearing of Lada Granta
I would like to note that wheel play can occur even if the wheel bearing is intact. So, for example, it happened in my case when I went to an official dealer for zero maintenance. When inspecting the chassis, a slight play was discovered in both front wheels, which was eliminated by tightening the front hub nut.
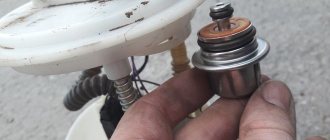
How to determine that the CV joint boot needs to be replaced?
The method is simple: you need to go to the pit and inspect the boot; if it is dry and no traces of oil are visible, then everything is in order and replacement is not required yet.
If, after checking, you find that there is a malfunction and a replacement is needed, then you will need the following tools: 1. Jack, hammer, wooden block; 2. Keys for 17 and 30; 3. Mount, balloon; 4. Flat screwdriver, special pliers for installing clamps; 5. New boot + CV joint grease, graphite grease, kerosene or similar flushing fluid.
There is a situation when, during a sharp start, a single knock or crunch is heard in the area of the front wheels. Most likely, you are already too late and will have to change the CV joint itself.
You can make payment in one of the ways convenient for you:
- To a SberBank or Alfa-Bank card. The most profitable method for the buyer, as well as the most convenient one, is to use the Sberbank Online service, Alfa-Click, an ATM, or through an operator at the bank. After placing your order, the manager will send you the card details. If you do not have a SberBank or Alfa-Bank card, you can also top up your card using the details at any SberBank or Alfa-Bank branch. Payment is credited within an hour.
- Yandex money. Customers who have Yandex.Wallet can quickly and easily pay for an order in our online store, the commission will be 0%.
- Yandex.Checkout is an online payment acceptance service. A convenient option with a large selection of payment methods for your order: plastic cards of any banks, including credit cards, in cash through terminals, ATMs or phone shops, Qiwi Wallet, Yandex.Money, WebMoney, from your phone balance, purchase on credit (payment in installments) . Please carefully check which email address you provided during the ordering process, as you will receive a receipt for payment for your order. Yandex.Checkout commission for transfer will range from 3% to 6% .
- QIWI wallet. If it is more convenient for the client to use a QIWI wallet or, if it is not available, to pay through the nearest QIWI terminal, the manager will provide you with the wallet number. Commission 0%.
- Payment at any bank using an invoice or receipt (+3% to the cost). If you do not use electronic wallets and plastic cards, we provide the opportunity to make payments at any bank in Russia. The site manager will send you a pre-filled receipt “Form No. PD-4” by e-mail; please carefully check the e-mail address you provide. The bank commission will be approximately 3% and depends on the bank itself
- Cash on delivery upon delivery by the Transport Company (payment for purchase upon receipt of the order).
- Cash on delivery upon delivery by Russian Post (payment for purchase upon receipt of the order). The order arrives at the post office, after which you pay its cost and pick it up, in which case the Russian Post charges a commission.
The main cause of element malfunction is a violation of the boot seal. Once it starts to crack, dirt and dust will get inside. They act on the ball like an abrasive. As a result, play appears and the support begins to break on its own. Is it possible to repair it? The Lada Granta suspension is designed in such a way that the ball joints cannot be restored and must be replaced entirely with new ones.
These elements are replaced as a set. The price of two balls is about 700 rubles. The service station will charge about 600 for installation. Although you can replace them yourself. All you need: a jack, a pit, a set of sockets and a special sprocket wrench. But please note that the bolts in this place may become sour. When replacing, there is a high risk of licking off the edges of the sprocket. Unscrew all bolts very carefully - do not press too hard. The service life of original ball joints is about 40 thousand kilometers.
This element serves for uniform rotation of the car wheels. There are 4 such bearings on the Grant. On average, their resource is 100 thousand kilometers. What are the signs of a problem? The main symptom is a characteristic hum when moving. It may get worse as the car turns. The hum can occur on either side of the car, depending on which bearing has fallen apart. The entire assembly is replaced with a new one, and it doesn’t matter whether the Lada Granta’s rear suspension or the front one. It is pressed out using a puller with special paws. Pressing takes place in a vice. It is important to maintain alignment when pressing. If a bearing is installed crookedly, it will be subjected to high loads and may fall apart after just a thousand kilometers.
The main enemy of a bearing is moisture. Therefore, during installation it is so important to ensure the element is sealed. Some manufacturers cover it with a special cap (it is put on the fastening nut), which will prevent salt, water and other reagents from getting inside. But as soon as dust penetrates the bearing, the latter begins to operate outside of its temperature range. As a result, the lubricant is washed away, and the dirt acts as an abrasive. Untimely replacement of this element can provoke a sudden wheel wedge, which is fraught with consequences.
vote
Article rating
Symptoms of malfunction
The most durable and high-quality key structural elements of a car are CV joints. To protect against adverse effects, the constant velocity joints are protected by a rubber boot. It keeps the grenade elements sealed against moisture, dirt and dust.
If the car undergoes technical inspection in a timely manner and is well maintained, and is operated on asphalt roads, then the external and external grenades will serve for a long time without causing any inconvenience to the car owner.
When operating a vehicle off-road on poor-quality roads with potholes and potholes, various malfunctions of constant velocity joints occur. It is necessary to highlight the main reasons for grenade failure:
– the boot is damaged and various types of contaminants and moisture get inside the grenade; – operation of the hinge with poor-quality lubrication or lack thereof; – manufacturing defects in the manufacture of CV joints or the use of low-quality metal;
If, during operation of the car, extraneous noises appear that characterize themselves as clicking, a characteristic grinding sound or a metallic crunch, then you should pay attention to the serviceability of the internal or external grenade of the vehicle. All malfunctions arise from the penetration of dust or dirt between the races and balls, i.e.
into the space between the grenade elements. When performing repairs, the entire grenade is replaced with a similar one
All malfunctions arise from the penetration of dust or dirt between the races and balls, i.e. into the space between the grenade elements. When performing repairs, the entire grenade is replaced with a similar one.
In general, such a structural device as a constant velocity joint ensures durable, efficient operation of the vehicle. And it rarely forces car owners to visit a car service center.
Share information with friends: