An important component in every car is safety. In addition to seat belts, the car itself must have a protection system so that a short circuit does not result from the car burning out. The car is a complex device of mechanical and electronic systems that ensure trouble-free operation of the car and comfort inside the cabin. The well-known injector cannot function without electricity and a control unit, and many electronic and mechanical components are involved in its operation.
The injector allows you to achieve high fuel economy without loss of power, even on cars with an 8-valve gas distribution system.
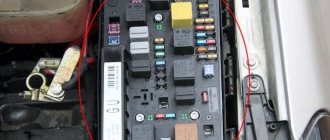
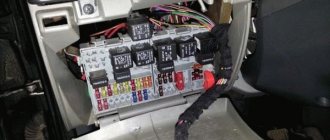
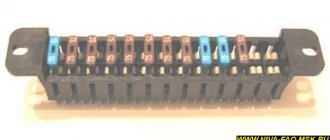
VAZ 2115 fuses (Mounting block)
A fairly common type of breakdown in cars is the shutdown of the vehicle's electrical equipment. Quite often this is due to a blown fuse. To quickly fix such a problem, you need to know exactly where the fuse is located, which is responsible for the disabled electronic component of the car, as well as how to replace it.
Where are the fuses located?
No vehicle is designed to have fuses scattered in different places. In every car, including the VAZ 2115, all fuses are located in a special block called a fuse block.
Like most cars, the VAZ 2115 has two fuse blocks. One of them is located in the car's interior, under the dashboard, and the second in the engine compartment, near the left glass.
What fuses are located on the VAZ 2115
Let us recall that in the previous article we looked at malfunctions of the ignition module on the VAZ 2115, its repair and replacement with our own hands.
Each fuse, which is located in the vehicle fuse box, has its own marking, by which you can determine what it is responsible for:
1. “K1” – this element of the fuse block is responsible for the headlight cleaning system relay.2. “K2” - that element of the fuse block is responsible for the relay of the system for switching turning lights, as well as for the alarm system.3. “K3” – is responsible for the windshield cleaning system.4. “K4” – is responsible for monitoring the performance of the lamps.5. “K5” – is responsible for the electric window system.6. “K6” – is responsible for sound signals.7. “K7” – is responsible for the rear window heating system.8. “K8” – is responsible for illuminating the roadway in high beam mode.9. “K9” – is responsible for illuminating the roadway in low beam mode.10. "F1" - "F20" are special fuses.
The design of the fuse box on the VAZ 2115
The interior fuse box has a slightly different structure than the one located under the hood. It includes an electronic control unit, three fuses, and three relays.
Just like in the fuse box located in the engine compartment, here each fuse has its own purpose.
If we describe them from top to bottom, we get the following:
1. The fuse that controls the fuel pump. Its current strength is 15 amperes.2. The fuse is responsible for the electric radiator fan relay, the valve located on the adsorber purge, as well as for the mass air flow sensor, DC and DC. The amperage of this fuse is 7.5 amps. 3. Fuse that controls the ECU. The current on this fuse is 7.5 amps.
Also, in order to fully understand fuse blocks, you should know about the relays that are located in the interior fuse block.
Below you can find their description from top to bottom:
1. Relay, which is responsible for turning on the fuel pump.2. A relay that is responsible for turning on the electric radiator fan of the cooling system.3. Main relay.
How to identify a blown fuse and replace it?
As we said above, each fuse that is located in the car is responsible for its own electrical equipment. In this regard, you only need to look at the cover of the fuse box, and according to the diagram that is printed on it, determine the location of the required fuse.
To get to the fuses themselves, just press the latch with one hand and open the fuse box cover with the other.
How can I be sure the fuse is blown?
There are two main ways to evaluate the performance of a fuse. The first, simpler, but less reliable - “by eye”. To do this, pull out the fuse and see if its middle part is intact.
The second method of checking the fuse is better. You need to turn on the ignition and measure the voltage at the fuse contacts one by one. If one has it, but the other does not, then the fuse has blown.
In conclusion, I would like to note that if your fuses blow quite often, then you should check all the wiring of the vehicle. This requires serious experience and specific knowledge. If you do not have them, then it is better to contact an experienced specialist at a service station.
Relay box in the center console
Diagram of an additional relay block on the left side of the center console
Designation and numbering of relays and control units in the center console
Location of the relay box in the car
Designations
| Element no. | vendor code | Purpose |
| 1 | Central locking control unit | |
| 2 | Immobilizer block | |
| 3 | Rear fog lamp relay |
Fuse blown
Sometimes the device does not need to be replaced. It is enough to change the fuse located inside the device itself. The procedure is carried out as follows.
- Open the hood and remove the negative terminal from the battery. You can also remove the fuse from the mounting block that is responsible for the cigarette lighter of the VAZ 2110.
- We unscrew the four fasteners of the tunnel covering and remove both parts of the lining.
- Disconnect the three-pin plug going to the cigarette lighter.
- Remove the lining under the handbrake lever.
- Remove the gearshift lever cover.
- We move the seats back, and then unscrew the three fastenings of the upper part of the tunnel and remove it.
- Pull out the cartridge.
- Use a flat-head screwdriver to pry the cigarette lighter latch so that it comes out of the seat.
- We remove the nest from the cladding for subsequent repairs.
Inside the cigarette lighter is a miniature mica plate. It is a semiconductor that sometimes breaks and melts. It needs to be removed. After this, it is worth assembling the unit and then checking the functionality of the device.
Replacement example
Since all fuses are located in a common block, the replacement principle is the same for all. Therefore, we can consider an example of only one element that needs replacement. Let this be the cigarette lighter. It is designated F6 and F18 (see table).
The first priority before replacing a fuse is to check its functionality. Many people immediately change the element without even considering whether the problem of the unit failure really lies in it.
Remove with tweezers
To check the fuse, you should perform several step-by-step operations:
- Start the car by turning the key in the ignition;
- Make sure that the cigarette lighter is inside its socket, where it should be;
- Wait about 20 seconds;
- Take out the cigarette lighter and check if it is warm. If the temperature remains the same, that is, the element is cold, then the fuse needs to be changed.
How to do it? Pretty easy.
- Get to the panel on which the board with the relays and cigarette lighters is located. The mounting block is located, as you remember, to the left of the steering wheel, at the bottom of the dashboard.
- By pressing the special latches, the cover will move away from its seat. Be careful not to break the latches.
- The mounting block has now opened in front of you.
- If you look at it carefully, you will see special tweezers on the edge. It is provided by the factory in order to carefully remove fuses and insert new elements in their place.
- Remove the affected fuse. In this particular situation, we are talking about the cigarette lighter fuse, so you need an element designated F6 or F18.
- This component burns out due to the fact that modern motorists need additional electrical equipment, such as vacuum cleaners and electric pumps. All this is connected to the fuse and overloads it. Hence the frequent breakdowns.
- Using the same tweezers, insert a new fuse with the same parameters indicated on the mounting block.
If for some reason you don't have tweezers inside your black box, small pliers can serve as an alternative to this tool. Never try to remove the elements with your fingers. The nests are quite fragile, and with your hands you can only loosen it and damage it.
Replacing relays and fuses is a simple and inexpensive repair. But if you damage the block itself, then you will have to spend more, and you will definitely have to work hard.
Are fuses repairable? No. These are fusible elements that simply become deformed when burned. Therefore, repair is possible only in one option - replacing blown fuses.
There are times when, for no apparent reason, the windshield wipers stop functioning, the rear and front turn lights do not turn on, the fuel pump does not turn on, or the cigarette lighter coil simply does not heat up. In this case, do not rush to run to the store to buy a brush motor or spend money on light bulbs or other devices. Most likely, it's all about blown fuses or relays. You need to carefully study the fuse block diagram of the VAZ 2110 and then you can easily fix this problem.
All electrical consumers in a car are protected by small and very simple devices - fuses. In particular, thanks to these simple devices, in the event of an increase in voltage, the wiring will not burn out, but the circuit will simply break. Each electrical fuse or relay is designed for a specific amperage and has an individual purpose. In some cases, one fuse controls several devices, for example, a cigarette lighter and other equipment.
Component functions
- Each element of the block is responsible for its own electronic unit. A blown fuse or damaged element can lead to malfunction of the vehicle's lighting system, power system and other volatile devices.
- Each electronic device in a car unit plays a very important role. If you suspect a malfunction, it is necessary to change it as soon as possible, so that on the road the car does not present you with a surprise in the form of a malfunction.
- If the car does not have an injector, but a carburetor, then the car will be able to work with a damaged or inoperative fuse block, but there will be no idle speed and other components may not function fully.
- When the unit burns out, the central locking and alarm system stop working, so the car must be parked in a safe place during this time.
Installation of blade fuses in VAZ 2101, 2103, 2106
The previous post was about the disadvantages of standard fuse blocks, in this same post we’ll talk about installing blade fuses on the VAZ 2101, 2106. The difference in installation on the “kopek” and on the “six” is not too big, the whole difference is in the presence of an additional fuse block in the sixth models that contain backup fuses and fuses for the turn signal and hazard warning circuits, as well as the cooling fan circuit.
Knife fuses have a number of useful properties that are actually better than standard ones, but all the advantages come down to one thing - better contact of the fuse with the socket in which it is installed. That's all. But thanks to this, there are no fuse melting, heating and other joys.
What is needed for installation:
- Key to "8"
- A screwdriver if it is difficult to remove the terminals from the standard unit
- Heat shrink is like a more “touchable” version of electrical tape, although you can also use electrical tape, but it won’t look very good
- Tester, may be needed
- Female connectors are 6.6 mm, for VAZ 2106 you will need 12 pcs, for VAZ 2101, 2103 - 8 pcs
- Actually, the blade fuse block itself is suitable for a Volga 3110 with 13 fuses
- Wires for making jumpers
- Straight arms, attentiveness
To begin the installation, I recommend starting by disconnecting the battery mass; this is a prerequisite for starting work and guarantees the safety of the work for you and your car. Next, using the “8” key, unscrew the fasteners of the fuse box, making sure that the wires do not come loose from the terminals.
We unscrew it here (VAZ 2106), in the VAZ 2101 there is no lower block, but everything is the same
After you have unscrewed the block, you need to move it down as far as the wires allow. No need to pull all the wires in a row! There is a possibility of mixing something up, and subsequent problems cannot be avoided. The entire installation is carried out according to the following diagram, which shows the markings for connecting the wires.
Wiring diagram for blade fuses in VAZ 2106
This diagram clearly shows in which places to install jumpers; they allow you to reduce the number of wires and simplify the electrical circuit.
Important!!! Jumpers need to be installed on those wires that carry voltage from the engine compartment, that is, from the voltage source wire, installed before the fuse. If you connect a jumper after the fuse, it turns out that current flows through one fuse, which powers two consumers. Next you need to start making jumpers, their length is about 10cm, it can vary, it all depends on how you want to make them
Next you need to start making the jumpers, their length is about 10cm, it can vary, it all depends on how you want to make them.
They look like this:
Jumpers
Next, you need to connect the contacts of such fuse numbers with these jumpers, for the VAZ 2106 the connection order is:
Thanks for subscribing!
3-4, 5-6, 7-8, 9-10, 11-12, 12-13
For VAZ 2103, VAZ 2101 and all others without an additional fuse box:
Let me remind you that it is necessary to connect the incoming wires on which there is circuit voltage; the current from them goes through the fuse to the on-board network.
Well, then it’s a matter of technique, we remove one wire at a time (starting from 1 fuse) from the old block and rearrange it to the new one, and so on until the last block. After installing all the wires, you need to check the correct connection; this is quite easy to do. For example, turn on the low beam and pull out fuse No. 5, accordingly the left headlight should go out, put the fuse in place, pull out fuse No. 6, the right headlight should go out. If this happens, then these circuits are connected correctly. By analogy, it is necessary to test the remaining circuits.
If, when you remove one fuse, two headlights still light up (for example, or the equipment is working), then the jumper is not installed correctly, check the connection diagram.
Causes of failure
Fuse and relay block VAZ 2110
There are also not many reasons for breakdowns. There are only two of them:
- Defect due to production. Quality companies do not allow their products to have any flaws. Therefore, defective goods are sorted and thrown away. However, Chinese firms neglect this.
Note: Without wanting to install a low-quality unit on your car, you should pay attention to it at the time of purchase.
- In addition, the unit may fail due to the fact that a short circuit has formed in the system. But it happens because the fuses are not in order. However, choosing high quality fuses (see VAZ 2110: how to replace fuses) for your car is not as easy as it seems at first glance. Recently, you can increasingly find fuses from “left-wing” sellers. You should avoid them.
Fuse box for VAZ 2110
Installing Blade Fuses
Such fuses are much better than conventional ones, as they have many positive properties. They have better contact with the socket into which they are inserted. Due to this, they retain their positive qualities for a long time, so they are not in danger of melting or heating. To install them you need to have:
- A screwdriver that can be used to remove the terminals.
- Key for 8
- Heat shrink
- Female connectors
- Block
- Wire to make jumpers
The installation itself is carried out as follows:
- Disconnect the negative terminal of the battery so that a short circuit does not occur in the system.
- A size 8 wrench will allow you to easily unscrew the fasteners from the block.
Note: It is very important that the wires do not fall off the terminals.
- When the block is unscrewed, it must be weighed down until it stops. But you need to act carefully so that the wires do not break.
- Make jumpers.
- Install blade guards.
- Return everything to its place.
Question/answer on fuses for VAZ 2110, 2111, 2112
We answer some questions sent on the topic.
Tell me, the left turn signal and high beam headlights on the VAZ 2110 stopped working, what could be the reason? Open the fuse and relay box, the contact may have come loose, move the wires, look and check, and if necessary, replace the fuses yourself.
Please tell me I'm already tired of it, the washer motor shorts, the light in the cabin with the clock and fuse F17 blows? Install a light bulb instead of a fuse, turn off all devices that are connected to this fuse. Turn on the ignition. If the lamp does not light, connect everything back one by one. Whichever one lights up, that's where the problem lies. If it lights up immediately, there is a short in the wiring.
Tell me what could be wrong, the reverse lights are dimly lit, if you remove one bulb, the second one starts to burn normally, put them back in place, both light up at half power. The brake lights on the same board light up normally. This problem is due to poor ground contact.
Why does fuse F8 melt? Look under the cover on the driver's side. If the catalyst was clogged, then the wires that go to heating were broken.
Why is the stove turned off, but hot air comes in? If the air is hot, but the switch is set to cold, then the electric drive of the faucet has soured.
The car starts only periodically when I turn on the ignition and the lights come on. I put the starter on direct and it starts. Tell me what is the problem? Place a relay between the lock and the starter, it won't help - it's the ignition switch.
Recommendations for use
- In order not to cause harm to the elements of the electrical circuit, never insert wire or other bugs in place of a burnt-out element.
- Before replacement work, de-energize the system by turning off the ignition, and in some cases, disconnecting the negative terminal of the battery.
- Replace elements using plastic tweezers, which should be included in the kit.
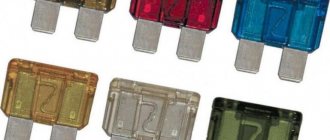
- When replacing, be sure to look at the rating of the fuse you are replacing; if it was 16 amps, then change it exclusively to 16 amps. Otherwise problems may arise. If you put it with a rating below 16 A, it may burn out immediately. And if it is higher, then it will not be able to protect the corresponding consumer during a power surge.
How to check and replace
Before taking any measures to repair the speaker system, it is necessary to determine the exact cause of the malfunction. In most cases, diagnosing and replacing the fuse on the radio for the VAZ-2114 can be done independently, since this does not require special equipment or deep knowledge in this field.
Correct sequence of actions:
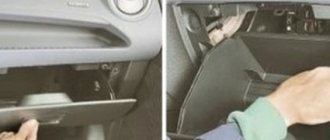
- To begin work, open the plastic cover of the distribution box, held in place by 2 latches.
- Conduct a visual inspection of the contacts for oxidation or burning.
- If any defect cannot be identified, then carefully remove the fuse from the mounting socket. This work is done using special plastic tweezers, which can be found inside the junction box. The device is put on the safety catch and pulled out slowly upward.
- They look for spare protective elements in the mounting block.
- One of them is removed from the cell and installed in place of the burnt out one.
- After this, turn on the radio and check its operation. If the new fuse immediately fails, then the cause of the failure is a short circuit.
- To find the source of its origin, they check the entire structure of the radio and fix the existing problem.
The protective part may fail due to the destruction of the conductive paths in the mounting block. This situation is rare in the VAZ-2114 and occurs as a result of moisture getting inside the body. If this problem occurs, it is recommended to replace the module with a new one, since its repair will lead to large financial and time costs.
Checking and installing the radio fuse on any popular VAZ model (2114, 2115, 2108, 2109 and others) is simple and quick. To avoid any difficulties during work, it is necessary to study the features of the process in advance and consider all possible repair options.
- autotuning.expert
- fb.ru
- autotuning.expert
- omagnitolah.ru
Removal and disassembly
The fuse box on a VAZ 2110-2112 car can be changed on your own. The procedure is not difficult; even an inexperienced car owner can do it if desired. Each element of the block is replaceable.
First, remove the block cover. In some fuse boxes, a special button is responsible for removing the panel. The change is carried out by removing the unusable part and installing a new one of the same rating.
Make sure that the circuit of the part being replaced matches the new one, otherwise the new one may also deteriorate and lead to additional elements in the circuit. Before starting work, check the manufacturer's description of the unit to ensure all disassembly is performed correctly.
If the fuse box is completely burnt out or damaged, it can be replaced with a new one. This part is affordable today and can be bought at any spare parts store for VAZ cars.
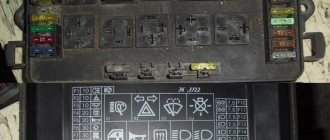
Relay and fuse diagram for VAZ 2110
The mounting block, in which the main fuses and relays are located, is in the cabin.
| Relay no. | Purpose |
| K1 | Lamp condition |
| K2 | Front glass cleaner |
| K3 | Relay-breaker for direction indicators and hazard warning lights |
| K4 | Low beam |
| K5 | Turning on the high beams |
| K6 | Additional starter relay |
| K7 | Heated rear window |
| K8 | Rear fog light |
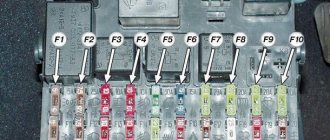
| Fuse no. | Current (amps) | Description of fuses |
| F1 | 5 | License plate lamps. Instrument lighting lamps. Indicator lamp. Trunk light. Left side lamp |
| F2 | 7,5 | Near left headlight |
| F3 | 10 | Far left headlight |
| F4 | 10 | Right fog light |
| F5 | 30 | Door window motors |
| F6 | 15 | Portable lamp or socket |
| F7 | 20 | Engine cooling fan motor. Sound signal |
| F8 | 20 | Heated rear window. Turning on the heated rear window |
| F9 | 20 | Recirculation valve. Windshield and headlight cleaners and washers. Rear window heating coil |
| F10 | 20 | Reserve |
| F11 | 5 | Right side light |
| F12 | 7,5 | Right low beam |
| F13 | 10 | Right high beam. High beam warning lamp |
| F14 | 10 | Left fog light |
| F15 | 20 | Electrically heated seats. Trunk lock lock |
| F16 | 10 | Relay-breaker for direction indicators and hazard warning lights (in hazard warning mode). Hazard warning lamp |
| F17 | 7,5 | Interior lighting. Individual lighting. Illuminated ignition switch. Brake light bulbs. Clock or trip computer |
| F18 | 25 | Glove compartment lighting. Heater controller. Cigarette lighter. |
| F19 | 10 | Locking door locks. Relay for monitoring the health of brake light lamps and side lights. Direction indicators with warning lamps. Reversing light. Generator excitation winding. On-board control system display unit. Instrument cluster. Clock or trip computer |
| F20 | 7,5 | Rear fog light |
Main unit
The main mounting block is located near the driver's seat on the front panel, to the left of it. The niche is closed by a plastic lid with a shutter above it in the shape of a button - to open it you need to press it. Under the cover there are fuses, numbered in the diagram from F1 to F20 - they are responsible for all vehicle control elements, except for those placed in an additional block (there are three of them). The power of the fuses is different. There are also eight relays responsible for the main elements of the car control power circuit.
Console additional mounting block
You can find it inside the center console. It is located behind a plastic cover attached with screws, to the left of the front passenger seat. The block contains three relays and three fuses. In particular:
- Fan motor relay;
- Ignition relay;
- Fuel pump motor relay;
- Engine ECU and ignition module fuse;
- Fuse for electronic elements of the fuel supply system;
- Fuse for the electrical circuit of the speed and oxygen sensors, as well as the air flow meter and the canister purge valve.
The power of all fuses is rated at 15 Amps.
In the diagram, the letters indicate the following colors:
- B - white;
- Ch - black;
- F - yellow;
- O - orange;
- G - blue;
- P - pink;
- Z - green;
- C - gray;
- K - brown;
- P - red.
If the letters are together, then wires of two colors must be connected to the plug.
Changes in switching and layout of mounting blocks
The most important innovation in the VAZ 2110 fuse box from old to new models affected the location of the fog lamp fuse. In the first modifications, this device was located behind the block, and not inside it, and was supported by a bundle of wires, without being equipped with a board. Over time, the designers provided a special board for it, which was still located outside the main unit, but was placed to the left of the console. Only ten years later did it find a place among the other fuses.
Blocks with different layouts differ in numbering. The first models with 6 relays have the number 2110-3722010, while those equipped with 7 devices were marked 2110-3722010-08, and the most modern ones - 2110-3722010-01. Modifications that do not have relay legs for turning on the front lighting are marked as 21110-3722010-12. Also, the manufacturer produces units equipped with legs, but not relay K1, which can be either with or without jumpers - in both cases, independent installation of the device or jumpers instead of it is allowed.
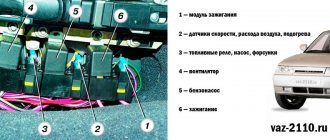
Additional block
Location of the additional block with fuses and relays.
There is an additional block in the central panel, the location of which can be seen in the photo. It contains three fuses with the same power of 15A:
- The first is responsible for the controller and ignition module in the VAZ 2110.
- The second takes over the protection of the mass flow sensor (mass flow meter), purge valve, heating and speed sensor.
- The third is responsible for the injectors and fuel pump.
And three relays:
- The fourth number indicates an electric fan.
- Under the fifth is an electric fuel pump.
- The last relay relates to the ignition of the VAZ 2110.
Replacement example
Since all fuses are located in a common block, the replacement principle is the same for all. Therefore, we can consider an example of only one element that needs replacement. Let this be the cigarette lighter. It is designated F6 and F18 (see table).
The first priority before replacing a fuse is to check its functionality. Many people immediately change the element without even considering whether the problem of the unit failure really lies in it.
Remove with tweezers
To check the fuse, you should perform several step-by-step operations:
- Start the car by turning the key in the ignition;
- Make sure that the cigarette lighter is inside its socket, where it should be;
- Wait about 20 seconds;
- Take out the cigarette lighter and check if it is warm. If the temperature remains the same, that is, the element is cold, then the fuse needs to be changed.
How to do it? Pretty easy.
- Get to the panel on which the board with the relays and cigarette lighters is located. The mounting block is located, as you remember, to the left of the steering wheel, at the bottom of the dashboard.
- By pressing the special latches, the cover will move away from its seat. Be careful not to break the latches.
- The mounting block has now opened in front of you.
- If you look at it carefully, you will see special tweezers on the edge. It is provided by the factory in order to carefully remove fuses and insert new elements in their place.
- Remove the affected fuse. In this particular situation, we are talking about the cigarette lighter fuse, so you need an element designated F6 or F18.
- This component burns out due to the fact that modern motorists need additional electrical equipment, such as vacuum cleaners and electric pumps. All this is connected to the fuse and overloads it. Hence the frequent breakdowns.
- Using the same tweezers, insert a new fuse with the same parameters indicated on the mounting block.
If for some reason you don't have tweezers inside your black box, small pliers can serve as an alternative to this tool. Never try to remove the elements with your fingers. The nests are quite fragile, and with your hands you can only loosen it and damage it.
Replacing relays and fuses is a simple and inexpensive repair. But if you damage the block itself, then you will have to spend more, and you will definitely have to work hard.
Are fuses repairable? No. These are fusible elements that simply become deformed when burned. Therefore, repair is possible only in one option - replacing blown fuses.
Location
Since AvtoVAZ engineers tried to do everything so that car owners would not have problems replacing relays and fuses, it would be stupid to come up with a clever arrangement. Therefore, finding them is not difficult.
- The main unit is located to the left of the steering wheel;
- You will find the first additional block in the dashboard inside the niche, directly behind the main mounting block;
- The second additional block is located in the same place, only on the opposite side.
We will get acquainted with each block separately so that you do not have any confusion when searching for one or another fuse.
On injection engines with 16 and 8 valves, the location of the MB is identical, so the instructions are equally relevant for owners of both versions of the dozen.
Main MB
Relays and fuses are located here. Let's look at their descriptions in more detail and separately.
Found the main MB
Let's start with the relay.
Next comes the fuses. They are located in the same place, but are designated by the letters F.
Each fuse is indicated with a current rating and designation. This allows you to use a new fuse with parameters that meet the requirements of the equipment connected to it.
First additional block
Inside the central panel there is the first of two additional blocks provided for the VAZ 2110. You can find it at the bottom left on the front passenger side.
This block provides three fuses. Each of them has the same power rating - 15A.
- The first fuse is responsible for your vehicle's ignition and controller module.
- The second protects the mass air flow sensor, heating sensor, speed sensor and purge valve.
- The third is necessary to ensure protection of the injectors, as well as the fuel pump. So if problems arise with the fuel pump, the first thing we recommend is to check the condition of the fuse responsible for it.
Additional block location
Plus, the same block includes three relays:
- Relay number 4 is responsible for the electric fan;
- Relay number five is the electric fuel pump;
- The third relay is part of the ignition protection group on your VAZ 2110.
Second additional block
The second additional block should be looked for already in the driver’s feet, on the right. Behind the protective cover on the console you will find the required board.
There are three more components on it. They are responsible for:
- Immobilizer operation;
- Additional optics (mostly fog lights);
- For the operation of the car's central locking control.
Introduction.
Have you checked the fuses? Isn’t this the phrase we hear most often from our comrades and repair advisors? Indeed, the VAZ 2110 fuse box protects each of the key elements of the electrical circuit and it is very worth checking them. But when is it really useful, and when can it be considered just a waste of time?
Fuse box VAZ 2110
It doesn’t matter which element of the car has failed: it could well be a broken starter, dead wipers or headlights, for example. Checking the protection circuit is the fastest and most effective way to start repairs.
But if the fuses in your car “like” to blow out often, are they really needed? Is it possible to refuse unwanted “protectors”?
In the inquisitive mind of a motorist, many specific questions arise regarding the maintenance and repair of his iron horse. Quite tricky in some places, very interesting in others. Even about the usual VAZ-2110 safety block you can write a lot of useful information. Perhaps you didn’t know something or were embarrassed to ask. We tried to answer various useful questions in this thematic article.
Fuel system.
If the starter in the car is spinning at full strength and a good spark is observed in the ignition system, then possible problems with starting the engine may be associated with the fuel system.
If your car is equipped with electronic fuel injection, then several of its subsystems may specifically cause the power unit to fail to start.
True, it should be noted here that in most of these cases you simply will not be able to independently diagnose all kinds of electronic systems and subsystems, which may actually be the reason for the failure to start the engine. The point is this: this check requires special diagnostic equipment, which is only available in car service centers or car service dealerships.
True, there are some moments when you can check certain subsystems yourself in a garage. And all this thanks to certain and specific methods of such checking. Although you will not find the specific cause of the breakdown, in any case you will significantly narrow the scope of the search for this malfunction, which will save you a lot of money when you go to a car service for electronic diagnostics of the car.
— Electrical connections: There are many electrical connections in the fuel injection system. Each fuel injector has its own connector on top. There are electrical connectors in the air system of the car, as well as on the cylinder head. You should check all the electrical connectors that are under the hood of the car. This is quite difficult, we understand, but nevertheless, you will save a lot of money on this, which you can then give to a car repair shop without regret.
— Fuel pump and relay: To check the fuel pump you will need special equipment that diagnoses the vehicle's fuel system (pressure). Since most of us motorists do not have this kind of equipment, all we can do ourselves is to completely check all electrical connections.
For example, check the flow of electrical current on the positive wire that powers the fuel pump itself. To do this you need an electrical tester. Before checking, make sure the ignition key is in the “On” position. If the tester shows that current is flowing to the pump, then proceed to the next troubleshooting step. If there is no current and does not flow, then you need to check the fuse. If the fuse is in good condition, then the problem with starting the engine is in the fuel pump relay itself. Replace this relay with a new one.
— Fuel filter: If the fuel pump is working correctly, this does not mean that fuel is getting into the engine in the normal sufficient quantity. For example, due to this fuel filter, fuel may not flow into the combustion chamber in sufficient quantities, which may cause the power unit to fail to start. In order to avoid such problems, you need to change the fuel filter in your car every 20 thousand kilometers, which can be heavily contaminated with enzyme-forming substances present in the fuel itself.
You can easily check all these elements in the car yourself and, if necessary, replace them yourself, specifically using everyday auto tools. Unfortunately, there are many other fuel electronic systems that simply cannot be checked without the use of special equipment. Therefore, remember, our dear motorists, to do electronic diagnostics of a car, it is best to trust specifically to professionals and contact a car service center.
Replacing the fuse
One of the most common causes of breakdown is failure of the protective element.
A clue that the fuse for the cigarette lighter has blown will be a non-working VAZ 2110 stove or a faulty glove compartment illumination lamp. To carry out repairs, it is necessary to replace the blown fuse in the mounting block. To get to the box, press the button in the front panel to the left of the steering wheel. The fuse to be checked is number F18, rated for a current of 25 amperes. It is convenient to use tweezers for replacement.
A fuse of the recommended rating should be installed. Otherwise, there is a high risk of insulation melting, short circuit, and fire. After repair, you cannot connect powerful devices to the cigarette lighter socket. The maximum power is 300 watts. Calculated using the formula P=I*A, where I is the network voltage (12 volts), and A is the amperage (25 amperes).
Finding the fuel pump relay and troubleshooting
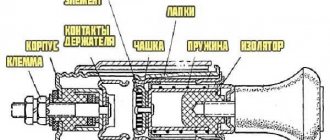
As you know, in order to start any process, be it mechanical or electrical, you need a source of energy. And the relay thus represents a kind of trigger mechanism, because its work is to connect the contacts located inside, which close when exposed to electric current. The following two tabs change content below.
About the expert:
Fan-avto All my life I have been surrounded by cars! First, in the village, already in the first grade, I was rushing around on a tractor through the fields, then there was JAVA, then a penny. Now I am a third-year student at the Polytechnic Faculty of Automotive Engineering. I work part-time as a car mechanic and help repair cars for all my friends.
If we personally consider the VAZ-2112 fuel pump relay, then there are certain specifics in its operation. It also happens that many car enthusiasts simply do not know where exactly this relay is located, and how to correct the malfunction when it fails.
Principle of operation
Almost all relays that are mounted on Russian cars are identical. For the most part, they differ in the number of contacts with five versus four, and the latter, as a rule, does not have a central input.
The current strength, measured in Amperes, is also almost the same and is about 30 - 40A.
>
The relay in the photo is 30 Ampere.
The relay is connected to the network using a plastic block (plug - approx.), and when the electric current reaches the coil inside the relay and the magnetization process begins, it then closes and the circuit is connected.
Relay in additional fuse box
Location of the additional relay unit inside the car
The fuel pump relay is located on the left side of the front passenger's feet, where three relays and three fuses are located next to each other.
After dismantling, we put it aside
The fuel pump relay is located exactly in the middle under the number “5”. The fuse number “3” is also located nearby.
Additional block
Functionality check
In order to check the fuel pump fuse, you just need to inspect it and, if necessary, replace it with a known working one.
There are several methods to check the fuel pump relay:
- The easiest way is to replace the old relay with a known good one.
- If you don’t have one at hand, you can use a regular multimeter.
Operating principle of fuses
The principle of operation of the electrical equipment of the VAZ 2110 is not far from its great-grandfather’s VAZ 2101 - it is still the same single-wire circuit, where the role of the negative wire is played by the car body. The scheme is advantageous in that it allows you to reduce the number of conductors, but it also has its drawbacks. The main one is that in the absence of contact with the main mass on the body, almost all the electrical equipment of the car goes out.
Be that as it may, no one has repealed the laws of electrical engineering, and when a positively charged conductor and a negative one come into contact, without a load, a short circuit inevitably occurs. It leads to failure of electrical appliances on board, overheating of conductors, melting of insulation and can cause a fire. That's why you have to complicate your life with fuses.
Why doesn't the cigarette lighter work?
On the VAZ-2115 the device stops working due to the following reasons:
- Fuses blown. The cigarette lighter in domestically produced cars often shorts out, and the protective parts have to be changed regularly. This is considered a design flaw that is difficult to eliminate.
- Connecting too powerful devices to the socket. Burnout is caused by the insertion of a plug into a car vacuum cleaner or compressor.
- Changing the state of the nest. With frequent use, it becomes loose, the block dangles, which provokes a short circuit. In this case, the fusible protective elements quickly burn out. The absence of a beep helps determine the malfunction (the fuse-link is loaded with sound devices).
- Fan motor short circuit. Standard devices are unreliable and quickly break down. In this case, the cigarette lighter does not work on the VAZ-2115.
- Burnout of the track in the installation block due to a short circuit. When the pads are exposed to moisture, the contacts become covered with an oxide film. The fuse box is the weak point of a domestic car.
Which fuse is responsible for the VAZ 2110 radio?
Sometimes a confusing wiring diagram is an impossible task for a beginner. This is especially true for the domestic automobile industry, in which there are a large number of differences. You can often find cars from different years of manufacture on the same model. A spectacle that looks like the same element is responsible for different parts.
Therefore, the radio is often connected to the power system either at F10 or at F4.
F10 is a reserve that is used in the event of a breakdown. Our craftsmen often connect a tape recorder to it.
F4 – responsible for the front right fog lamp. And can power the car's music.
As you can see, the question about the radio has the same problem as the question - which fuse is responsible for the cigarette lighter of the VAZ 2110.