At the beginning of 2016, AVTOVAZ showed a new 1.8-liter engine with a power of 122 hp. with index VAZ-21179. At first this engine was installed on the Lada XRAY, and then it appeared under the hood of the Lada Vesta sedan. Let's consider its characteristics, features and reviews from the owners of this power unit.
Technical characteristics of the VAZ 21179 engine
Comparison table of Lada Vesta and XRAY engines:
| Engine model | VAZ 21129 | HR16DE/H4M | VAZ 21179 |
| Symbol | 1.6 l, 16 cl | 1.8 l, 16 cl | |
| Type | Petrol, 4-cylinder, in-line | ||
| Working volume, l (cm3) | 1,6 (1596) | 1,6 (1596) | 1,8 (1774) |
| Cylinder diameter, mm | 82 | 78 | 82 |
| Piston stroke, mm | 75,6 | 83,6 | 84 |
| Compression ratio | 10,5 | 10,7 | 10,3 |
| Number of camshafts | 2 | ||
| Number of valves per cylinder | 4 | ||
| Timing drive type | Toothed belt | Chain | Toothed belt |
| When the timing belt breaks | Valve bending (until 08/15/18) | — | Valve bend |
| Rated net power, kW/hp. (at crankshaft rotation speed, min-1) | 75/106 (5500) | 81/110 (5800) | 90/122 (6000) |
| Maximum net torque, Nm (at crankshaft speed, min-1) | 148/4200 | 150/4000 | 170/3750 |
| Minimum crankshaft rotation speed at idle, min-1 | 840 | 675-725 | 840 |
| Weight, kg | 92,5 | n.d. | 109,7 |
| Ignition system | Electronic, contactless, microprocessor controlled | ||
| Cylinder operating order | 1-3-4-2 | ||
| Supply system | Multiport fuel injection | ||
| Fuel | Unleaded gasoline with octane number 95* | ||
| Availability of neutralizer | Eat | ||
| Toxicity standards | Euro 5 | ||
| Oil consumption depending on fuel consumed, % | 0,3 | 0,3 | |
| Oil volume in the lubrication system of an engine with a cast (light-alloy) sump (manual transmission), l | 4,1 | 4,7 | 4,1 |
| Engine oil quality class according to API* | SL, SM or SN | ||
| Engine oil viscosity grade according to SAE* | see motor oil | see motor oil | see motor oil |
| Resource, km | 200 000 | ||
Belt life:
- Timing belt - 180 thousand km.
- Drive belt for auxiliary units - 90 thousand km.
Causes of problems and solutions
In the very first Vesta and X-Ray models that came off the assembly line in 2016, motor 21179 has been in use for less than two years. At this stage, only two problems have been identified that are unique to this modification:
- increased oil consumption - insufficient quality of valves made in China, replacement with original Mahle parts is necessary;
- wear of the crankshaft and liners - poor lubrication due to manufacturer defects; replacement of the original yokes with versions of previous engines with a small groove and main bearing liners with a 180-degree groove is required.
Fuel rail
Other malfunctions are similar to 16 valve internal combustion engines of previous generations.
Peculiarities
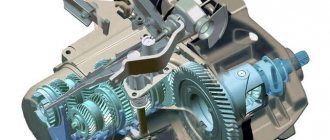
The first AVTOVAZ engine with a volume of 1.8 liters is built on the basis of the previous VAZ-21127/21129 engine (volume of 1.6 liters). The working volume was increased by increasing the piston stroke from 75.6 to 84.0 mm. For the first time, a VAZ (Variable Valve Timing) system, a phase shifter or “phaser” began to be used on a VAZ engine. It changes the position at which the intake valves begin to open depending on engine speed and load. This ensures maximum air filling of the engine and allows for a more even distribution of torque depending on the speed.
When assembling the engine the following are used:
- Lightweight valves are from Mahle.
- Pump from GMB (increased performance and service life).
- GMB oil pump (high performance).
- Automatic toothed belt tensioner from INA.
- Lightweight connecting rod and piston group - manufactured by Federal Mogul.
- The fuel rail is from Continental.
- Catcollector from the Russian company Ecoalliance.
- Camshafts made in South Korea by Toyota Tsusho.
What has been improved:
- Cylinder block with additional lubrication channels
- The crankshaft has an increased crank radius and other counterweights.
- The diameters of the crankshaft connecting rod journals were reduced from 47.8 to 43 mm (reducing mechanical losses).
- Oil channels with drilling from neck to neck (reduced cost, less chips left).
- A graphite coating is applied to the piston skirt; the shape of the skirt is adjusted to increase the contact patch.
- The rings are the same, only the oil scraper rings are chrome plated.
- Reducing the length of the connecting rod from 133 to 128 mm.
- Main bearings with an oil distribution groove of variable cross-section are installed (to reduce oil consumption).
- Camshafts are hollow inside (lighter).
- Instead of a soft one, a metal head gasket is used (cylinder deformation has dropped to 25 microns).
- and etc.
Maintenance and repair of the 1.8-liter engine is less convenient than that of previous VAZ 1.6-liter power units. The designers did not provide a simple mechanism for fixing the crankshaft when setting the marks. The absence of marks on the pulleys, as well as fixing the camshafts, requires special equipment. And to replace the timing belt on a VAZ 21179, you will need to disassemble almost half the engine. More details about this in the video:
Another review of the VAZ 21179 engine:
Also see the process of assembling and testing the VAZ 21179 engine.
Reliability, weaknesses, maintainability
Reliability
The issue of reliability of the VAZ-21179 has always caused controversy among car owners. It was not possible to reach a common opinion.
The manufacturer has made several attempts to increase the reliability of the internal combustion engine. Unfortunately, they did not lead to the expected result. As noted, the main problem with this engine was high oil consumption. The main ways to solve this problem were chosen:
- changing the valve timing control calibration;
- contacting valve suppliers to improve the quality of supplied products;
- changes in the manufacturing technology of valve stem seals;
- replacing 5W30 oil with a more viscous one;
- changing the design of the oil deflector.
A huge amount of work has been done in these areas, but has yielded virtually no results. Car enthusiasts write about this in their comments on forums. So, Xotab_555 o. And such reviews are not isolated.
At the same time, it is noted that some engines lasted 300-350 thousand km without breakdowns or deviations in oil consumption. But, judging by the reviews, this applies to those engines that have undergone a major overhaul with the replacement of the piston group and boring of the cylinders.
The general conclusion is not comforting - the reliability of the VAZ-21179 engine is extremely low.
Weak spots
There are not so many of them, but they are significant. Increased oil consumption has already been mentioned. Another problem that often occurs in the lubrication system is the oil pump pressure relief valve jamming in the open position.
The main reason for the phenomenon is contamination of the working surface with combustion products and the use of contaminated oil.
Oil leaks through seals. Eliminated by replacing seals or gaskets. Sometimes it's enough just to tighten them a little more.
The occurrence of knocking noises when the engine is not warmed up. In most cases, the “authors” are hydraulic compensators. This is not fatal, but in this case it would not be superfluous to have the engine diagnosed at a specialized service station - there are many reasons for the appearance of knocking noises.
The electrics of the unit also cause a lot of complaints. Particularly annoying is the regular appearance of the “Check Engine” icon on the dashboard. Often, immediate computer diagnostics of the engine in this case does not detect any deviations in the operation of the engine systems.
Low quality of parts supplied for assembly by importers, especially from China.
Other malfunctions that sometimes occur in the unit are not critical.
Reviews about engine 21179
The plant positions the new VAZ-21179 power unit as a modern engine with good dynamic performance. The new engine is in many ways similar to 21129, which leaves owners with a mostly positive impression. The near future will show what the power unit of the VAZ-21179 will turn out to be in practice.
Leave your feedback about the VAZ-21179 engine, and also take part in the survey. Let us remind you that an AVTOVAZ specialist spoke about the new VAZ engines and the features of their torque in one of the issues of “Okay Mechanics”.
Keywords: Lada Vesta engine | lada xray engine
1 0 0 0 2 0
Share on social networks:
Maintenance
The actual life of the internal combustion engine is still unknown due to the short service life of the first cars that rolled off the assembly line in 2016. However, to increase it, engine 21179 should be serviced according to the regulations below:
- 10,000 km means changing the filter/oil;
- twice as long, the alternator belt runs 30,000 km;
- after 45,000 km, change hoses/fittings and antifreeze;
- spark plugs and batteries are enough for 60,000 km;
- About 180,000 the original timing belt passes.
For 2022, the internal combustion engine device is considered the most advanced in the AvtoVAZ manufacturer’s line. In practice, his project had been considered since 2006, but was constantly postponed until the technical, economic and market situation in the Russian Federation finally developed favorably. That is, AvtoVAZ in this project prioritized the power output of the engine, and not economical fuel consumption, as was usually the case before.
History of origin
Motor 21179 was already in the minds of the engineer much earlier than you can imagine. Even at the end of the USSR, developers began to think about the Lada C project and its power units. Even then, engineers “knew” this motor by its features and power characteristics. But the difficult economic situation of that time and the collapse of the USSR forced the engineers to completely forget the Lada-Ts project.
And now, after a long time, when Boo Anderson comes to the post of general manager of AvtoVAZ, the project is raised and developed again.
The main task was to create an engine with good low-end torque, which AvtoVAZ lacked for a confident, comfortable ride. “Tractor” 8-cl engines have long since become obsolete, but the new 16-cl engines had a more “sporty” character. The situation was corrected by the then 21127 engine, now 21129, which is installed on Vesta, Xray, and other AvtoVAZ models. Due to the intake receiver with variable geometry installed on it, the torque from the bottom began much earlier, unlike the Prioromotor (21126), and its shelf was much further, right up to the cutoff. But with the start of production of a sedan with a larger mass - the Vesta, and the Xray hatchback - the need for low-end engines reappeared.
The engine was run in and tested for a long time. As a result, during the testing process it turned out that the rings were already stuck at 4t.km., as a result, the heat zone was increased and the problem disappeared.
Nissan HR16DE engine with 110 hp power. It copes well with its task on front-wheel drive. But if you have all-wheel drive, it will strain, get hot, eat a lot and not drive.
Another factor in the creation of the 21179 motor is economics and politics. Because the Nissan engine, although it is assembled here, still belongs to Nissan. And in the event of an unfavorable economic situation, an increase in exchange rates, the cost of its production and sale may simply be unprofitable.
Start of production of motor 21179
Back in 2014, there were rumors about the possible production of a 1.8 liter engine with phase shifters. And yet it became a reality. Previously, OPP and its subsidiary Super-Auto were already engaged in the construction and installation of a 1.8 liter engine with index 21128, which was installed in Priora Sport. But that engine did not have a special resource.
Operating conditions and factors affecting oil consumption
Exceeding the engine fluid consumption rate should alert the car owner. Lubricant consumption may increase in engines with significant wear. In any case, engine oil consumption must be periodically monitored. Insufficient mixture in the lubrication system leads to malfunctions, which are usually followed by the need for expensive repairs.
Lubricant consumption depends on several aggregate indicators:
- characteristics of the condition of the internal combustion engine (this includes not only age, power, cylinder displacement and degree of wear, but also the climatic conditions in which it is operated, timely technical inspection and a number of other factors);
- filter condition (clogged or damaged will increase flow);
- type of internal combustion engine design (oil consumption depends on the type of fuel resource and the method of its supply);
- technical characteristics and quality indicators of motor fluid.
The reason for the high consumption of engine oil in the engine may be due to operating conditions, increased load, external unfavorable factors and excessive levels of lubricant in the system.
Install crankshaft
Install and secure the cylinder block on a stand (electric or manual hoist, stand for disassembling and assembling units).
Select sets of main and connecting rod bearing shells according to tables 9 and 10, respectively.
Sets of main and connecting rod bearing shells for the repair crankshaft should be selected according to the amount of reduction in the diameter of the main and connecting rod journals.
The reduction amount is marked on the first cheek of the crankshaft (for example, K 0.25; W 0.50). The size marking of the set of inserts is applied on the packaging. In addition, on the repair size liners, the repair reduction value is marked on the outer surface (-0.25; -0.50; -0.75; -1.00).
Lubricate the main and connecting rod bearing shells, thrust half rings, as well as the main and connecting rod journals of the crankshaft with engine oil (motor oil).
Place the shells in the main bearing sockets of the block. Install the liners with grooves on the cylinder block in the bed of the main bearings, and the liners without grooves - in the main bearing caps.
Place the crankshaft in the main bearings and insert two thrust half-rings into the sockets of the middle support.
WARNING
. Install the thrust half-rings with the grooves to the thrust surfaces of the crankshaft. Install a steel-aluminum half-ring (part 2101-1005183) on the timing drive side, and a cermet half-ring (yellow, part 2106-1005183) on the flywheel side.
Install the main bearing caps according to the marks. The marks on the covers should be located on the side where the water pump is installed.
Install and tighten the main bearing cap bolts. The tightening torque of the fastening bolts is 70…86 N∙m (7.0…8.6 kgf∙m) (replaceable head 17, wrench, extension, torque wrench).
Check crankshaft rotation. The shaft should rotate freely and without jamming by hand. If the rotation is tight or there are jams, it is necessary to remove the crankshaft and repeat the operation to select a set of bearings.
Check the axial clearance of the crankshaft. Install rack 2 with indicator 3 on cylinder block 1, Figure 51. Place the measuring rod of the indicator on the crankshaft flange 4, as shown in Figure 48, and set the indicator scale to zero. Moving the crankshaft using screwdrivers 5, measure the axial clearance of shaft 4.
The axial clearance of the crankshaft should be within 0.06...0.26 mm. If the axial gap is more than 0.26 mm, adjust the gap by replacing the normal thrust half-rings with half-rings increased by 0.127 mm. Enlarged steel-aluminum half-rings are marked “P” on a steel base. The enlarged metal-ceramic half-rings are not marked and have a thickness of 2.44...2.49 mm (ShM-PV-8 tripod, ICh-10 indicator, 2 flat-head screwdrivers, MK 25-1 micrometer).
Install the intake module
Install the lower crankcase ventilation hose onto the cylinder head cover pipe and secure with a clamp (pliers).
Install new seals for 5 gas channels on module 4, Figure 8, inlet.
Insert the lower crankcase ventilation hose into the hole in the intake module.
Install the intake module to the cylinder head. Screw in and tighten two bolts 7 and three nuts 8 securing the intake module with washers.
The tightening torque of bolts and nuts is 21…26 N∙m (2.1…2.6 kgf∙m) (replaceable head 13, wrench, extension, torque wrench).
Install two washers 2, screw in and tighten the two upper nuts 1 securing the intake module to the cylinder head. The tightening torque of the nuts is 3…5 N∙m (0.3…0.5 kgf∙m) (replaceable head 10, wrench, extension, torque wrench).
Attach the fastening elements of the injector wiring harness to the intake module.
Install a new seal 3 of the throttle pipe.
Install the throttle pipe 3, Figure 7, on the intake module and secure it with three nuts 1 with washers 2. The tightening torque of the intake module mounting nuts is 5…8 N∙m (0.5…0.8 kgf∙m) (replaceable head 10, knob , extension cord, torque wrench).
Install tube 2, Figure 6, with oil level indicator 1 assembly and secure with screw 3 with washer 4 (Phillips screwdriver).
Engine tuning
As standard for the AvtoVAZ manufacturer, engine 21179 has a potential of at least 150 hp. With. However, tuning is complicated by the following factors:
- M86 control unit - it is very difficult to change the internal combustion engine settings online;
- exhaust tract - the diameter of the manifold is narrowed for Euro-5 standards, it is almost impossible to install a “spider”.
Electronic throttle
Motor 21179 is initially already a factory tuning of versions 21127 and 21129, so without the ability to configure controllers, rarely anyone manages to upgrade it on their own.
Thus, the 21179 engine for 2022 is the best version of the 16-valve power drive with a DOHC two-shaft design. All components have undergone changes, with the exception of control controllers and spark plugs; spare parts from foreign companies are widely used, which is not entirely correct at the time of EU sanctions against Russia.
Cylinder head
The cylinder head is made from aluminum, just like the base engine. But there is a significant difference - in the cylinder head of the VAZ-21179 there is a system of additional oil channels to the phase shifter control valve, originating from an additional oil supply point from the block between the first two cylinders. In this case, the valve acts as a solenoid that regulates the flow of lubricant into the chambers of the VVT system. The lubrication system has been improved - in the intake camshaft support, which had to be expanded for this purpose, there are two oil intake channels and one outlet. These channels are connected through an electrovalve in a certain way to the chambers of the phase shifter, which rotates under their influence. Possible oil leakage through the camshaft seals is resolved by installing drain holes in the front supports.
photo of VAZ-21179 block head
Sliding bearings, their types and role in the operation of internal combustion engines.
Main and connecting rod bearings are two types of plain bearings. They are produced using the same technology and differ from each other only in the inner diameter (for connecting rod liners this diameter is smaller).
The main task of the liners is to convert translational movements (up and down) into rotational ones and ensure uninterrupted operation of the crankshaft so that it does not wear out prematurely. It is for these purposes that the liners are installed under a strictly defined gap, in which a strictly specified oil pressure is maintained.
If this gap increases, the engine oil pressure in it becomes less, which means that the journals of the gas distribution mechanism, crankshaft, and other important components wear out much faster. Needless to say, too much pressure (reduced clearance) also does not bring anything positive, since it creates additional obstacles in the operation of the crankshaft, it can begin to jam
That is why it is so important to control this gap, which is impossible without using a torque wrench in repair work, knowledge of the necessary parameters that are prescribed by the manufacturer in the technical literature on engine repair, as well as observing the tightening torque of the main and connecting rod bearings. By the way, the tightening force (torque) of the connecting rod and main bearing cap bolts is different
Please note that the given standards are relevant only when using new sets of parts, since the assembly/disassembly of a previously used unit due to its wear and tear cannot guarantee compliance with the required clearances. Alternatively, in this situation, when tightening the bolts, you can focus on the upper limit of the recommended torque, or you can use special repair bushings with four different sizes, differing from each other by 0.25 mm, provided that the crankshaft is ground until the minimum gap between rubbing elements will not be 0.025/0.05/0.075/0.1/0.125 (depending on the existing gap and the repair product used)
Examples of specific tightening torques for connecting rod and main bearing cap bolts for some VAZ family vehicles.
| Automobile model | Bed cover tightening torque, N*m (kgf.m.) | Tightening torque of connecting rod bearings, N*m (kgf.m.) |
| VAZ 2108 | 69,0–84,0 (6,9–8,4) | 44,0–54,0 (4,4–5,4) |
| VAZ 2106 | 68,31–84,38 (6,97–8,61) | 43,32–53,51 (4,42–5,4) |
| Lada Priora | 68,31-84,38 (6,97-8,61) | 43,3-53,5 (4,42-5,46) |
Cylinder block
The material used for the cylinder block of the 21179 engine is traditional - cast iron. But the filling is not traditional, it is new: - in the cooling system - additional channels of the original cross-section between the second and third cylinders, to increase the efficiency of the system in order to increase the service life of the piston rings, which had high wear due to overheating of the inter-cylinder walls; - in the lubrication system - an additional oil channel, communicating with the main one, between the first two cylinders, for supplying oil in the cylinder head to the automatic phase distribution regulator, phase shifter;
photo of VAZ-21179 cylinder block
Oil consumption for Lada Priora 126 engine
Lavr ML-202 for starters
To be honest, it's bullshit, it doesn't help.
Something broke, but it doesn’t look like oil in the cop.
looks like an over-rich mixture. loose light coating from oil
began . sofa decokers pulled up..
Decarbonization is very similar to the magic of Suprotec
The magic is simple: either it will get better, or nothing will change. It won't get any worse anyway. Well, if you don’t worry too much about the 280 rubles spent. and half an hour of time.
that this is a standard oil burner for a 126 engine
.overhaul the engine at 100 thousand.
Dmitriy_NMSK
The 126th engine normally pumps 15 atm (kg) minimum compression. Oil and can reach 18 atm, the well-known accordion how at first the compression meters were turned off on prior engines.
Added after 2 minutes 32 seconds:
Was there burnt oil on the spark plugs? You can shine a flashlight on the pistons, into the spark plug holes, and look at the carbon deposits.
Was there burnt oil on the spark plugs?
cruel. rebuild the engine at 100 thousand.
I invested mine at 80k and sharpened the block. oil consumed 2 liters per 1000
I found a Jonessway screw-in compression tester at home. This was the first pleasant surprise. The second surprise is much more unexpected. Having used the tool for its intended purpose, interesting numbers emerged. The engine pumped 16.5-16.2-16.2-17.1 kg/cm2
I had 16-16-16-17 and was eating oil like crazy. the pistons were hanging around a lot, scuffing, etc. had to invest
Source
Hidden design reserves
The capabilities of the 179th engine are not exhausted by today's performance. If there is need and funding, the following forcing options are possible:
- Installation of the 2nd “phaser”. The main advantage of this solution is the improvement of environmental parameters; the increase in power is not very significant. Moreover, the option is not easy and quite expensive.
- An increase in power can be achieved by lengthening the exhaust channels of the catalytic collector (the so-called “pants”). With short pipes in front of the “barrel”, turbulence of the working medium is formed, caused by pressure surges as a result of the exhaust. With the removal of the neutralizer from the BC, the nature of the movement of gases approaches laminar, power losses are reduced, but at the same time the emission purification deteriorates. However, with a compromise solution, this option is quite acceptable, and its implementation is associated only with the rearrangement of the power unit. And deteriorated environmental performance can be compensated by the VVT system.
- Thanks to the easily changeable design of the cam shafts, you can experiment with debugging all timing parameters.
- Finally, we can return to a two-mode intake system: long path at low speeds and short path at high speeds. As mentioned above, a compromise option has now been implemented - the average length of the intake tract.
XRAY and Vesta cars with a 1.8 engine have been in use for less than a year, so no systemic deficiencies have yet been noticed in these engines. As they say, the flight is normal. In any case, AvtoVAZ design services are able to quickly eliminate possible shortcomings so that the 21179 engine does not disappoint the expectations of car enthusiasts.
Tuning a car VAZ 2110, 2111, 2112 Ten - Camshaft
Remove the camshaft gear pulley (see Composite camshaft drive pulley for an eight-valve engine).
To avoid losing the pulley key, remove it from the camshaft groove.
Using a 10mm wrench, unscrew the nut securing the rear timing belt cover.
Using a 10mm wrench, unscrew the two nuts securing the throttle cable bracket to the receiver...
...and remove the bracket.
Using a Phillips screwdriver, loosen the clamps securing the two crankcase ventilation outlet hoses and remove the hoses from the valve cover fittings.
Using a Phillips screwdriver, loosen the clamp securing the crankcase ventilation supply hose and remove the hose.
Using a 10mm wrench, unscrew the two nuts securing the valve cover.
Remove the valve cover.
Rubber sealing bushings are installed in the valve cover holes.
Remove the valve cover gasket.
Using a 10mm wrench, unscrew the two nuts securing the ends of the ground wires to the studs of the cylinder head plug and remove the wires from the studs.
Use a 10mm wrench to unscrew the two nuts...
...and one bolt securing the plug.
...and its O-ring.
Using a “13” wrench, evenly in several steps (until the pressure of the valve springs is removed), unscrew the ten nuts securing the camshaft bearing housings.
Remove the front one from the studs...
...and the rear camshaft bearing housings.
Moving the rear timing belt cover slightly away from the cylinder head, remove the camshaft.
Remove the camshaft oil seal.
We install the tuning camshaft in the following sequence.
We clean the mating surfaces of the cylinder head and bearing housings from sealant and oil.
Lubricate the bearing journals and camshaft cams with engine oil. We place the shaft in the cylinder head supports so that the cams of the first cylinder are directed upward (the figure shows the position of the cams of the first cylinder when the camshaft is placed in the cylinder head supports).
On the surfaces of the cylinder head that interface with the bearing housings in the area of the outer supports, apply a thin layer of sealant (arrows).
We install the bearing housings and tighten the nuts securing them in two steps.
Pre-tighten the nuts in the sequence shown in the figure until the surfaces of the bearing housings touch the cylinder head.
In this case, it is necessary to ensure that the installation sleeves of the housings fit freely into their sockets. We finally tighten the nuts to a torque of 21.6 N.m (2.2 kgf.m) in the same sequence.
After tightening the nuts, carefully remove any remaining sealant.
After lubricating the working edge of the new oil seal with engine oil, press it into place with a suitable piece of pipe.
We install the camshaft timing belt and timing belt. (See Composite camshaft pulley for eight-valve engine).
Turn the crankshaft clockwise until the timing marks on the camshaft sprocket and the rear timing belt cover align.
Then we turn the crankshaft another 40-50° (2.5-3 teeth on the camshaft pulley).
In this position of the shafts, we use a set of feeler gauges to check the gaps at the first...
... and the third camshaft cam.
The clearance between the camshaft lobes and the washers should be 0.20 mm for the intake valves and 0.35 mm for the exhaust valves. The clearance tolerance for all jaws is ±0.05 mm.
If the gap differs from the norm, then install a device for adjusting the valves on the studs of the camshaft bearing housings.
We introduce the “fang” of the device between the cam and the pusher.
We rotate the pusher so that the slot in its upper part faces forward (along the direction of the car).
By pressing the lever of the device, we recess the pusher with the “fang”...
...and install a clamp between the edge of the pusher and the camshaft, which holds the pusher in the lower position.
Move the lever of the device to the upper position.
Using tweezers, pry the adjusting washer through the pusher slot and remove it.
If you do not have a device for adjusting the valves, you can use two screwdrivers.
Using a powerful screwdriver, leaning on the cam, press the pusher down. By inserting the edge of another screwdriver (with a blade at least 10 mm wide) between the edge of the pusher and the camshaft, we fix the pusher.
Use tweezers to remove the adjusting washer.
Install sensors
Install phase sensor 2, Figure 13, and secure it with bolt 1. The tightening torque of the fastening bolt is 4…8 N∙m (0.4…0.8 kgf∙m) (replaceable Torx E8 head, wrench, extension, torque wrench).
Install valve 2, Figure 12, for adjusting the position of the camshaft and secure with bolt 1. The tightening torque of the fastening bolt is 5…8 N∙m (0.5…0.8 kgf∙m) (replaceable head 8, knob, extension, torque wrench) .
Install sensor 1, Figure 11, of the oil pressure warning lamp. The tightening torque of the sensor is 25…30 N∙m (2.5…3.0 kgf∙m) (replaceable high head 21, wrench, torque wrench).
Install detonation sensor 5, Figure 10, and secure with bolt 4. The tightening torque of the fastening bolt is 15…24 N∙m (1.5…2.4 kgf∙m) (replaceable head 13, wrench, extension, torque wrench).
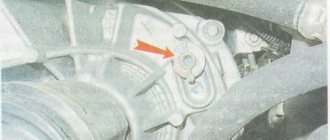
Water pump
The VAZ-21179 pump is produced by the same Korean company GMB. The water pump is equipped with high-quality bearings, high-quality seals and also has enhanced characteristics, since by increasing the engine power, it is inevitably necessary to improve its cooling system.
photo water pump VAZ-21179
Site materials - https://vestaxray.ru