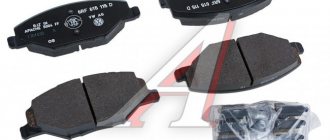
The safety of the people in the car depends on the correct operation of the headlights in the Volkswagen Polo. The luminous flux helps the driver to detect holes and obstacles on the road in bad weather, and helps the car confidently move through unfamiliar terrain in the dark.
The topic of our review is the operation of the lighting fixtures of this German car model. Let's also look at what lamps are installed in the VW Polo and tell you about the procedure for replacing them.
How to remove the headlight on a Polo sedan
Next, unscrew the hardware on top, 3 bolts, white circles in the photo:
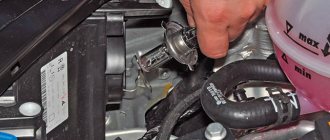
Replacing the low or high beam lamp, as well as removing the front headlight unit on a Volkswagen POLO
In general, I can advise anyone who needs it, he glues everything that he can get his hands on.: Then we unscrew 15 bolts from the wings and bumper. It took me an hour to remove the lamp itself.
Home» List of forums» Technical section on the Volkswagen Polo sedan (year of manufacture - present day)» Electrical equipment…
It looked like this: It took me an hour to pull out the lamp itself. Use a screwdriver to pry and pull, pulling out the bumper a little.
After installation, check the operation of the headlights and their adjustment. Turn the high beam adjustment servomotor in the bayonet lock and release the spherical head by pulling it out of the adjustment segment on the headlight by the body. In general, there are two of them.
I marked with a cross where there is no need to try to get into it with a screwdriver in order to bend something there.
Just grab the edges with both hands, the right one in the oval area, the letter P, the left one on the other side and pull sharply, strongly, without fear of breaking it. About the third time I pulled out. Pull. Well, that’s it. Here you can see the boards under the wheels. So, now for part 2, removing the TV. I’ll tell you right away, it’s easy to remove, I did everything in one.
There is no need to disconnect the radiators; after removal they will hang, and that’s all.
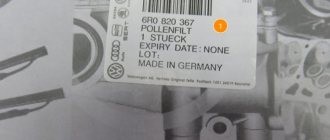
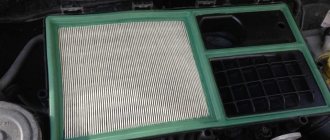
replacing the cabin filter on a Volkswagen Polo sedan
But I would put boards under the TV, you never know, so that it is level with how it is screwed on. Immediately figure out how you will hold the hood, because then the time will come and the spacer will have to be removed. We unscrew the 2nd bumper guides, they have 4 bolts each, and for the best you need to remember how they stood, because later, when you install the bumper, they will be a pain in the ass... the gaps will depend on how you screwed them in, I did 6 times here and there the bumper pulled and twisted them: Next, unscrew the “hardware” on top, 3 bolts, white circles in the photo: Next, remove the left one and put it aside, and on the right there is a hood cable, there is a small “box” with a connection, open it, and disconnect cable: Well, everything is clear here. Next, unscrew 2 bolts, on both sides, from the TV, in the area of the side members.
Next we unscrew the amplifier, or whatever it is, from the side members, 3 bolts each, in my opinion. You can see them in the previous photo.
Similar questions
Arrows So, then our TV is supported on two guides, which are attached to the radiators. If the headlight glass is damaged or the reflector has become dull, the headlight assembly must be replaced. The lens and headlight mirror are glued together and cannot be replaced individually.
After installing a new headlight, it needs to be adjusted. To do this, carefully unscrew the plastic screws from the mount until they can be removed from the mounting hole. Disconnect the bracket from the turn signal lamp in the engine compartment, remove it from the headlight cutout and disconnect the contact.
Remove the two front grille screws in the turn signal slots on both sides. Unscrew the 5 screws of the front grille; 3 screws in the radiator area; one screw each on the left and right side of the front grille and remove it.
Disconnect the headlight and main light pins. Of course, I put the PZ back, but it is clearly not in the standard grooves. I'll be removing the headlights completely this weekend.
Volkswagen Polo Sedan Electrical equipment – DMCUNMOR.RU
Who knows another way? Everything turned out to be much simpler and more prosaic. Bend the rubber cover from the headlight grooves.
We disconnect the plug from the lamp - the lamp remains pressed PZ to the headlight housing. It will be difficult, but it really can be done.
Using the upper edge of the PZ, we pull it towards us and down - the PZ will be held in its lower grooves. We put the PZ in place. Puts a leather cover on the headlight.
How to remove a bumper or headlight on a Volkswagen Polo sedan
My main mistake was that after several attempts I started shooting in a different way, assuming that it would not be possible to remove the lamp without disconnecting the plug. Unfortunately, it is difficult to take clear photographs in this position.
Fog lights! Help =) | Topic author: Drazan
Connection kit for fog lights for VW Polo sedan (from 2010 onwards)
to date), HB4 https://shop.polosedan.ru/index.php? route=product/prod. I want to buy it, but I don’t have enough money for the switch((((Has anyone installed it themselves and where did they put the wires, what button or toggle switch did they install?
Alexey (Cori) I didn’t install it myself, I bought it with foglights, it’s a trend. The power button is located on the panel, as I understand it, in place of the button for turning on the heated windshield.
Sergey (Achyutanand) can you have a photo of the button =)
Alexey (Cori) Sergey, who is to the right of the emergency gang.
Sergey (Achyutanand) Alexey, thank you! We need to try to find such a button and connect the fog lights!
Pasha (Ignace) Sergey, when you finish the installation, write what happened and take a photo of the car, please, I also want to get dirty in the near future, do you have Comfortline?
Sergey (Achyutanand) Pasha, no, I have a trend =) Right now I’ll read more on the forums and get confused! I’ll be sure to write back and post photos of the step-by-step installation!
Pasha (Ignace) Sergey, ok
Anton (Janka) Sergey, I support Pavel, I will also wait for photos) and descriptions
Alexey (Cori) This is what it looks like for me.
Pasha (Ignace) Alexey, did you initially have fog lights from the factory? or did you install it yourself?
Alexey (Cori) Pasha, I bought it through resellers, already with fog lights.
Pasha (Ignace) Alexey, do you have the highline or comfortline equipment? We’re just talking about a car that doesn’t have foglights, but the person installs them himself, and if you had them installed from the factory, then that doesn’t mean anything =)
Alexey (Cori) Pasha, I have a trend, I bought them in 2010, then fog lights were not installed on them.
Pasha (Ignace) Alexey, ahh well then it’s cool) it’s just a pity you didn’t put them on
Vertical and horizontal headlight adjustments are made using white controls
How to remove a headlight on a Volkswagen Polo sedan video | review, year
Transparent and carbon options for such protection are available. How to improve the headlights of a Polo Sedan As a rule, VW Polo Sedan owners do not have serious complaints about the operation of lighting fixtures, but something can always be improved. Quite often, owners of a Polo sedan install headlights from a Polo hatchback.
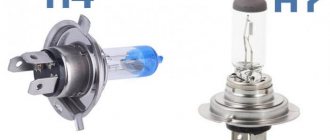
The advantages of hatchback headlights are obvious: When the high beam is turned on, the low beam continues to work. The designs for how to remove the headlight on a Volkswagen Polo are the same, so you won’t need to redo anything, unlike the wiring, which will have to be adjusted. This is due to the fact that in H4 lamps the low beam filament is half covered by a protective screen, while in H7 lamps there is no screen in the headlights of the hatch and all the light falls on the reflector.
This is especially noticeable in rainy weather, when with the stock ones you can no longer see anything, but with the Hatch ones, at least something. Ro...maN https: The quality of lighting will improve, but such a replacement requires disassembling the headlight. The VW Polo headlight is, as a rule, non-separable, and to open it, it will require exposure to temperature.
You can heat the headlight for disassembly in a heat chamber, a conventional oven, or using a technical hair dryer.
How to remove the headlight on a Polo sedan
It is important that during heating, direct heat flows do not hit the glass surface and cause damage. The disadvantage of such headlights is low brightness, so it is better to replace LEDs with more powerful ones. The connection connector in this case is the same as for the Polo hatchback, so for the sedan you will have to rearrange the wiring. Taiwanese Dectane headlights can look quite impressive on a Polo sedan. If the owner of a Polo sedan expresses a desire to install the highest quality and reliable devices on the car, he should pay attention to the headlights for gas-discharge lamps, which are intended for use on the Polo GTI.
At the same time, you should be prepared for the fact that this is also the most expensive option for external lighting. In addition to such headlights, you will need to install auto-corrector and change the comfort control unit.
The most expensive option for lighting devices is headlights for gas-discharge lamps from Polo GTI. I installed the following on the car, H7 LED lamps for low beam. After installing the lamps, the craftsmen adjusted the low beam, placed the car in front of the wall, and adjusted the light beam there.
They've been on for a year and a half now, but I mostly only drive in the city and they're always on. I don’t know what k means, maybe it’s the power of light? Checking the serviceability of the headlight elements To check the functionality of the headlight, you should use the electrical circuit diagram of the corresponding headlight.
The diagram of the right headlight unit is shown in the figure: In the diagram: According to this diagram, you can ring each lamp from the connector side. To do this, you can use a multimeter switched to the Ohm resistance measurement position.
If the device shows infinite resistance, the corresponding electric lamp must be replaced. The diagram of the left headlight unit is shown in the figure: On the secondary market, the original headlight can be purchased from rubles. Recommendations for operating headlights on Volkswagen Polo cars While operating a car, to prevent headlight failure and maintain their performance characteristics, you should: Tired of paying fines?
There is an exit! Forget about fines from cameras!
More details at the link. Sharply and strongly, chick In the photo he indicated where to grab with his hands and where to pull, with arrows Arrows Next, two at a time, how to remove the headlight on a Volkswagen Polo under the headlights, Marked with squares A, B. Use a screwdriver to pry and pull, pulling out the bumper a little. Then you need to pull the radiator grille out of the latches. I marked with a cross where there is no need to try to get into it with a screwdriver in order to bend something there. Just grab the edges with both hands, the right one in the oval area, the letter P, the left one on the other side and pull sharply, strongly, without fear of breaking it.
Installing new door trim
When the old upholstery is removed, it is left for cutting out a fragment when making an insert in the door. Markings are made on the part: cutting lines, places for standard holes for handles, fasteners, music speakers.
If the casing does not require replacement, then cutting out a new part according to the pattern is not provided.
Instructions for installing the panel on the driver's door:
- The cable for opening the door fragment lock is connected.
- Electrical wiring harnesses are secured.
- Connectors are connected to the control panel, power windows and mirrors.
- The battery terminal is connected.
- The functionality of all electrical mechanisms is checked.
When installing the panel, it is important to make sure that the latches match the seat. The clips snap into place by simply pressing in the middle
At the end, the handle is mounted with two screws from the bottom and top.
Replacing the rear light of a Polo sedan
In order to remove the rear brake light on a Volkswagen Polo sedan, simply bend back the trunk trim, unscrew the large plastic valve and remove the power connector for the rear light bulbs. By the way, to remove the connector you don’t need to press anything, just pull the red tab. The taillight of a VW Polo car can be easily removed from its seat by hand, and with the lamp removed, it is also easy to change the stop, turn and rear running lights, but this must be done carefully so as not to break the latches on the gray board. To see more clearly how to remove the Polo's taillight and change the bulbs in it, watch the video.
Subscribe
to our channel in
Index.Zen
Even more useful tips in a convenient format
Marking of rear and front side lamps of Volkswagen Polo
Participated in a boring
autumn road accident. As a result, the headlight, or rather the transparent plastic of the lampshade, is broken. 1. Lampshade:
...well, what to do, I decided to look for this plastic, but it wasn’t there, it’s not there separately, at least I didn’t find it. On some VW
, they say, can be found.
I ordered the entire lamp: 6RU945112D
— Rear right lamp
2. Here it is, the lantern of my dreams (c):
To work you need: desire, a warm garage (not the month of May), something flat (for removing fasteners)… Let's go!
3. Never removed the taillights on a VW
. I decided to take a look at what’s what, unfastening a couple of herringbone fasteners to move the trunk trim:
There is just a hole in the casing for manipulating the lantern. Okay, the main thing is now everything is simple and clear.
4. Through this hole we unscrew the fasteners of the lantern itself. It will be like this:
5. Disconnect the power connector. There are no photos because my fingers barely got through. You need to move the connector lock in the direction the car is moving, then remove the connector itself. We take out the flashlight.
6. Having removed the lamp, you need to disconnect the block with the light bulbs in order to place them on the new lamp. Carefully disconnect one from the other. This is what happened.
7. Next, we carry out all the manipulations in reverse order, do not forget to connect the connector. That's all! The car can again “blink” at other road users.
That seems to be all. He described the process itself in as much detail as possible. It took about 20 minutes, out of ignorance, and the procedure itself took 10 minutes, no more. In the absence of Polovodami, a repair book may be useful to someone.
Special thanks to focusnick29 for the warm garage and tenacious fingers (hello to the connector designers)