Maintaining the required level of brake fluid is necessary for the proper operation of the vehicle's braking system. How much is needed can always be found in the service book, but often car owners are not used to looking into it, but act empirically or look for the answer on the Internet. It is these users that we will try to help figure out the question of how much brake fluid is needed for replacement and which one should be poured.
Brake fluid is the working fluid of the brake system, with its help the force created in the master cylinder is transmitted to the wheel pairs.
If the brake fluid level is below the minimum mark (by the way, this will be indicated by the corresponding icon on the instrument panel - a red circle with waves inside), then you need to top it up. It also doesn’t hurt to check the master brake cylinder and the brake system as a whole, since a decrease in the fluid level may indicate a malfunction or wear of the master cylinder gaskets. As a rule, the brake system of a passenger car contains from 0.55 to 1.0 liters of brake fluid. And its specification can very often be indicated on the body of the expansion tank or its cap.
When checking, do not forget to pay attention to the color of the liquid . The new TJ is transparent with a yellowish tint. During operation, it changes its color and becomes dark, this is mainly due to the accumulation of various impurities. If the fluid has darkened, this may mean that a complete replacement is necessary and simple topping up is not enough.
Experts recommend replacing brake fluid approximately every 2-3 years ; this interval is optimal, because the shelf life of the fluid can vary depending on hygroscopicity and susceptibility to temperature loads. For the brake mechanisms to function properly, the fluid must have a number of properties and also meet a certain standard.
Table of filling volumes
Filling volumes and names of liquids used in the Lada Priora car, according to the instructions of the manufacturer.
| Place for filling the required liquid | Name of infused liquid | Volume of infused liquid (L) |
| Engine crankcase (lubrication system for engine rubbing parts) | Automotive motor oils classified according to SAE 5W-30, 5W-40, 10W-30, 10W-40, 15W-40 | 3,5 |
| Gear box | Automotive transmission oil classified according to SAE 75W-90, 80W-85 | 3,3 |
| Interior heating and engine cooling system | Antifreeze or antifreeze with a freezing point of at least -40 degrees | 7,9 |
| Fuel tank | Gasoline with an octane number of at least AI - 95 | 43 |
| Hydraulic Brake System | DOT-4 brake fluid | 1 |
| Windshield washer reservoir | Special liquid for glass processing that does not freeze in frost (in winter), water (in summer) | 2,2 |
Standard engine mount - article number and price
On Lada Priora with 16 valve engines, four types of airbags are installed:
- The top support is also a guitar;
- Bottom.
- Right (front);
- Left(back);
By the way, engine mounts for Lada Priora are available in several versions. New sample parts have the best performance.
Some car enthusiasts additionally install another cushion attached to the gearbox. The VAZ-2110 with an 8-valve engine was standardly equipped with this element.
Right
The right (upper) front engine mount on the Priora is attached via a bracket to the engine, it is used for:
- Transferring the weight of the power unit to the body;
- Limitations on longitudinal movements of the motor.
Part number – 2110-1001240. In retail stores it costs 300-600 rubles. On sale you can find one pillow (only a rubber part) or assembled with metal stops.
Left
The left one, when viewed in the direction of travel, is the car engine mount, installed between the gearbox and the body, and performs the same functions as the right one. Another name is posterior (lower).
The rubber part of the cushion is identical to that used on the right, catalog number: 2110-1001240. But the fastening of the front and rear parts of the Lada Priora power unit is different, so the spare parts supplied assembled with limiters come as two different parts.
Upper
The upper support of the Priora power unit prevents the lateral movement of the motor. This part is a rod, along the edges of which there are large-diameter holes; rubber cushions are installed in them to dampen vibrations. Because of its shape, the top rod was popularly nicknamed “guitar.” In some repair manuals the part is called a rod.
The upper “guitar” is available in several modifications. A special aluminum frame and improved damping pads used on new parts increase the service life of the unit.
Replacing the upper support (rod) of the Lada Priora engine is easier and therefore faster than replacing other mountings of the power unit of this car.
Lower
The lower engine mount, also known as the right rod, in the Lada Priora is the same as the upper one, these are two identical parts. Therefore, everything that is said about the upper “guitar” is true for her. Sometimes the lower engine mount is called the rear engine mount, which in the Lada Priora spare parts catalog is designated as the left engine mount.
Additional at the checkpoint
Additional support is not provided for the 16-valve Lada Priora engine. But Prior owners often install it themselves. This does not require any modifications; the design of the gearbox housing and body of the Priora is similar to the VAZ-2110.
Its installation makes the engine mount more rigid, jerking when driving in low gears, and “nodding” of the power unit during sudden accelerations and stops stop. But the vibration transmitted to the body increases.
The rear gearbox rod is designated in the catalog number 2110-1001280 and is supplied assembled with a mount. Price – 500–800 rub.
When and what liquid to pour?
As you can see from the table, AvtoVAZ recommends filling in several types of oils and liquids. So let's figure out what liquid to fill and when.
Engine lubrication system
It is recommended to fill the Lada Priora engine with several types of automotive oils according to the SAE (American Association of Engineers) classification. In order to determine what kind of oil to pour into the engine, it is necessary to rely on the air temperature at which the car will be operated. The table below shows the temperature and oil used at a certain temperature.
Oil table depending on air temperature
| Outdoor temperature | SAE oil classification |
| -25 to +35℃ | 5W-40 |
| -25 to +20℃ | 5W-30 |
| -20 to +35℃ | 10W-40 |
| -20 to +30℃ | 10W-30 |
| -15 to +45℃ | 15W-40 |
Based on this table, it is necessary to select the required oil in the Lada Priora according to the degree of viscosity. The manufacturer recommends changing the engine oil no later than 15 thousand km, but it is better to change it at 10 thousand km.
Gear box
The choice of oil for the Lada Priora gearbox is based in the same way as the choice of engine oil on the ambient temperature in which the car will be operated.
Below is a table of transmission oil depending on air temperature.
Table of dependence of transmission oil on air temperature
| Outdoor temperature | SAE oil classification |
| From -26 to +45℃ | 80W-85 |
| -40 to +40℃ | 75W-90 |
AvtoVAZ recommends changing the oil in the gearbox no later than 75 thousand km, but in practice it is better to change the oil after 50 thousand km.
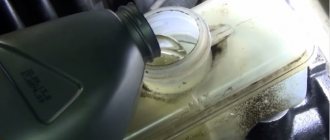
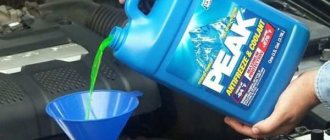
Engine cooling system
The manufacturer recommends adding antifreeze or antifreeze to the engine cooling system. The volume of Priora coolant is 7.9 liters. It should be noted that antifreeze is filled at the Priora plant. Under no circumstances should you ever use water as a coolant, since when the air temperature drops, the cylinder head may defrost with dire consequences and costly repairs.
Fuel tank
The Priora's fuel tank capacity is 43 liters, which is quite enough for an engine capacity of 1.6 liters. AvtoVAZ recommends using only high-octane gasoline, namely AI-95. It should be noted that on a full tank the Priora can travel from 400 to 600 km, depending on driving style.
Hydraulic Brake System
Priora is equipped with a system with hydraulic brakes and ABS. The volume of Priora brake fluid is 1 liter. DOT-4 brake fluid. It is recommended to replace brake fluid every 2-3 years, as brake fluid tends to age.
Windshield washer reservoir
The Lada Priora washer reservoir contains 2.2 liters of special liquid for cleaning the windshield from dirt. It is necessary to use a special liquid that does not freeze down to -40 degrees. During summer time, filling with ordinary water is allowed.
We hope our article was useful to you.
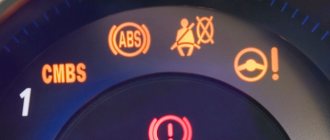
ABS device
The design of the anti-lock braking system of car wheels implies the presence of the following parts and components:
- Speed sensor, acceleration/deceleration.
- Control valve. due to the difference in the density of air and brake fluid, with ABS Lada Priora with abs. This element is located in the brake system line. The control valve is an integral part of the pressure module.
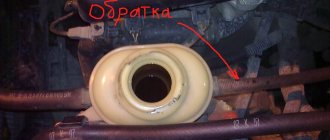
- Anti-lock braking system ECU. The main task of the electrical control unit for the ABS system is to receive signals from the sensors listed above and control the operation of the valves.
In this case, liquid will flow out of the hose. As soon as the liquid stops flowing from the hose, tighten the fitting, and only after that can the assistant release the pedal. We repeat this operation until new brake fluid (lighter than the old one) comes out of the fitting. We remove the hose, wipe the bleeder fitting dry and put a protective cap on it. Remove the protective cap from the brake bleeder fitting of the left front wheel. We put a hose on the fitting, and immerse its free end in a container partially filled with working fluid.
Similarly, we bleed the brake mechanisms of the other circuit.
When pumping, you need to monitor the fluid level in the tank and add fluid if necessary.
After bleeding the hydraulic brakes, bring the fluid level in the reservoir to normal.
How to replace Priora brake fluid?
- What color is the brake fluid for Lada Priora? – 1 answer
To change the brake fluid you need:
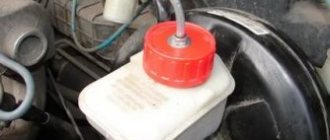
1) Unscrew the cap of the brake master cylinder reservoir and carefully wipe the float.
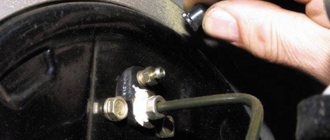
2) Unlock the pressure regulator of the rear brake mechanisms (if the rear wheels are suspended) by placing a screwdriver between the piston and the plate. After replacing the TJ, remove the screwdriver .
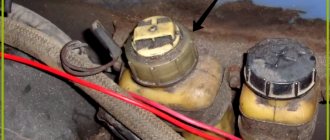
3) Clean the rear right brake air release valve from dust. mechanism and unscrew the cap from the valve.
4) Install a hose (preferably transparent) onto the valve fitting, lower the other end into a clean, empty container.
5) An assistant should sharply press the brake pedal 4-5 times, fixing it at the last press.
6) Unscrew the air outlet valve so that the old fluid flows out. When it stops draining, tighten the valve.
7) Make sure that the brake fluid in the reservoir does not fall below the minimum mark , top up as necessary.
 Do this until clean brake fluid runs, then do the same procedure on the left front brake. mechanism, then in the left rear and then in the right front.
9) Check the brake pedal travel. If there are dips and sinkages, air has entered the system and it needs to be pumped.
10) Reinstall the protective caps and add brake fluid to about.
After servicing or repairing the brake system of a Lada Priora, it is necessary to bleed the hydraulic brakes to remove excess air. I don’t think it’s worth talking about what the consequences may be if you ignore this procedure.
Signs of air getting into the brake system hydraulic drive:
– when you press the pedal once – increased pedal travel, its “softness”;
– with repeated pressing of the pedal - a gradual decrease in the pedal stroke with a simultaneous increase in its “hardness”.
Before bleeding the hydraulic drive, it is necessary to identify and eliminate the cause of depressurization.
Helpful advice.
If pumping a hydraulic drive is associated with the repair of one circuit and the serviceability of another circuit is known, then pumping only the circuit being repaired is permissible.
Sequence of bleeding the brakes:
You will need:
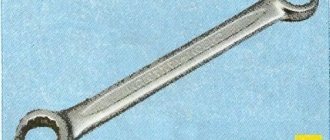
"8" wrench, rubber hose, container for collecting brake fluid.
Self-bleeding brakes on Lada Priora
1. Check the level and, if necessary, add brake fluid to the master cylinder reservoir to the “MAX” mark.
Attention.
Only add brake fluid of the same grade as that used in the system.
Please note that on our website there is already a publication about bleeding the brake system of a VAZ 21099 with your own hands.
2. Place the vehicle on an inspection pit or lift.
3. If the rear wheels are suspended, first unlock the rear brake pressure regulator by inserting a screwdriver between the plate and the piston. Don't forget to remove it when finished.
4. Clean the air release valve on the brake mechanism from which air is supposed to be removed from dirt and dust.
5. Remove the protective cap from the air release valve.
6. Place the rubber hose over the valve head and immerse the end in a clean, transparent container partially filled with brake fluid (the end of the hose should be immersed in the fluid).
7. An assistant must sharply press the brake pedal 4–5 times (with an interval of 1–2 s between presses). After the last swing, you need to keep the pedal pressed.
8. Unscrew the air release valve 1/2 to 3/4 turn. Air bubbles will be visible in the liquid flowing from the hose. When the fluid stops flowing from the hose, close the air release valve completely, after which the assistant should release the brake pedal.
9. Repeat steps 7 and 8 until there are no air bubbles in the flowing liquid. At the same time, monitor the brake fluid level in the reservoir and, if necessary, add fluid, not allowing the level to drop below the “MIN” mark.
10. Remove the hose, wipe the air release valve fitting dry and put the protective cap on it. Bleed the brakes of the remaining wheels if necessary.
Notes.
Do not reuse brake fluid that was drained when bleeding. If the brake system hydraulic drive is not pumped thoroughly enough, then when you press the pedal at the end of its stroke, you will feel an increased “softness” of the pedal.
Recommendation.
There are two ways to bleed the hydraulic brake system without an assistant. The first is the most reliable: order a turner an aluminum or bronze cover for the main brake cylinder, screw the valve from the camera into it and connect it to the spare wheel with an additional hose; air pressure should not exceed 0.05–0.07 MPa (0.5–0.7 kgf/cm2). The second is not very reliable, but acceptable: connect the rubber bulb to the wheel cylinder fitting - the connection should be very tight. Squeeze the bulb, unscrew the fitting; When the bulb is half full, tighten the fitting. Repeat the procedure three to four times. During test braking, check the operation of the brakes.
Do-it-yourself brake bleeding on the Lada Priora has been successfully completed. Let us remember that the previous article was about replacing the wheel bearing on a Lada Priora.
Which brake fluid to choose for Priora
The manufacturer fills it with DOT 4. The most popular brake fluids among buyers are ROSDOT 4 and NEVA-M. The first option is more expensive, the second is cheaper. For cars with and without ABS, it is recommended to use different types of fluids.
- DOT-4 plus - for cars without ABS
- DOT-4 class 6 - designed for modern braking systems (ABS, ESP, VSA)
Depending on the capacity, the cost of the brake fluid indicated above is from 50 to 150 rubles.
You can also add DOT 5.1 fluid. It has a lower viscosity than the above samples, as well as a higher boiling point and, according to manufacturers, changes once every five years.
It is prohibited to mix liquids of different types with each other!
Types and types of abs anti-lock braking systems
Based on the number of control circuits, there are three types of anti-lock braking systems:
- single-channel - when one wheel is blocked, all four are released;
- two-channel - triggering occurs based on data from the best (high-threshold) or worst (low-threshold) wheel;
- four-channel - each wheel is adjusted separately, which ensures maximum braking efficiency.
Important! Modern cars are equipped with four-channel systems.
Depending on the location of components and maintenance features, there are three types of ABS:
- with components (hydraulic module, valves, accumulator and pump) located in a single unit;
- with components spaced in the form of different units;
- with optional SBC and ESP systems.
Despite the complicated design, it is quite possible to replace ABS brake fluid yourself.
Do-it-yourself bleeding of the brake system
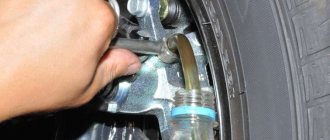
Each wheel has a special drain fitting to remove air from the brake system. It is through this that you need to remove air and old liquid.
A rubber hose prepared by us is put on the fitting and lowered into a container to drain the old liquid. In this case, the hose in the dish must also be in the liquid so that there is no air leakage.
Using a brake wrench, unscrew the fittings on each wheel sequentially and pump the old fluid out of the system until it is clean. You will need an assistant who will pump the brake pedal; your task is to drain the old fluid.
That is, the assistant pumps the brake pedal 5-10 times and presses it. You unscrew the fitting a little and drain the liquid. The assistant pumps the pedal again, then presses it and drains the liquid again. And this must be done with each wheel.
When bleeding the brakes, keep an eye on the fluid level in the reservoir; it should not be empty.
After bleeding, make sure that the brake fluid in the reservoir is between MIN and MAX. This completes the replacement of brake fluid on the Lada Priora.
Summary
You can replace the fluid yourself only on cars with a hydraulic accumulator and valves combined into one unit. List of required equipment:
- syringe with extension tube or bulb;
- transparent containers;
- transparent tube 20-30 cm long;
- open-end wrenches at “8” or “10”.
Briefly about the procedure for replacing brake fluid in a car with ABS on your own:
- replace the composition in the tank with a new one;
- bleed the left and right front brake cylinders;
- bleed the rear right cylinder with the brake pedal depressed and the pump turned on;
- bleed the rear left cylinder with the brake pedal released and the hydraulic pump turned on;
- check the system for leaks.
If there is a drain fitting on the ABS module, you should use the classical method according to the scheme specified by the factory to bleed all 4 brake cylinders, and then “drive” the ABS installation with excess pressure supplied from outside.
How much brake fluid do you need to replace a Priora?
Take precautions when working with brake fluid: it is toxic. If brake fluid comes into contact with wires, plastic or painted body parts, they may be damaged. Therefore, when pouring, always use clean rags. If liquid gets on parts, wipe them immediately with a clean cloth. Replacing brake fluid on Grant.
The next stage is pumping out the brake fluid already in the system.
To do this, remove the rubber cap from the right rear fitting of the valve, having previously cleaned the latter from dust, dirt and carbon deposits, and instead of the cap we put on a transparent tube, which we lower into a container for working out.
Here you will need outside help, since it will not be possible to pump the brake pedal and work under the car at the same time. Replacing brake fluid and bleeding the brakes of a VAZ 2108 2110 2114 Priora in the cold with your own hands, dismantling, washing...
Ask your partner to press the brake pedal several times, and then, pressing it all the way, hold it in this state until the desired moment. At this time, another person is under the car and, using an eight key, unscrews the air release valve.
But you don’t need to unscrew it completely, just make a few turns until the used brake fluid flows out of the container. As soon as this happens, the brake pedal will fail.
The car owner should quickly tighten the valve as soon as all the old fluid is gone.
At the same time, you should inspect the entire system responsible for the brakes, since if the brake fluid leaks, this may indicate problems or the need to replace the master cylinder gasket. Brake fluid tester Proven Auto Parts (swelling, foreign car) CAR Mysteries…
In order for the brake system in a Lada Priora to function correctly, it must contain the working fluid at the proper level. What volume is required for the correct functioning of the brake system can be found in the service book attached to the machine. Replacing brake fluid on a LANCER X in 20 minutes - by two amateurs. THE BEST CHOICE was to replace the brake...
Periodically check the level of brake fluid in the reservoir and add it if necessary, otherwise air will enter the brake system. Guys, try not to add brake fluid to the brake fluid reservoir. Keep it at minimum...
A few words about safety precautions
- Be careful when handling brake fluid as it is toxic.
- Avoid contact of TJ with skin and eyes.
- Do not allow brake fluid to come into contact with plastic or rubber products or paint surfaces.
- If liquid gets on any of the above, wipe them immediately using a clean cloth.
Note: Brake fluid is hygroscopic (capable of absorbing moisture and various substances from the air), so reuse or filtering is not permitted. TJ can only be stored in a closed container.
Lada Priora Hatchback Persian › Logbook › Replacing brake fluid
Today I changed the front pads, installed smar ones, by the way, they have good braking and don’t creak, before that the green ferodo ones were creaking harshly (I don’t think it’s worth describing how to change them) and so I decided to change the brake fluid, it was very dark, like used sunflower oil, now clean) Here are the complete instructions 1. The rear wheel pipe (rear brake circuit) is under increased pressure. 2. It is necessary to constantly monitor the brake fluid level (in order to prevent the hydraulic pump from running dry (we swam - we know: I foolishly screwed up the working pump) 3. The pump should not run for more than 2 minutes (if the pump worked for more than 2 minutes, then you need to turn off the ignition and let the pump cool for 5-10 minutes)
Bleeding the system Turn the ignition key to position “0”. Disconnect the two electrical connectors on the brake fluid reservoir cap. Left front wheel brake Place the air bleed hose onto the fitting and open the fitting on the brake caliper one turn. Press the brake pedal all the way and hold it in this position. Close the bleeder valve and release the brake pedal. Continue these steps until air bubbles stop appearing. Right front wheel brake Bleed the air in the same way through the fitting on the brake caliper. Right rear wheel brake Place the air bleed hose on the fitting and open the fitting on the brake caliper one turn. Press the brake pedal all the way and, turning the ignition key to position “2”, keep the pedal pressed. Allow the brake fluid to drain with the pump running until air bubbles stop appearing. Close the bleeder valve and release the brake pedal. Continue these steps until air bubbles stop appearing. Left rear wheel brake Place the air bleed hose onto the fitting and open the fitting on the brake caliper one turn. AHTUNG! DO NOT PRESS the brake pedal. Allow the brake fluid to drain with the pump running until air bubbles stop appearing. Press the brake pedal halfway and hold it in this position. Tighten the bleeder fitting tightly. Release the brake pedal and wait until the hydraulic pump stops completely. Turn the key to position "0". Connect the connectors on the tank lid. Check the system for leaks.
The sequence of removing air from the vehicle
We start pumping the brakes from the front right, and then the left. The procedure takes place with the ignition turned off (position at “0”) and the terminal on the TJ tank removed.
- We put the hose, with the bottle, on the fitting and open it (with an open-end wrench). It is necessary to push the transparent hose so that air bubbles can be seen, and the other end of the hose must be completely placed in the liquid.
- We fully depress the pedal and hold it until all the air comes out.
- Tighten the fitting and release the pedal until liquid flows out without air.
New Lada: Lada Priora (Lada Priora): album of electrical connection diagrams » Car manuals: operation, repair and maintenance of the car
The rear wheels are pumped with the ignition on in key position “2”.
- As when bleeding the front wheels, we put a hose on the bleeding fitting on the caliper.
- Having fully depressed the pedal, turn the ignition key (to start the hydraulic pump). We observe the air coming out and control the level of brake fluid in the reservoir (top up periodically).
To properly bleed the ABS brakes on the rear left wheel, the sequence of actions needs to be slightly changed.
- As in previous cases, we first put the hose on the fitting and do not unscrew it completely, but only 1 turn, and the pedal does not need to be depressed.
- Turn the ignition key to start the hydraulic pump.
- As soon as the air comes out, depress the brake pedal halfway and tighten the bleeder fitting.
- Then we release the brake and wait for the pump to stop.
- Turn off the ignition and connect the removed connector from the tank.
If you need to pump the brakes together with the ABS modulator, then information on this procedure can be found here.
It is imperative that after bleeding the brakes, before driving off, you need to check the tightness of the system and the absence of leaks. Check the brake fluid level.
Types of brake fluid (BF) for cars
Brake fluid is a fluid of a special composition that ensures the transmission of forces that are created in the brake cylinder to clamp the brake discs or release the pads.
The composition of all brake fluids is 92-97% basic composition and 3-8% additives. Without additives, it will not be possible to create a fluid that will meet the high requirements of a responsible brake unit. Depending on the combination of constituent components, TJ can be classified into 3 groups.
Classification of brake fluid by type:
- Mineral TJ. Based on LHM mineral oil, alcohol and castor oil.
- Glycolic TJs. Based on essential and polyglycol oils.
- Silicone TJ. This type is based on silicon-organic polymer products.
Classification according to physical and chemical parameters:
- By viscosity.
- By boiling point.
Exceeding the viscosity and boiling point ranges significantly degrades the properties of the brake fluid. So, for example, if you heat the brake fluid to a temperature exceeding the maximum permissible, then some substances from the composition will begin to evaporate and a vapor lock will form. After this, it happens that the brake pedal simply falls down without effort.
Brakes (discs, pads, sensors) Lada Vesta
Products from the Dustershop77 range on the topic of the article:
| Name | Manufacturer | Price | Availability | Add to cart |
| 410608481R | Front brake pads Duster, Vesta original 410608481R for disc 260-269mm | Original | 3000 / 2300 rub. Discount: 2200 rub. | 2 |
| DC441-GDB3332 | Front brake pads 1.6 and 2.0, TRW GDB3332 (410608481R for 260-269mm disc) | Analogue | 3000 / 2500 rub. Discount: 2200 rub. | 2 |
| DC1399 | Hex key for replacing pads | Analogue | 200 / 150 rub. Discount: 100 rub. | 4 |
| DC444-23973.175.1 | Front brake pads for disc 260-269mm ZIMMERMANN 23973.175.1 (410608481R) | Analogue | 4000 / 3800 rub. Discount: 3400 rub. | 2 |
| DC1149-8200276361 | Renault brake pedal sensor original 8200276361 | Original | 700 / 550 rub. Discount: 500 rub. | 1 |
| DC510-7701205518 | Set of springs for rear brake pads Duster 4x2 original 7701205518 | Original | 3000 / 2700 rub. Discount: 2500 rub. | 1 |
| DC627-ASAM32116 | Brake master cylinder with ESP ASAM 32116 (460119952R) | ASAM | 2500 / 2200 rub. Discount: 1800 rub. | 1 |
| DC1657-479703074R | ABS ring Lada Vesta rear original 479703074R | Original | 2000 / 1600 rub. Discount: 1400 rub. | 3 |
| DC1650-8450031577 | Front brake disc Vesta, XRAY original 8450031577 (260mm - 1 pc.) | Original | 2900 / 2500 rub. Discount: 2400 rub. | 2 |
| DC2222-410605536R | Front brake pads Vesta, X-Ray, Largus, Sandero, etc. for 258mm disc) original 410605536R, 410604682R, 8660005291 | Original | 2300 / 1600 rub. Discount: 1400 rub. | 1 |
| DC912-QZ-120-0410 | Front pad mounting kit (plates) (D259mm ventilated) Quartz QZ-120-0410 (kit) | Analogue | 1300 / 1000 rub. Discount: 700 rub. | 2 |
| DC1689 | ABS ring Lada Vesta rear analogue 479703074R | Analogue | 1500 / 1000 rub. Discount: 800 rub. | 1 |
| DC1651-24165 | Front brake discs Lada Vesta, XRAY FEBI (260mm - 2 pcs.) | Analogue | 4900 / 3600 rub. Discount: 3300 rub. | 1 |
| DC1655-11196350208900 | Rear pads Lada Vesta (for disc brakes) original 11196350208900 | Original | 2800 / 2500 rub. Discount: 2200 rub. | 1 |
| DC1652-8450031131 | Rear brake disc Lada Vesta, XRAY original LADA 8450031131 (260mm - 1 piece) | Original | 2700 / 2300 rub. Discount: 2000 rub. | 2 |
| DC1656-440609415R | Rear pads Lada Vesta (for drum brakes) original 440609415R | Original | 2900 / 3200 rub. Discount: 2800 rub. | 1 |
| DC1656-BS-5717 | Rear pads Lada Vesta (for drum brakes) LYNX BS-5717 | Analogue | 1900 / 1500 rub. Discount: 1200 rub. | 1 |
| 410607115R | Front brake pads original 440603905R / 410605961R / 410607115R / 410600379R for 280mm disc | Original | 5000 / 4300 rub. Discount: 3900 rub. | 0 |
| DC396-MR0276361 | Brake pedal sensor MANOVER MR0276361 (8200276361) | Analogue | 500 / 400 rub. Discount: 350 rub. | 0 |
| NF0010851 / 410608481R | Front brake pads NF0010851 Duster, Vesta analogue 410608481R for disc 260-269mm | 750 Discount: 750 rub. | 0 | |
| 000050BSX / 440603905R | Front brake pads Duster (2.0 doors) Stellox 000050BSX non-original, analogue 440603905R for 280mm disc | STELLOX | 1200 Discount: 1200 rub. | 0 |
Brake fluid standards
US standard
The American Department of Transportation has created a quality standard FMVSS No. 116 (Federal Motor Vehicle Safety Standard), which it is advisable to use.
If anyone doesn’t know what DOT is in the designation of brake fluid, then it is nothing more than an abbreviation of the name in English of the US Department of Transportation, that is, Department of Transporation or DOT.
Therefore, owners of new modern cars must adhere to the accepted quality standard, that is, use glycol TJ DOT 4 or glycol-silicone DOT 5.1.
And for old cars, roughly speaking, before the year 2000, you can safely use DOT 3 or BSK.
BSK brake fluid is an old brand of TZh, which is created by combining castor oil and butyl alcohol in a 1:1 ratio. Analogs of BSK liquid: Neva, RosDot, Tom, Rosa.
Characteristics of TJ DOT:
- Viscosity degree.
- Maximum temperature (boiling).
- Neutral to rubber and plastic products.
- Corrosion resistance.
- The ability to maintain its properties and qualities during long-term operation.
- Ability to act as a lubricant.
- The ability to absorb or not absorb moisture from the air.
According to the American quality standard FMVSS No. 116, brake fluids are divided into 5 classes. Some are only suitable for disc brakes, others for drum brakes.
European standard
In addition to the American standard, there is also a European development:
- SAE (Society of Automotive Engineers) J1703/1704;
- ISO(DIN) 4925 - International Organization for Standardization.
Japanese standard
The Japanese, as everyone knows, are one of the most advanced today in the field of electronic and mechanical equipment. So they have their own developed brake fluid quality standard JIS (Japanese Industrial Standard) K2233.
In Russia and other CIS countries there is no such standard, which sets strict requirements for the composition and capabilities of brake fluid, that is, their own technical conditions (TS), which are adhered to by brake fluid manufacturers.
If pressure in the brake system is not created due to wear of the rubber seals, the master brake cylinder repair kit must be replaced. You can do this yourself.
Antifreeze-Sintez
A very popular composition in our country, which can be found in any auto store. I’m glad that the substance can be used in almost any weather conditions.
Including frosts below minus 50. One of the best options for northern regions, as well as areas with high humidity (hygroscopicity is another advantage of the manufacturer).
Application of DOT brake fluids
Since the American quality standard is very widespread, we will break down the classes of TJ DOT:
- DOT 3. DOT 3 is used for cars that cannot reach fast speeds. Maximum temperature (boiling) from +220 degrees.
- DOT 4. DOT 4 is used in fast cars that have both front and rear disc brakes. It boils when heated to a temperature of +240 degrees.
- DOT 4+, DOT 4 super. DOT 4 plus and DOT 4 super are improved TJs. Boiling point +260 degrees.
- DOT 5. DOT 5 cannot be used in braking systems with ABS (there is also an EDS system - this is an addition to the ABS system). This is due to the fact that the fifth bunker does not absorb moisture, so moisture collects in some area. boiling temperature +280 degrees. The viscosity is much lower than that of previous classes. For use in racing cars only.
- DOT 5.1. DOT 5.1 differs from DOT 5 in that 5.1 absorbs moisture. Suitable for high speed vehicles. Recommended for braking systems with ABS and ESP. Boiling point +270 degrees.
Rearranging torsional vibration dampers on a VAZ
The main problem when joining the crankshaft drive gear and the torsional vibration damper on an 8-valve engine of the VAZ front-wheel drive family is the locking cylindrical key. Over time, it breaks and simply flies out. Then the damper shifts along with the drive pulley (at least a tooth later) and problems with ignition appear. Up to the point of turning off the cylinders.
16 valve VAZ models are already deprived of this key, and the alignment and installation of the pulleys is carried out due to the boss on the drive gear and the groove on the damper. These models (engine 2112, 21124, 21126, 21127, 21129) use a wider timing belt and higher loads on the associated parts. 8 valve models installed on modern Kalinas, Grants, Priors, 2114-2115 use the design of a sample from the beginning of the VAZ injection era (developed by GM in 1995).
So, let's compare the details:
2108 (2110 eng) 21100-1005053-24 (used on 8 valve injection engines 21083, 11186, 21116, installed on VAZ cars 21083, 21093-21093, 2110, 2111, 2112, 2113-2115, 2 190, Lada Granta, Lada Kalina , Lada Priora, Lada Kalina2, Bogdany) and damper 2112 21120-1005058 (used on all 16 valve engines except the 1.8 liter engine which are installed on the LADA Vesta Cross? LADA vesta SW, LADA Xrey).
The specified pulleys work in tandem with the following crankshaft pulleys (gears):
21080-1005030 and pulley 21100-1005030-00, respectively. On models of 8 valve engines with a volume of 1.6 liters, a higher cylinder block is used, and the installation mark for the location of the piston of the first cylinder at TDC is shifted by 2 degrees.
In terms of overall dimensions, the parts fit together and are installed on an 8-valve engine without additional modifications to the generator brackets. The only difference is in the bolts securing the pulley to the crankshaft and an additional washer is needed. A parts list is attached.
Instead of pulley 21100-1005053-24 we install 21120-1005058 Instead of pulley 21080-1005030 we install 21100-1005030-00 Instead of bolt 15540433 (m12x1.25x30) we install either the original 21100-1005076 or any other m1 2x1.25x35 We select the washer according to size, or take original 21100-1005065
Brake fluid volumes for complete replacement on various vehicles
The usual volume of the brake system is from 0.5 to 1 liter. The volume depends on whether the brakes have ABS or not, and on the class of the car. When replacing a TZ, you can focus either on the service life or the mileage. Some change it based on mileage up to 60 thousand km. For high-speed cars, the mileage for replacing brake fluid is up to 10 thousand km.
Below is a table with popular car brands and models and how much brake fluid you need to change:
| car model | DOT class | Required quantity of fuel fluid, l |
| Ford Focus 2 | DOT4 | 1 |
| Ford Focus 3 | DOT4 | 1 |
| Ford Kuga | DOT4 | 1 |
| Chevrolet Niva | DOT4 | 1 |
| Chevrolet Cruze | DOT4 | 1 |
| Chevrolet Lacetti | DOT 4 | 0.5 a with ABS and ESP 1.0 |
| KIA CEED | DOT4 | 1 |
| KIA RIO 3 | DOT4 | 1 |
| KIA RIO 2 | DOT 4 | with ABS - 1-1.5 l without - 1 l |
| KIA SORENTO | DOT 5.1 | 1 |
| KIA SPECTRA | DOT3, DOT4 | 1 |
| RENO LOGAN | DOT 4 | with ABS – 1-1.5 l without – 0.7 l |
| RENAULT DUSTER | DOT4 | 1 |
| RENAULT FLUENCE | DOT4 | 0,5-1 |
| Renault Sandero | DOT4 | 1 |
| Renault Megane 2 | DOT4 | 1 |
| VAZ 2107, 2109 | DOT 3 | 0,55 |
| VAZ 2114, VAZ 2115 | DOT 4 | 1 |
| VAZ 2108, 2110, 2112 | DOT 4 | 1 |
| Lada Kalina | DOT 4 | 1 |
| Lada Priora (VAZ 2170) | DOT 4 | 1 |
| Lada Granta | DOT 4 | 1 |
| Lada Largus | DOT 4+ | 1 |
| DEU MATIZ | DOT 4 | 1 |
| Mitsubishi Pajero 4 | DOT 4 | 1 |
| Mitsubishi Lancer IX | DOT 3, DOT 4 | 1 |
| Mitsubishi Lancer 10 | DOT 4 | 1 |
| Mazda Demio | DOT 3, DOT 4 | 1 |
| Mazda 3 | DOT 5.1 | 1 |
| Mazda cx 5 | DOT 4 | 1 |
| Skoda Superb II | with ABS DOT 4 | 1 |
| SKODA Octavia A5 | DOT 4 | 1 |
| Toyota RAV4 | DOT 3, DOT 4 | 0,5 |
| Toyota Corolla | DOT 4 | 1 |
| Toyota Prado 150 | DOT 4, DOT 5.1 | 1,5-1,6 |
| Volkswagen Polo sedan | DOT 4 | 1 |
| Daewoo Nexia | DOT 4, DOT 5.1 | 1 |
| Hyundai Solaris | DOT 4 | 1 |
| Hyundai Accent | DOT 5.1 | 1-1,5 |
| Volvo XC70 | DOT 4+ | 1 |
| Nissan Tiida | DOT 4 | 1 |
| Nissan Qashqai | DOT 4 | 1 |
| Nissan X Trail | DOT 3, DOT 4 | 1 |
How many TJs are needed for a complete replacement in VAZ cars
For front-wheel drive VAZs, TZH DOT4 is used, for rear-wheel drive classic VAZs 2101-2107, brake fluid of the DOT 3 class is used. For “classics” you need a little more than half a liter of TJ, and for front-wheel drive ones - about 1 liter.
How many TJs are contained in VAZ models?
Most often, quite practical and inexpensive Dot 4 liquid is poured into the cars of the Volzhsky Automobile Plant. The systems of classic models (from VAZ-2101 to VAZ-2107) do not contain so much of it - 0.55 liters, but more modern Ladas (VAZ-2114, “Kalina”, “tenth” family) already require a whole liter of brake fluid. However, if you plan to flush the system, it is better to purchase a little more liquid than required. One and a half liters will be enough, but since packaging is done only in liter containers, it is better to take two such packages.
It is also useful to know that most of the liquids used (in particular Dot 3 and Dot 4) cannot be stored open for too long: a maximum of two years!
Source
Which brake fluid to choose
Before purchasing new brake fluid for a complete change with or without flushing, or just for topping up, it is advisable to read the owner's manual for your car.
The choice of TJ depends on which brakes, drum or disc, whether there is ABS anti-lock or not.
Also, you should pay attention to the characteristics declared by the manufacturer:
- boiling temperature;
- corrosiveness (does it corrode metal, rubber and plastic);
- stable viscosity;
- lubricating properties.
There is a rating of the TOP 5 brake fluids from foreign manufacturers:
- No. 1 Castrol React DOT4. The cost in the car market is up to 500 rubles.
- No. 2 Motul DOT 5.1. Price about 600 rubles.
- No. 3 Liqui Moly Bremsenflussigkeit DOT4. Price 300 rub.
- No. 4 Ros DOT4. Russian manufacturer. Price up to 200 rub.
- No. 5 Sintec Super DOT4. Russian manufacturer. Price 100 rub.
List of brands of brake fluids that do not comply with temperature conditions of class DOT-4:
- Luxe DOT 4. Has a low boiling point.
- Sintec DOT 4. Has a low boiling point.
- Alaska DOT 4. High viscosity.
- Oilright DOT 4. Has a low boiling point.
- PP "LUMO" (Ukraine). High viscosity.
- Belhim DOT 4 (Belarus). High viscosity.
Those who need detailed knowledge of reviews can find reviews from those who have filled in such brake fluids on the relevant forums.
Summarizing the information published above, we can give the following recommendation: whoever wants all the components and parts of his car to maintain their performance indicators (reliability, durability) for a long time, must apply the recommendations of the manufacturer of this brand and model of car.
Required Tools
To complete the work you will need the following tools:
- Jack for lifting and fixing the machine.
- Wrenches for 13 and 17.
- Screwdriver.
- A tool for unscrewing the bolts that secure the wheel.
- Pliers.
- Metal brush.
Additional materials must include special lubricant and rags.
Instructions
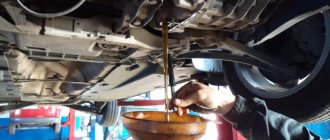
We warm up the engine to 45-50 degrees. Warm oil has better fluidity and will drain better from the engine during a complete replacement. Our task is to remove as much as possible the old dirty and used fluid that no longer has useful properties from the engine and fill it with new one. If a lot of old dirty oil remains in the crankcase, it will be swept away with the new one and will worsen its beneficial properties. Warm up the engine for 5-7 minutes before starting, this will be sufficient. For easy access to the drain plug (and in some models the oil filter is also attached from the bottom) and the bottom of the car as a whole, you need to jack it up or drive into an inspection hole (the best option). Also, some models may have engine crankcase “protection” installed. We open air access to the crankcase by unscrewing the filler cap and dipstick. Place a large container (equal to the amount of oil being poured). Unscrew the drain plug with a wrench. In this case, on our Priora, the drain plug can be unscrewed with a regular open-end or 17 mm socket wrench
Don't forget to wear protective gloves, the oil will most likely wake you up warm, but you need to be careful. We wait about 10-15 minutes until the waste flows into a basin or cut-off plastic canister. Optional but very effective! Flushing the engine with a special liquid is not included in the maintenance regulations and is not mandatory - but
By getting a little confused, you will be much better at flushing out the old, black oil from the engine. In this case, wash with the old oil filter for 5-10 minutes. You will be surprised at the black oil that comes out with this liquid. This liquid is very easy to use. A detailed description should appear on the flushing fluid label. Changing the sedum filter. In some models, it is not the filter itself or the filter element (usually yellow) that is changed. Impregnating the filter with new oil before installation is a mandatory procedure. Lack of oil in the new filter before starting the engine can cause oil starvation, which in turn can cause filter deformation. Overall this is not a good thing. Also remember to lubricate the rubber O-ring before installation. Fill in new oil. The last maintenance operation is, of course, pouring new oil into the engine. Do not forget to check the level using the dipstick; do not overfill the level. In the future, when the engine is running, the oil level will probably change; be careful during the first few days of operation. Recheck the oil level using the dipstick after the first start.
How to replace the clutch mechanism on a Priora
As already mentioned, this is a rather complex and time-consuming process.
So, for this operation you will need the following tools.
- rolling jack;
- telescopic stand with a top for the gearbox;
- mount;
- locksmith's key set;
- new clutch to replace;
- gearbox input shaft, separately.
Place the car on the pit. Engage and lock the Priora parking brake. It is better to place “shoes” or other clamps under the wheels. Remove the entire lower engine protection. Check access to the box mounting. Jack up the left (driver's) side of the Priora. Remove the left wheel and get to the ball joint. Disconnect it. Remove the grenade from the box and leave it in the caliper. Do the same with the right wheel.
Now unscrew the bolts of the box cushions. Disconnect the clutch cable from the release bearing drive fork. Unscrew the bolts securing the box to the engine block and remove it. Access to the coupling is open.
Replacing the Priora clutch
The clutch basket is attached to the engine flywheel with 6 x 10 bolts. When the gearbox is removed, unscrewing the entire assembly is not difficult. This will take no more than 10 minutes, and the basket with the driven circle is removed.
Installing a new part
But here there are already some tricks. It is in this operation that a separate transmission input shaft will be needed. The difficulty is that if you put the basket in place at random, the driven disk may move. A deviation of 0.5 mm is enough, and it will be almost impossible to install the box in place. This is where a separate shaft comes in handy. Insert it into the basket in its regular place, put on the driven disk and insert the limit switch into the hole in the flywheel. Insert it all the way. Only after this, seat the basket itself along the shaft, according to the marks made during disassembly. If necessary, replace the release bearing before installing the box. Just remove it from the shaft and install a new one. Carefully remove the adjustment shaft from the flywheel and reassemble everything in reverse order.
Useful video on the topic of replacing the clutch on a Priora:
Mixing antifreeze
Antifreeze from different manufacturers cannot be mixed. When mixing liquids of different colors, many believe that nothing bad will happen. Various dyes are added to antifreeze to give it a tint, but it has no effect on the properties. Therefore, the choice of antifreeze should not be based on color, but on the chemical composition
(type) recommended by the car manufacturer. When the liquid is highly concentrated, it must be diluted with distilled water in the correct proportions.
An important element of the system is a liquid pump (pump), the purpose of which is to ensure the circulation of antifreeze. The condition of the pump should be checked frequently. If the bearing begins to fail, it will jam. As a result, it will become impossible to maintain the optimal temperature and there will be a risk of the drive belt breaking.
Before replacing the pump, you must prepare:
- container for draining;
- keys for dismantling;
- new water pump;
- sealant;
- inspection hole.
Priora 2014 is now available in three different variations: Standard, Normal and Lux. Its advantages are enhanced anti-corrosion protection using galvanization and a six-year warranty against through corrosion for any type of body. also installed in a number of trim levels.
, heated windows and seats, light and rain sensor. High-level security, equipped with the latest technologies.
The promo website of the Lada Priora claims that when hit at a speed of five kilometers per hour, only the car’s bumper receives damage.
State certification and testing of this vehicle were successfully completed. Braking, stability and handling, electromagnetic compatibility and other measurements (tests) have been completed. The choice always remains with the buyer; the quality of the product is the reputation of the manufacturer.
https://priorik.ru/lajfhak-kak-samostoyatelno-pomenyat-antifriz-na-lade-priore-s-konditsionerom-i-bez/https://ladafakt.ru/kakoj-antifriz-luchshe-zalivat-v- prioru.htmlhttps://xn--80aal0a.xn--80asehdb/reviews-tests/lada-vesta-reviews-tests/1074-kakoy-antifriz-tosol-luchshe-zalivat-v-avtomobili-lada.htmlhttps:// priorik.ru/lajfhak-kak-samostoyatelno-pomenyat-antifriz-na-lade-priore-s-konditsionerom-i-bez/https://antifriztosol.ru/76-priora.html
Company recommendations
Lada Priora
- a machine that is quite unpretentious in maintenance, with a good and reliable engine, resistant to corrosion. Manufacturers managed to remove all design flaws, improve safety, modernize the car's driving performance and improve sound insulation.
What antifreeze to use:
- cool steam standard;
- cool steam premium;
- felix carbox;
- syntek;
- long life;
- energy
You also need to know how to drain antifreeze from a Priora, observing the necessary conditions. Then it will be easy and realistic for any driver to do.
Extreme caution and coordinated actions in the process of such work are recommended.
Replacing the fluid yourself:
- drain antifreeze from the system;
- add new fluid;
- remove air.
Coolant quantity – 7.82 liters
as directed by technical support for normal cooling operation. In some cases, six liters of antifreeze will be enough.
After installing the machine on a flat surface, it takes time for the engine to cool down. Then you need to remove the plastic protection by unscrewing the two fixing clips on the sides and unscrew the cap on the expansion tank. Place a container under the vehicle and drain the liquid by unscrewing the cap on the cylinder block. We also unscrew the protective plug under the radiator and the antifreeze flows out. An important recommendation is to close the existing plugs when the drainage is complete, and you can begin to replace the substance.
After replacing antifreeze on a Priora, you don’t have to worry that the car’s engine will overheat.
On a Priora, the coolant temperature sensor is located between the cylinder head and the thermostat
. It determines the temperature state of the engine, has two contacts, and practically does not break. The only negative is that the wires at the base of the connector often fray.
Instructions
We warm up the engine to 45-50 degrees. Warm oil has better fluidity and will drain better from the engine during a complete replacement. Our task is to remove as much as possible the old dirty and used fluid that no longer has useful properties from the engine and fill it with new one. If a lot of old dirty oil remains in the crankcase, it will be swept away with the new one and will worsen its beneficial properties. Warm up the engine for 5-7 minutes before starting, this will be sufficient. For easy access to the drain plug (and in some models the oil filter is also attached from the bottom) and the bottom of the car as a whole, you need to jack it up or drive into an inspection hole (the best option). Also, some models may have engine crankcase “protection” installed. We open air access to the crankcase by unscrewing the filler cap and dipstick. Place a large container (equal to the amount of oil being poured). Unscrew the drain plug with a wrench. In this case, on our Priora, the drain plug can be unscrewed with a regular open-end or 17 mm socket wrench
Don't forget to wear protective gloves, the oil will most likely wake you up warm, but you need to be careful. We wait about 10-15 minutes until the waste flows into a basin or cut-off plastic canister
Optional but very effective! Flushing the engine with a special liquid is not included in the maintenance regulations and is not mandatory - but. By getting a little confused, you will be much better at flushing out the old, black oil from the engine. In this case, wash with the old oil filter for 5-10 minutes. You will be surprised at the black oil that comes out with this liquid. This liquid is very easy to use. A detailed description should appear on the flushing fluid label. Changing the sedum filter. In some models, it is not the filter itself or the filter element (usually yellow) that is changed. Impregnating the filter with new oil before installation is a mandatory procedure. Lack of oil in the new filter before starting the engine can cause oil starvation, which in turn can cause filter deformation. Overall this is not a good thing. Also remember to lubricate the rubber O-ring before installation. Fill in new oil. The last maintenance operation is, of course, pouring new oil into the engine. Do not forget to check the level using the dipstick; do not overfill the level. In the future, when the engine is running, the oil level will probably change; be careful during the first few days of operation. Recheck the oil level using the dipstick after the first start.