The VAZ 2109 tank is located under the bottom of the car, under the rear seat
The gas tank on a VAZ 2109 is replaced if it is broken. Or if a fuel leak appears at the junction (in this case, you can try to solder it). The appearance of a leak as a result of destruction of the walls of the tank is treated by replacing it. When the fuel line on a VAZ 2109 becomes clogged, removing the gas tank and cleaning it solves this problem, and the grid of the electric fuel pump should be replaced. Each car owner can carry out the replacement independently if necessary. Don’t even think about succumbing to advertising that offers to buy Super, an additive that, when poured into the tank, leads to complete resorption of dirt. Know that this method is only good as a preventive measure, for example, every 10,000 kilometers you fill in a similar product, then it really helps to remove sediments and deposits not only from the gas tank, but also cleans the entire fuel line without any damage to your car. In the case (and such cases are common among car owners) when the gas tank on a VAZ 2109 has never been cleaned before, the use of an additive will only complicate the problem.
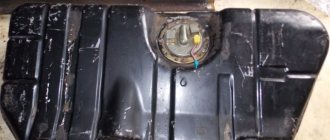
↑ Fuel tank elements
1 — air release hose; 2 — separator hose; 3 - filling pipe hose
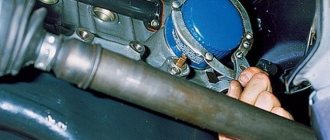
First, disconnect the wire from the “–” terminal of the battery.
NOTE! It is recommended to have an assistant remove the fuel tank.
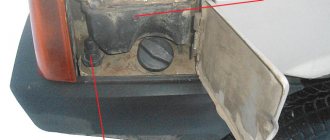
- Fold back the rear seat cushion and unscrew the cut-out part of the sound insulation.
- Unscrew the two screws securing the hatch cover.
- Remove the hatch cover with the rubber gasket.
- Disconnect the block with wires from the fuel level sensor.
- Unscrew the nut securing the sensor, under which the ground wire is secured.
- Remove the wire from the stud.
The remaining operations are carried out under the bottom of the car.
↑ Clamps and hoses
- Loosen the clamp.
- Disconnect the hose from the filler pipe.
- Loosen the clamp and disconnect the air release hose from the fitting on the fuel tank.
- Loosen the clamp and disconnect the separator hose from the fitting on the fuel tank.
- Loosen the clamps and disconnect the hoses from the fuel lines.
- Holding the tank, unscrew the two bolts of the tank mounting clamps.
- Pull the clamps down while supporting the tank. Bend the clamp on the left side behind the resonator pipe.
↑ Removing the fuel tank from the car
- Lower the front end of the tank down and remove it from the vehicle. Drain any remaining gasoline from the tank.
- Unscrew the five remaining sensor mounting nuts and remove the fuel gauge sensor from the tank.
- Remove the sensor gasket.
↑ Diagnostics and repair of the fuel tank
- Inspect the tank along the line where the upper and lower parts meet.
- If you find a leak, pour out the remaining gasoline, thoroughly rinse and dry the tank. Then solder the leak with soft solder.
- If necessary, glue the torn rubber gaskets on the tank.
Warnings!
You can solder only a thoroughly washed tank that does not contain gasoline vapors. Otherwise, when soldering, the vapors may ignite.To wash the fuel tank, use detergents: “Labomid”, “MS” or “ML”.
To remove any remaining detergent, rinse and steam the tank with hot water. Dry the tank thoroughly.
↑ Checking the sensor
Connect an ohmmeter to the sensor contacts and check the sensor resistance at three float positions:
- in the lowest position (empty tank) the resistance should be 315 - 345 Ohms,
- in the middle position (tank half full) – 108–128 Ohm,
- in the uppermost position (full tank) – no more than 7 Ohms.
If the resistance is different from the specified value, replace the sensor.
↑ Filter and float
Wash the dirty filter. Shake the float. If there is gasoline in it, then the float is leaking. We recommend replacing the float.
↑ Replacing fastening clamps
To replace the tank mounting clamps, remove them from the brackets on the body and install new ones.
Replacing a filter on a carburetor car
In order for the replacement of the fuel filter on a carburetor VAZ 2109 to be successful, it is recommended to follow the step-by-step instructions presented below.
- There is no high pressure in the fuel circuit of a carburetor car, so there is no need to bleed gasoline.
- Open the hood.
- Unscrew the clamps at the ends of the filter.
- Disconnect one of the hoses.
- Drain the fuel from the filter.
- Disconnect the second tube and remove the filter from the engine compartment.
- Install a new filter, taking into account the direction of gasoline flow.
- Check for fuel leaks while the engine is running.
vote
Article rating
Replacing the VAZ 2109 gas tank if necessary
The VAZ 2109 tank is located under the bottom of the car, under the rear seat
The gas tank on a VAZ 2109 is replaced if it is broken. Or if a fuel leak appears at the junction (in this case, you can try to solder it). The appearance of a leak as a result of destruction of the walls of the tank is treated by replacing it. When the fuel line on a VAZ 2109 becomes clogged, removing the gas tank and cleaning it solves this problem, and the grid of the electric fuel pump should be replaced. Each car owner can carry out the replacement independently if necessary. Don’t even think about succumbing to advertising that offers to buy Super, an additive that, when poured into the tank, leads to complete resorption of dirt. Know that this method is only good as a preventive measure, for example, every 10,000 kilometers you fill in a similar product, then it really helps to remove sediments and deposits not only from the gas tank, but also cleans the entire fuel line without any damage to your car. In the case (and such cases are common among car owners) when the gas tank on a VAZ 2109 has never been cleaned before, the use of an additive will only complicate the problem.
Gas tank repair
Repairing a fuel tank is usually not very difficult. Much here depends on the nature of the damage and the skills of the car owner. Small holes in the case can simply be soldered, but large damage will require the use of a welding machine.
The tank itself does not always need welding or repair. On VAZ 2108/09/14/15 vehicles, the tank fastening elements or its components (for example, the neck or studs) often fail. Such malfunctions need to be eliminated urgently - the safety of fuel storage in the tank is largely determined by its fastening, position relative to the body axis and tightness.
Required tools and accessories
Removing the gas tank is carried out using a standard set of tools: wrenches of different sizes, a screwdriver and a hammer in case any element is difficult to dismantle.
To wash, clean and repair the tank you will need:
container for draining fuel;
tire pump for supplying compressed air;
hose connected to a hot water supply;
What is a gas tank and what is it for?
The tank capacity of a modern car allows the driver to travel more than five hundred kilometers without refueling. It's time to figure out what this much-needed and important unit of the fuel system is:
- The fuel tank is a special container for safely storing fuel, preventing its leakage and losses due to evaporation
- Installed in the safest place on the machine
- The VAZ 2109 gasoline tank is located under the rear seat, since this area is least susceptible to deformation upon impact.
- The gas tank is attached to the car body with tape clamps
- To provide it with additional protection from damage, it can be protected from the bottom with a metal sheet
- To avoid fuel heating from exhaust system parts, it has thermal insulating gaskets
Tank material
In the manufacture of tanks, three main materials are used: plastic (polyethylene, the most modern material), aluminum and steel:
- Plastic, as the most modern one, is often used in the production of gas tanks for passenger cars.
- Plastic is convenient because it allows you to more fully use the entire installation space, make a container of almost any shape and size, and obtain the largest fuel capacity, which is most important.
- The main advantage of plastic is its resistance to corrosion.
- However, plastic is permeable to hydrocarbons at the molecular level, therefore, to avoid micro-leakage, the walls are made multilayer and the inner surface is additionally coated with fluorine
- Metal tanks are made by welding stamped steel sheets
- Aluminum is used mainly for diesel fuel, less often for gasoline.
Some tips and tricks
- If you constantly use your car, then you do not need any regular replacements - you just need to clean the fuel tank every three years, draining the settled gasoline and rinsing it (the tank) clean. Remember that gasoline is not a pure fuel, but a hydrocarbon mixture containing water, which, when the car is parked for a long time, begins to separate from the coal part. If this happens in winter, then condensation easily forms in the tank, turning into very light ice. To prevent a thin crust of ice from forming in the tank when the car is parked for a long time, you need to keep it at least half full.
- Of course, before removing the tank, you need to pump out the remaining fuel from it. This is especially true for leaded steel gas tanks. This is done simply, using an ordinary rubber hose that fits the diameter of the hatch hole.
- When removing the tank for repairs and patching holes, it must be very well cleaned, rinsed and dried. Gasoline is a flammable substance and there should be no open fire nearby.
- If fuel begins to leak from your car’s tank while on the road, you can temporarily plug the hole that appears with regular fatty soap. Gasoline does not react with it and does not dissolve, which will give you the opportunity to hold out at least until the nearest workshop.
Fuel tank volume Lada Vesta
Another example for 2112.
Design and location of the gas tank VAZ 2108/09/14/15
A gas tank is one of the elements of a car's fuel system. Its main and only purpose is to store a certain amount of fuel. In this case, storage is carried out as safely as possible, without leaks and fumes.
On VAZ 2108/09/14/15 cars the fuel tank is installed under the rear seat. Therefore, even in the event of a serious head-on collision, its damage will be minimal. The risk of fuel leakage and ignition will be equally minimal.
The tank volume on VAZs is 43 liters (including a reserve of 4–6 liters). This volume should be enough for the car to run autonomously for 400–600 kilometers.
The fuel tank on the VAZ 2108/09/14/15 is located under the rear seat
How to remove the gas tank on a VAZ 2107, 2109, 2110
Fuel level sensor FLS for VAZ 2108, 2109, 21099 cars
How to remove the gas tank?
Almost all drivers who have owned a car for five years or more eventually wonder how to remove the gas tank. There may be several reasons for this need. For example, changing the gas pump or gas intake filter, cleaning the old tank or replacing it with a new one. In principle, there is nothing tricky or complicated in this task, except for minor differences in mounting the gas tank on different cars. On domestic VAZ 2110, 2109 it is installed at the bottom, on the VAZ 2106 or 2107 on the side, and on foreign cars again at the bottom. In general, different locations have their own operating nuances in each individual case, although sometimes there is no need to remove the fuel tank if you just need to clean the fuel system, of which this tank is a part.
Most often, removal is required after an accident, during body work, or to replace it with a new one, when the old tank is so rotten that it makes no sense to seal all the holes and cracks, it’s easier to buy and install a new one, it will be even cheaper. But one thing can be said for sure, in relation to any make and model of car - the gas tank, as well as the entire fuel system of the car, must be carefully monitored, periodically subjecting it to various preventive maintenance work. We must not lose sight of the change of seasons, when during the transitional spring-autumn period the tank needs to be cleaned and washed.
Procedure for removing the fuel tank
We will not focus on either domestic cars or foreign cars, so as not to mislead anyone, but we will trace the entire principle of operation point by point, so that everyone can understand how to remove the gas tank on almost any car.
To avoid any failures, you need to strictly follow the removal order, then the entire tank replacement will be successful. That, in fact, is the whole task. As you can see, there is nothing extremely complicated or difficult about this.