We have a VAZ 2105 car, manufactured in 2010, with a mileage of 58 thousand km under repair; it is necessary to replace the reaction rods (rods) on the rear axle suspension. We will show you how to do this procedure yourself; the instructions are also applicable for VAZ 2107, VAZ 2106.
We lift the car. We press the bridge with a hydraulic strut so that the shock absorber is untied and the spring does not fall out. If you will be working on the ground, you can use an additional jack. Nuts 19, unscrew the lower mount of the rear shock absorber:
And another bolt next to it:
Now let's move on to the fastenings of the rods themselves:
We take out the old rod and take a new one, we have rods from the KEDR company, order number MK-01-2919100, new fastening bolts were also purchased for them in advance, their order number is 21010-2919000-86. Before installation, lubricate all fasteners with copper grease so that during further repairs they can be unscrewed without any problems. Install in reverse order.
Then unscrew the top short reaction rod:
Then the front bar:
There are washers on both sides at the front, remove them and replace them with new ones. Using a mounting tool, unscrew the bridge a little to insert the bolt:
After tightening your pants, you can remove the panhard rod:
Fasteners on the other side:
In order to then insert a new bolt into this place, you will again need a mounting tool, which we will use to press out the spring.
Do-it-yourself replacement of VAZ 2106 steering rods
Steering rod is a part of the car that serves as a connecting link between the steering knuckle and the steering mechanism. It is thanks to him that the front wheels of cars change their angle, and the car changes direction.
The realities of our roads are such that after driving a short section of the road you can seriously damage the steering rod of your car and lose a large amount of money. At a service station, repairing a traction rod costs as much as a quarter of a car, so we will repair it ourselves. Let us recall that in the previous article we looked at how to adjust the idle speed of a VAZ 2106 in a garage.
Replacing the VAZ 2106 steering rod
1. The cotter pin is tightened with a nut with a diameter of 22 millimeters. Therefore, we select the appropriate wrench and remove the fastening of the ball joint pin.
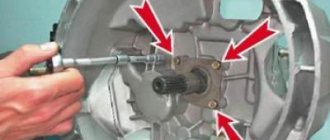
2. The trunnion arm holds the tip pin firmly. Therefore, you need to press it out using a puller.
3. Next we will use a socket wrench. With this we will unscrew the fastenings of the rods to the bipod.
4. Place the stop in the lever and press out the ball joint pins. To do this, you need to hit it well with the end of a hammer of a convenient diameter. If there is no such hammer, substitute a suitable rod.
5. Before replacing the tip or side rod, you need to measure the length of the rod that is already installed on the car. You need to measure between the centers of the plugs.
6. The rod installed on the machine must match the length of the previous rod. The most convenient way to change the length of the rod is by turning the threaded coupling, designed specifically for adjustment. After making control measurements, tighten the clamps and coupling.
7. Check the wheel alignment angles. If they are incorrect, remove the rod and adjust them. If the wheels are adjusted incorrectly, there is a possibility of them rubbing against the body elements.
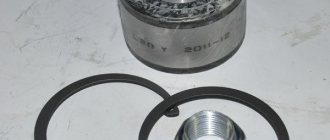
Homemade silent block remover
It is convenient to change the rubber-metal elements of the front suspension using a puller. However, not everyone has it. Therefore, you have to make the device yourself, since it is quite difficult to dismantle the hinges with improvised tools. Let's take a closer look at how and from what materials a puller can be made.
The main elements of the puller are bushings of different diameters and a bolt with washers and a nut
How to detect a fault
You can check the serviceability of the steering rods yourself; all you need is an inspection ditch or overpass. It is advisable to do such a check on a VAZ 2106 car every 5 thousand km or after every long trip on bad roads. Such a short interval is due to the quality of manufacture of the parts in question; on average, they last 15-20 thousand km.
To carry out diagnostics, you need to park the car over a ditch or drive onto an overpass and secure the vehicle with the hand brake. Grasping the rod near the tip with one hand, you need to sharply push it up and then down. A serviceable tip either has no play at all, or it is only a couple of millimeters, you can feel it with your hand.
If there is more play, and at the same time the thrust rod easily rotates in both ball pins, then replacing the VAZ 2106 ends is inevitable. In this way, you need to check all 6 fingers, and if they are clearly worn out, it is better to replace the entire steering linkage, which consists of 3 rods.
It happens that there is no play in the connections, but the protective boots are torn or cracked. If they are not changed, then the dust and dirt that constantly accumulates in the hinge will do their job: the unit will quickly fail. Worn anthers must be replaced. To complete the work you will need a minimum of tools:
- a set of spanners or open-end wrenches;
- mounting blade;
- puller for pressing ball pins out of their seats.
The puller is a metal cup with a slot so that it can be put on the bipod of the steering mechanism or pendulum. There is one in almost every garage where a VAZ 2106 or another model of the “classic” Zhiguli is parked.
Replacement instructions
The steering linkage is replaced in an inspection pit or overpass. The disassembly procedure is as follows.
- Loosen and unscrew the ball pin mounting nut. On some cars you can still find tie rods with cotter nuts. In this case, you will have to first remove the cotter pins by bending their antennae with pliers.
- From the side of the rounded end of the steering bipod, insert the puller so that its support area is under the bipod lever.
- Rotate the bolt at the top of the puller with a wrench and press it out of the socket.
- Repeat the operation on all other tips.
Sometimes when unscrewing the nut, due to contamination of the ball thread, the pin begins to rotate along with the nut, turning in the seat. Then, to unscrew the nut, you need to block it with a mounting blade. A small feature: the left and right outer rods of the VAZ 2106 are different from each other, so it is better to mark them after removal.
Installation
If a grinder was used, it is important to remove all remnants of fasteners with a mounting spatula. How do you then replace the VAZ-2107 jet rods? After this, the new element is installed in the previous mounting locations. But installation may be difficult. Since the old rod could no longer cope with its task, the bridge could “move” a few degrees to the side.
To ensure that the new link is properly secured, rest the mounting blade against the bracket and unscrew the bridge until the holes line up. Next, tighten all the bolts and nuts. The same procedure is performed on the second side. For tightening, use the same wrench and a 19mm hex head.
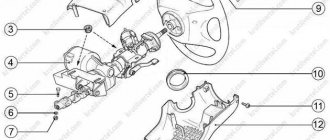
Operation of articulated rods
On most modern cars, the wheels are turned by a gear rack. But on cars of the classic Zhiguli family, instead of a rack, outdated technology is used using special rods, called “steering linkage”. This mechanism is not very reliable. The maximum you can count on is 50,000 kilometers, although in reality the resource rarely exceeds 30 thousand km. The structure of the mechanism is simple, and if you have experience in car repair and knowledge of the subject, you can carry out repair work or replace components yourself.
What is a trapezoid for and how does it work?
The articulated rods serve as an intermediate link between the steering shaft and the wheel hub at the front; the force is transmitted through the steering knuckles. The main purpose is to turn the front wheels simultaneously in the direction in which the steering wheel turns.
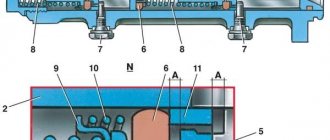
This mechanism is attached to the front side members and structurally consists of the following parts:
The middle part is a tube with hinge mechanisms on both sides. The side parts consist of a short and a long tip. They are connected to each other with a special clamp and two bolts.
The principle of operation of a trapezoid is as follows.
- When you turn the steering wheel, the steering shaft and the gearbox shank begin to rotate. Thanks to the worm mechanism, more torque is transmitted to the bipod at a reduced number of revolutions.
- The bipod begins to rotate, and with it the middle rod on the left. At the same time, the middle rod transmits force to the right side of the trapezoid via a bracket.
- All three parts turn in one direction or another depending on which direction the steering wheel goes, and at the same time the front wheels begin to turn synchronously.
A pendulum-type lever is attached to the second spar, which serves as an additional hinge. At the ends of all three rods there are conical pins, thanks to which the trapezoid is always in a strictly horizontal position, regardless of the travel of the car’s suspension.
Design features of articulated rods
The middle element is the simplest in its structure. It is a non-separable rod, at the ends of which there are hinges. The conical fingers of the rods are installed in the holes of the bipod and secured with castle nuts, and a cotter pin is used for additional fastening.
The right and left rods consist of an outer tip with a pin and an inner tip with a hinge. They are connected to each other using a threaded clamp and two bolts. The design of the side rods consists of several parts and can be separated. This was done to be able to adjust the wheel alignment/camber. The length can be changed by twisting or unscrewing the threaded clamp, thus adjusting the position of the front wheels.
The hinged ends of all rods are identical in design and consist of the following parts:
- threaded pin and hole for a cotter pin;
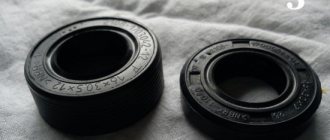
- boot (protective cover made of rubber or silicone);
- durable metal body;
- cracker (support liner);
- spring;
- cover installed in the housing.
A ball joint (hinge) works on the same principle as a bearing, i.e. a metal ball rotates in a plastic housing. On more expensive and high-quality ball bearings, manufacturers cut a grease fitting into the cover on the body to allow lubrication using a syringe. External or external rods on both the right and left are the same, internal ones have differences. The right lever is bent so that it does not touch the gearbox housing when moving.
Selection of new steering rod parts for VAZ 2106
Repairing the steering linkage allows you to replace only the failed part. Rarely does anyone change all the components at once. As a result, the articulated rods on many cars are assembled from different parts that differ in quality. At the moment, finding original spare parts for the VAZ 2106 is becoming increasingly difficult, since the car has long been out of production.
Due to the low resource, standard kits have long become a rarity. However, there are many other manufacturers that produce analogues of factory steering linkage parts:
These brands have proven themselves well among car enthusiasts; their products are of good quality. When choosing, it remains to recommend not to buy spare parts in dubious places, since the likelihood of purchasing a fake in this case increases sharply. You should not chase low prices; high-quality parts cannot be suspiciously cheap.
All steering rods of VAZ 01-07 models are identical, so when purchasing, do not worry about reading the numbers 2101 on the packaging. The only thing worth paying attention to is the mobility of the ball pin in the rod end. In the new product, it should be difficult to turn in the socket due to manual effort. After successfully replacing even just one tip, you cannot drive right away; you must definitely adjust the toe angles of the front wheels at the nearest service station.
Lada 2107 › Logbook › front chassis. Bulkhead + repair of lower arm studs.
mileage 40,000 km. good night. I dedicated this entry to the revision of the front suspension, and I will also try to talk in as much detail and clearly as possible about the repair of the studs (more precisely, the replacement) of the lower arms. so the mileage is, in principle, low, in order to get into it, I used it carefully. BUT there are a couple of buts. The first thing that pushed me to such a repair was the fact that I ride on a non-factory suspension! Accordingly, the loads on the components and parts are completely different. second, non-factory wheels are an order of magnitude heavier and wider. Well, thirdly, an extraneous noise appeared in the area of the front right wheel. Not strong, and infrequent, but still bothered me a lot) to begin with, I purchased spare parts and the necessary tools. 1. a simple device for pressing out ball joints of a VAZ classic. (photo 1) popularly known as a “soldier”. Despite its simplicity, it is a very effective device. And the price is very low. 2. front spring tie (photo).
3. a device for pressing and pressing out the silent blocks of the upper and lower arms. (photo 3). Sorry, I didn’t take photos of the tool. (I took it from the internet).
Then I purchased spare parts. 1. set of TREC ball joints. (photo 4) if any of my fellow countrymen are interested, I managed to find these (as a set) in the BI-BI auto store.
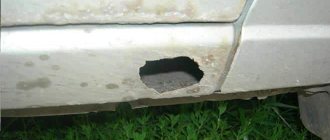
2. a set of silent blocks (photo 5) 3. and most importantly patience))) I drove the car into the garage into a pit, had a hearty lunch, and then away we go). disassembly did not pose any particular difficulties. Since I already have experience, the shock absorber mounting studs on the lower arm failed, I don’t know why. Either the quality. Or the gas-oil Niva Amik did its job. They simply broke off at the first attempt to unscrew the nuts... a problem arose that it was necessary to decide! I obviously didn’t want to change the levers completely because of this...(photo of problem 6)
After twirling the part in my hands for about 15 minutes, I decided that I would change the studs, a route map of the work was already emerging in my head))) HOW I CHANGED THE STUDS. 1. I cut off the remaining studs with chewing gum, as much as possible (I decided to do the same with those needed to fix the stabilizer, in order to immediately strengthen this unit by installing bolts of larger diameter in their place. 2. using electric sandpaper I removed the remaining parts of the studs. There is no photo, but I think everything is clear. 3. Using a drill, I drilled through holes strictly in the places where the studs used to be. (Photo 7) 4. The next step is to take a tap and cut the thread. (Photo 8 9
) IT IS IMPORTANT THAT THE HOLES ARE DRILLED AT THE ANGLE AT WHICH THE FACTORY STUDS WERE SET. 5. Carefully, so as not to damage the thread, screw the prepared studs into the lever. As I wrote earlier, I took the studs with a larger diameter and length than the manufacturer sets. (Photo 10) Everything is visible in the photo
5. Carefully, so as not to damage the thread, screw the prepared studs into the lever. As I wrote earlier, I took the studs with a larger diameter and length than the manufacturer sets. (Photo 10) Everything is visible in the photo.
screwed pin into the lever (photo 11)
regarding “screwing in” since the holes for fastening the ammonia were drilled through, we screw in a new pin so that after applying the weld seam, it does not protrude beyond the plane of installation of the spring in the lower cup (on the lever) photo 11 6. we drill holes in the fasteners themselves shock absorber (lower) with a diameter suitable for the new studs. (no photo) 7. before you start welding this thing, the studs need to be secured from “moving to the side” during welding work. (photo 12) (13)
8. We weld. (photo 14) 9. We process the seams. (No photo) regarding the stabilizer studs. In this case, I used bolts, since the amount of space allows them to be used. I did not cut the threads in these holes. Actually on (
photo 15) everything is visible. 10. Then the bolts were also welded. The seams were put in order. 11. the result obtained. (photo 16 17 18) the rest of the photos are just in the process of assembly...
Payment via Yandex Cashier
After selecting payment via Yandex, the Yandex Cashier payment system will launch, where you need to select a convenient payment method (bank card, QIWI, Yandex Money account, etc.)
After specifying payment details and confirming payment, payment for the goods will occur.
If you have a bank card in a currency other than the ruble, then the money will be debited from the card at the rate of the Central Bank of Russia at the time of the purchase.
This payment method is optimal for residents of Russia, Kazakhstan and Belarus.
Official website of the Yandex Kassa payment system https://kassa.yandex.ru
Payment via Portmone
After selecting payment through Portmone, the payment system will launch, where you need to select the payment method: bank card or Portmone account.
The price in the Portmone payment system is converted into dollars at the exchange rate of the Central Bank of the country where you are located.
If you have a bank card in a currency other than the dollar, then the money will be debited from the card at the rate of the Central Bank of your country at the time of the purchase.
After specifying payment details and confirming payment, payment for the goods will occur.
Official website of the Portmone payment system https://www.portmone.com
Payment via PayPal
After selecting payment via PayPal, the PayPal payment system will launch, where you need to select the payment method: bank card or PayPal account.
If you already have a PayPal account, then you need to log into it and make a payment.
If you do not have a PayPal account and you want to pay using a bank card via PayPal, you need to click on the “Create an Account” button - shown with an arrow in the picture.
PayPal will then prompt you to select your country and provide your credit card information.
After specifying the information required to make the payment, you must click on the “Pay Now” button.
Official website of the PayPal payment system https://www.paypal.com
Articles
Renault produces silent blocks both individually and assembled with levers. The part is designated as follows: 6040002245 (60 40 002 245). Analogues:
- 26304 (FEBI)
- 60 92 6304 (SWAG)
- TD729W (DELPHI)
- C8617 (LYNXauto)
- 30292 (ASAM)
- 4500001 (FORMPART)
- 53210 or 33124 (MAPCO)
- FZ90454 (FORTUNE LINE)
- L25819 (MONROE)
- 38DC1002 (AS METAL)
- V46-0268 (VAICO)
- MGZ-508014 or 72-1956 (MAXGEAR)
- 5103924 (NK)
- F8-7977 (OPTIMAL)
- D300165 (DENCKERMANN)
- 4340201409 or EMS8502 (JP GROUP)
- DC11001 or B56112 (RIW)
- 57-00732 (TALOSA)
- 8500 25819 (TRISCAN)
- 77-00862-SX (STELLOX)
- 31242 01 (LEMFORDER)
- RESB3746 (MOOG)
- JBU751 (TRW)
It seems that the last three are praised. But there is nothing better than the original. And the cheapest analogue is produced by SWAG.
Payment via WebMoney
After selecting payment via WebMoney, the payment system will launch, where you need to select the payment method: bank card or WebMoney wallet.
If you already have a WebMoney wallet, then you need to log into it and make a payment.
If you do not have a WebMoney wallet and you want to pay in another way, you need to select any of the methods that WebMoney offers and make the payment
After specifying payment details and confirming payment, payment for the goods will occur.
Official website of the WebMoney payment system https://www.webmoney.ru/
Downloading a book
After successfully completing the payment (by any method) and returning to the KrutilVertel store from the payment system website, you will be taken to the successful payment page:
On this page you need to indicate your e-mail, where access to download the book will be sent.
If you are already registered on our website, then simply follow the link to your personal account.
The book you purchased will be in your personal account, from where you can always download it.
Please note that after making the payment, you need to return back from the payment system website to the KrutilVertel website.
If for some reason you did not return back to the site and closed the payment system tab with a message about the successful completion of the payment, please let us know - we will send you a letter indicating access to download the book.
Problems when paying with bank cards
Sometimes difficulties may arise when paying with Visa/MasterCard bank cards. The most common of them:
- There is a restriction on the card for paying for online purchases
- A plastic card is not intended for making payments online.
- The plastic card is not activated for making payments online.
- There are not enough funds on the plastic card.
In order to solve these problems, you need to call or write to the technical support of the bank where you are served. Bank specialists will help you resolve them and make payments.
That's basically it. The entire process of paying for a book in PDF format on car repair on our website takes 1-2 minutes.
Caring for steering wheel parts
The first and, it may seem to you, the most banal advice, but, unfortunately, it is often neglected - this is the banal dryness of the room in which the machine is located. Most garages have extremely damp spaces, which is not very favorable for the steel and other parts that are in the car. Due to the prolonged presence of the car in a damp room, parts become susceptible to external influences, and metals oxidize over time.
It is recommended to store the machine in a dry place
The second point is one that you can influence extremely minimally, but you still can. This means trying not to drive on roads with poor surfaces, off-road conditions and, of course, being wary of potholes. Yes, all these insidious surprises on the road can damage literally any part of the car.