Almost every driver has gone through the domestic auto industry, and everyone knows firsthand about its problems. Many can be easily treated at minimal cost. This post will not open America to anyone, but I will still write briefly how you can do all this yourself.
On the 10th family, gear shifting is generally convenient, but the moves are a bit too big. Like a typical pelvic driver, I installed a short-stroke and a Kalino card www.drive2.ru/l/2206012/, and there were problems with engaging the reverse gear. It's all about the white plastic under the gearshift knob cover, which is the guide and limiter for 1.2 and 3.x. I cut it, everything seems to be working, but somehow it’s all wrong... During the next gearbox overhaul, I installed a screw lock with a preload of 4.5 kg, a pair of 4.1 from 2108 and replaced the gear selection mechanism from 2108. After that, I removed the white plastic as unnecessary and put washers under the lever ball so that it does not move down. Everyone knows the differences between switching on s.h. on 2110 and 2108. Shifts have become clear, adjusting the rocker has become much easier))) More precisely, now you don’t need to adjust it at all, you just select a convenient position for the gearshift lever and tighten it. After 50t.km. again I had to disassemble the gearbox in order to increase the preload in the helical differential from the already 3kg to 7kg. The assembly took a little longer and this turned out to be to my advantage. In a friend’s garage I saw live an amplified sample of a clubturbo, the only amplification in it was a jumper plate in the form of a horseshoe between the “mustache”. Well, I studied it))) and went to the garage to repeat what I saw. I examined my sample, which had worked 50 thousand km, and noticed that the whiskers had indeed spread apart from each other. I pressed them back in a vice and began to model the horseshoe-amplifier, first from cardboard. Then I made it from 5mm hot-rolled sheet metal. I decided that I could make it more powerful, and taking into account the errors, I made its final version. You need to cook it carefully, preferably with a semi-automatic machine, so as not to shit too much, otherwise it will be very difficult to get to the excess scale! During assembly, I also replaced the switching rod with a 2108 one. Many friends advised me when installing a sample from 2108. I also installed a rubber boot from the Priora, since the one from 2110 was constantly torn after installing the Kalino cardan. Another issue I noticed was that the inner two roller bearings rotate directly on the secondary shaft. There was only one way out, grab it by welding...
After assembly, the activation became clearer, the longitudinal strokes remained the same, but everything was still about 2 times less than that of a standard rocker, but the transverse ones decreased, the horseshoe is in action! Still, such a small piece of hardware, but it does its job)))
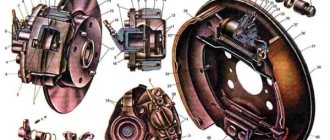
Intervention in the VAZ-2110 gearbox is required in cases where extraneous noise and shifting problems are observed. To perform repairs, you will need new items, consumables, appropriate tools, a vehicle operating manual and the recommendations given in this article.
How does the VAZ 2110 gearbox work?
Before repairs, it is advisable to understand the operating principles of the gearbox installed on the VAZ 2110 model. The operating principle of the gear unit is as follows:
- The device contains a primary shaft consisting of a gear block. They are in constant mesh with the gears designed to move the car (drive gears);
- A drive gear is installed on the second shaft, on which the synchronizers are located. The bearing and oil sump are also installed here;
- by means of a flange, the driven gear of the main gear is connected to the two-satellite differential;
- elements of the device also include rods, ball joints, levers and switching mechanisms;
- so that the speed does not “take off”, the unit is equipped with a jet thrust, the ends of which are fixed to the power unit and support.
Transmission repair, instructions for assembling and disassembling the box of a Lada 2110 car, the procedure for replacing oil seals with your own hands, a repair manual for the VAZ 2111, VAZ 2112, VAZ 2110 drive. Repair instructions for the box of the Lada 2110. Repair of the clutch, differential, drive of the Lada 2112
We remove dirt and wash the outside of the gearbox (do not allow water to enter the crankcase). Using a 17mm wrench, unscrew the bolt securing the power unit suspension bracket. Using a 13mm socket, unscrew the six nuts securing the rear crankcase cover. Remove the bracket. Tapping with a copper hammer (or an ordinary one through a soft metal mandrel) on the tides of the cover,... ...remove it together with the sealing gasket from the studs. Having pressed the gear selection rod all the way, we turn on the third gear, or, by retracting the rod all the way, we turn on the fourth. Using a 10mm spanner, unscrew the bolt securing the fifth gear fork. Using a soft metal drift, we hit the fork downwards, including the fifth gear of the VAZ 2110. Using a punch, we straighten out the dents in the nuts of the primary and secondary shafts of the VAZ 2111. Using a “32” socket with a powerful wrench... ...we unscrew the shaft nuts. Using a screwdriver, pry off the fifth gear fork and remove the fifth gear assembly of the VAZ 2112. Remove the fifth gear shift fork. Remove the synchronizer sliding clutch from the hub. Remove the blocking ring of the VAZ 2110 synchronizer. Remove the thrust plate. We move the hub inside the sliding clutch of the VAZ 2112 synchronizer... ...and remove the hub, springs, clamps and fifth gear synchronizer blocks. Using a copper hammer, we strike the end of the input shaft of the VAZ 2111. Insert two screwdrivers into the resulting gap between the thrust plate and the fifth gear drive gear. Prying up the gear with screwdrivers, we compress it. Using the “13” socket, unscrew the three plugs of the gearshift rod clamps. Remove the springs and retaining balls from their sockets. Using a Phillips impact screwdriver, unscrew the four screws securing the thrust plate. The screws have special lock washers. Remove the thrust plate. Use two screwdrivers to pry off the thrust washer of the fifth gear driven gear bushing. Into the resulting gap between the end of the rear bearing and the thrust washer we insert the paws of the puller... ...and press the VAZ 2112 gear bushing and the thrust washer. Use two screwdrivers to separate the retaining ring on the input shaft... ...and remove it. In the same way, remove the retaining ring from the secondary shaft of the VAZ 2111. Using the “13” head, unscrew the reverse gear lock plug and remove the spring. We insert a screwdriver into the socket of the latch and, applying a magnet to it, remove the ball. Using a “13” socket, unscrew thirteen nuts and one bolt securing the VAZ 2110 gearbox housing to the clutch housing. By inserting a screwdriver into the groove at the junction of the crankcase mating planes, carefully lift the box crankcase... ...and remove it. Using a 10mm spanner, unscrew the bolt securing the 1st-2nd gear shift fork to the rod. We lift the rod up and disengage the fork. Using a 10mm spanner, unscrew the bolt securing the 3rd-4th gear shift fork to the rod. Use a screwdriver to remove the rod from the gear selection mechanism. Raise the rod up and remove the fork from the groove of the synchronizer sliding clutch. By turning the 5th gear engagement rod, we remove it from the gear selection mechanism. We take out the axis of the intermediate gear of the VAZ 2110 reverse gear. Remove the reverse intermediate gear. We simultaneously remove the primary and secondary shafts of the VAZ 2111 from the roller bearings of the clutch housing. We take out the differential assembly. Using a 10mm socket, unscrew the three bolts securing the gear selection mechanism... ...and remove it. Using a 10mm socket, unscrew the installation bolt of the gear selector lever. Remove the gear selector lever from the rod. Using a screwdriver, remove the protective cover of the rod from the bushing. We take out the gear selection rod. You can replace the gear selector rod hinge on a VAZ 2112 gearbox installed on a car (you should not remove the joint from the rod unless necessary, since the fastening bolt is installed on a special TB-1324 glue). For clarity, we carry out this operation on the removed rod. Using a 10mm spanner, unscrew the hinge mounting bolt... ...and remove the hinge. To replace the gear selector rod oil seal, pry it with a hook made of thick wire and remove it from the bushing. Using a screwdriver, remove the rollers of the front bearing of the secondary shaft from the separator. We take out the bearing separator. Having hooked the hook of the device onto the shoulder of the outer ring of the bearing, strike the hook... ...press out the ring. Remove the oil pan. In the same way we press out the outer ring of the input shaft bearing. We take out the magnet. Using a suitable piece of pipe, knock out the drive seal from the clutch housing... ...the drive seal. Through the bit we strike the end of the outer ring of the differential bearing... ...and press out the ring. In the same way, we knock out the oil seal and the outer ring of the differential bearing from the gearbox housing. We take out the adjusting ring. We clamp the input shaft in a vice with soft jaws. We pry up the rear ball bearing with two mounting blades and press it together. Through the mandrel we strike the end of the inner ring of the front bearing... ...and compress the ring. We clamp the secondary shaft of the VAZ 2111, VAZ 2110, VAZ 2112 in a vice with soft jaws. Using two screwdrivers, we rest against the ends of the locking ring... ...and remove it from the front end of the shaft. Insert a screwdriver into the gap between the inner ring of the front bearing and the end of the main gear drive gear and press out the ring. We insert two mounting blades into the resulting increased gap and press the inner ring of the bearing off the shaft. Having grabbed the driven gear of the 1st gear of a VAZ 2110, VAZ 2111, VAZ 2112 with a three-legged puller, we compress the drive gear of the main gear. If there is no puller, we place stops under the gear and strike the end of the shaft of a VAZ 2112, VAZ 2111, VAZ 2110 with a copper hammer. Remove the drive gear of the main gear. Remove the 1st gear driven gear. Remove the 1st gear synchronizer blocking ring. Using round-nose pliers, separate the retaining ring of the synchronizer hub and remove it. By prying the driven gear of the 2nd gear with two mounting blades, we press the hub of the sliding clutch of the 1st–2nd gear synchronizer off the shaft. Remove the sliding clutch with the synchronizer hub and the blocking ring of the 2nd gear synchronizer. Remove the 2nd gear driven gear. Turn the shaft over in a vice. Prying the rear bearing of the secondary shaft with two mounting blades,... ...press it. Remove the thrust washer. Remove the 4th gear driven gear. Remove the blocking ring of the 4th gear synchronizer. Use a pair of pliers to separate the locking ring of the synchronizer hub... ...and remove it. Having grabbed the third gear gear with a three-legged puller, we press the hub of the sliding clutch of the third-fourth gear synchronizer from the shaft. If there is no puller, we place stops under the gear and strike the end of the shaft with a copper hammer. Remove the sliding clutch from the synchronizer hub. Remove the third gear synchronizer blocking ring. Remove the 3rd gear gear. We clamp the driven gear of the main gear in a vice with soft jaws. Using a “17” head, unscrew the eight bolts securing the gear to the differential box of the VAZ 2111. Using a copper hammer, knock out the differential box. By turning, we remove the drive gears (semi-axial) from the box. Holding the VAZ 2110 differential box in a vice, use round nose pliers to remove the retaining ring from the satellite axis. By pressing on the satellite axis, we remove it from the box. We remove the satellites from the box. To remove the differential bearings, clamp the box in a vice. Having inserted a chisel into the gap between the end of the inner ring of the bearing and the differential box, we strike the chisel... ...and compress the bearing.
Adjusting the gearbox, video instructions
If it is necessary to replace gears, bearings or other parts, the box must be dismantled. Usually in such cases, the VAZ 2110 gearbox is overhauled and elements that have failed are replaced. But removing the box is not always necessary.
It is known that the 10 has problems with gear shifting. In fact, the speed is knocked out.
To eliminate the problem, the unit is equipped with a special mechanism that allows you to adjust the drive.
The operation is performed in the following cases:
- the gearbox was dismantled due to repairs, for example, replacing the input shaft bearings;
- speed knocks out while driving;
- Gears don't engage or disengage easily.
If such situations arise, then adjustments cannot be avoided.
Of course, performing this procedure is much simpler than dismantling work. The work is performed in the following sequence:
- At the bottom of the vehicle there is a nut in a bolt. This fastener holds the transmission linkage in place. The fastening element does not need to be removed: just unscrew the nut a little;
- to move the grooves of the rod and the slot of the fastening clamp apart, just use a flat screwdriver;
- the rod must be set to the neutral position. Then you need to remove the cover from the gearbox handle;
- then the lever is set in accordance with the template;
- at the next stage it is necessary to adjust the backlash of the rear vector rod;
- adjusting axial play;
- At the final stage, the fastening must be installed in place and tightened.
Gear shift drive rocker from Priora on VAZ 2110
| After the start of production of the Priora, the plant constantly refined the design of the car. So, starting around 2011, AvtoVAZ began equipping cars with a new type of gear shift drive. Thus, the Priora got its own gear knob (and not like on the “ten”), a rocker, a lever axis and other elements of the shift drive. Let's figure out what this modernization of the Priora gave and why this design is installed on the VAZ 2110. |
| 1 | Gear shift knob cover | 21700-1703124-00 |
| 2 | Lever | 21700-1703088-00 |
| 4 | Hinge bushing | 21700-1703226-00 |
| 5 | Thrust washer | 21700-1703371-00 |
| 17 | Control drive assembly | 21700-1703010-00 |
| 18 | Lever arm | 21700-1703082-00 |
| 19 | 21700-1703219-00 | Lever axis |
- No vibrations on the gearshift knob;
- New design of the gear knob with a gray insert to match the interior style.
- Owners who have installed new parts notice a gap between parts 17 and 20. The metal disks 16 are not pressed against the spacers 16 and the lever 20 tightly enough due to the bushing 18. The problem can be solved by shortening the bushing by 1-2 mm.
- Vibrations on the gearshift knob become less, but they do not disappear completely. They say that only cable shifters have no vibrations, but even there there is a rattling of the gearshift knob.
xn--2111-43da1a8c.xn--p1ai
Transmission repair
Adjustment does not always achieve the desired effect. Therefore, the motorist will need to carry out repair work. Practice shows that most often the gears that are responsible for the first and second speeds are knocked out. When disassembling, the car owner needs to make sure that all fasteners are in good condition. We are talking about 3 springs. 1 design serves the first and second speeds, 2 - the third and fourth, and 3 - the fifth. The first clamp has the maximum length.
Before repairing a VAZ 2110 gearbox with your own hands, it is recommended that you carefully study the video material, as well as read the operating manual.
Repair work
If the adjustment does not give the desired result, you will have to work more carefully with the box. A common problem is knocking out the gears responsible for speeds 1 and 2.
When dismantling, make sure that each individual fastener is in good working order. The latches are springs, of which there are a total of three. The first one is the longest, it is responsible for speeds 1 and 2. The second is medium in size, and its prerogative is 3 and 4 speeds. The third detent is the smallest, and its “guardian” is fifth gear.
Difficulty engaging second gear, video
The owner of the ten may encounter the same problems as when turning on the first speed. In any case, malfunctions are due to the following reasons:
- abrasion of gear teeth. At the first stages, the speed turns on poorly, but over time it will start to crash. Therefore, surgical intervention is required;
- there is insufficient adhesion of the gear to the gear shift clutch;
- the speed is switched off when hitting uneven road surfaces. In this case, the problem is the clutch.
Sometimes, to eliminate the knockout of the second gear, it is enough to replace the clamp. If replacement does not achieve the desired result, then a major overhaul is required.
Adjustment in this case will not solve the problem. Carrying out repair work yourself is quite difficult. Unlike adjusting and replacing oil seals, major repairs require professional skills.
Nuances, video
It should be noted that the gearbox is a fairly stable component of the vehicle. Compared to other units, breakdowns occur much less frequently here. At the same time, you need to remember that for the normal functioning of the box, you should change the oil in a timely manner, and use products from trusted brands. In terms of their performance, the gearboxes are almost identical. If we are talking about front-wheel drive cars, which include the VAZ-2110, then you can use oil poured into the power unit. If we are talking about rear-wheel drive VAZs, then special oil is provided for them. Sometimes car owners notice an oil leak. This is caused by weak fastening of the box and crankcase. The problem is solved with the help of seals, as well as careful tightening of the bolts.
If problems arise with the box, first of all it is necessary to adjust the drive and replace parts that have failed as a result of physical wear.
If the car owner has the skills and experience, then repairing the gearbox of a VAZ-2110 car can be done with his own hands. In other cases, it is better to visit a trusted auto repair shop and eliminate the deficiencies after professional diagnostics.
Where can I buy
You can buy a new replacement part at special retail outlets or HERE.
The cost of the checkpoint varies, starting from 50,000 tenge
Help
If you haven’t coped with this task yourself or simply don’t want to bother with the work, you should contact a service station, which you can choose HERE.
The VAZ 2110 has been produced for several years now, because all the “sores” of these cars have long been known, both to ordinary owners of “ten” cars and to VAZ itself. The latter seems to be trying to gradually solve these problems, but very gradually. But that's a completely different story, as they say.
Common gearbox problems
Owners of the VAZ 2110 car note several characteristic faults in gearboxes for this model. Some people do not engage reverse gear, others complain about overshoot, and so on.
Let's look at the most popular problems that the domestic "ten" box can boast of.
- First speed problem. It may fly out or be difficult to turn on in the car. There are several reasons:
- The synchronizer has failed;
- The latch spring has a defect, it has burst;
- The lever has become loose, causing the gears to switch spontaneously;
- The rod is out of order or the fork is faulty; they must be replaced.
- Second gear problem. It often gets knocked out, or it’s difficult to switch to it. There may also be several reasons for such a malfunction:
- The gear teeth do not cling well to the gear shift clutch;
- The tips of the teeth are worn out and worn out, making it difficult to switch on the speed. Over time it will begin to fly out. Therefore, repairs are required;
- If the gear is knocked out when hitting a bump, then there is nothing good about it - the problem lies in a failing clutch.
Having experience, relevant knowledge and skills makes it possible to deal with checkpoint problems with your own hands. If all this is missing, we strongly recommend that you contact a trusted service center, where they will carry out diagnostics, determine the true causes of the problem and return your gearbox to its previous condition. Yes, it will cost some money, but you can’t do without it. Nothing is eternal. Moreover, the “tens” gearbox.
Reverse speed of automatic transmission does not engage
In practice, reverse gear may not be engaged in both manual and automatic transmissions. Taking into account the fact that automatic transmissions are different, it should be noted that some problems of manual transmission robots are similar to “mechanics”, while “classic” automatic transmissions have their own list of problems due to which the reverse speed disappears.
- The level of the ATF transmission fluid has deviated from the norm, the fluid in the automatic transmission is contaminated or has lost its properties. As you know, an automatic transmission is extremely sensitive to the level and quality of oil. For this reason, the check should begin with the transmission fluid.
Please note that both under and over levels can cause gears to shift incorrectly. Also, ATF oil has a limited service life, that is, the fluid needs to be changed every 40-60 thousand km, contamination, cloudiness, etc. are not allowed.
- Wear of automatic transmission clutches (friction discs). This malfunction often affects both reverse gear R and gears in drive mode D. Problems with clutches lead to gears not being engaged, and certain speeds may disappear (for example, the car goes to 1 and 2, but not 3 and 4, as well as reverse gear). To fix the problem, you will need to replace the automatic transmission clutches.
- Other automatic transmission malfunctions and breakdowns. For example, if the splines of the drive drum are cut off, the machine can move forward, but there is no reverse gear. There may also be complete absence of movement both forward and backward. To solve the problem, the drum needs to be replaced.
Other problems include broken brake band piston cuffs or severe wear. The malfunction only appears when the driver engages reverse gear, that is, the car moves forward normally, but there is no reverse movement. Another common problem with similar symptoms is failure or jamming of valve body valves and individual solenoids.
Additionally, experts draw attention to the fact that if there is no connection between the oil pump drive gear and the torque converter, the automatic transmission will not engage in both forward and reverse gears.
Repairing a gearbox by hand, how to bring spare parts into the desired form
- If it is necessary to replace the rod hinge, remove the protective cover on it, and then unscrew the bolt securing the hinge. For strength, a special glue TB-1324 was applied to the bolt. Therefore, before assembly, it is necessary to clean the bolt and apply this glue to the surface.
- Check the magnet, if it is intact, just clean it of dirt. If small cracks are found or if it does not magnetize well, it should be replaced.
- Clean the surfaces of the gearbox housings, clutches and rear cover from sealant.
- Using transmission oil, lubricate all rotating elements.
Repairing the box
In the event that this kind of adjustment work did not bring much results, you will have to remove and disassemble the gearbox of your VAZ 2110
The main attention should be paid to the gears, as they are most often knocked out. This is especially true for first and second speeds.
It will also be important to check the latch. There are three latches in total in the gearbox.
The very first of them is very long and is responsible for 1st and 2nd gears. Next comes the clamp for third and fourth gears, and the shortest of the clamps is intended for 5th gear
There are three latches in total in the gearbox. The very first of them is very long and is responsible for 1st and 2nd gears. Next comes the clamp for third and fourth gears, and the shortest of the clamps is intended for 5th gear.
complete gearbox assembly
Often, VAZ 2110 owners voice a problem regarding the switching or departure of first gear. Most likely, the reasons lie in the following:
- synchronizer problems;
- damage to the retainer spring when the lever dangles and the gears are switched on randomly;
- damaged rod and fork.
A common problem is when the second gear is reluctantly engaged, or it is simply knocked out. The most likely causes of the problem:
- poor engagement of the gear and clutch that engages the gears;
- wear of gear teeth and coupling;
- problems with the clutch.
Repair of the gear selection mechanism of the VAZ 2110 gearbox.
The gearbox of cars of the tenth family uses a gear selection mechanism with a silumin housing. The most common malfunction in it is wear of the moving parts of the gear selector lever. If the selection mechanism is worn out, it is recommended to replace it as an assembly. Since it is quite expensive, you can try to repair it. To do this, let's analyze it:
We unscrew bolt 1, pull out locking ring 2. Simply extend the rods and pull them out:
The spring needs to be replaced, the same one used here as in the selection mechanism of the VAZ 2108, and we will try to repair the lever. First you need to boil the weakened levers, to do this we clamp them in a vice and boil the levers, only in this case you need to install the levers shown by the arrows as evenly as possible:
Then we take the electrode three, clean it from the coating, bend it and insert it into the place of wear and boil it:
That is, we make a kind of spacer bushing out of wire to remove the backlash:
Then we assemble the mechanism in the reverse order, installing a new spring. If done carefully it will last longer than new. When assembling, please note that the spring should be installed only as in the photo, with the large end towards the silumin body: