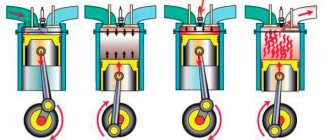
The fuel system of VAZ 2105, 2107 cars includes several elements that serve to supply fuel to the engine: carburetor, fuel tank, fuel pump and fuel lines. The fuel tank is used to store fuel (42 liters), a mechanical fuel pump for pumping fuel through the system, fuel lines for supplying fuel, a carburetor for preparing the fuel mixture necessary for the operation of the car engine in different modes.
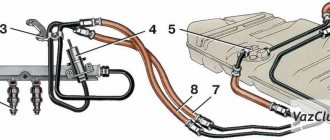
Elements of the fuel system VAZ 2105, 2107
- Carburetor.
- Fuel supply hose to carburetor.
- Mechanical fuel pump.
- Fuel fine filter.
- Front fuel line pipe.
- Rear fuel line pipe.
- Level indicator and fuel reserve sensor.
- Fuel level sensor float.
- Strainer on the fuel intake in the gas tank.
- Fuel tank ventilation pipe.
- Fuel tank safety shield.
- Fuel tank.
- Gasket under the fuel tank.
- Fuel tank mounting clamps.
Notes and additions
— The fuel system of VAZ 2104 cars has a similar scheme.
More articles on the fuel system of VAZ 2105, 2107 cars
To monitor the fullness of the fuel tank, the design of the VAZ 2107 car is equipped with a special sensor that transmits a signal to a dial indicator located on the dashboard. The FLS or fuel level sensor of the VAZ 2107 is designed to monitor the fullness of the tank, and if it malfunctions, the driver has to focus on mileage consumption, which is not entirely convenient. Device diagnostics will help correct the situation, based on which the causes of the breakdown will be identified.
Why the sensor may not show
Cases when the fuel level sensor does not work on a VAZ 2107 are not at all uncommon. Experienced owners of 7s know what can cause a device to break down. Moreover, sensor breakdowns occur equally often on both carburetor and injection VAZ 2107 models.
The fuel level sensor or FLS is a rheostat made of nichrome wire. The position of the moving contact is changed using a float. The device is located on both injection and carburetor models inside the tank. The only difference is that the injection sevens additionally have a fuel pump, which is located next to the sensor. If the fuel gauge does not work, then there is a high probability that there is a malfunction of the sensor in the tank.
Failures of this device manifest themselves in different ways:
- The pointer indicator is constantly in the “0” position.
- When the car moves, the needle tends to “jump,” which also indicates a malfunction in the fuel level control system.
- When the ignition is turned on, the needle on the fuel level indicator is at zero, but when driving, after a while it begins to function.
- The indicator (light) does not light up, indicating that the amount of fuel in the tank is reduced.
What causes the fuel quantity indicator in the tank on the seven to not work needs to be disassembled in detail, this will help you find out where to start repair work. The causes of breakdowns are:
- The sensor fuse has blown - this element must be checked first so that you do not have to do unnecessary work. If the fuse is blown, the dial indicator will always show “0”.
- The board tracks are worn out - this type of malfunction is directly related to the sensor on which the tracks are erased due to their wear-out. This type of breakdown is not considered serious, as it can be easily fixed. To do this, you need to bend the slider so that it moves along the section of the track that has not yet been erased.
- If the true fuel level in the tank is distorted, it is necessary to adjust the sensor regulator. To solve the problem, you will need to change the position of the FLS pins. Changing the position of the pin is done by moving it to the side until the pointer arrow moves to “1”. The arrow in positions “0” and “1” must be stationary, and if it moves when installed in these positions, then it is necessary to bend the pin accordingly.
- Oxidation of the FLS contacts, which also causes the indicator to become inoperable. To eliminate the breakdown, you will need to clean the contacts.
- The sensor float is damaged - depending on the fullness of the tank, the float moves the moving contact of the rheostat to the appropriate position. The float is a sealed volume of air. If the integrity of the float is compromised, fuel gets inside, which results in the display of incorrect data.
Malfunctions of the engine with distributed injection
In any mechanism during its operation, certain breakdowns occur. The injection engine of the “Seven” is not immune from this. There are many faults and they are different, let’s look at the main, most common ones:
- unstable and unstable operation of the engine without load;
- clogged injectors;
- increased gasoline consumption;
- the permissible norm of CO2 in exhaust gases has been exceeded;
- when the throttle valve is opened sharply, dips in engine speed are formed;
- the power plant does not “pull”, power decreases.
To correct these defects, it is better to contact a specialized workshop. Specialists will carry out diagnostics using a computer with a specific program. They will determine the causes of failures, check whether the sensor readings are correct or not, and evaluate the operation of the ECU. After this, the necessary repairs will be carried out using equipment.
Fuel system features
"Seven" is an improved version of "Six". The latter, in turn, like all its predecessors, was distinguished by a carburetor power system. On the VAZ-2107 an injector can be used to supply the combustible mixture.
An injection system is a whole complex of parts that combines the following elements:
- Control block.
- Sensors (mass air flow and lambda probe).
- Idle speed regulator.
- Fuel tank with adsorber valve.
- Pump.
- Filter.
- Injectors.
- Connecting tubes and hoses, as well as wiring.
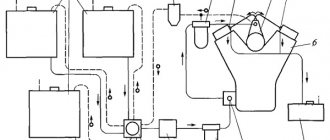
A more detailed diagram of the VAZ-2107 fuel system (injector) is presented below.
A submersible pump pumps fuel out of the tank, where it enters the intake manifold through tubes under a pressure of 3 - 3.5 atmospheres. Gasoline first undergoes a purification procedure. For this purpose, a fine and coarse filter is provided (the latter is located directly in front of the pump). The amount of fuel that enters the cylinders is dosed by the injectors themselves using electronics. Excess gasoline flows through the fuel check valve into the tank. This element is two-way. It is indicated by the number 10 on the diagram of the VAZ-2107 fuel system (injector), which is presented above.
All processes for supplying and preparing the gasoline mixture occur automatically. As reviews note, the system is quite reliable and does not require adjustments, as is the case with a carburetor. But sometimes problems can arise with it. For example, the smell of gasoline suddenly appears in the interior of a VAZ-2107 (injector). What to do and why it is dangerous, we will consider further.
Is there any point in redoing it?
The carburetor engine has long been “morally obsolete”. Back in the second half of the 90s of the last century, VAZ cars were equipped with an injector. Nevertheless, carburetor engines still have a lot of “fans” who claim that the carburetor is not so bad. Before we begin converting the car, let’s look at it in detail, is everything so clear? Maybe it’s too early to consign the carburetor to the dustbin of history? Let's paraphrase Hamlet and ask ourselves: “Carburetor or injector, that is the question?” This is, of course, a joke. But is it really worth investing so much effort?
- To re-equip a VAZ-2109 you will need to invest at least $500. It is unlikely that the savings from using an injection engine will pay for such costs. Maybe only in the long term.
- The environmental performance of a car can be improved much more easily. Install a vortex aerodynamic device. It’s easy to buy such a unit, it’s inexpensive, and it installs quickly.
How to solve a problem?
A new electric fuel pump gasket is required. It is very easy to replace it. First you need to relieve the pressure in the injector power system. To do this, you need to start the engine and remove the fuse for the pump while the engine is running. After a couple of seconds the car will stall on its own. Next, you need to open the trunk and use a 7 key to unscrew the submersible pump mounting bolts in order. It is a one-piece structure that combines a coarse filter, a gasoline level indicator, fuel lines, an anti-drip cup and a cover.
After unscrewing all eight bolts, you need to remove the pump by removing the wire plug. Be careful - when removing, the fuel level indicator may get stuck (it is slightly bent and has a float at the end).
Signs of malfunctions and self-diagnosis
Problems in the operation of the fuel pump can be understood by the following facts:
- Fuel consumption increases.
- Extraneous noise is heard at the location of the node.
- A fueled car stalls after the engine starts.
- Jerks in the movement of the car, a slow increase in engine speed, a prolonged reaction of the car when you press the gas pedal.
- The engine starts only when the starter rotates for a long time.
- The car won't start.
When you turn on the ignition on a car with an injector, you can hear the characteristic sound of an electric fuel pump, followed by its shutdown. In carburetor cars, the housing of the unit in good condition should not get hot.
You can check the operation of the entire fuel supply system in a car with a mechanical pump if the hose coming from the outlet pipe is removed and directed into a plastic bottle. Gasoline must be supplied under pressure. When the engine makes 20 rpm, the pump pumps about 1 liter of fuel.
If the electric pump is working, but the machine motor rotates unevenly, you need to check the pressure in the ramp using the following algorithm:
- First remove the fuel pump fuse.
- To use up the remaining fuel, we start the car.
- After the car stalls, we connect a pressure gauge to the ramp by removing the plug.
- We put the fuse in place and start the engine again.
- We assess the pressure. It should be from 280 to 380 kPa.
- When driving at a speed of 45-50 km/h, the indicators cannot deviate.
When pressure surges are present, the filter mesh must first be cleaned. To do this, the pump will have to be removed. In addition, the pump will not work well if the valves at the injectors are worn out, there is dirt in the fine filter, or the pressure regulator is faulty.
Before repairing the fuel pump, you must purchase a repair kit that matches the brand of the part.
Fuel lines
If the problem has not gone away and you can still smell gasoline in the interior of the VAZ-2107 (injector) with the windows open, you should check the tightness of the fuel lines. They stretch along the entire body. A leak can occur anywhere. Usually the cause is mechanical damage (for example, after overcoming a high obstacle, the car hit the ground with its bottom). Gasoline will not always flow like a river from under the car. Fuel pipes are very reliable, and often everything is limited to only small drips. But it is precisely because of them that the smell of gasoline appears in the cabin on the VAZ-2107 (injector).
It is worth inspecting the bottom more carefully. If there are dark streaks on the tubes, it means depressurization has occurred. Such elements need to be changed urgently. Pay special attention to places where hoses come into contact with other objects. During use, they can simply fray.
Lambda probe
This is a sensor that allows you to estimate the oxygen content in exhaust gases. It should be noted that direct measurements cannot be taken, so you have to install a sensitive element inside and outside the exhaust pipe. And to improve sensitivity, you need to warm up the device to 600 degrees.
This sensor sets the ignition timing and regulates the quality of the fuel mixture. The presence of the device is due to the introduction of toxicity standards.
Canister valve
This element is installed on all car injectors, and the “Seven” was no exception. What is this element? The adsorber valve is a kind of can installed in the engine compartment near the air filter and filled with activated carbon. What is it for? The adsorber valve on the Semerka serves to condense and absorb gasoline vapors. When fuel vapor evaporates, it turns back into liquid and is sent back to the engine power system.
How to check this element? The main sign of a malfunction is the accumulation of gasoline vapors and a pungent odor in the cabin. The problem is also accompanied by dips at idle and loss of power during acceleration. If the tank hisses when opening, it means that the adsorber valve has become unusable. It is not necessary to change the entire jar - just one valve is enough. After replacement, the car works properly again, and strong odors no longer penetrate the interior.
Necessary equipment and tools
Of course, reworking an engine requires special equipment that can make basic manipulations easier. You will undoubtedly need:
- well equipped, warm garage. Agree, it is difficult to work in the cold or in the rain. Electricity is also required;
- convenient overpass or garage pit. It is not recommended to use a jack or improvised devices in order to avoid unsafe situations leading to accidents;
- spare car. It can be useful for quickly responding to various force majeure circumstances, such as the need to urgently replace a defective part.
To make the process easier, we recommend that you stock up on the following tools:
- a set of different screwdrivers. Keys and sockets, including a wrench and a hexagon, will also come in handy;
- a suitable container and a special hose up to 4 m long. Used when draining antifreeze with machine oil;
- a set of adjusting washers, probes and other devices for debugging valves;
- file;
- a chisel, drill and grinder, which can be useful in difficult situations;
- a set of various clamps.
In addition, it is recommended to keep an effective solvent on hand. This product is used to combat souring of nuts.
Checking the valve with a multimeter
Diagnostics can also be done with a voltmeter. How to check the fuel canister check valve? You need to open the hood and disconnect the wiring harness connector from the valve. Next, connect the negative probe of the multimeter to ground and turn on the ignition. Then bring the positive probe to the wire chip and look at the values of the device. The readings should not be lower than 12 V.
To inspect the valve itself, loosen the hose clamp with a screwdriver and remove the tube outward. Next you need to remove the valve itself by prying it off with a slotted screwdriver. It is necessary to turn on the ignition and apply “plus” and “minus” to the corresponding terminals on the element. If the valve is working properly, you will hear a characteristic click. Otherwise, the element is defective and must be replaced. The cost of a new element is 350 - 370 rubles (suitable for a VAZ of the tenth family).
To replace the valve, you only need a slotted screwdriver. She needs to unscrew the clamps of the gasoline hoses and pry off the edges of the element. The new one must be installed tightly into the grooves until it clicks. Next, put the hoses on the valve and tighten the clamps. At this point, the replacement of the Semyorka adsorber valve has been successfully completed.
General diagram of the electrical equipment of the VAZ 21074 injector
General diagram of the electrical equipment of the VAZ 21074 injector
1. Electrical connection diagram of the wiring harness of the instrument panel assembly LADA 21074
- – ignition switch unloading relay;
- – relay-interrupter of direction indicators;
- – windshield wiper relay;
- – brake signal switch;
- – switch for headlights and direction indicators;
- – windshield wiper and washer switch;
- – ignition switch;
- – hazard warning switch;
- – instrument cluster;
- – rear window heating switch;
- – rear fog light switch;
- – external lighting switch;
- – heater motor switch;
- – additional resistor for the heater electric motor;
- – heater electric motor;
- – indicator lamp for heated rear window;
- – brake fluid level warning lamp;
- – instrument lighting switch;
- – cigarette lighter;
- - watch;
- – reverse light switch;
- – hand brake sensor;
- – rear fog light relay;
- – block of the instrument panel harness to the ignition system harness;
- – glove box lighting;
- – mounting block.
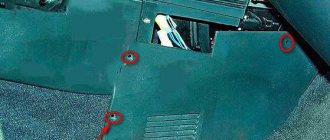
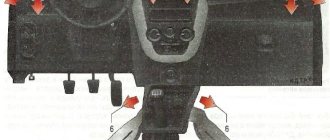
Things to take note
To repair the fuel system yourself on a VAZ, you will need to remove the receiver.
This is carried out in several stages:
- First, remove the throttle controls from the receiver, then loosen the retaining clamp and disconnect the vacuum hose.
- The fuel pipe holder is being dismantled.
- The bracket-clamp of the throttle drive cable is removed.
- The 5 fastening nuts are twisted and the pressure adjustment hose is disconnected. After this you will be able to remove the receiver from the studs.
This is the only way to gain access to the fuel rail.
Let's stop using substances
Good day, dear readers of my logbook.
So, the object is 21074 injector. This means that there is a high pressure fuel system and a vapor recovery system. One of the problems of owners of injection classics is the smell of gasoline in the cabin. Interestingly, the smell occurs when the windows are open. After looking through several forums on square classics, I came to the conclusion that the main reasons for the smell are: - poor sealing of the gas tank cap; - valve. Since the plug turned out to be airtight (when unscrewing in hot weather, a characteristic puff can be heard), it is necessary to deal with the valves. The main reason is in the valve environment - the atmospheric valve opens earlier than the two-way valve. There can only be two solutions to the problem: - select valves with the correct opening (a difficult option, the pressure can fluctuate over time + work in an aggressive environment). — instead of a two-way valve, install a tube. Let's open the engine power supply system in the Murzilka. Black indicates the location of the two-way valve. What’s interesting is that it’s not on the fuel line diagram at all initially. The valve is located behind the rear seat. If you are too lazy to buy a straw, the valve mechanism is pierced with an awl or a thin screwdriver. Specifically, in my case, the direct passage of vapors into the adsorber almost completely eliminated the smell of fuel; a slight smell of gasoline remained when driving, even with the windows closed. In addition, I replaced the fuel filter, now it’s some kind of “Salyut”. It remains to deal with the drop in revolutions when pressing the accelerator pedal and releasing the gas in neutral...
Source
Removal
1. Place the car on an inspection hole or overpass (see “Preparing the car for maintenance and repair”).
3. Remove the exhaust pipe from the exhaust manifold studs (see “Reception pipe - removal and installation”).
5. Disconnect the choke drive rod and the throttle drive cross rod from the carburetor (see “Carburetor - removal and installation”).
6. For ease of work, remove the battery (see “Battery - removal and installation”).
7. Using a 13 mm socket wrench, unscrew the nut of the lower air intake mounting.
8. Using the same tool, unscrew the nut of the upper fastening of the air intake and remove it.
9. Unscrew the nut of the upper fastening of the starter heat shield (see “Starter - removal and installation”)
10. Using a 13 mm socket wrench, unscrew the nut securing the eye and remove it.
11. Using the same tool, unscrew the nut securing the “mass” wire and remove it from the stud (for clarity, the chain tensioner has been removed).
12. Using a 10 mm wrench, unscrew the two nuts securing the coolant supply tube to the pump and disconnect the tube. A sealing gasket is installed at the connection point.
13. Using a 13 mm socket wrench with an extension, unscrew the seven nuts securing the intake manifold and exhaust manifold. Under the nuts of the joint fastening of the intake manifold and exhaust manifold, washers of increased thickness are installed.
Intake manifold mounting points
and exhaust manifold
14. Remove the intake pipe from the cylinder head studs and move it to the side.
15. Remove the manifold from the cylinder head studs.
16. Remove the gaskets from the studs.
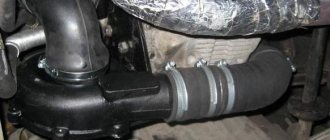
About installing a fine fuel filter
We should not forget that a carburetor malfunction such as “sneezing” or a sudden loss of power or jerky movement may indicate clogging of the fuel jets. This can happen due to small particles getting into the fuel. The reason could be either low-quality gasoline from the factory or the drain of the last batch of fuel from the tank of a fuel truck that ended up in your tank. If the fuel is not filtered, then repair of the carburetor or fuel pump is not far off.
How effective this “trap” is can be seen in the figure.
If the filter is not installed, you need to install it yourself. On average, the filter resource is 20-30 thousand kilometers. There is no difficulty in the installation procedure, you just need to remember three main points:
There is a rule according to which a fine filter must be installed before the fuel pump. In this case, the fuel pump will last longer and repairs will not be required. For example, in the figure we see an incorrect installation of the filter - after the fuel pump, in addition, the filter is located in a very hot area of the engine. If the housing is cracked, gasoline may leak out, be carried back by the air current onto the hot exhaust manifolds, and cause a fire.