The Chevrolet Lacetti, a popular car in Russia, which has an F14D3 or F16D3, 1.4 or 1.6 liter engine under the hood, has a chronic disease. This is an oil leak from the valve cover gasket.
There are several reasons for this:
- The cover is made of polymer material and has a different temperature expansion coefficient with the aluminum cylinder head;
- Metal bushings for the cover fastening bolts protrude beyond the plane of the mating surface and do not allow the gasket to be pressed more tightly to the block head;
- The original cover gasket is poorly executed; it is too thin and narrow.
All these factors lead to the fact that after 40 - 50 thousand km. mileage, engine oil begins to ooze from under the cap. This is especially true for spark plug wells, as leaking oil accumulates there.
As a result, the spark plugs float in the engine oil, there is no great harm from this, but there is no benefit either. In addition, oil attracts dust from the engine compartment.
The surface of the spark plugs becomes dirty and conductive paths appear, along which high voltage from the electrodes partially “drains” onto the body. The efficiency of the ignition system decreases.
What do you need to replace the valve cover gasket?
- 10 mm socket wrench
- pliers or a screwdriver (depending on what kind of clamps are on your Lacetti)
- Preferably a torque wrench. If not, then you can do without it
- Actually, the gasket itself.
- Sealant. Many “foaming at the mouth” argue that silicone cannot be used, because it can “poison” the oxygen sensor. This statement is not entirely true. There are different types of silicone sealants. Therefore, buy one that has the inscription on the tube: “Safe for oxygen sensors.” Or you can tell by the smell of the sealant - there should be no characteristic smell of vinegar, and ideally there should be no smell at all! As a rule, manufacturers of automotive sealants practically no longer produce silicones that are dangerous for sensors. If you are still afraid to use silicone sealants, then take any others. But I still chose silicone sealant - they have a lot of advantages over alternatives, ranging from better adhesion and durability to a high degree of elasticity, which makes it possible to use it also on movable structures without compromising the quality of sealing joints. Also read the instructions so that after hardening, the sealant can withstand high temperatures.
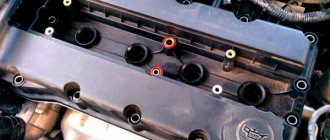
- sealing rings for bolts – 15 pcs. You can use KAMAZ ones, white ones made of silicone. Let's say I found red silicone rings. I don’t even know what they are made from, but they are several times cheaper than the original ones.
- It is advisable to immediately buy a couple of bolts in reserve so that you don’t have to run to the store again, as they break very easily!
- some kind of detergent for cleaning the valve cover. I had this. Fast and convenient.
Attention! Such rings for bolts, like mine, have the number 96353007. They were installed until 2011. After 2011, there are new rings under the number 25185121. They are not interchangeable. Here is a photo of the rings after 2011.
In the period 2011–2012, bolt seals of both the first and second options could be installed. Therefore, before ordering spare parts, it is better to check what is installed on your car.
Diagnosis of gasket condition on a Chevrolet Lacetti
The service life of the valve cover gasket on a Chevrolet Lacetti, as a rule, barely reaches 15–20 thousand.
An oil leak can occur as a result of engine overheating , then the cover becomes deformed and loses its seal. This is rare, but mostly oil oozes from under the cap and penetrates into the spark plug wells simply due to the gasket losing its elasticity and the sealant losing its properties.
Oil leakage occurs as a result of loss of elasticity of the valve cover gasket.
At the first appearance of traces of oil, and even more so when oil appears in the spark plug wells, you should not wait, but look for a new gasket as soon as possible.
Huge variety of articles
The market offers about a dozen gaskets for the cover of Lacetti engines; they are the same for 1.4 and 1.6-liter engines .
The original GM gasket bears article number GM96 353 002. It has a simple square profile, lasts quite a long time, but costs about 450 rubles.
There is a very inexpensive analogue of Parts Mall with the same index at a price of about 180–200 rubles . Many people prefer the Victor Reinz 155345601 . Its price is approximately 600 rubles , the gasket has a T-shaped profile and works no worse than the factory one. It is not recommended to buy cheap analogues, since they harden quickly, even a good sealant will not save you.
Valve cover gasket GM 96 353 002.
How to change a valve cover gasket
2. Loosen the clamp and remove the hose on the right...
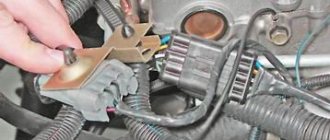
3. Disconnect the wiring block from the camshaft position sensor.
This is done this way - with a screwdriver or, if the thickness of your fingers allows, then with your finger we press the metal latch located to the right of the block against this same block and remove the block upwards. 4. Disconnect the wires from the spark plugs and put them aside.
5. Next you need to remove the air filter housing and the upper timing case. But I don’t do this, he doesn’t really interfere. It’s just that when you put the cover in place, the timing case will need to be pulled just a little to the left. I do this without problems. If you can't, then remove this cover.
Sequencing
- Using a 10-mm open-end wrench, unscrew the bolt on the negative terminal of the battery and remove the cable from it.
- Using the same wrench, we unscrew all the screws and nuts located on the engine casing.
- Remove and remove the casing.
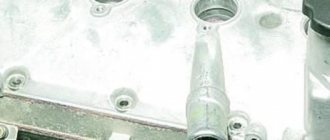
- Using pliers and a screwdriver, loosen the clamps on the air hoses (one ventilation hose and one hose for the breather, all of this is located in the left corner of the valve cover).
- Remove the loose hoses from the cover.
- Using a screwdriver, loosen the oil hose clamp (located in the right corner of the valve cover).
- Remove the oil hose from the cover.
- We remove the connector with the camshaft sensor wiring from the cover.
- We remove all the wires from the spark plugs and move them to the side.
- Using a 12mm socket wrench, unscrew all 15 bolts securing the valve cover.
Bolts are unscrewed
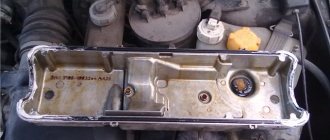
- Remove the valve cover.
Cover removed
- Remove the gasket from the cover.
- We install a new gasket in the groove and reassemble it.
Applying sealant to the lid
Sequence of tightening the mounting bolts
Lacetti engine valve cover bolt tightening diagram
Tighten the valve cover and replace the gasket yourself - this is what most Chevrolet Lacetti owners do. But not everyone knows how to do it correctly, which leads to leakage from under the cover.
The video will tell and show how best to replace the valve cover gasket of a Lacetti engine.
Comment navigation
Respect. I have been looking for such information for a long time. I've probably changed about 5 gaskets in 5 years (a gasket every year) Now oil is pouring like a stream from under the cover. This time I’ll do according to your advice (nothing to lose, I’m sick of this jerk already) First, I’ll check the pressure of the crankcase gases, and then grind off the face guides. I’ll definitely write back (in half a year) I’ll add you to my bookmarks. Good luck to everyone in this difficult task.
under load I think the glove will not only “stand up”, but will also increase when the vacuum in the intake manifold decreases and the crankcase gas pressure becomes greater
Tightening diagram
Many car enthusiasts have encountered the need to properly tighten the valve cover after replacing the gasket. For this purpose, there is a special scheme developed and recommended by the manufacturer.
Lacetti engine valve cover bolt tightening diagram.
When tightening, it is best to use a torque wrench - the force should be 10 N.m. If the key is not at hand, tighten it with one hand, the same thing will happen.
It is better to make several test rides before installing the motor cover. This is done to ensure that there are no leaks. After this you can mount it back.
Fixing leaks from under the Chevrolet Lacetti valve cover
The Chevrolet Lacetti, a popular car in Russia, which has an F14D3 or F16D3, 1.4 or 1.6 liter engine under the hood, has a chronic disease. This is an oil leak from the valve cover gasket.
- The cover is made of polymer material and has a different temperature expansion coefficient with the aluminum cylinder head;
- Metal bushings for the cover fastening bolts protrude beyond the plane of the mating surface and do not allow the gasket to be pressed more tightly to the block head;
- The original cover gasket is poorly executed; it is too thin and narrow.
All these factors lead to the fact that after 40 - 50 thousand km. mileage, engine oil begins to ooze from under the cap. This is especially true for spark plug wells, as leaking oil accumulates there.
As a result, the spark plugs float in the engine oil, there is no great harm from this, but there is no benefit either. In addition, oil attracts dust from the engine compartment.
The surface of the spark plugs becomes dirty and conductive paths appear, along which high voltage from the electrodes partially “drains” onto the body. The efficiency of the ignition system decreases.
Troubleshooting options
Most car owners strive to deal with oil leaks. We can identify the main ways to improve the situation.
Replacing the gasket with a new one
A new high quality valve cover gasket is purchased. Some people prefer products from the Victor Reinz brand, others like Elring gaskets. These products compare favorably with others; they have a T-shaped cross-section, increased thickness of the working part, and “sit” better in the grooves of the lid.
A heat-resistant sealant is added to help the gasket. At the same time, O-rings are installed around the bushings of the cover mounting bolts.
Another advice from experienced people is to cut off the protruding parts of the bushings flush with the mating plane of the cover. All these measures eliminate oil leakage, at least temporarily.
Installing a new valve cover.
There is a new style valve box cover. In it, the bolt bushings no longer protrude outward. The cover part number is GM 251 922 08. The delivery set includes a gasket, O-rings for the bolts and a PCV valve.
Paired with a high-quality “original” gasket, such a cover can protect the engine from oil leaks.
The cover bolts should be tightened “crosswise”, from the center to the periphery, preferably in two or, better yet, three steps. The last tightening must be done with a torque wrench, tightening torque no more than 10 N*m.
Then let the sealant harden, this takes from half an hour to two hours, start the engine, warm it up for 15 - 20 minutes. Then check the tightening torques of each cover mounting bolt. If necessary, tighten the bolts.
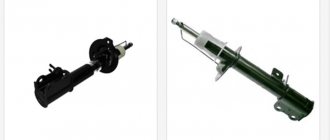
Aluminum Valve Cover Installation
You can find aluminum valve covers in auto shops. For example, these:
They are made in China. There are practically no negative reviews about them. The covers are equipped with a “original” gasket. Some of the Lacetti owners bought them in Russia, others purchased the covers using the Ali Express service. The issue price is from 5 to 8 thousand rubles. Those who have supplied such products report on thematic websites that problems with oil leakage have been radically resolved.
Which method to choose is up to the owner of the Lacetti to decide.
Little trick
Not every motorist has a torque wrench. And the tightening of the cover bolts must be done with its help, otherwise you can get uneven pressure on the gasket along the plane, which will sooner or later cause an oil leak.
There is a fairly simple way out. It is easy to find a spring steel balance or even an electronic steel balance in the household. It is easy to lengthen the socket driver to the required size, for example, 0.5 meters. There is no head and wrench, you can screw the extension to a spanner or even an open-end wrench.
The tightening torque of the valve cover bolts is 10 N*m or approximately 1 kgf*m. With a shoulder of 0.5 meters, the force with which to pull the wrench extension will be 2 kgf. Quite realistic and not difficult! Of course, the accuracy of such a homemade product will be less than that of a real torque wrench, but this is much better than tightening the bolts “by eye.”