Owners of VAZ 2107 begin acoustic tuning of their car by installing or replacing the main components - the head unit (car radio) and low-quality standard speakers. Replacing the head unit (head unit) is also practiced if the VAZ 2107 radio tape recorder stops working, which they refuse to repair as outdated.
Theft of a radio is also a common reason for installing a new PG. For professionals, installation operations are not difficult, but a novice amateur can damage the dashboard by connecting the wires incorrectly. Incorrect installation of the VAZ 2107 radio leads to short circuits and burnout of the receiver's electronic boards.
In this article we will describe how:
- replace front speakers;
- use the sound shelf correctly;
- move the radio to the place of the air ducts or to the glove compartment;
- install a 2DIN car radio;
- Connect the head unit to the speakers and power supply.
We hope that the tips will be useful to you.
How to install
Model 2107 has 2 locations suitable for mounting a 1DIN head unit.
The radio can be installed in a standard place on the center console; it is also possible to install equipment instead of the central vents. The first installation option requires trimming the mounting socket to the required size. The second option reduces heating of the player body by the hot interior heater, providing comfortable control of functions. But at the same time, ventilation deteriorates and there is a risk of heating the head unit by direct sunlight.
On the VAZ-2106, the only place for installation is the center console, which needs to be cut to the standard 1DIN size. The head unit is attached using a metal shaft, which is located in the instrument panel. The shaft fixation scheme is the same for VAZ-2106 and 2107 - using bent tongues.
It is possible to install 2DIN standard equipment, which is located in the glove box.
To fix the device, a housing must be manufactured; control is carried out using a remote wired remote control or via radio. It is possible to install the head equipment in the front passenger's feet, but such a scheme is rarely used due to the risk of damaging the radio.
Step-by-step installation instructions.
— First of all, you need to prepare a set of tools, and of course the radio itself, before moving on to its specific installation.
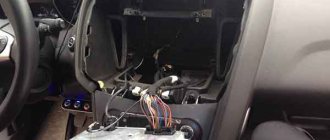
— Next, you need to make room for the newest radio. For this purpose, it is necessary to remove the standard console and all elements that interfere. It is necessary to prepare a screwdriver to remove what remains to make accessible fasteners for our client.
— When the place for the new radio is ready, you need to make a mock-up of the frame. For this purpose, of course, you need to take cardboard, where you need to draw the appearance of the frame for the radio. It is necessary to accurately measure the size so that it matches the prepared space for the device.
Installing the front speakers
First of all, we install the front speakers. Then, when connecting the radio, you will not have to get confused in the wires installed by an illiterate radio technician. Most often, buyers of used cars encounter such cases. Identical black wires with careless twists and minimal insulation need to be ringed and labeled. It is much easier to replace unreliable electrical wiring with cables of the desired cross-section and color.
Speaker wires of different colors are used for the left and right speakers. The color of the wire is selected according to the pinout of the car radio manufacturer. In radio engineering, pinout is the color, letter, and digital designation of outputs and cables. When installing more powerful speakers (100 - 150 watts), take into account their mounting depth, which should not interfere with the movement of the glass. To extend the speaker, spacer rings are used.
To install the speakers, you need to disassemble the front door and remove the window lift mechanisms.
The bottom of the door is usually used to install speakers. Holes for the diffuser are cut in the door panel.
Spacer rings are attached to the door frame, into which the speakers are installed. The wires for connecting the speakers to the head unit are pulled into the technological holes in the door. After assembling the door, additional work can be done.
A grill (decorative and protective grille) is installed on the speaker, the door card is covered with vinyl or leatherette. Without additional door cavity soundproofing, the speakers may sound muffled or resonate. For sound insulation, the outer metal is glued with a vibration-insulating material that dampens metal vibrations (for example, “Bimast”). The internal surfaces of the frame and stiffeners are covered with noise-absorbing “Spleen”.
How to connect a VAZ 2110 car radio with your own hands
Installing a radio in a VAZ
Today you can find almost any speaker head unit on the market. Different prices, different needs and finally, a car radio is purchased. Almost every one of them today is equipped with a radio receiver and is capable of reading discs of any format. And if the choice of a head unit is not a problem for many, then installing a VAZ or other car radio becomes a real problem. In our article we will look at how car radios are connected. Installation on a VAZ 2107 or another model should be easy and quick if you study everything that is presented below.
Features of Chinese radios
In general, there is absolutely nothing wrong with a Chinese radio. This can be explained very simply.
Almost all car radios can be considered Chinese. Why? Everything is elementary. Leading manufacturers, including Japanese, European and American brands, prefer to carry out assembly in China. This is due to financial gain. Collecting everything in China, including radios, is very cheap. Hence the conclusion that the majority of radio tape recorders offered on the market are from China.
But here it is also important to determine which Chinese product we are talking about
All car radios can be divided into several categories. Moreover, I advise you to study this issue separately in more detail.
Price is a largely determining factor in choice. When buying a Chinese radio, you actually choose one of 3 options.
- Radio tape recorders manufactured to order from leading manufacturers. These include Sony, Pioneer, Kenwood, etc. There are clear regulations, rules and standards from which the contractor (factory in China) has no right to deviate. This allows you to obtain very high-quality devices at low manufacturing costs for the brand owner;
- Chinese brands. These are well-known companies that offer radios under their own brands on the international market. The quality may be a little lower, but the price is appropriate. In most cases, they copy or make radios as similar as possible to devices from leading radio manufacturers;
- Unknown Chinese brands. These are radio tape recorders with an incomprehensible name and the same origin. If this is your first time hearing about the company and you can’t find anything really about it on the Internet, it’s better not to mess with such a 2 din radio.
Drawing conclusions, I can say that the best solution would be to buy a radio for your car from category 1 or 2.
Installing the head unit
All modern power units use a standard ISO connector (International Unified Electrical Engineering Standard) to connect power cables and speaker wires. After installing the car radio housing in the selected location, all cables must be secured into a rectangular block suitable for this connector. The letter markings of the car radio outputs are different; you need to look for them in the equipment manufacturer’s instructions. If your existing wiring uses a different type of connector, purchase an ISO connector adapter.
Expanding the sound system with speakers on the rear sound shelf
The extended connection diagram for the VAZ 2107 radio provides for the installation of front speakers and rear acoustics. The front speakers create frontal sound, the speakers from the passenger compartment are responsible for the lower frequencies and surround sound. At the rear, multi-way speaker systems use woofers or oval full-range speakers.
From an acoustics point of view, the best place to install ovals or compact subwoofers in the 7's cabin is the rear parcel shelf of the car. The standard rear shelf of the VAZ 2107 for mounting equipment is not strong enough. If you simply cut holes in it for speakers, the plastic will vibrate and distort sound waves.
To reconstruct the shelf, additional fasteners (corners) are used along the sides of the body. The shelf is reinforced with an additional frame, soundproofed, and covered with carpet (a special sound-absorbing and decorative material).
The acoustic wires are pulled under the interior flooring along the sides of the car.
Audio system in VAZ-2107
Sergey KHUDYAKOV, Kursk
A classic play in three acts with a prologue and epilogue.
In fact, with us everything is prose and prose. You give us dramaturgy, and it’s classical in every sense!
- System type: audio
- Composition: 2-way front + subwoofer
- Source: Blaupunkt Bremen MP74
- Amplifiers: Helix DB4, Oris CA 702
- Acoustics: Hifonics Zeus ZS6.2c, Philips made in Ukraine
- Subwoofer: Hifonics Brutus BX12D2
Characters
Sergey Khudyakov . 30 years. Lives in Kursk. A systems engineer by education, a programmer by work, I had to master other professions throughout my life. Has hobbies, big and small. One of the big ones is car audio.
VAZ-2107 . Classic. The car, in principle, is a service car, but is given to the main character at his complete disposal. Actually, one of the hero’s tasks was to preserve the useful volume of the trunk as much as possible. Four bags of cement had to fit in there, regardless of any musical filling. You just need to be more careful on the bumps. Have you probably seen a “Classic” type car with a trunk bent down?
Head device . At the beginning of the play - Alpine 9827, then - Blaupunkt Bremen MP74. Because with the processor. Because he can still play music, compared to Alp - the difference is huge. Because with “Blau” low bass appeared, which was not the case with “Alp”. I tried hero 9855 - also not very good.
Front . Mids from the Hifonics Zeus ZS6.2c kit in 13 l boxes. Because they are inexpensive and can play very loudly in boxes. If they had three stripes, it would be really good.
Tweeters . At first they were from the Hifonics kit, then they were changed to Philips made in Ukraine, they are installed in the standard places of VAG cars and not only. Because they cost 200 rubles a couple, but outperform any bourgeois ones up to 2 thousand.
Subwoofer . Same manufacturer as the front, Hifonics Brutus BX12D2, dual-coil. 2 x 2 Ohm. Played at 4 ohms. I connected it to 1 Ohm at SPL competitions, but the amplifier was different. The speaker loves volume. How it plays in the recommended cubic foot - I didn’t like it, only for the “sausage”. We managed to get a low bass from it in a 50 liter box with filling. Measurements showed that the speaker is not at all for a “phasic”. Therefore, subsequently the port of the box, visible in the photo, was plugged with a camp blanket from the back seats.
Amplifier to the front . Helix DB4. Because good filters are just for channeling.
Amplifier for sub . Oris CA 702. Because it's cheap and cheerful. Serious power for frivolous money. The power supply has a small “tweak” in the form of increasing the capacitance in the secondary power winding. As a result, the bass is lower and the undistorted power is higher.
PROLOGUE
Judging by the statistics of AvtoVAZ, almost-cars like the VAZ-2107 are still produced in Russia, and what’s more, they are popular. I myself became the owner of one such copy. The car is noisy and was not initially intended for creating a high-quality music system.
Of course, cars of this class are purchased not by the direct heirs of Rockefeller, but by representatives of the working class, or as a first for young novice car enthusiasts, read - youth. Among the latter there are quite a lot of lovers of good music, and this play was written for them, which tells how in this body you can create a decent quality sound system for reasonable money.
Seat boxes with midbass of the current edition, in the workplace and separately
ACT ONE
Pancakes and Pioneers
It all started with a cheap radio and the same “pancakes” in the rear shelf without any preparation. Since the car initially spent the night on the street, soon, leaving the house in the morning, I discovered the absence of those same pancakes, the pioneers’ favorite dish. The radio did not give up, but was pretty damaged. A “convenient” case for upgrading the system has appeared.
The first thing that was done was to cut out a partition from 10 mm plywood, separating the car interior from the trunk. An acoustic shelf was then made from 20mm plywood. New Ural pancakes took up residence in it. I screwed the speakers from below and covered the shelf with carpet. As a result, there is sound, but you can’t see where it comes from. Actually, this idea has always been one of the main points in the further development of the system. The shelf + partition did their job - some kind of bass appeared in the music, but still. As always happens, very soon “such” music became scarce. He had an ear for music and many hours of listening to music at home.
The second stage was the purchase of Ivolga component acoustics with the simultaneous sale of “pancakes” and shelves. Midbass were installed in the door, tweeters were installed on the stands. Due to the lack of special materials at that time, the doors were generously (but carefully) treated with vibration-proof mastic from the car market. The speakers are screwed to the metal of the door through plywood rings. The audition showed: yes, there is progress, but something is not right. The rings were replaced by podiums made using foam-stocking technology, with an additional turn at the driver's ear. Better again, but again not the same. After reading information on forums on the Internet, I took a decisive step towards radically improving the system.
The concept of its construction was completely revised. I decided to do everything “the right way,” based on the materials of my favorite magazine and the experience of knowledgeable people from the forums. At the same time, I wanted to preserve the original interior of the car as much as possible, make the installation invisible to prying eyes and inaccessible to prying hands, and also preserve the volume of the trunk as much as possible, since at that time it was actively used for transporting building materials in the “cement-brick” style.
It was decided: to give the Oriole front speakers as a gift to one of my friends, to buy a new component front, to replace the cheap cassette player with a CD receiver, to buy a subwoofer and, of course, an amplifier. In this case, the front must have channel-by-channel amplification to enable “advanced” system configuration, and then, possibly, installation of a processor control unit (which was done at one time).
Previous version, with phasic (there was no subwoofer then)
ACT TWO
Happy New Year!
The pioneers leave, pancakes and a radio tape recorder, Tanya comes with gifts.
The New Year was approaching, and Santa Claus, represented by my beloved wife Tanya (special thanks to her for her understanding and support), together with my brother Oleg, placed a new Alpine 9827R under my Christmas tree. The new system began with him. Then gradually everything else was bought. The process of building a new system took a lot of time, I won’t describe it completely, but I’ll tell you the main points.
Alpine 9827R was installed in place of the standard air ducts in the middle of the dashboard. The result, by the way, is excellent ventilation of the head unit. From the battery to the PG with a 4 sq.m. wire. mm through a 10-amp fuse, the positive power wire is pulled. Minus - under the bolt on the body.
Following the advice of a guru from the forum, I purchased Philips Made in Ukraine tweeters, which, in fact, is what is written on them. I don’t remember the exact model, but it is known that they are installed in standard locations of VW, Skoda, and Audi cars. The market knows what it is. They cost 200 - 300 rubles. A silk dome for this money is just a gift. They outplay most tweeters from component acoustics costing up to $200. The tweeters themselves are sold without housings or protective grilles. So you can either buy pop tweeters for 50 rubles as housing donors, or do as I did, without housings at all, recessing the tweeters into racks.
The stands are made from factory ones using stocking-epoxy technology. The surface was treated with finishing putty, then, to add texture and hide minor imperfections, it was coated with anti-gravel in one layer, and then painted with matte black spray paint.
Tweeters installed according to secret recipe No. 1 are still old, Hifonics
Secret recipe No. 1 (speaks in a whisper to the side):
After numerous experiments, the optimal orientation of the tweeters was found - installed at a height of approximately 1/3 of the height of the racks. In this case, the left tweeter looks into the driver’s left ear, the right one - at a point located approximately in the middle of the left pillar. Such an unusual installation is due to the fact that our car is unusual, the stands are located too close to the listener. With this orientation we ensure that the sound comes from somewhere under the interior mirror.
Semi-secret recipe No. 2 (to the side, but in a low voice):
Setting the midbass to “classic” is a separate matter. As I already wrote, before this the midbass was in the door. This time I decided to try a different design, namely the “seat-box” design. As it turned out, it was not even in vain. If we use speakers designed for installation in small spaces, we get very decent sound. I have never heard such low end and such feedback from a standard door installation. I highly recommend it to everyone. And in the “classic” there is a lot of space under the front seats, and you just can’t help but take advantage of it!
So even without a subwoofer we get a very powerful frontal bass. By the way, at first, until I bought a subwoofer, this was the case for me. Only the boxes were of a slightly different type - they also had a port, which further increased the impact at the bottom. All the mirrors in the cabin were shaking, people did not believe that the system could play like that without a subwoofer, which everyone tried unsuccessfully to find.
The boxes were made of 16 mm chipboard, painted for moisture protection, and covered with carpet for beauty. The volume of the boxes was approximately 14 liters. The port setting is at a frequency of about 40 Hz. The drawers do not protrude forward from under the seats and absolutely do not interfere with either the legs or the adjustment of the chair. A significant advantage of this installation is that there is no need for careful vibration insulation of doors, which is not at all easy in the “classic”. Nothing vibrates and, accordingly, does not create hateful sounds. Production time for boxes is half a day/pair.
The four-channel Helix DB4 amplifier is working at the front. For little money, it has a pleasant sound and advanced filters, which is necessary for building a system with channel-by-channel amplification. The frequency of the midbass-tweeter section was chosen to be about 3.5 - 4 kHz. A compromise solution, since these tweeters can't play that low, and the midbass can't go that high. But I wanted to raise the sound stage as high as possible. It would be nice to add a third band (MF) to this system, it would be a fairy tale, but I haven’t decided on this yet - I don’t have enough experience.
And these are the new ones Made in Ukraine, they are built into racks without any housings
ACT THREE
Subwoofer
After installing the front, it was the turn of the bass support. A sedan is probably the most difficult body type to install a subwoofer. The trunk is separated from the passenger compartment by a partition and a shelf. Typical solutions are either to direct the subwoofer as a speaker into the cabin through the ski hatch, if, of course, there is one, or to “brighten” the shelf, i.e. cut holes in it large enough to allow bass to penetrate into the cabin. I tried both the first and second methods and did not bring satisfaction. In the first case, the low end turned out to be “not enough”, the speaker jumps wildly, and the bass seems to be inaudible, what can you do? Apparently, this is the geometry of the cabin, which eats up all the most delicious things. In the second case, we get a delayed bass and hear all the overtones emitted by the trunk. There is more bass though. But that's also not an option.
The best option (in terms of sound, but not ease of implementation) is to install a subwoofer in a shelf, but not free-air. We screw the box to the bottom of the shelf, thereby creating the necessary acoustic design for the speaker.
The Hifonics Brutus BX12D2 subwoofer already worked in this car in a 30 liter housing, which turned out to be not enough for it. It was decided to place the subwoofer speaker in the rear parcel shelf, while maximizing the usable trunk volume. The problem was that if you make a box of a standard trapezoidal shape and not protruding too far beyond the step in the trunk, then the maximum possible volume will be no more than 30 - 35 liters, and this is not enough, we went through... It was necessary to use the space above the shock absorbers, and there it would be You can certainly scrape together ten to twenty liters.
I decided to make the box out of MDF, however, after visiting all the construction markets in the city and calling furniture factories in Kursk, I found out that you can’t count nightingales in our province, and MDF is a rarity. True, one of the saleswomen said that in the region, in the city of N, there is a certain plant for the production of chipboard and fiberboard - maybe they have one. After searching on the Internet, I found out the phone number, it turned out that yes, there are letters “MDF” in the word “Kursk”! Sheets 1.2 x 2 m. With a thickness of 16 mm. The cost turned out to be surprisingly low - 150 rubles / sq. m. m. I went back and forth (150 km), bought 2 sheets, and there they cut them for me into pieces 1.2 x 0.7 m in order to stuff them into the car.
I decided to glue the purchased pieces together in two to give the walls of the box a decent (32 mm) thickness. I glued it with furniture PVA under pressure. Next, armed with packing cardboard and scissors, I cut out a mock-up of the front wall of the box. The rear wall is obtained by “squeezing” the front wall vertically. Based on the cardboard model I made, I cut out the walls of the box from MDF using a jigsaw. The joints were glued using liquid nails like Titebond “Heavy Duty” - I recommend it to everyone! The walls were tightened together using European furniture screws, for which I purchased a special drill and an hex key - indispensable things in this matter. It’s even better to buy a special bit for a screwdriver, I did that, but where did it go? I don’t know.
The side walls of the box, due to their complex shape, were decided to be sculpted from bars - scraps of the same MDF sheets. Since there are inevitable gaps between the bars, they had to be sealed with something. I remembered the good old advice of car audio builders - epoxy with sawdust. I mixed it in a jar, carefully pushed this mass into the cracks with a spatula, it turned out quite strong and airtight.
After this, the upper wall of the box was cut out, in which two holes were cut - for the speaker and the bass reflex port. The hole for the speaker is not a complete circle, but this should not have been a problem, since the speaker itself will be screwed to the shelf, and given that the speaker from the diffuser goes into a cone, the cut hole should have been enough for it. A hole is cut out on the back wall for installing the terminal.
The shelf was made using the same technology (“scissors - cardboard”) from two parts: the lower one, on which the speaker itself is attached, and the upper one, which covers it (its edge is 8 - 10 mm above the speaker plane), which should be enough to install a protective mesh that does not interfere with the movement of the diffuser and for subsequent covering of the whole thing with carpet from prying eyes. The top shelf was subsequently cut to allow the speaker to be exposed if desired. At night the diffuser also glows blue.
The removable part of the shelf is screwed to the main shelf using hex head furniture screws, which is an additional security measure against pioneers. When assembled, the screws are invisible, and it is generally not clear how the shelf is removed.
Installing the finished box in place was not an easy task. Firstly, in order for the box to be located as close as possible to the partition behind the rear seat, two grooves had to be cut out on its wall, into which the metal stiffening ribs of the body fit. Actually, there are three ribs, but I already removed one when the subwoofer was standing in another box and playing into the interior through the armrest. Secondly, there are also two grooves on the bottom of the box, since the step in the trunk where the box is placed has two protrusions; bend the cover and you will see for yourself. Thirdly, a pair of torsion bars supporting the trunk lid are in the way; they must be removed during installation. Fourth, even after removing the torsion bars, it turned out that the installation of the box was hampered by the fastenings of the torsion bars, so I had to cut down the corners of the box a little.
In the end, the box was successfully installed, all the gaps between the shelf and the box were filled with sealant, and the shelf was attached to the box with long screws. The result was an absolutely blind monolithic structure.
It was not possible to take part in competitions on sound quality, but during the next stage of the SPL club, the organizers decided to open a new category of competitions on maximum sound pressure - “Bass-0”, i.e. systems without a subwoofer. And at that time I had a front installed in boxes with a port. As a result, from a 60-watt amplifier I got a result of 130 dB and first place. Some systems with a subwoofer performed worse.
A curtain…
EPILOGUE
After installing the subwoofer, the front midbass could concentrate on its direct responsibilities, while the need for a bass reflex design disappeared. I present here a cross-section of the seat boxes that I tested. If you are lazy, you can simply copy it with enlargement, cut it out - the template is ready. The volume turns out to be about 10 liters, if you need more, then increase the height of the rear wall (shown in red and marked with an asterisk) to 13 cm, then the displacement will be about 14 liters, the midbass will become softer, but the seat will be harder.
Subwoofer walls cut using the “cardboard” method
Blanks for side walls of complex shape
Euroscrews and accessories for them (except for the lost one). I recommend
In addition to screws - Titebond glue, I highly recommend it
For strength, all joints are sealed with a mixture of epoxy and sawdust
The joints on the outside are also reinforced
On the side facing forward along the car, cuts were made for the ribs of the trunk wall
On the back of the case there is a terminal for connection
Beginning of the next stage: the bottom layer of the shelf
We continue: the shelf consists of two layers of MDF with spacers between them
The head is attached to the bottom layer and is recessed into the top
Later, I converted the upper part of the shelf into a composite one, with a removable central part
When the removable part of the shelf is in place, pioneers can safely smoke on the playground
The actual removable middle of the shelf when viewed from above
Bottom view: the windows are covered with steel mesh, the strips that provide the gap between the bottom panel and the top are visible
Subwoofer in its rightful place
During installation, the trunk lid torsion bars were the biggest hindrance.
The rest is just trifles. At the time of filming, the wiring had not yet been tidied up, but now everything is as it should be...
Sectional shape of the seat box. Depth (in the sense of width, across the cabin) - 370 mm
Tags: BlaupunktHelixHifonicsPhilipsVAZVAZ-2107
How to connect a radio to a VAZ 2107
What could be better than an advanced car? It only improved even more. In most cases, modifications to improve the consumer properties of a car, motorists begin with installing or improving acoustics. Speaking about the usual model, connecting an acoustic system does not present any particular difficulties for independent implementation.
Car audio system
It's a rare driver without music in the cabin. Depending on the owner’s preferences, the system can be simple or spiral. Advanced speakers. a separate topic worthy of a multi-letter continuation. The degree of sophistication of acoustics is limited only by the car enthusiast's handbag and his personal awareness of coolness. In this article we will talk about what it is and how the most common music is installed in the VAZ interior.
It doesn’t matter what kind of acoustics, including for cars, consists of a main acoustic device (MA) and speakers. In a simple case, a radio and a pair of speakers perform these functions. The current default radio combines a music player with digital media. disks or flash drives and radio. It also has a built-in amplifier.
The main radio, provided by the manufacturer, is located on the panel above the cab heater fan switch. Before first use, the hole created for installation is closed with a plastic plug.
Features of car radio communication
The standard wiring diagram is the same for all car models and radios. But there are a number of aspects that need to be taken into account.
- The wiring of Russian cars is designed to connect a device with a mechanical search for radio stations, this can cause certain difficulties if you are going to connect a modern model;
- In most VAZ models, the branch for connecting the control unit comes from the ignition key: when the key is turned on, there is a short-term power cut, which leads to a reset of the parameters if the model does not provide uninterrupted operation. power supply systems;
- Before you begin, the user must decide whether the fact that music can only be listened to when the engine is on, or hunting so that you can use the radio and dock.
Connecting the radio
How to connect and configure the radio
- installation of the device case;
- electrical connection;
- installation and connection of speakers.
You'll likely still need to connect an antenna.
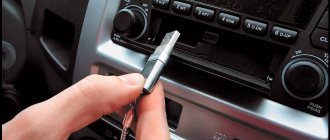
To install the radio housing, you first need to install the metal frame. The frame is secured in the socket using numerous tabs that need to be bent around the perimeter. The radio is jammed. To remove it, special keys are installed.
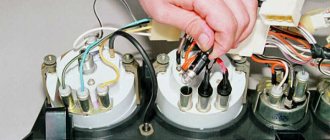
Make sure the battery is disconnected before using the electrical connection. When assembling an electrical circuit, the main thing is not to mix the wires, but to connect according to the markings. You can see the fundamental in the photo. Of course, this is not a royal question. read the instructions. But, nevertheless, carefully read the manufacturer’s recommendations on the top of the case or in your passport before you begin installing the PG.
Typically, electrical wires are marked as follows:
- wire marked “12V”, yellow. power, plus, comes from the battery;
This wire connects to the radio's permanent power supply, which stores the settings memory.
- wire marked “GND”, black. “minus” connected to the car body;
- Marking ACC, red wire. is also responsible for power, but goes through the ignition switch.
If you connect your device this way, you will only be able to listen to music when the engine is on. This circuit was developed by manufacturers to save battery power. The easiest way to access the radio, regardless of engine, is to connect directly.
If you twist the yellow and red wires together and connect the radio directly to the battery, the radio may completely drain the old battery if parked for a long time.
Car sound system
Rarely does a driver go without music in the cabin. Depending on the owner’s preferences, the system can be simple or sophisticated. Advanced acoustic systems are a separate topic, worthy of a multi-letter story with a continuation. The degree of sophistication of the acoustics is limited only by the wallet of the car music lover and his personal understanding of cool. In this article we will talk about what it is and how to install the simplest music in the interior of a VAZ.
Any acoustic system, including a car one, consists of a head acoustic unit (HA) and speakers. In the simplest case, these functions are performed by a radio tape recorder and a pair of loudspeakers. A modern default radio tape recorder combines a music player from digital media - disks or flash drives - and a radio receiver. It also has a built-in amplifier.
The standard location of the radio, as provided by the manufacturer, is in the panel above the interior heater fan switch. Before the first use, the hole intended for installation is closed with a plastic plug.
Features of connecting a car radio
The standard connection diagram is generally the same for all cars and radio models. But there are a number of nuances that need to be taken into account.
- The electrical wiring of domestic cars is designed to connect a device with a mechanical search for radio stations, this may cause some difficulties if you are planning to connect a modern model;
- In most VAZ models, a branch of the wiring for connecting the power supply comes from the ignition switch: when you turn the key, a short-term power failure occurs, which leads to a reset, if the model does not provide an uninterruptible power supply system;
- Before starting installation, the user needs to decide whether he is happy with the fact that he can only listen to music when the engine is on, or whether he wants to be able to use the radio while parked.
Connecting the radio
The connection work can be divided into three stages:
- installation of the device case;
- electrical connection;
- installation and connection of speakers.
Most likely, you will also need to connect an antenna.
In order to install the radio casing, you first need to mount a metal frame. The frame is fixed in the socket using numerous tabs that need to be bent around the entire perimeter. The cassette player snaps into the frame. To remove it, special keys are installed.
Before starting electrical connection work, you need to make sure that the battery is disconnected. When assembling an electrical circuit, the most important thing is not to mix up the wires and connect according to the markings. You can see the connection diagram in the photo. It is clear that it is not the royal business to read instructions. But, nevertheless, before you start installing the PG, carefully read the manufacturer’s recommendations on the top of the case or in the passport.
Typically, electrical wires are marked as follows:
- wire marked “+12V”, yellow – power supply, “plus”, comes from the battery;
A constant power supply to the radio is connected through this wire, thanks to which the settings memory is saved.
- wire marked “GND”, black – “minus”, connects to the car body;
- marked “ACC”, the red wire is also responsible for the power supply, but goes through the ignition switch.
If you connect the device in this way, you can listen to music only when the engine is on. This scheme was developed by manufacturers to save battery charge. The easiest way to achieve the ability to use the radio regardless of the running engine is to connect directly.
If you twist the yellow and red wires together and connect the radio directly to the battery, then if parked for a long time, the radio can completely discharge the old battery.
Inserting a button into the wire
A more correct way is to insert an on-off button into the wire, which allows you to turn off the power manually.
- “ANT”, the wire is usually white - serves to control the antenna built into the radio, can be used to connect an external antenna;
- wires marked “FL” and “FR” are used to connect the right and left front speakers;
- wires “RL” and “RR” respectively serve to connect the right and left rear speakers;
Modern machines are usually equipped with an ISO international standard connector. In older cars, it is worth installing an adapter on the ISO connector, then when changing the radio model, you will only need to switch the connector.
Having completed the electrical connections, you can proceed to installing the speakers and external antenna. If the machine is designed for only one pair of loudspeakers and there are no plans to install a second pair, then the wires can be twisted together in pairs, left and right.
How to install a radio in a Zhiguli.
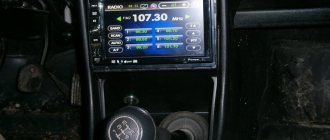
It is no secret that AvtoVAZ in Tolyatti still gives the future owner of the VAZ 2107 car complete freedom of action, covering the place for installing the radio in the “beard” or the center console with a plug. Connecting the radio yourself is a matter of honor for an amateur. Installation here is safer in terms of theft, since the radio is not conspicuous to anyone and is located low. In addition, it is easier to install the device - no re-arrangement of electrical and internal space is required. The only significant “minus”, even two, is the rather strong heating of the audio system when the heating is on. At high temperatures, the radio does not work for long. There is also the inconvenience of pulling out the audio disc due to the fact that the gear shift lever is in the way. But since disks are already becoming a thing of the past, giving way to “flash drives,” this is not a very significant drawback, unlike the first.
Shown here is a homemade installation on a “seat” under the radio instead of elongated and removed air ducts. This homemade configuration has the following advantages: no heating (after all, the air ducts are removed), and ease of control of the device. Disadvantages are: changes in design, strong heating in direct sunlight, and the risk of theft. In addition, if you put it on top, the interior ventilation works worse, and this is an important argument against. Selling such a VAZ 2107 will most likely be more difficult. Therefore, before you connect a radio with such a serious modification, think carefully.
Either way, you need a radio. If you are just a fan of listening to “Autoradio”, then you can install “Aiwa”. If you want to get professional car audio, then think about purchasing a full-fledged audio system to connect a serious system, such as Pioneer. But at the same time, remember that you need to start working with proper complete soundproofing of the interior, purchasing a subwoofer, amplifier and other expensive things.
In addition, if your radio does not have a USB input, then know that you are purchasing and intend to install a very cheap and old model.
After this, you need to purchase speakers, at least four: a classic installation contains two front and two rear, with a power of about 200 Watts. It is not worth purchasing higher power speakers for the VAZ 2107.
The installation requires high-quality wiring, which you will have to buy yourself; in total you will need about 10 meters - 7 for the rear and 3 for the front speakers. When purchasing, it is better to take a wire with 4 cores so that the speakers can be connected “from one wire.”
By the way, the standard color of the wires on the power supply is as follows:
When installing the radio in its original location, be sure to read the instructions. It should have a diagram of how to connect the speakers, indicating the “plus” and “minus”. Remember that the “minus” is the mass, that is, the car body, and in this capacity you can consider a well-cleaned bolt in contact with the body. It works as a contact.
Of course, before you begin, you need to remove the negative terminal from the battery.
Then we connect the speakers: we hide the wiring harnesses in the cabin and route them to the speakers.
Shown above is the wiring of four-wire wires to the acoustic shelf for the rear speakers.
Radio VAZ classic
Hiding the radio in the glove compartment of a VAZ 2101: preparation and purchase
It's time to tidy up the salon. I have long outlined a program to get rid of music. Or rather, not from the music, but from its detrimental effect on the original appearance of the interior. The main goal is to hide it out of sight; I don’t want to completely give up audio. Those who follow the BZ should remember that I have already redone the rear parcel shelf - the speakers are not visible. The next step is moving the head unit to the glove compartment (say “NO” to the 2107 beard!). To do this, I bought 4 mounting angles, which should directly secure the radio to the glove compartment tray.
Since the antenna cord would not reach the right place, I bought an extension cord. It is as much as 4 meters, I couldn’t find anything less. Let's go, no problem.
Well, for a long time I was haunted by the old JVC KD G-227 mafon. He does his job, no questions asked. But the obsession was to replace it with a new device, more functional. It will be the JVC KD-R531, I bought it today.
Connection diagrams for a radio with a subwoofer and/or a sound amplifier
Connection diagrams for VAZ - Lada car radios of various models. Connection diagrams for the radio from the ignition switch, from the alarm and from the button
In this article we will look at methods and diagrams for connecting car radios to VAZ, Lada cars, the following models: VAZ 2101, 2102, 2103, 2104, 2105, 2106, 2107, 2108, 2109, 21099, 2110, 2111, 2112, 2113, 2114 , 2115, Priora, Kalina, Niva, you can find connection diagrams for newer models at the very beginning of the article devoted to connecting radios to cars of various brands. So, the diagrams:
Standard radio connection diagram for VAZ 2101, 2102, 2103, 2104, 2105, 2106, 2107, Niva
Wiring diagram for a VAZ radio from the ignition switch using a relay
Wiring diagram for a VAZ radio from the ignition switch using a relay (Option 2)
Wiring diagram for a VAZ radio from the ignition switch using a relay (Option 3)
Wiring diagram for a VAZ radio from a button using a relay
Wiring diagram for a VAZ radio from an alarm system using a relay
Connection diagram for radio for VAZ 2107 with injector
Radio connection diagram for VAZ 2109, 2109, 21099
Connection diagram for radio for VAZ 2109, 2109, 21099. Pinout of contacts (for all VAZ models)
Connection diagram for a VAZ radio in which: the PG (head unit, radio) is turned on only when the ignition is turned on, when the ignition is turned off, the PG continues to work, when the alarm is armed, the PG turns off
Radio connection diagram for VAZ 2110, 2111, 2112, 2113, 2114, 2115
Radio connection diagram for Lada Kalina, Priora (and Largus)
Radio connection diagram for Lada Kalina, Priora (and Largus). Pinout
Description of correct connection, wire meanings
A very useful video that discusses in detail the correct connection of the radio, which allows you to avoid loss of battery energy in the inactive mode of the radio, and also provides a visual overview of the connection diagrams from the ignition switch
A video from which you will learn about the purpose of each of the wires, as well as about the correct connection of the radio (additional information to the video above)
Video - examples of connecting radio tape recorders in a VAZ
Video of connecting the radio for VAZ 2101, 2102, 2103, 2104, 2105, 2106, 2107
Video of connecting the radio for VAZ 2107 injector, 2108, 2109, 21099, 2110, 2111, 2112, 2113, 2114, 2115
Video of installation and connection of a 2 DIN radio for Lada Priora
Possible problems
When installing music devices, vehicle owners face various problems. Because of them, the radio for the VAZ-2114 does not turn on or any of the functions do not work.
Most common problems:
- Burnt fuse. This situation occurs due to connecting additional amplifiers or any other equipment to the radio, as well as listening to music at high volume.
- Network short circuit. It appears due to errors made during wiring.
- Oxidized contacts. During operation of the device, moisture may enter its housing. It will damage the contacts and prevent you from using the radio.
How to connect
The correct connection of the radio on the VAZ-2107 and any other car is carried out through the contact group of the ignition switch. In this case, when the key is removed, the power supply to the equipment is stopped; only the memory unit is powered, which is supplied from the battery.
On carburetor cars it is necessary to modify the contact group:
- Disassemble the plastic steering column cover.
- Remove the connector from the ignition switch and unscrew the 2 mounting screws.
- Remove the lock from the column by squeezing the lock with a thin object (with the key inserted and turned to position 0).
- Remove the contact group that needs to be modified by soldering an additional element.
- Assemble the lock and install the parts in their original places.
A lock modified in this way receives the ACC position instead of 0, which is used to operate the head unit in the parking lot. An additional fuse is introduced into the connection circuit of the tape recorder to protect the circuits from overload. Connection with speaker cables is made through an adapter.
Speakers
The 2107 car has standard installation locations for front speakers, located in the corners of the instrument panel. When installing speakers in door panels, it is necessary to cut holes in the parts; diffusers and loudspeaker magnets are placed in standard recesses available on the inner metal part of the door. It is necessary to correctly route the speaker cables; for this, a special adapter sleeve is used, placed between the end of the door and the stand. The element protects the tourniquet from creases and damage.
For improved music playback, a pair of rear speakers are installed, which are located on the shelf behind the back of the rear seat. To install the parts, trimming of the metal panel is required; the cables are routed under the floor covering.
You can connect the radio on the VAZ-2106 only to the speakers located in the front doors and on the rear parcel shelf. There is no space in the instrument panel for installing speakers (except for the central oval-shaped loudspeaker, which was mounted in the console during the Soviet era).
Subwoofer
The low-frequency speaker on the VAZ-2107 is installed in the trunk. For connection in the car, separate speaker cables are used, connected to the head unit or additional amplifier. When using an active device connected to the on-board network, a protective fuse must be placed in the power circuit.
Antenna
The antenna on a VAZ-2106 or 2107 is installed on the roof or trunk lid; it is possible to use an active type device mounted on the windshield. The unit is connected to the car radio in a VAZ-2107 or 2106 using a standard plug or adapter.
Installation
Installing a car radio on a VAZ 2107
We will begin our story with the simplest way to install a car radio. This approach is completely justified, because it is impossible to learn complex installation options right away and you need to start from the simple. Before purchasing expensive equipment, you should decide on the choice of installer. If you intend to carry out such an operation on your own, then you need to know many secrets. On the contrary, an inexpensive device is very easy to connect and there is no need to spend money on the services of a specialist. So, what does a typical speaker system consist of? Of course, the main role here is occupied by the car radio, the installation of which we will do. But don’t forget about the four standard speakers that come included. You will need to connect wires from the head unit to them.
Note. All speaker components are installed only in places designated in advance by the automaker. This is done not only for the sake of simplicity, but also to avoid short circuits.
Connecting wires
Let's move on to the connecting wires. Almost all sets of speaker systems are now equipped with similar wires. But these wires are not for installation, but for testing. That is, they are included in the kit, so that during the purchase you have something to test the speakers with, and not use them in the car. The cross section usually does not exceed 0.25 - 0.5 millimeters. This is not enough to pass all the power supplied to the radio.
Such wires should be used only when the power of the installed speaker is low and the sound quality does not matter. That is, they will be used as auxiliary acoustics. To make high-quality tuning of the audio system of a car like our classic, you need to think about a set of good connecting wires. We select the wire cross-section based on the rated power values of the speakers.
Cable cross-section
Connecting speakers to amplifiers or to the head unit and laying connecting wires is undoubtedly a labor-intensive process, but not as impossible as installing an automatic transmission on a VAZ 2107 so that you have to contact a car service. You can do it yourself; you will need a little diligence and attentiveness. For speakers 16 inches or larger, you must use special speaker wires to get high-quality sound. These are wires that use oxygen-free copper and are directional. Their cross section is from 4 mm, depending on the power of the radio and the audio system as a whole.
Set of wires for connecting acoustics
For true lovers of high-quality acoustics, we recommend installing directional wires, because every curl of a copper bundle matters for an ideal sound. Usually, in addition to the name, such wires also contain arrows that indicate the desired direction for installation from the head unit to the consumers. In fact, installing a radio and tuning acoustics is done according to the same principles for other cars, be it a VAZ2106 or a foreign car. It is carried out in a similar way, so the material from this article is applicable to other cars of our and foreign production.
Insulating material
The wires must be equipped with a high-quality insulating layer, and silicone would be best (it does not crack in our severe frosts). They must match the power of the audio system. Wires should be laid away from power wiring and other consumers. We don’t need the extra length, it’s both interference and waste of materials. Therefore, we lay them at the optimal possible distance. The process of laying them through the cabin must be closed. The wires should not be touched by feet or chafed by various loads in the trunk. So try to arrange them as neatly as possible.
For example, if you are tuning the audio system of a VAZ 21063 car, the wires must be laid in a special protective corrugation not only in the door pillars, but also in the doors themselves. This is done so that the large loop goes behind the counter, and not in the door itself. If you bought oval speakers for installation in the rear of the car, place them on the rear parcel shelf so that the sound waves spread from them diagonally across the car, the left one to the passenger, and the right wave, respectively, to the driver.
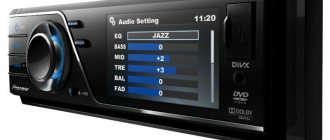
Installing a double din car radio
Modern 2DIN size standard radios are equipped with a larger display and touch controls. They are similar to 1DIN car radios in width and installation depth. Better functionality is achieved by increasing the height of the housing by 2 times (up to 100 mm).
The two-din radio tape recorder does not fit into the VAZ 2107 car in its regular place. The installation of a large housing under the center console is hampered by the gear lever. It is also impossible to install a 2DIN car radio in place of the air ducts. At the top, the edge of the “dashboard” does not allow expanding the niche of the air ducts. To expand the niche downwards, you need to remove the stove controls. Much easier than a complex reconstruction of the dashboard would be to install a double-din radio in the glove box of the car. There is enough space in the glove compartment to install a double-din radio, which can be supplemented with a separate amplifier. The main difficulties of this method are the design of fasteners for the installation section. Under them you need to install damping pads that absorb vibrations of the plastic.
What you need to know
Before installation, the car owner must decide on the type of radio tape recorder chosen. There are many models available on the market for the 1Din standard size (you may need an adapter frame for a 1 din car radio) at prices ranging from 1,000 rubles to 40,000 in the upper range. And for those who do not dare to install it themselves, you should contact a specialized service, where the installation cost will cost up to 5,000 rubles.
There is a special socket on the front panel of the car for installing a radio, and the manufacturer ran the audio system wires throughout the cabin. Of course, the owner can choose a different place to install the audio system and even expand it to fit a 2Din standard size, but this procedure involves many alterations in the ventilation and heating system and carries more disadvantages than advantages.
Some tips
I recommend taking advantage of the opportunity while everything is sorted and carrying out some simple procedures to improve quality. These tips may seem trivial to you, but they will help extend the life of the new audio system for an extra year or two. First, tin the wires and solder them.
This procedure will prevent the sound from losing quality even during prolonged use. Use female/male connectors. This method will be more effective and easier than soldering. Use heat shrink tubing. They will help maintain the quality of wire connections and extend the time it takes to resolder.
How to check the connection
To check that the cables are connected correctly, turn off the ignition and measure the leakage current, which should not exceed 30 mA. An additional test will be to turn on the equipment in high volume mode, and the components should not turn off spontaneously.
- How to connect Mystery radio
- Connecting the Ford Focus 2 radio
- Connecting a VAZ 2109 radio
- How to connect a radio to a battery
- What kind of oil to fill in VAZ 2107
Possibility of installing 2 din in VAZ-2114
The radio for 2114 is an excellent solution for improving the comfort of the car. In this case, it is best to entrust the installation of the device to professionals. Doing this yourself is recommended only for those who have certain skills and knowledge in this area.
The main advantages of installing a 2 din radio in a VAZ 2114 include:
- ability to connect to the Internet;
- possibility of data transmission via bluetooth channel;
- the ability to use GPS functions;
- possibility of installing a rear view camera, TV tuner and DVR;
- more functions of the standard radio.
Connecting the radio to the VAZ 2107 power supply
The standard connection of the VAZ 2107 radio through the ignition switch is inconvenient because the radio and player can only be listened to when the engine is on. The designers chose this connection scheme for reasons of increasing battery life. To connect a new car radio in the same way, you can use the standard wiring. But keep in mind that with such a connection, advanced power units, such as Pioneer, KENWOOD, Alpine, Hertz, can reset new settings when the engine is started. Indeed, a more logical connection of the radio directly to the VAZ 2107 battery can drain a worn-out battery. Most often this happens when the driver forgets to turn off the quiet music at night. To avoid this drawback, a manual power switch button is embedded into the yellow power wire from the battery. The standard fuse for the VAZ 2107 radio is not provided in the block of protective devices. To install protection in a reserve location in the fuse box, you need to rebuild the electrical circuit. It's easier to buy a power cable that has a fuse built into it. For normal protection of the radio from strong inrush currents and short circuits, a 20-amp blade fuse is sufficient. To expand the acoustic system, move the installation location, and install complex power units, an acoustic tuning enthusiast must master the skills of an auto mechanic, radio technician, or electrician. If you do not have confidence in your abilities, it is better to turn to car acoustics professionals.
Let's start work:
1. Cut out a piece of plywood, rectangular in shape. This piece should close the opening that is located between the carpet in the interior of your car and the screws that were used to secure the standard audio system box. Thanks to such manipulations, you will end up with a blank wall near the stove, which needs to be securely fastened.
2. Cut out stencils for the right and left walls of the shelf.
3. Using ready-made templates, cut out the parts and twist them. The back and front parts of the box should be approximately 20 mm thick. They need to be twisted using self-tapping screws. Thanks to this screwing path, the structure will not delaminate in the future.
Read
4. Take sandpaper and sand the entire structure until it has a perfectly smooth coating. This is done so that the leatherette that will cover the player compartment does not tear during use.
5. We begin to glue the leather substitute fabric using PVA glue.
6. If desired, the shelf can be repainted to match the interior color, or to any other color that you think will suit.
7. If there are any gaps in the structure, they can be corrected using foam rubber. This way you can be sure that the music will not jump while driving on uneven roads and over bumps.
8. We install the radio in place and connect all the necessary connecting wires. The main thing is to do good insulation to avoid unexpected short circuits. You can connect the system to the dashboard so that it turns on during ignition.
Choosing a location for the car radio
The standard connection of the VAZ 2107 radio is provided by the factory in an inconvenient place. The factory niche, closed with a plastic plug, is located at the very bottom of the center console.
This place is inconvenient for three reasons:
- when the stove is operating, the radio tape recorder overheats, which reduces its operating time;
- the gearbox selector interferes with working with SD and DVD drives (this drawback is not critical when using flash drives and compact storage media);
- You cannot install radios of larger sizes or with retractable screens in the standard niche.
If you want to avoid these troubles, you have no other choice but to install the radio in the VAZ 2107 in place of the two central air ducts.
In principle, this method does not affect the operation of the heating system, since the mass of warm air will pass through the side and bottom air ducts.
Before moving the radio up to the VAZ 2107, you need to remove the air ducts and do a number of preparatory work.
When installing a car radio in place of the air ducts, difficult work for a novice amateur will include making sealed plugs for the air ducts, carefully cutting out plastic partitions and shaped protrusions on the dashboard. Under the installation frame of the car radio, you need to make and secure brackets (bars - inserts). To close the gaps between the dashboard and the car radio body, you need to buy and fit a factory adapter frame.
Even more difficult is the independent production of original decorative cladding made of wood or fiberglass. Installing the radio in the air duct slot makes it easier to control the receiver and view the display.
When installing a car radio, it is useful to know
During the process of installing and connecting a radio in a car, non-standard situations often arise that cannot be foreseen in any instructions.
So, if you use a standard car antenna when installing a car radio, then sometimes the length of its wire may not be enough. Many cars are still equipped with antennas designed to install old-style radios. Their antenna socket is located on a “tail” that is only about fifteen centimeters long.
In this case, you can try to connect the antenna blindly after connecting all other wires to the radio. If this fails, then, most likely, you will have to remove the console and insert the antenna plug by touch after installing the car radio in the container.
By the way, after about half an hour of this “Kama Sutra” you will probably begin to think about buying a new car radio antenna.
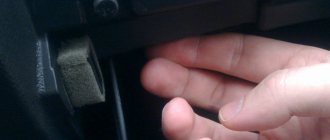
If it becomes necessary to remove a car radio with a removable front panel from the container, you will need to insert two flat keys included with the radio onto the sides of it until they stop. But before that, do not forget to remove the front control panel - it is usually detached with the “Release” button.
Connecting the Radio to the Ignition Switch of a VAZ 2107
22 May
Self-assembly of acoustic equipment is a common method of modifying Russian and foreign cars. At the same time, the user needs to know how to connect the radio to the ignition, since incorrect switching will lead to accelerated battery discharge and damage to the vehicle's on-board network. If a new player is installed instead of the standard one, it is recommended to keep the factory connection diagram.
What you need
To connect you will need a set of materials:
- a piece of copper cable;
- soldering iron and lead-tin solder;
- insulating tape on a fabric or polyvinyl chloride basis; heat-shrinkable tubing can be used;
- a set of tools for removing the steering column cover;
- test device.
Connection instructions
Connecting the radio via the ignition switch allows the main unit to operate when the key is turned to the ACC police or ignition activation position. After removing the key from the power lock, the amplifier is automatically turned off, only maintaining battery voltage to preserve the radio memory.
The radio receiver connectors have 2 cables equipped with yellow and red insulating coating. The yellow cord goes directly to the battery or cell where the positive force remains. A separate fuse is inserted into the circuit to protect the equipment from short circuits and fire.
- Error Code 8 on Niva Chevrolet
- 1 Transfer VAZ 2110 crashes Reasons
- How to register the key for Skoda Fabia
The red cord is output to the group of contacts of the ignition system lock.
The user can connect the car radio through the ignition on a VAZ-2107 with an injection engine according to the following scheme:
- Run a cable from the ignition switch that connects the ACC plug and the red power cable to the radio.
- Route the yellow cable to the battery using standard channels in the engine compartment. The cable is laid parallel to standard packages; it is necessary to protect the product from contact with hot exhaust system components or moving elements.
- The negative power cable, equipped with a black protective layer, is connected to the car body or output to the battery. You can use the negative output of the cigarette lighter, which is located next to the main unit's mounting socket.
- Connect the display backlight and buttons to the positive side outputs. When you turn on the external lighting, the backlight on the radio turns on automatically, the intensity is adjusted with a regular knob.
- Test your device. Ensure that there is no leakage current when the equipment is turned off by connecting the test device to a power source. Standby current. 10 mA.
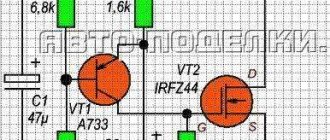
Lada 2106 › Logbook › Automatic on/off of the radio in the VAZ 2106.
With a standard connection of the radio from the ignition switch and battery, the wires are constantly under voltage. At the same time, some radios lose battery if the panel is not removed. I personally didn’t have any problems with the battery, but still I wanted to get away from the Zhiguli connection. I found several connection articles and diagrams, bought (borrowed) what I needed and started tinkering. It took two days to connect using this method.
This scheme didn't work for me.
I don’t know how Upek89 managed to achieve all the functions shown in the video review, but my radio turned on when the ignition was turned on and turned off when it was turned off. ignition I'm not an electrician, but I saw from his diagram that it wasn't working... if anyone knows about electrical diagrams, correct me if I'm wrong.
I took the diode from the garage, which was being prepared for a 12V stationary rectifier bridge.
Soviet made diode.
How I did it: - reconnected the wipers and heater using this method. I'm the only one with blade fuses. Therefore, I connected everything according to my fuse block.
— After 2 days of torment, I found this way to connect. After talking with Oleg Ushakov (StelS-KR). and he is the closest electrician at D2 KR, and decided to assemble a similar circuit at his place. Instead of the upper 5-pin relay, you can use a 4-pin relay (this is from the experience and advice of Oleg Ushakov). I assembled everything in exactly two days, and this is because I was not careful and remade it 3 times. I made this “quadrant”. (THIS IS MY SECOND MISTAKE)
It connects the corresponding jumper + input for connecting the heater + red wire of the radio. When I put everything together, it works, but when you turn off the engine, it doesn’t turn off))) the circuit closes in the reverse order through the radio... turned off the radio, the engine turns off. REDITED.
I give links to both blogs, read and comment. Here I made several mistakes due to inexperience and negligence. Follow the diagram carefully... Since I was in a hurry, I did not connect the central locking (a short-term minus when arming), so I tested it by simply shorting it to the case, the radio turned off! Everything worked perfectly until I turned off the radio with the button... after that it stopped turning off automatically after turning off the ignition... As it turned out, it was the “radio memory” that worked - as it turns off, it turns on... I didn’t know this and again Oleg Steals-KR helped with advice . All my mistakes were facilitated by a random combination of numbers on the odometer)))
Now everything is working, I am pleased with the work done. My car has become closer in function on the way to a foreign car