Classic Niva
For all its popularity, the Niva 2121 has a number of disadvantages. One of the most common problems with this SUV is increased vibration in the cabin. Moreover, the more the car is used, the more noticeable the vibration becomes.
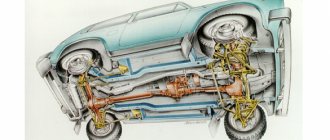
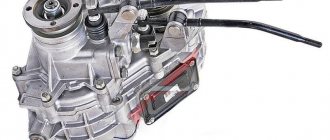
The reason for the increased vibration is a structurally incorrect solution for securing the transfer case (transfer case). The fact is that this box on the Niva is attached directly to the bottom using silent blocks. And since during operation the vibration of the transfer case is significant, all this is transmitted to the cabin.
As a result, strong vibration affects the transmission and it wears out faster. Although the metal of the bottom in the area where the transfer case is attached is reinforced, due to strong vibration, the bottom is destroyed over time due to exposure to vibration.
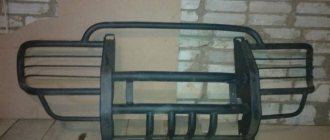
Often, Niva 2121 owners, in order to reduce vibration in the cabin, install a subframe under the transfer case. This device is made of metal. The Niva subframe absorbs any vibration impact from the transfer case.
The subframe has enough advantages:
- Receives the oscillatory movements of the transfer case.
- Protects its body from possible damage when driving off-road.
- When installed correctly, there is virtually no displacement of the axis between the transfer case and the gearbox, which has a positive effect on the durability of both transmission units, as well as cardan and intermediate shafts.
Benefits of use
A device such as a subframe has many advantages, the main one of which, as we have already noted, is the reduction of noise and vibrations in the cabin. In addition, this device is the only protection for the lower part of the transfer case.
By the way, on the conveyor the Niva is already equipped with special fastenings to the floor, which allow mounting supports on the transfer case. Thus, installing a transfer case subframe on a Niva will take the car enthusiast no more than 30 minutes. Another thing is to make this part yourself (in this case, the work can take several days). However, why is the car not initially equipped with such a device? To answer this question, let's consider the main disadvantages of the mentioned device.
Factory design
One of the recommended devices for eliminating transfer case vibration is the so-called “Niva Comfort” kit. The Niva Comfort subframe was developed a relatively long time ago, has a quality certificate, and Niva 2121 owners often use it.
This device is a welded structure made of metal corners, with drilled fastening points, mounting plates to which the base will be mounted. Since the transfer case should not be fixed rigidly to the base, the kit includes elastic supports.
For all its advantages, this subframe for the transfer case has disadvantages. It is installed in the places where the box was previously attached, that is, to the bottom, so if there are problems with the base, installing the Niva Comfort design will be problematic.
Required Tools
First of all, prepare a large and small grinder (angle grinder), a drill (preferably not a battery-powered one), calipers, a roller, a hammer, a ruler, as well as protective equipment to prevent hot metal shavings from getting into your eyes while working with a grinder. All work should be carried out according to a certain scheme (you can see a drawing of the Niva 2121 transfer case subframe in the photo below).
So where to start? First you need to measure and process the base edge of the channel. After this, use a ruler to measure the required distances from it. Windows in the device must be cut out with a small and large grinder in the transverse and longitudinal direction, respectively. The length of the cut should not extend beyond 8 millimeters from the edge of the top flange of the structure. After the windows are cut out, the contours of the sidewalls should be processed and chamfered.
We install transfer case subframes on the Niva Comfort SUV: where is the protection attached?
It is mounted on the corners at the bottom of the device. As for the type of connection, it, similar to the two options listed above, is bolted. However, the holes in the body of the side parts of the device and the lower part of the corners are made according to the threaded principle. The protective sheet is part of the load-bearing structure, which forms a kind of box and gives the subframe greater strength. Accordingly, the box will be less vulnerable to various mechanical damage, which will have a positive effect on the Niva’s cross-country ability.
Additional holes
An additional window is cut under the drain plug to drain the oil. You can drill holes in any place convenient for you, without bothering with the accuracy of the markings. Car enthusiasts also make technological windows to drain the water formed between the sidewalls of the channel and the dirt that gets there. The protection is enhanced by corners that are attached to the box support and the frontal part of the entire device. This design will protect the transfer case from all kinds of impacts on stumps, ditches and other obstacles that can lead to deformation of the subframe.
Preparation.
1. After the initial preparation of the elements, finishing processing and connection into a single structure is carried out: 1. In the channel, in accordance with the diagram, rectangular windows are cut out, ending no closer than 0.8 cm to the edge of the edge. Bevels (chamfers) are eliminated;
2. In corners measuring 70x50 or 70x70, holes are made for bolted connections, after which they are tacked by welding.
3. Corners of 35x35 cm are fixed to the lower edge of the channel, to which sheets are welded to protect against impacts and dirt. In the latter, for the purpose of access to the drain plug and regular cleaning, service holes are cut out.3. Corners of 35x35 cm are fixed to the lower edge of the channel, to which sheets are welded to protect against impacts and dirt. In the latter, service holes are cut out in order to gain access to the drain plug and regular cleaning.
How can you improve your device for extreme driving?
In this case, you can change the profile of the sidewalls of the device, which will make it flatter and more durable. The corners are welded not only to the transfer case brackets, but also to the side shelves of the channel. They are also attached inside the last element. At the end you should have a frame of four corners. This design makes it possible to cut the sidewalls of the channel to fit the corner flange. As a result, the height of the subframe will be reduced by 50%, and the strength will double.
Installation
For ease of installation, the car is fixed on a lift or above a pit. Pre-preservation of surfaces (attachment points, subframe) is carried out using protective agents, for example, Movil.
The finished product is tried on site individually for each vehicle. 4 holes are drilled along the perimeter of the structure, symmetrical relative to the center line. Having previously loosened the transfer case fasteners.
Having placed the plates on the interior side, as in the photo, the subframe is attached to the side members with M12x1.25 bolts.
The RK brackets are sequentially removed, turned over and freely fixed to the subframe. The position of the shaft flanges is adjusted until minimal gaps are formed by moving the entire structure. Alignment is performed at 3000 rpm with the machine standing.
The bolts are thoroughly tightened.
What dangers can await a motorist while driving?
As practice shows, even such a device as a subframe does not guarantee 100% protection for the transfer case and other components of the car while driving off-road. Therefore, if you often operate the Niva in rural areas, where there is a danger of “picking up” a stump or some other object that is difficult to notice in uncut grass, install the special protection on the subframe that we talked about in the previous paragraph. Then the risk of transfer case deformation will be reduced to zero. If there is no such protection, both the subframe and the box itself will deteriorate.
So, we found out how to make a transfer case subframe for a Niva with our own hands. Whether you need it or not - decide for yourself.
To absorb unnecessary vibrations, it is worth installing a subframe on the Niva 2121. You can assemble this metal structure even at home. How to make it and secure it under the body of a Chevrolet Niva and other VAZ models?
Subframe under the RK (+ installation manual) — Lada 4×4 3D, 1.7 l., 2001 on DRIVE2
Another improvement to the car, namely the manufacture and installation of a subframe under the transfer case. As always, this task was handled by my friend and comrade Dima (Raketa)
. He manufactured and installed it, for which many thanks to him!
As can be seen from the photo, the design is quite simple and reliable, it has been tested many times and has received a number of positive reviews.
Installation takes about 15-20 minutes, unless of course you distract the mechanic with “smart” questions)) First, we unscrew the cushions from the existing fasteners and turn them over. The stock fasteners can be cut off with a grinder, or you don’t have to cut them down))
And we place the subframe:
In total, the pillow is located on the subframe like this:
We place everything and fasten it with four bolts and washers to the spar, directly into the interior:
Next, bend the muffler a little using a stand:
And we get:
Then we set up the location of the steering wheel on the subframe: put the steering wheel in neutral, engage 5th gear and drive the engine at 3000-4000 rpm.
Having decided on the ideal location of the RC, we screw it to the subframe:
That's all, after a little ride, we tightened all the bolts. The result is very pleasing, there is no stock vibration, because... The RK is not installed in the floor, where the metal is thin, but on the subframe and side bars, which are much thicker.
Many thanks to: Dima (Raketa)
for the skill and work, as well as
the Hangar18″4x4club service station
for the opportunity to do this in good conditions!
Shaking problem
Many drivers who have a VAZ 2121 Niva at their disposal have encountered the fact that the cabin vibrates strongly while driving, especially off-road or at high speed. Vibrations that spread almost throughout the entire cabin cause a lot of inconvenience and constant discomfort. Technically, this was not corrected, so the people’s minds had to independently find a way out of the current situation. And the solution turned out to be quite simple - the transfer case needs a structure that will absorb vibrations. Installing a subframe solves this problem.
The ready-made protective metal frame Niva Comfort is suitable for models 2121, 21213, 21214. The main purpose of the protective part is to eliminate all vibration from the transfer case. But the benefits of installing a subframe on a field turn out to be much greater:
After installing the transfer case subframe, the ground clearance will slightly decrease, but the car will be much more comfortable to drive.
Design description of vibration suppression system
Car with front and rear wheel drive
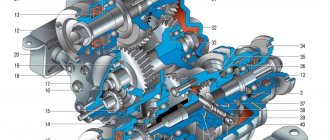
The invention relates to an off-road vehicle. The car contains a frame (3) made of two parts (4) and (5) with two elastic supports (7) and (8) attached to the floor (2) of the car body (1).
The gearbox (16) is rigidly connected to part (5) of the frame (3). Elastic supports (20) and (21) of the transfer case (19) are installed on part (4) of the frame (3). Additional elastic support (24) is rigidly fixed to the transfer case (19) and is rigidly connected to part (4) of the frame (3).
Three elastic supports (20), (21) and (24) ensure an unambiguous position of the transfer case (19) relative to the gearbox (16). Under all vehicle driving conditions, the gearbox output shaft (16), transfer case drive shaft (19) and connecting shaft (22) remain coaxial, which reduces vibration and ensures engine longevity.
The design of the frame (subframe) is periodically improved, so there may be some discrepancies with the presented drawings, photos and descriptions.
Delivery of goods is carried out by transport companies throughout Russia.
For sending we use the services of the following shipping companies:
- Energy
- SDEK
- Business Line
- PEC
- or any other convenient for you
If it is impossible to deliver the ordered goods to you by a transport company, the goods are sent by Russian Post.
Eliminating vibration on the Niva using a subframe for the Niva Comfort transfer case. Part 1.
Elimination of vibration on VAZ 2121, VAZ 2131 using a subframe for the Niva Comfort transfer case. Part 2.
Elimination of vibration on VAZ 2121, VAZ 2131 using the RK Niva Comfort subframe. Part 3.
Materials, tools and drawings
The protection is mainly used for models 21214, 2121, 21213, which have vibration problems. To assemble a subframe on the field with your own hands for a transfer case, you will need metal channels, angles, bolts and a sheet of thin metal as the main materials. In addition to materials, you need to get diagrams or a drawing of the subframe. The simplest design consists of two transverse parts and two crossbars that connect them. Tools worth preparing:
- grinder;
- drill;
- measuring instruments - calipers, ruler;
- bank;
- hammer.
To protect against metal filings, you should take protective clothing made of thick fabric.
There are several design options, so the number of channels and angles may vary depending on the drawing.
Assembly options
The first step is to measure the distance for the parts. Using the subframe drawings, we assemble the structural parts according to the measurements obtained.
Here are three build options:
- A simple version of the Niva-Comfort type frame, where you only need 5 main parts and a couple of fasteners for them. It is assembled from five square-shaped channel pieces with an additional reinforcement strip. The ends of the four parts are bent into the frame and holes are drilled into them for bolted connections. The frame parts can be welded or bolted together. A more complex design consists of almost a dozen parts and is assembled according to three drawings.
- In this homemade version, one wide channel is used as a basis, in which there will be a hole exactly for the transfer case. On the sides of the channel there are large corners, and at the ends there are shelves made from smaller corners. All parts are connected exclusively by bolted connections. This design protects the bottom of the machine well, but is more labor-intensive for manual production. The great advantage of this particular option is the installation of engine crankcase protection, which can be connected to the subframe; in addition, the protection of all parts around is improved.
Post of anger about the subframe — Lada 4×4 3D, 1.7 l., 1996 on DRIVE2
Before the holidays, a subframe was purchased in the South Port in order to unload the tired Niva floor. At first I was going to cook it myself, but then laziness prevailed and the installation and centering mechanism was incomprehensible. that's why I bought this one.
The photo is not mine, I’ll make a reservation right away, no stickers or other “identification marks” of the manufacturer. but it seems to be well made. as it seemed. put it on for fitting - pre-assembly
Full size
First, we try on the RCP with new supports. on one side we set it exactly:
Full size
then on the other side the holes do not coincide by 5-6mm. needs to be drilled out. constructor “finished it yourself” dammit
Full size
constructor
I’m generally silent about the rear support
Full size
Re-drill everything, nothing matches.
As I attached the gearbox support to the subframe, I was silent, the angle grinder and the drill ruled, and it was cool. but I managed to post a photo, I didn’t take a photo, my hands were dirty! but the main ambush was hidden in something completely different! I can’t believe that in different fields the distance between the side members can vary by 30-40mm! this is exactly how much my subframe is ALREADY the distance between the side members
At the same time, since the entire transmission is assembled, when trying to press the subframe with manual gearbox, cardan shafts and shaft to the right side, it encounters resistance and a desire to move more centrally. In addition, the description says to mark the holes in the side members, drill and weld the bushings into the side members. with the left one everything will work out, there is a lot of empty space, but with the right one it’s a mess! The middle part of the exhaust interferes from the inside, the sills interfere from the outside. I plan to weld the corners as in the picture. 1 will allow you to choose the distance between the subframe and the beams 2 will allow you to attach the subframe not with horizontal mortgages, but with vertical ones, and drilling through the floor is easy. who did what in this case? Having supported the entire structure during the fitting and turning over the gearbox supports, I tried it on and saw that the gearbox was not at the same points relative to the old original studs, it was necessary to move it back, and the fastening of the gearbox support did not allow this to be done; in short, it had acquired some kind of feces. I do not know what to do