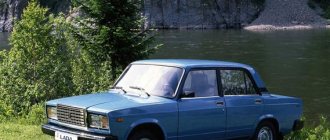
Chevrolet Niva is one of the most popular domestic vehicles. This is greatly facilitated by its performance qualities. The machine is characterized as durable, which means that the installation of a towbar is quite possible. However, this may pose some difficulties.
Niva Chevrolet
The fact is that this device is specialized. It should be used mainly for towing not too heavy trailers. This constructive “gadget” is especially relevant in the summer season. But such a vehicle with a trailer places increased demands on its movement. Therefore, the choice of a towbar designed for a Chevrolet Niva must be approached very responsibly - for this brand of car it must have the appropriate standards.
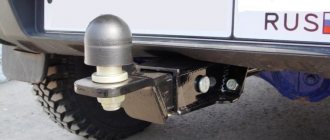
Do-it-yourself towbar installation
The towing device is sold in a complete set, which consists of the towbar itself, a socket, wires, a cap on the ball, special nuts and screws (3 pieces each), 6 bolts, 6 spring washers and 6 regular graphite lubricants.
The basic set has everything you need, so there is no need to buy anything additional.
Before installing the towbar, the vehicle should be positioned so that you have access to its lower part. Also make sure there is good lighting so you can see all the mounting holes. Next you need to do the following:
- clean the mounting area from dirt and remove the factory tape;
- all elements intended for fastening must be lubricated with graphite grease;
- Carefully insert the bolts into the pre-prepared holes and tighten the nuts tightly in order to secure the towbar well. First, a transverse rail is attached to the spar, and then a longitudinal one;
- Lastly, install the removable ball.
Let's consider the package
A Chevrolet Niva car comes from the factory without a towbar, but installing it will not be any problem, because there are special holes in the body used for attaching a towbar.
The towbar is sold as a set consisting of:
- the device itself;
- sockets;
- wires;
- cap on the ball;
- special bolts, nuts, screws for fastening.
Towbar on Niva Chevrolet
As you can see, the kit includes everything for installation; you don’t need to buy anything additional, which is very convenient. When installing the tow bar on the Niva, strictly follow the instructions.
CHEVROLET NIVA petrol since 2001, restyling since 2009, (EURO3/EURO4) repair manual
More details
CHEVROLET NIVA petrol from 2001/restyling from 2009 onwards, (EURO 4) repair manual
More details
VAZ 2123 / CHEVROLET NIVA petrol, since 2001, maintenance manual
More details
CHEVROLET NIVA petrol from 2001/restyling from 2009 onwards, (EURO 3) repair manual
More details
Operational risks
For this reason, towbars were not produced either, which provoked the growth of all kinds of handicraft industries.
Their “products” suggested 2 types of do-it-yourself installation of a trailer hitch on a car:
- Attaching the towbar to the rear bumper guides;
- Attaching the trailer hitch to the side members and the car body.
The photo shows how to install the trailer hitch on the bumper brackets
In addition, the “handicraftsmen” also took into account the desires of the owners to equip their Nivas with gas cylinder equipment, which included installing a cylinder in the rear of the body. For this reason, the design of the trailer hitch attached to the side members looked rather unusual.
Installing a towbar on a Niva 21214 with gas equipment provided only this option
Note! Naturally, no one has carried out any dynamic tests of the trailer hitch, carried out according to GOST R 41.55-2005 standards. And car owners exposed their cars to danger, which often caused accidents.
Towbar attachment points that have been torn out “with meat” are a natural result of incorrect installation
Bumper towing options
Before purchasing a towbar for a Chevrolet Niva, you need to familiarize yourself with the manufacturing companies and the varieties of this part.
Among the companies that occupy leading positions in the production of towbars, it is worth highlighting such as “Bosol”, “Auto-Hack”, “Baltex”. Experienced motorists and specialists recommend choosing trailer hitches manufactured by these companies. The devices are characterized by high reliability and high-quality materials.
Towbars for Chevrolet Niva are divided according to the design of the product into:
- Removable.
Easy to install and dismantle. Mounted with 2 or 4 bolts, which are easy to remove. You can often find models with a removable ball on sale.
- Fixed.
They are a one-piece design. Installed on a reinforced car bumper. They are welded to the side members or attached to massive bolts.
- Quick release.
Often equipped with a folding mechanism. The ball is removed and stored separately from the trailer hitch. Used for transporting light loads in a trailer.
On the old-style Niva there are no standard mounting points for the tow bar. Experts do not recommend making special holes for mounting the trailer hitch yourself. In addition, it is impossible to find models of towbars for such cars on sale, and homemade towing devices do not have the proper quality.
After selecting a suitable towbar, we proceed to install the trailer hitch on the vehicle ourselves.
Recommendations for using the tow bar
If you have correctly installed the towbar on the Niva, you should adhere to the following recommendations for using the trailer hitch:
- It is prohibited to tow cargo weighing more than 1300 kg.
- It is necessary to adhere to a certain speed limit when towing a trailer (no more than 90 km/h).
- The load on the coupling ball should not exceed 50 kg.
- At each vehicle maintenance, it is necessary to tighten the connecting threads.
- If the load extends beyond the trailer by 1 meter at the front or rear, or 40 cm from the outer edge of the side light, it must be marked with special identification marks.
You should also adhere to the rules for placing cargo in a trailer. It should be evenly distributed, that is, the center of gravity should be above the axle (if we are talking about a single-axle trailer) or between the axles (if you are using a two-axle model).
These rules should not be neglected, since in a situation where the load is shifted forward, the load on the coupling device and the rear of the machine will increase, which will lead to poor traction with the road surface. It is also impossible to allow a shift back, otherwise the rear part of the car will rise, which will also worsen the vehicle’s handling.
What to choose
In this article, we specifically did not describe the technical characteristics of each product. The thing is that for the average person this information will be like an explosion in the head. All the numbers are intertwined there and you can get confused. We can give you advice on how to proceed easier.
Ask yourself what do you want from a tow bar? What will you carry on it?
If you are looking for a budget model, this is definitely the Trailer! One of the advantages is the price from 2500 rubles. and technical characteristics, the disadvantages are the short-lived coating
We recommend: What happens if you pour sugar into the gas tank of a car?
The highest quality, toughest and most durable towbar is the Bosal VFM tow bar. But the price also corresponds, starting from 3200 rubles.
The average option, which combines good technical performance, reliability and durability, is Leader Plus. This manufacturer offers the maximum range of types of balls. The line includes a towbar for gas-cylinder equipment. Prices start from 2500 rubles.
Requirements for a towbar on a Niva Cheverol
The proprietary device that is planned to be installed on this car model must meet all the necessary standards. Typically, before it goes on sale, it undergoes tests that check metal fatigue and all important loads.
Before the towbar is installed on the Chevrolet Niva, you need to ensure that it meets the following requirements:
- Be sure to purchase an original tow hitch.
- Towing weighing more than 1300 kg is not allowed.
- When traveling, you must not exceed a speed of more than 90 km/h.
- It is imperative to monitor the load on the coupling ball - it should not exceed 50 kg.
- With each subsequent maintenance, tightening of thread connections is necessary - it is better to do this at a service station.
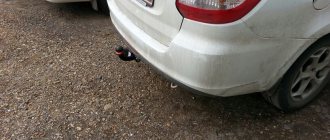
Towbar on Niva Chevrolet
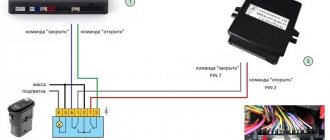
Connecting the towbar socket
When connecting the towbar socket, you need to know the wiring diagram of your car. Usually it has 7 contacts, 6 of which are in a circle and 1 in the middle. But please note that in imported trailers there are 9 such contacts, of which 2 more are designed to provide additional lighting and operation of household appliances. Before connecting the equipment, check that there are no burnt contacts anywhere and disconnect the car battery. Further:
- strip the insulation on the wiring of the rear headlight;
- Carefully solder one of the wires to the contact in the socket using the pinout diagram, then solder the next 6 contacts;
- carefully wrap the wire insertion points with insulating tape;
- return the headlamp to its place and connect the battery.
Once completed, check all of the vehicle's lights.
Comments 11
I remember I came to buy a trailer. The towbar was in the trunk. While my wife was filling out the paperwork, I installed the towbar. I connected it according to his instructions - it turned out to be wrong. I connected it according to the trailer instructions - everything works. They could have messed up the wiring in the trailer - I don't know.
By the way, I didn’t know about the rubber plug; I ran the wiring through the left air duct. It needs to be redone.
In principle, they’ve already suggested it, but I’ll add some little additions for completeness...
The colors in the car are:
Driver's side light Black - Red foot Green reverse Orange/black rear fog lights Yellow dimensions Blue-black left turn
Passenger side light Blue is a right turn
The right turn signal cord stretches through the standard rubber bands to the lights, remove the rubber band, thread the connector, wind up the wire, insert the connector into the headlight, wrap it around the rubber band with electrical tape to the standard wiring, and return the rubber band to its place, under the plastic trim across the trunk, secure the blue wire with electrical tape and that’s it ...
In the towbar socket the numbers are signed, but... 1) left side 2) rear PTF 3) weight 4) right side 5) reverse 6) feet 7) dimensions
I recommend starting with the marker pin (in the center of the socket)
I pull the entire tourniquet outward in a different way than in the picture. a) On the driver’s side, inside the wing, at the canopy, remove the air duct clapper, swaying upwards and pulling... b) Spray everything with water... c) Having wound all the wires at the end with electrical tape, pull the cable through a thin round elastic band, where the black and yellow wires pass d)
We intercept it from below under the elastic band and pull it all back into the cabin. This way we pull the harness through the rubber band and do not interfere with the reinstallation of the flapper valve. If the valve is not installed, then there will be an incredible amount of dust in the cabin(!) e) We tie 60 centimeters to a broaching wire and push it back down, closer to ourselves, sitting in the trunk, the harness passes in the area of the ventilation in the bumper, but closer to the driver ( you need to get there, it’s a matter of skill and luck) e)
Electrical connection
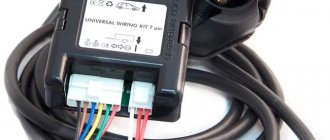
An electrical connection is necessary for the operation of additional lighting on the trailer. For this purpose, a 7-pin socket is used, which is supplied with the towbar.
The socket connection diagram is in the towbar instructions and looks like this:
- Left turn signal.
- Fog lamp.
- Weight.
- Right turn signal.
- Reverse.
- Brake signal.
- Parking lights.
Connecting the socket to the wiring is carried out according to the following algorithm:
- The rear headlight is removed and the insulation on its wiring is stripped.
- The wires are soldered in accordance with the pinout diagram.
- The places where the wires are inserted are wrapped with electrical tape.
- The headlight is installed in place.
We recommend: How and with what to lubricate car door hinges?
After completing the work on connecting the socket, check the functionality of the trailer lights.
Useful tips
- Due to the fact that a breakdown of the structure while driving can cause a lot of trouble. Avoid butt welding metal. Therefore, it is preferable to attach steel strips to the edges of the beam by cutting holes in them to the size of the pipe section, putting them on its ends, and then welding them.
- Do not use an angle grinder without protective glasses, and do not cook without a mask: take care of your eyes.
- If you want to paint a new towbar with your own hands, then first, thoroughly prepare its surface for painting. To do this, pickle it with any product that contains phosphoric acid to convert rust. Then sand the surface with waterproof sandpaper, pouring water on it to wash away the waste. Dry the assembly, degrease it with solvent for nitro paints or acetone, and cover it with adhesive primer from a spray can. Dry the soil according to the instructions. Sand with 400 grit sandpaper and water until the surface is evenly matte after the water dries. The surface is ready - dry, degrease with alcohol or B-70 gasoline (the solvent will smear the fresh soil). Then you can paint. After this preparation, your paint will last a very long time.
The emergence of a new Niva
Everything changed with the appearance of a new model in the AvtoVAZ lineup - the Chevrolet Niva:
- The manufacturer has provided attachment points for the trailer hitch;
- They have been reinforced and equipped with threaded connections;
- For operation without a towbar, the attachment points were initially sealed with special tape.
Factory instructions allowed towing trailers weighing up to 1300 tons
Note! The automaker entered into agreements with trailer hitch manufacturers, which led to the unification of parts for the coupling device, thereby protecting the cars and their owners. This applies not only to the Chevrolet family - installing a towbar on a Priora station wagon has also become safer.
Thanks to this, every owner of new AvtoVAZ cars can independently purchase and install a trailer hitch kit. In addition to towing, the towbar often serves as additional protection for the underbody, as well as making stickers for the headlights, protecting the glass from flying stones.
Connect the socket for the Niva Chevrolet trailer according to the diagram | Chevrolet
Fastening the connection of the Chevrolet Niva towbar wires to the towbar body, into the designated recess near the ball;
The work is carried out in accordance with the drawing contained in the instructions; Cable protection with a corrugated pipe is practiced; The wiring is inserted into the Chevy interior through a special hole and secured; Ferrules are used for wires, and fuses must also be installed; Since the wires connect to the taillight, pay attention to their color and follow the instructions. Installing and connecting a towbar Do not neglect information regarding their purpose. The procedure for connecting and pinout of the towbar socket is indicated below: Pull the harness through the hole in the bracket and install the socket. Lubricate the socket mounting bolts with graphite grease. Remove the trim 6 screws.
Remove the sound insulation. Near the platform with the car body number, under the vibration-insulating layer, find a plug; in the photo, the platform with the number and the plug are indicated by arrows.
Take off. Make a hole in it with a punch.
Pull the electrical wiring harness through the hole in it. Near the plug, make a branch of one of the wires that will go to the left rear light.
In this case it is the yellow wire. The remaining 4 wires will go to the right lamp. Disassemble the right rear light casing, which is attached to two pistons. Disconnect the connector from it.
The quality of the photos is not very good - due to the weak battery, the flash connection to the Chevrolet Niva tow bar wires was triggered. There is a rubber plug in the trunk floor, closer to the lamp. It needs to be removed and pierced to suit the size of the wire. Plug in the left side of the trunk There is a hole in the spar at the bottom of the car - we push the wire there: We pass the wire through the hole in the spar and catch it from the hole in the plug: We bring the wire into the trunk I also decided to connect the three-core wire to the left lamp: This is done for reasons of safe connection round connector in zero visibility conditions.
It is almost impossible to install incorrectly or short-circuit the sockets with this arrangement. Each of the connector pins has a clear purpose. The table shows the areas of the minimum cross-section of wires that are used to connect to the required circuit element.
Niva Chevrolet connecting towbar socket
Some car enthusiasts ignore the separation of the right and left side lights, combining them circuit-wise into a single wire. This function is to connect the wires of the Chevrolet Niva towbar while parked on the side of the road. Pinout diagram for a 7-pin American connector: A special feature of the connector is the presence of a reverse contact and the absence of separation between the right and left rows of side lights.
In some models of American cars, there is no separation between side lights and brake lights; they go along one wire. In many cases, the set of towbar connectors already includes conductors of the appropriate color and cross-section.
This greatly simplifies the electrical connection process. The main difference between this connector is that there are several contacts for the negative and positive buses, and backup contacts for connecting additional devices, such as a rear view camera.
Installing the tow bar
The standard trailer hitch set for the Chevrolet Niva includes:
- set of wires and socket;
- screws and nuts (3 pieces each);
- 6 bolts;
- 6 regular washers and 6 spring washers;
- ball cap;
- graphite lubricant.
Having prepared everything you need, position the car so that you have access to the underside of the car and perform the following steps:
- Place the towbar against the mounting location to determine where the mounting holes are located.
- Clean the mounting points from dirt and remove the factory tape from them.
Healthy! There is no need to remove the bumper, which significantly speeds up the installation process.
- Lubricate all fasteners with graphite grease.
- Attach the hitch to the spar and apron, after which you need to insert the bolts into the holes and secure them tightly with nuts in the following sequence: first, attach the transverse beam, which is attached to the spar (inside the rear bumper), then this rail is connected to the longitudinal one.
- Install the removable ball.
This completes the mechanical installation. Now you need to connect the electronics responsible for the light elements of the trailer.
About installation
Before installing a tow bar on a Chevrolet Niva with your own hands, you need to prepare the car:
- Place the car on an overpass or inspection hole.
- De-energize the vehicle.
- Remove the luggage compartment trim.
By and large, any car enthusiast can install a tow bar on a Chevy Niva with his own hands if he has at least some experience in car repairs. The towbar comes with a passport with installation instructions. The only thing to keep in mind is that from 2022, the rules for making changes to the design of the car have been tightened. Now, even on the road, you may be asked for the appropriate papers.