The transfer case is the most important part of a Russian SUV. The vehicle's cross-country ability depends on its proper operation. In this article we will understand how and why the transfer case works, how faults are diagnosed, as well as the Niva VAZ transfer case - repair and replacement.
Transfer case location and functions
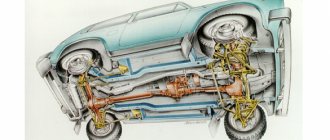
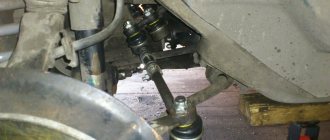
Location of the transfer case in the Niva 21213
The transfer case occupies an intermediate position in the vehicle transmission between the gearbox and the driveshaft. It has its own body in which its components are located.
The transfer case helps to implement such SUV capabilities as:
- Center differential lock.
- Disabling the drive axle.
- Increased torque of the drive wheels.
- Distribution of torque along the wheel axles.
Changing the oil in the transfer case
The 2121 transfer case, of course, requires regular maintenance. The main maintenance work for transfer case 2121 includes changing the oil according to the automaker's recommendations. It is recommended to change the oil every 45 thousand kilometers. To perform this procedure, you need to take a twelfth hexagon, a syringe for filling the oil, the oil itself and a container for processing. It is best to change the oil in an inspection pit or on a lift.
The order of work is as follows:
- We unscrew the drain plug above the waste oil container and wait until it all drains;
- Screw in the drain and unscrew the filler plug;
- Fill with oil using a syringe until it reaches the bottom edge of the filler hole;
- Screw the plug.
Do not forget that only transmission oil should be used, and it has different characteristics compared to conventional engine oil.
VAZ 2121 Niva has established itself as a reliable and versatile Soviet SUV. In 1977, the first domestic all-terrain vehicle rolled off the assembly line, which, unlike ordinary passenger cars, the VAZ 2121, had all-wheel drive and increased cross-country ability. The Niva transfer case design was developed by experienced AvtoVAZ designers in order to increase the functionality and versatility of the vehicle both when driving off-road and in city conditions.
In 1994, an updated version of the SUV was released, labeled Niva 21213, differing from the previous version in a more powerful power unit. Since 2006, this series of cars has been known as Niva 4x4.
Understanding the terminology
Let's start by diving into the materiel. Transfer case (TC) is a separate unit of an all-wheel drive vehicle, which provides multi-mode power distribution from the engine to the front and rear axles.
Externally, this is a mechanism located under the bottom of the car, in the body of which a multiplier (divider) is placed in series to obtain an intermediate gear ratio in the transmission and a splitter of one power flow into two. It is with the help of this device and its controls (levers) that go into the vehicle interior that the LADA 4×4 driver selects the all-wheel drive operating mode.
The RK directly connects the front driveshaft and the intermediate shaft (shaft) with the vibration damper to the vehicle’s gearbox. As is probably already clear from the description, this element is connected to the rear axle of the car via a rear propeller shaft.
Transfer case 2123 (2-row bearing) Chevrolet Niva Art. 21230-1800020-0116500.00-+ Buy Transfer case 2123 Chevrolet Niva Art. 21230-1800020-0114500.00-+ Buy Transfer case (2-row bearing) 21213 Art. 21213-1800020-0115000.00-+ Buy
Eliminate vibration with additional fasteners
Installing the third support of the transfer case on VAZ 21213/21214 vehicles allows you to reduce the level of vibration of the transfer case; with this support it is easier to center the transfer case. The part can be purchased at auto stores or made yourself. The finished product comes with three long studs (for model 2121); to install the third support on this machine, you will need to unscrew the short studs from the transfer case housing and install new studs from the kit. We carry out repairs as follows:
- dismantle the front passenger seat in the cabin;
- remove the floor tunnel lining;
- in the cabin we move aside the carpet covering the body amplifier (in front of the handbrake lever);
- remove the transfer case (alternatively, you can simply hang it up, but removing the third support makes it easier to install);
- We attach the bracket of the new support to the body of the RC;
- we install the transfer case in place, center it in the optimal position, and fasten the side supports;
- we combine the third support with the body, drill two holes in the bottom;
- Using washers, bolts and nuts (from the kit) we attach the support to the bottom of the body.
Vibration is eliminated more effectively by installing a subframe under the transfer case. You can also make such a device yourself or buy a finished product at a car store.
In order to install the subframe, the transfer case must be removed. It is more convenient to carry out such work in a pit; we carry out repairs as follows:
- leave the car in neutral gear;
- disconnect the propeller shaft from the transfer case, it is advisable to mark the driveshaft flange and the drive shaft so that during installation, align the driveshaft according to the marks - this way, the occurrence of unnecessary vibrations is eliminated;
- dismantle the muffler mounting bracket;
- remove the gearbox traverse;
- jack up the transfer case, remove the side fastenings of the transfer case;
- We treat the places where the subframe fits to the body with Movil;
- place the subframe on the gearbox studs;
- we mark the attachment points of the subframe on the side members, drill holes, attach bolts to the body;
- we tighten all fastenings, except for the transfer case supports themselves;
- we perform alignment of the steering wheel;
- Finally tighten the transfer case supports.
It should be noted that installing an additional support or subframe on the steering wheel does not always lead to the desired effect; in some cases, vibration only increases.
Centering method
To carry out this work you will need a lift, although with some skill you can get by with simple supports. First you need to prepare the car. If there is a lift, it is raised up. If supports are used, the corners of the machine are jacked up one by one and it is placed on them. Please note that all supports must be stable, otherwise the work will be unsafe. You should also prepare the tool in advance. If there are no plans to simultaneously replace other parts, then it is quite possible to get by with a ratchet and a “13” head. During operation, an assistant must be in the cabin.
Adjustments are made in the following order:
- To begin with, you should evaluate the condition of the splines on the cardans. If they are very worn, then most likely you will not be able to perform the alignment correctly. In case of significant wear, parts should be replaced;
- The transfer case mount is inspected. Often the displacement can be seen with the naked eye;
- Next, loosen the transfer case mount. Just don’t unscrew it completely;
- After this, start the engine and “accelerate” the car to a speed of 80-90 km/h. In this case, the transfer case will fall into place on its own;
- The crucial point is to consolidate the result obtained. This can be achieved in 2 ways. Mechanics argue which one is better, but both are used in everyday life. Most often, the engine is turned off, and with its help the transfer case and cardan shafts are stopped.
- All that remains is to quickly tighten the nuts. Disadvantage here 2. Stopping the box in this way can have a negative impact on its condition.
- Also, you need to tighten the fastener as quickly as possible, otherwise it will be of no use. A more reliable, but technically complex method is to tighten with the engine running;
- The car is lowered to the ground and testing is performed.
If the vibration persists, the procedure should be repeated.
Recommendations for centering the control gear
After any operations to remove and install the transfer gearbox, it must be centered. To do this you will need:
- loosen the transfer case so that it “sits” more freely and can move slightly;
- accelerate to a speed of 80 km/h, after which the transfer case will sit in its seats;
- tightening occurs as quickly as possible and with the engine running, so that through vibration, the manual transmission does not have time to take an inappropriate position.
After such repairs, the transfer gearbox can serve faithfully for a very long time. Unfortunately, the operation of the transfer case under conditions of increased loads often significantly affects the reduction of service life due to its weak design. To increase the reliability of the manual gearbox, you can install a subframe, which will allow the transfer case to sit firmly in its place, as well as eliminate strong vibration from the operation of the transmission.
The finished subframe for the Niva has ready-made holes and fasteners for attaching it to the body. Also, to increase reliability, an additional transfer case support was installed. To install the subframe, you will need to place a jack under the transfer case, loosen the fastening nuts and lower the transfer case. Next, the subframe is tried on the seats. I strongly recommend lubricating the holes in the bottom well to prevent possible corrosion. The subframe is screwed onto the transfer case seat, and the box itself is screwed onto the subframe. Due to the fact that the subframe is rigidly connected to the body, vibrations will still transfer to the body, but not so significantly. Thanks to reinforced supports and high-quality rubber cushions, the transfer case will no longer have the tendency to move out of its seat, which means that all elements of the chassis will last much longer.
Disassembly
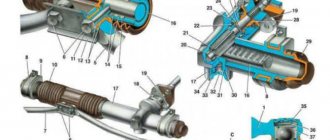
1 — front axle drive housing; 2 — crankcase cover; 3 — speedometer drive housing fig. 3-39fig. 3-38
rice. 3-38fig. 3-39
1- intermediate shaft; 2 - drive shaft; 3 — differential; 4 - front cover
1 - flange; 2 — oil seal; 3 — thrust ring of the bearing, 4 — front bearing; 5 - drive shaft; 6—high gear; 7 — hub; 8 - coupling; 9 — low gear; 10 — bushing: 11 — rear bearing; 12 — bearing installation ring; 13 — intermediate shaft bearing; 14 - intermediate shaft
- remove the lock ring 1 (Fig. 3-45) and spring washer 2 of the front bearing;
- remove the rear and front bearings from the differential housing (Fig. 3-46), using a universal puller and stop 67.7853.9559;
- by turning the bolts of the differential housing, separate the housing;
- remove the differential driven gear;
- remove retaining rings 8 (Fig. 3-45) and spring washer 14, then press out the pinion axis and remove the satellites and drive axle drive gears with support washers.
Also interesting: Adjusting VAZ 2114 and 2115 headlights: tips and tricks
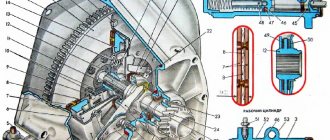
1 - retaining ring; 2 - spring washer; 3 - bearing mounting ring; 4 — differential housing bearings; 5 — driven gear; 6 - front differential housing; 7 — front axle drive gear; 8 — retaining ring of the satellite axis; 9 — satellite; 10 — rear differential housing; 11, 15 — support washer; 12 — rear axle drive gear; 13 — satellite axis; 14 - spring washer
1 — puller A.40005/1/6; 2 — stop 67.7853.9559; 3 - bearing
- the axial clearance of each axle drive gear should be 0-0.10 mm, and the moment of resistance to rotation of the gears should not exceed 14.7 N m (1.5 kgf m). If the gap is increased, replace the support washers with others of greater thickness; if the specified gap cannot be obtained when installing support washers of the greatest thickness, replace the gears with new ones due to their excessive wear;
- The drive and intermediate shafts are installed in the transfer case housing simultaneously (see Fig. 3-47);
- Press the bearings onto the differential housing using mandrel 67.7853.9558 (see Fig. 3-48);
- Before installation in covers and crankcases, lubricate the working surfaces of the oil seals with LITOL-24 grease;
- Tighten threaded connections to the torques specified in Appendix 2;
- when compressing the transfer case shaft nuts, use mandrel 67.7820.9520 (see Fig. 3-49).
Disassembling the transfer case
A complete repair will require an automotive tool kit and a transfer case repair kit (bearings, seals and gaskets, possibly some gears), a hammer and a bearing puller.
- Remove the front and rear covers of the RCP housing. To do this, you will need to loosen the nuts securing the covers and, using a pry bar, pull the cover towards you from all sides. On the other side of the box we perform a similar operation. The front cover will come out together with the shaft responsible for locking the differential, and the rear cover with the shaft responsible for the reduction gear.
- Using a hammer, knock out the differential assembly from the housing. The design of the differential located inside the transfer case is similar to that found in the axles. Having unscrewed the nuts securing the main pair, we open access to the satellites. If there is wear on the satellite teeth, then be sure to replace all the parts.
- We check each bearing for any extraneous sounds during rotation. If there are any, then remove the shaft nut on which the bearing sits and use a puller to press out the old bearing.
- The internal parts of the transfer case are installed in reverse order. It is recommended to use new bolts and nuts to ensure sufficient tightening torque for the shafts and housing covers.
- After assembly, fill in new semi-synthetic oil, not lower than GL-4 classification - 0.9 l.
Eliminating prerequisites
The misalignment of the transfer case occurs due to an undeveloped design. Therefore, many craftsmen strive to modify the fastening so as not to bother with alignment once a year. A special frame is used for this. In recent years, it can be purchased in stores, but you can also make it yourself. The advantages of this modification are the following:
- The transfer case is mounted on the rigid base of the subframe. The attachment to the body is made through a subframe, this allows to reduce the level of vibration transmitted to the body;
- It plays the role of a kind of protection for the crankcase;
- Also worth mentioning is adding additional rigidity to the side members.
- Among the disadvantages, we can mention a slight decrease in clearance. Although, in light of the advantages, this does not play a special role.
To assemble the subframe you will need a square pipe. Some people use a corner, but in this case the structure will be less durable. The support plates are made of sheet steel. Before assembly, you should cut off the old transfer case mounting bolts. Now it will be installed on the subframe. The pipe is cut to size and the frame is welded. After that, holes are drilled in the crossbars for fastening the transfer case. It is important not to make a mistake with the sizes. The next step will be assembling the mount to the body. Sheet steel support plates are welded to the subframe. Holes are drilled in it. After fitting, you need to drill holes in the floor of the car.
M12 bolts should be used for fastening
, as well as thick washers.
After installing the subframe, do not forget to treat it with an anti-corrosion compound. This will increase the service life of the part. This is how, through simple manipulations, you can get rid of one of Niva’s sores. Conclusion
. Even great cars have flaws. The domestic SUV Niva is no exception. During active use, vibrations emanating from the transmission may occur. That’s when the question arises of how to center the transfer case on the Niva. In fact, this work is not difficult, but there are some nuances that are better to know before starting work. Some people, knowing this feature of this car, install a subframe, this can significantly reduce the noise of the transmission.
Razdatka on Niva 21213 main faults and their elimination
The Niva has excellent off-road potential, and that is why it becomes an indispensable assistant when foraying into the wilderness. But, as with any car, problems can also occur with a domestic SUV.
Like any mechanism, the transfer case also fails, and this can be easily determined by the following symptoms:
- Delays when turning on the front axle, its abrupt shutdown. This situation can only happen in the case of early modifications with a demultiplier. All Niva cars have permanent all-wheel drive, but many craftsmen upgrade their cars, after which they have the ability to disable the front axle.
- Constant overheating under load. A possible reason will be a low oil level, if this is the reason, then the oil needs to be added, if not, then it is caused by increased friction of the parts.
- Increased gearbox oil consumption. The reason is any leak due to wear of the seals, poorly tightened crankcase bolts, or simply a drain plug that is not fully tightened.
- Loosening of the transfer case and gearbox. Leads to strong vibrations in the cabin. It may be related to the fastening of mechanisms or the alignment of the transfer case.
- Vibrations can also be caused by damaged transmission mounts; this issue can be resolved by simply replacing broken parts.
- Loosening of the flange bolts, as well as its wear. It can be solved by replacing or tightening the bolts, or in the worst case, by purchasing an intermediate shaft. This breakdown leads to noise and vibration, initially only when the car starts from a standstill, later it turns into a constant hum at speeds over 80 kilometers per hour.
- Jamming of the propeller shaft joints. Breakage occurs due to drying out of the elements; to fix it, you will have to renew the lubricant using a syringe. If re-syringing does not help, then you will have to replace the entire part.
- Similarly, the CV joint can jam, this happens either due to lack of lubrication or due to deformation. In case of severe wear, you will have to buy the entire intermediate shaft; if the problem was only with lubricant, you can simply replace it.
- Cardan play can be resolved by replacement.
- Wear of the differential can lead to noise and crackling when cornering; only replacing the differential will correct this reason.
- Also, a possible cause of noise when cornering is often the satellites and their difficult movement. This is due to burrs, which can be removed with a needle file.
- Often it is not the transfer case itself that fails, but the lever, rod and fork, which prevent full control of the unit. Also, these parts can simply jam; to do this, they must be cleaned of dirt or, in case of severe wear, replaced.
The device of the VAZ Niva transfer case
The transfer case is not present in all VAZ passenger cars, but only on cars with two drive axles. In the transmission, the transfer case (TC) is installed at the rear of the gearbox; a rear driveshaft is attached to its shank, which connects the transfer case to the rear axle. The front axle is also driven by the steering wheel; it is connected to the transfer case by a front driveshaft.
The reduction gear in the Republic of Kazakhstan is designed to obtain high torque, it is used to overcome difficult sections of the road, and helps to cope with off-road conditions. The VAZ Niva transfer case contains the following main parts:
- the body itself;
- front axle drive shaft;
- intermediate shaft;
- drive shaft;
- gears;
- bearings;
- differential housing;
- satellites;
- differential lock clutch;
- gear shift clutch;
- flanges (for connection to cardan shafts);
- oil seals;
- control levers.
Overcoming a deep puddle
How ESP Works in a Car
Often a dispute arises between motorists about how best to cross a ford with a transfer case. Some people prefer to “fly” into a puddle from acceleration, others prefer to downshift. If you get into a mud pit, there is a high risk of water hammer - water enters the cylinders through the filter, and the engine “chokes.” To exclude this, many install a special snorkel. But you can do without it. A deep puddle should be overcome in second low gear. This is done so that in case of trouble (when the car starts to fail) you can switch to first gear in time and not stall. If you enter the water from acceleration (which is a better decision), remember that the wheels may get stuck in the middle of the journey. The engine power is not enough to turn the wheels - the car stalls, and the engine experiences a hydraulic shock.
Methodology for determining the causes of vibration of the transfer case and body floor in the area of the front seats
First, note at what speed the transfer case vibration occurs, then begin to determine the causes of the vibration.
Test 1
Place the transfer case and gearbox levers in neutral and start the engine.
Set the engine speed equal to the vehicle speed at which the vibration occurred.
If vibration persists when the vehicle is stationary, you should check the fastening and condition of the engine mounts, as they are the cause of the vibration.
Test 2
If vibration is not detected during test No. 1, then set the transfer case levers to the neutral position, start the engine, engage direct gear in the gearbox and set the engine speed corresponding to the vehicle speed at which the transfer case vibration occurred.
If vibration is observed with a stationary car at this crankshaft rotation speed, then its cause is a malfunction of the intermediate driveshaft (imbalance, bending of the fastening bolts or elastic coupling flange, jamming in the universal joint).
Test 3
If no vibration is detected in tests 1 and 2, proceed to test 3.
Accelerate the vehicle to a speed where vibration occurs and place the transfer case and gearbox levers in neutral.
If the vibration persists, it is caused by a malfunction of the front or rear driveshafts, imbalance, jamming of the universal joints or imbalance of the center differential.
Before centering the transfer case, we check the condition of the power unit supports and the correct installation (the centering washers of the engine mounts must fit into the corresponding holes in the side brackets).
We install the transfer case on the car without fully tightening the nuts securing the brackets for its suspension.
By moving the transfer case in the longitudinal, transverse and vertical directions (tightening or loosening the nuts of its fastening), we achieve a minimum and uniform gap between the flanges of the intermediate shaft and the drive shaft of the transfer case (the flanges must be at the same level and parallel to each other).
We fill the gap between the body floor and the supports with adjusting shims and align the centering belts of the flanges, slightly moving the transfer case forward (by the amount of the gap between the flanges).
Finally tighten the nuts securing the transfer case supports.
When replacing a transfer case or changing a four-speed gearbox to a five-speed one and vice versa, as well as when the rear engine mount settles, causing vibration of the transfer case, it is necessary to select and install a new thickness of gaskets 3 (Fig. 1).
Installation and Centering
- make sure that the engine mount mounts are installed correctly in the brackets (the centering washers of the front engine mount mounts must fit into the corresponding holes in the side brackets);
- install the transfer case on the car without fully tightening nuts 4 and 5 (Fig. 3-41) securing the transfer case suspension brackets;
- moving the transfer case along and across the body, as well as in the vertical direction, find its position in which the flanges of the drive shaft of the transfer case and the intermediate shaft of the driveline are at the same level, parallel and the gap between them is minimal; The transfer case shafts must be located parallel to the bottom of the body;
- Having installed the previously removed adjusting shims under the suspension brackets (supports), fully tighten the nuts securing the transfer case suspension brackets;
- attach the front and rear propeller shafts to the transfer case shafts; Connect the flexible shaft to the speedometer drive and the wires to the differential lock warning lamp sensor.
Rice.
3-41. Transfer case installation diagram: 1 - bolts for fastening the flanges of the intermediate propeller shaft and the transfer case drive shaft; 2 — transfer case; 3 — adjusting shims; 4 — nuts securing the transfer case to the body; 5 — nuts securing the transfer case suspension brackets to the axles
- make sure that the engine mounts are installed correctly in the mounts (see the chapter “Removing and installing the engine”);
- disconnect the flanges of the transfer case drive shaft and the intermediate driveshaft;
- loosen the nuts securing the transfer case supports to the body, remove the adjusting shims and, moving the transfer case along and across the body, as well as in the vertical direction, find its position in which the separated flanges are at the same level, parallel and the gap between them is minimal, and the transfer case shafts are located parallel to the bottom of the body;
- Fill the resulting gap between the body floor and the supports with the required number of gaskets,
- align the centering flanges without creating tension in the transfer case and engine supports and, holding the transfer case in this position, tighten the previously loosened nuts securing the transfer case supports;
- insert and secure the bolts securing the transfer case flanges and the intermediate shaft; if the bolts pass freely into the flange holes, then the alignment is carried out correctly, otherwise repeat the operations to align the flanges.
Video: Aligning the Niva transfer case without a lift
Repair and alignment of the transfer unit must be carried out subject to the presence of experience and knowledge in the field of design and repair of the specific transmission of all-wheel drive vehicles. The range-multiplier needs to be centered after each reinstallation. The correct position of the box is judged by the presence of vibration.
- Do-it-yourself UAZ Patriot repair
Bottom line
Repairing the transfer gearbox of a Niva car is quite simple. If you have the necessary tools at hand and minimal knowledge of the gearbox design, then in a few hours your transfer gearbox will live a new life. Installing a subframe will eliminate many problems and prevent premature wear of all parts, components and assemblies of the transmission.
Is it really worth changing the transfer case?
I took a radical approach to the issue of eliminating excess noise in the Niva’s cabin. I often drive my family, so I simply installed a new small-module transfer case. The front and rear covers were equipped with 2-row bearings; this innovation was introduced at the Tolyatti plant back in 2010. Thus, the output shafts eliminated unnecessary vibrations, and in general, the service life and reliability of the entire RK mechanism increased.
I also simultaneously replaced the levers with ones that have anti-resonance bushings installed inside them. A lever of a similar design, by the way, was originally installed from the factory on the Chevy Niva (it has only 1 lever), which is why the howling and hum characteristic of the classic Niva were usually not noticed on the Shniva.
Dismantling
- To remove the manual transmission, you will need a “13” wrench (open-end or ratchet), a flat-head and a shaped screwdriver. For convenience, removal is carried out in the inspection pit.
- Inside, use a screwdriver to remove the decorative trim of the levers. Under the cover there will be a boot of two shift levers, which is also removable.
- The cardan shafts are being dismantled. This is done using the key at “13”. The front and rear driveshafts are disconnected in the same way. Before removing the shafts, you need to mark the seat with the cardan fork so that vibration does not occur after installation.
- The speedometer cable is dismantled by unscrewing one nut and moved to the side.
- Next, unscrew all the bolts securing the transfer gearbox through the supports to the body and remove the gearbox.
Vibrations in the field, prologue
Introduction to history. In the team of people with whom I work, there are quite a lot of people with different characters, education and astrology)) What I mean is that “Virgo” is “VIRGO”. And either you understand this, or kill him right away. For example: when this person had problems with the gearbox and he decided to bring it “to mind” and go through it, he did it FIVE TIMES. Sometimes during disassembly, changing one bearing that he didn’t like, for one reason known to him))) And this person suggested that I look for vibrations, because the box had been rebuilt 5 times, the transfer case 10, and even the “hammer and sickle” CV joint driveshafts were taken for additional balancing.
Forced unlock
Sometimes it happens that the lock jams - it cannot be turned off even when the car is completely stopped. The situation is quite common for the Chevrolet Niva. How to solve it? There is a sure way. To do this, turn on reverse gear, accelerate a little, and turn it off while driving. At a certain speed, you can easily “knock it out.” But if a similar lamp continues to light on your instrument panel, as in the photo below, the lock has not been turned off.
What to do in such a situation? It is necessary to turn on the first speed and try to turn off the unit again. Moving back and forth will solve the problem of a stuck differential. In general, it is recommended to turn on the center lock only in serious off-road conditions. At the intersection of dirt roads and sand dunes, a downshift is sufficient.
Vibration and how to deal with it.
The main reason for the occurrence of unnecessary sounds is multi-frequency vibrations of the components of the transmission. In general, the vibration of the transfer case on a Niva is one of the most common cornerstones that other car owners are forced to fight (or put up with) constantly.
Also interesting: Chevrolet Niva air conditioner repair at the best price!
- Check the cushions (supports) on which the power unit, gearbox and other parts are attached to the body, including the muffler. Any worn-out pad or rubber band can easily cause excessive shaking of the iron and accompanying rumble. It is better to replace worn silent blocks and pillows immediately.
- Be sure to pay attention to the intermediate shaft (inlet shaft). If you see signs of “fatigue” - change the elements that have become unusable, or the entire part!
- Examine the condition of the driveshafts. The “old” version of the cardan allows you to service (repair) the part, for example, by replacing broken crosspieces.
- In the case of CV joint driveshafts, you will have to replace a completely non-functional element.
- As for driveshafts on constant velocity joints (CV joints), this design is more expensive, but it has an undeniable advantage - it is easy to dismantle and install back, and this operation does not disturb the balancing of the driveshafts.
- It would be a good idea to pay attention to the placement of the transfer case. If an additional (third) RC mount is installed, unscrew it from the box; there is no need to unscrew it from the body. Set the transfer case to neutral, start the car and in fourth gear, rev it up to about 3-4 thousand revolutions. It must stabilize and, as they say, find its place. Turn off the car and secure the mechanism.
Perhaps this is the most complete set of measures that experienced auto mechanics advise when the transfer case on a Niva hums and vibrates!
How to remove the transfer case from a Niva
There is nothing complicated in removing and repairing a range multiplier; anyone with the necessary tools can carry out this procedure.
The main difficulty of this car is that the transfer case is not attached directly to the gearbox itself, like in modern SUVs; in the Niva they are connected using intermediate shafts. Dismantling the unit itself is quite simple; to do this, the car is driven into an inspection hole. All levers in the cabin are set to the neutral position. Then the plastic casing is removed from the tunnel, and all covers and handles are removed. Then the hatch is unscrewed, which provides access to the transfer case. The speedometer sensor is also removed, after which the driveshafts are disconnected. In the end, all that remains is to unscrew a few fasteners of the box itself, and then remove it. After the mechanism is removed, you can begin to disassemble it for further replacement of worn parts
In general, installation occurs in the reverse order, but it is worth paying attention to the centering of the transfer case with the gearbox, that is, you need to ensure that the flange of the gearbox drive shaft is aligned with the intermediate shaft of the transfer case, after which you can tighten the mounting bolts of the range itself
Bottom line
The Niva has permanent all-wheel drive, and the car itself is inexpensive. And that is why, from the point of view of reliability and price, it is the best suited for outdoor enthusiasts. Servicing the all-wheel drive of this car will cost symbolic money, however, the design of the mechanism itself is quite reliable for such a price.
- Next The best new Russian crossovers and SUVs
- Back Sable 4x4 2016: the all-wheel drive family has been updated
- Engine/Ratings
Aug 23, 2019
- Hyundai crossovers / News
Aug 23, 2019
- Aug 22, 2019
- Volkswagen crossovers / News
Aug 21, 2019
- Crossovers Ford / News
Aug 20, 2019
- Audi crossovers / News
Aug 20, 2019
- April 13, 2019
- March 12, 2019
- Feb 17, 2019
- April 11, 2019
- July 27, 2017
Popular crossovers
Acura crossovers Audi crossovers BMW crossovers Cadillac crossovers Chevrolet crossovers Chery crossovers Citroen crossovers Dodge crossovers Ford crossovers Honda crossovers Infiniti crossovers Jeep crossovers Hyundai crossovers Kia crossovers Lexus crossovers Lada crossovers Land Rover crossovers Mazda crossovers Mercedes crossovers Mini crossovers Mitsubishi crossovers Nissan crossovers Porshe crossovers Peugeot crossovers Crossovers Opel Crossovers Renault Crossovers Ssang Yong Crossovers Skoda Crossovers Subaru Crossovers Suzuki Crossovers Toyota Crossovers Volkswagen Crossovers Volvo Crossovers
Removing the howl and hum
We will assume that we have dealt with the vibration, but an equally significant problem remains - how to remove the howling of the transfer case on the Niva. Vibrations of the mechanism are not always the only reason for the appearance of extraneous irritating sounds. And the characteristic noise of the transfer case, alas, is one of the “trademark” shortcomings of one of the best domestic SUVs.
- The first thing you should pay attention to is the levers. It is better to immediately replace them with silent ones - with anti-resonance bushings inside. They won’t eliminate all the noise, but they will definitely extinguish some of it.
Silent transfer case levers NIVA 2121 black Art. SV-21-18040401400.00-+ Buy
- The result will be even better if you install a small-module transfer case - with front and rear covers equipped with double-row bearings. In 2010, AVTOVAZ introduced new double-row bearings for output shafts in order to get rid of backlash and runout, as well as extend the life of the seals and, in general, increase the reliability of the mechanism. Here logic is man’s friend: less shaking and hesitation means higher service life and reliability.
Transfer case (2-row bearing) 21213 Art. 21213-1800020-0115000.00-+ Buy
How to use it correctly
There is a diagram on the shift lever. To turn it on, you need to move the lever to the right, up. To lock the differential, pull it all the way to the left. There are also Latin letters on the lever. So, L is a low gear, N is neutral, and H is high. Now let's find out how to use all this so that we don't have to repair the mechanism and change the transfer case bearings. The Chevrolet Niva is a universal-purpose vehicle that is actively used not only on asphalt surfaces, but also off-road. So, if you have to overcome a ford or a puddle, you should stop completely and turn on a lower set of steps
Please note: it should only be turned on after a complete stop. Even at 5 kilometers per hour you will have problems with the transfer case
But you can lock the differential even while driving. This won't bring any surprises. Unless due to the constantly working two axles and axle shafts. In what cases is it necessary to turn it on on a Chevrolet Niva? Its work will be needed when crossing “diagonals”, fords and during a long climb, which you climb slowly. Motorists often ask: is it possible to drive for a long time with a lock? Please note that it should only be enabled when absolutely necessary. Otherwise, the load on the teeth and shafts increases. If you drive like this on the asphalt at high speed, you will soon need to replace the transfer case on your Chevrolet Niva.
Who is to blame and what to do?
I think that the first question is rhetorical))) But let’s try to answer at least “why this is so.” I am a mechanical engineer by education and work, production technology is at an average level, so I turned to a military plant technologist for advice. How it should be: the workpiece is made with a press, rough processing is carried out with allowances, a thermal treatment is made, the part is processed completely according to the “main and landing” dimensions. How it was done: the last stage was removed. After heat treatment, the part warps and does not come out clean. Or it is placed on a cylindrical mandrel during finishing processing, which cannot be done. Since with this design, everything is centered on the splines.
The answer to the second question. We buy a box at the factory containing 100 “semi-finished” flanges wrapped in oil paper, drag them to the lathe, set up the “finishing fixture” and finish the entire batch.
Chapter 4. Disassembly and assembly of transfer case Niva 2121, VAZ 2131, Lada 4x4
After the transfer case has been removed, you can begin disassembling and repairing it. To disassemble the transfer case on the Niva 2121 and 2131, prepare the usual set of tools, then perform the following sequence of actions:
· Drain the oil from the box (see Changing the oil in the transfer box).
· Next we dismantle the housing of the speedometer drive gears.
· Having inserted the bolts into the holes of the flanges and secured them from turning using a mounting spatula, loosen the tightening of the nuts securing them.
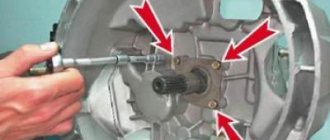
· Using a 13mm socket, unscrew the 5 nuts securing the front axle drive housing.
· After that, use a small flat-head screwdriver to pry the crankcase by the special lugs on its body and remove it and the sealing gasket located under it.
· Now you need to remove the differential lock lever shaft. To do this, remove the locking ring that secures it, pry it with a flat screwdriver, and remove it from its seat. If the axle cannot be removed, then knock it out with a hammer and a mandrel of suitable diameter.
· Remove the lever. Now, using a 20-four socket, unscrew the differential lock lamp switch.
· Remove the differential lever spring from the fork rod.
· Disassemble the front axle drive housing.
· Now you need to remove the rear cover of the transfer case housing; to do this, use a thirteen socket wrench to unscrew the nuts securing it, then use a flat screwdriver to pry it up so that it comes off.
· Remove the cover assembly with the shaft and its sealing gasket.
· We remove the drive shaft from the crankcase and disassemble it in the same way as the front axle crankcase shaft.
· Now you need to remove the gear lever bracket. To do this, unscrew the two nuts securing it to the transfer case body with a thirteen wrench.
· Completely unscrew the nut and remove the drive shaft flange.
· After that, unscrew the nuts securing the drive shaft bearing cover.
· Remove the cover and the sealing gasket located under it.
· After unscrewing the four bolts, remove the inspection hatch along with the sealing gasket.
· Inside the hatch there is a nut securing the rod to the fork. Using a 10 mm spanner, unscrew it, then close the hole with your finger so that when you remove the rod, the ball with the spring does not fly out. After closing the hole, carefully pull out the rod using pliers.
· When the rod is pulled out, the ball should fall out of the side hole.
· We remove the retainer spring itself from its seat using tweezers.
· We take out the gear shift fork and the plastic spacer sleeve.
· The holes of the gear shift fork rods are sealed with rubber rings. To remove them, you need to pry off the ring with a flat-head screwdriver.
· Now you need to unscrew the nuts securing the bearings of the drive and intermediate shafts. The nuts must be unlocked first.
· After that, with one key we hold the shafts from turning, and with the second we loosen the tightening of the nut.
· Remove the nut and the washer located under it.
· Remove the drive shaft flange. To do this, just as in previous versions, we insert bolts into its holes and screw in the nuts, securing it from turning with a small mounting blade, which we install between the bolts.
· Remove the flange and the stubborn ring of the front bearing.
· Using a 13mm socket, unscrew the remaining nuts securing the front cover of the transfer case.
· After that, remove the front cover assembled with the differential from the gearbox body.
· Remove the sealing gasket located at the joint.
· Using pliers, remove the mounting ring for the front bearing of the differential housing and remove it from the cover.
Using a mandrel of suitable diameter, you need to knock out the outer ring of the differential bearing from the seat of the front cover
We study problems and repair methods.
Any car owner definitely doesn’t need to be told why howling and humming are bad. Vibration of the transfer case on a Niva at low speed is quite common. The driver, of course, gradually gets used to many extraneous sounds in the car, but the noise level is high enough to make it impossible to carry on a conversation with passengers while traveling. Due to excessive noise pollution, you will inevitably have to deal with the problem.
Sources
- https://motorltd.ru/snyatie-i-tsentrirovanie-razdatochnoy-korobki-vaz/
- https://sv-parts.ru/blog/detail/vibracii-voi-razdatki-niva-kak-ubrat/
- https://AutoFlit.ru/2260-kak-otcentrovat-razdatku-na-nive-sposob-dlya-korotysha-i-shevrole.html
- https://NewNiva.ru/samodelka-razdatka-niva.html
- https://avto-idea.ru/remont/remont-razdatki-na-nive-21213-kak-ottsentrovat/
- https://avtomechanic.ru/niva-vaz-21213/transmisiya-vaz-21213/kak-ustranit-vibratsiyu-razdatochnoj-korobki-vaz-21213
- https://zen.yandex.ru/media/id/5f2ae91f66ca0e557c7aba7d/nadoel-voi-razdatki-na-nive-rasskazyvaiu-kak-ia-ot-nego-izbavilsia-5f2c55c38fa8d55d29d4d8dc
- https://niva-fr.ru/tyuning-osnovnaya-statya/vibratsii/
- https://NewNiva.ru/kak-ustranit-vibratsiyu-na-nive-21214.html
[collapse]