A digital rain sensor (hereinafter referred to as DD) is installed on Lada Vesta cars in the “Lux”, “Exclusive”, “Comfort” trim levels.
In budget models, “gadgets” are provided as optional equipment. The DD is designed to activate the windshield wiper drive when water or snow gets on the surface of the windshield.
How it works
It's logical to start with the question of how a rain sensor works.
For some reason, some are sure that the controller reacts to moisture that falls on the surface of the glass, and thereby turns on the windshield wipers, that is, the wipers, and also forces liquid to be supplied through the windshield washer nozzles.
But that's not true.
In reality, the operating principle is completely different. Even more complex, one might say.
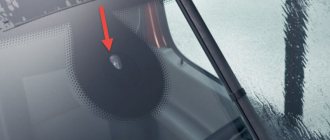
This controller is not located outside, but inside the car. And it is logical to ask how then he can feel drops of water on himself. No way. It does not react to moisture itself.
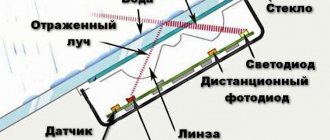
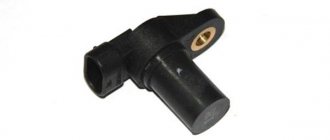
The controller has 2 elements. These are photodiode and LED.
The LED's job is to emit infrared light. The human eye is unable to see it. But these same rays accompany us in everyday life and beyond. Just remember the TV remote control. The principle is the same.
Infrared radiation hits the surface of the glass, is partially reflected from this surface, and returns back. At this moment it is captured by the second element, that is, the photodiode. It records the amount of light returned.
If there is no water on the glass, that is, it is dry, a lot of light will return. When wet, the amount of light decreases noticeably, which is prevented by drops. Having determined that the glass is covered with moisture, the sensor automatically starts the windshield wipers.
Of course, the effectiveness of cleaning depends largely on how correctly you managed to choose wipers for your car.
XRAY Cross vs Rio X-Line - in pursuit of fashion and competitors.
The Kia Rio X-Line cross-hatch appeared on our market a year and a half ago - in November 2022. Last year, the model's circulation exceeded 50 thousand copies, that is, every second Rio was purchased in an elevated version!
Cross hatch Kia Rio X-Line
However, Kia did not stop there and prepared an update - since February of this year, the X-Line's ground clearance has increased from 170 mm to 190 mm, and in the maximum configuration with sixteen-inch wheels to 195 mm. The modernization was a quick response to customer wishes: X-Line owners complained about insufficient cross-country ability compared to direct competitors.
Now the X-line is raised, let's see if it lives up to the X in the name.
Rain sensor for intermittent mode
#2
04 Oct 2016, 07:34
#3
04 Oct 2016, 09:12
so the lever is 1 position up and there is an intermittent mode. the wheel on the lever changes the pause; stripes are drawn on it corresponding to the length of the pause. If the rain sensor is triggered during a pause, it turns on the wipers once or in constant mode.
#4
04 Oct 2016, 09:16
#5
04 Oct 2016, 09:33
#6
04 Oct 2016, 09:51
#7
04 Oct 2016, 10:09
#8
04 Oct 2016, 10:32
turn the wheel on the lever and there will be a swing, the next one after a certain time or from the DD. spin the wheel to the desired frequency of strokes.
#9
04 Oct 2016, 10:41
First of all, we will ruin the planes, and then the girls, and then the girls.
Changing the configuration, firmware 140->163, 150->182->195hp, installing Hair Dryers, etc.
#10
04 Oct 2016, 11:37
#11
04 Oct 2016, 12:09
#12
04 Oct 2016, 12:13
#13
04 Oct 2016, 12:15
#14
04 Oct 2016, 12:23
I retrained the windshield wipers and it seemed that the rain sensor began to work normally. Or maybe he didn’t. In general, I also constantly work with my hands instead of this damn sensor.
#15
04 Oct 2016, 12:24
#16
04 Oct 2016, 12:30
I just rummaged around in the instructions. Settings for automatic wiper operation. This automatic wiper control function is set to the on state by default and remains there until it is turned off by the driver in the information display. If automatic wiper mode is disabled, the wipers operate intermittently.
That means it should be somewhere in the menu. I just haven’t dug that far into it yet. will seek.
#17
04 Oct 2016, 12:44
For me, the rotation of the wheel steers with pauses between strokes. I'll be in the car and take a closer look at the settings.
Perhaps when replacing the windshield, something was changed from the factory settings.
#18
31 Oct 2022, 20:30
#19
24 May 2022, 08:58
Good day to all! Recently became the owner of FC2. I can't understand how the rain sensor works. Please tell me in what position the switch needs to be set for the rain sensor to work. Thank you.
Source
Engine characteristics
As for engines, the Lada X-Ray still has the advantage. The manufacturer offers a choice of 3 engines at once, which cannot be said about the Lada Vesta, since there is no choice here, and only one engine is offered.
If we talk about general features, then for both cars a domestic engine of the VAZ-21129 series is produced. Engine power is 106 horsepower. The unit has a reliable and simple design: 4 cylinders and 16 valves, as well as a distributed fuel injection complex.
- The Lada Vesta can be accelerated to 100 km/h in 11.2 seconds, the X-Ray in 11.4 seconds, despite such a small power.
- As for the maximum speed, the difference is small. X Ray overtakes Vesta by 1 km/h (176 versus 175 km/h).
- Fuel consumption also has a slight difference: Vesta - 9.3/6.9/5.5 liters, X-Ray - 9.3/7.2/5.9 liters.
However, Lada X-Ray can offer its customers several more engines with 110 and 122 horsepower. The first option reaches speeds of up to 184 km/h and has a volume of 1.6 liters. The second one is a little more powerful: the maximum speed here reaches 186 km/h, the volume is 1.8 liters. As for fuel consumption, it is almost the same for both cars.
TTX Lada x Ray
What are the rear view mirror covers for Lada Vesta needed for?
The devices significantly improve the aerodynamics of the car. Driving at high speed is not accompanied by an unpleasant whistle if the Lada Vesta mirror covers are installed. In addition, they give the vehicle an attractive appearance. The most popular are linings made using relatively expensive chrome. The overlays are body color, are installed on top of the standard ones and have a low price. They can be bought for 800 rubles.
Lada Vesta pleased with mirrors with good visibility. Everything looks very good. They also added a turn signal repeater to the mirrors, it looks very cool. Moreover, the repeater is made with a slight bend so that the driver, looking in the mirror, can see whether the desired turn signal is on. Another nice thing is that the mirror bends in the other direction, that is, if someone hits it, it will not break, but will bend in the other direction, and then due to the spring it will bounce back to its original place. This is all very cool. But there is also a significant drawback of these functional mirrors with good visibility. They creak terribly when folding, especially when you park the car at night in a quiet courtyard and you start folding them in complete silence, the grinding sound is heard throughout the entire area, it is very unpleasant at such moments. You don’t fold mirrors, you close them like closing a barn door. Moreover, it happened two times that the mirror on the passenger side did not fold the first time; when it was completely bent, for some reason there was no click that fixes it in the folded position. It only worked from the second to the third time. I don’t know, maybe it was something that froze, but now everything seems to be working. Also, if you tap the mirror with your finger, you can hear the rattling and ringing of the spring inside, which is also sometimes noticeable when driving on a ribbed surface. The emptiness inside intensifies this ringing significantly.
Dimensions
Externally, the cars do not differ much from each other in size. However, if we look at everything in more detail, we can see that everything is different.
The Lada Vesta is almost 300 mm longer than the X-Ray, and therefore it is more comfortable due to its larger base. The cars are completely identical in width. The heights of the models are different: Vesta is 73 mm lower than X-Ray, although visually this difference seems larger. This is due, in particular, to the ground clearance - for the X-Ray it is 17 mm larger and equal to 195 mm, while for the Vesta it is 178 mm. When it comes to luggage compartment capacity, the sedan wins - its volume is 480 liters instead of 361 liters for the hatchback. Although the X-Ray looks larger in appearance, it weighs 40 kg less.
For those who value space and capacity, it is considered better to buy a Vesta; the X-Ray is less spacious. In addition, it is more comfortable due to its wheelbase. If there is a need to overcome light off-road conditions, then it is better to give preference to the X-Ray. It is worth noting that with the rear seats folded down, the luggage compartment volume of the hatchback increases to 1207 liters. Vesta does not have such an opportunity.
How to remove a rear view mirror
Mirrors of this type are designed to study the situation on the road behind the car. They can be divided into two categories:
- salon - installed inside the car;
- side - located on both sides on the front door pillars.
The interior mirror is located inside the car
side mirrors are located on both sides of the car
It seems that it could be easier than dismantling the mirror? In fact, this is not so easy to do, and the principle of dismantling can vary significantly between different brands and models. We will tell you about the most universal methods of removing, disassembling and installing internal and external ones. However, if any of the methods described here do not work for you, check your machine's owner's manual. Today, many automobile companies make all such processes much easier: perhaps, instead of unscrewing bolts and bending terminals, you only need to press a small button or pedal.
Required Tools
In order to remove the mirror, you do not need any specific or hard-to-reach tools. As a rule, everything you need can be found in any motorist’s garage.
- a set of screwdrivers (most likely, only figured and flat ones will be useful);
- wrench depending on the size of the bolts;
- household hair dryer for removing the mirror element.
Add to this set skillful hands and the desire to do everything efficiently, and you can get down to business.
Salon
Interior mirrors can be installed in a variety of ways depending on the make, model, and year of your vehicle. There are two methods that are used most often.
- Installation into the car ceiling using bolts or self-tapping screws.
- On the windshield using glue or suction cups.
Thus, on many domestic cars the assistant device is installed using ordinary bolts, which greatly simplifies the dismantling process. To do this, you just need to unscrew the bolts after removing the plug.
in order to remove such a mirror, you just need to unscrew the bolts
The situation can become more complicated if the mirror is mounted on a bracket glued to the glass. First of all, check whether it is possible to separate the bracket itself and the platform glued to the glass. On most cars, they are separated by moving the clamps or turning in a certain direction.
If this is not possible, you will have to resort to a radical method and remove the bracket along with the windshield. The fact is that the glue holds the elements very firmly, so when you try to separate the mirror, you may accidentally damage the glass.
You most likely will not be able to separate the bracket platform from the mirror on your own, so it is better not to risk it and contact a special salon. Especially if you are dismantling it for future tinting. However, if you decide to do it yourself, be prepared that a trace of glue will remain on the glass.
Side left and right
Side mirrors are divided into two categories:
- with mechanical drive;
- with electric drive.
On almost all cars, you will need to remove the door trim to get to the mounting screws. You can find out how to do this on your model in the instruction manual.
This is what a car door looks like with the trim removed
Next, to remove a mechanically driven part, you need to follow a certain procedure.
- Remove the regulator locking bracket.
- Unscrew the fastening screws on the inside of the door.
- Remove the mirror.
Video: dismantling the side mirror
If the mirrors are electric, the procedure will be slightly different.
- Disconnect the negative terminal from the battery.
- Disconnect the block from the wires.
- Unscrew the fastening screws on the inside of the door
- Dismantle.
A little about the multimedia radio
The music system works without problems, nothing slows down. People ask how to make the screen display the climate control and door opening. To do this, you need to buy a special device and connect to it. Then the display will show the operating parameters of the climate system and doors.
The steering wheel was covered with braid, which was ordered from a well-known online store. We bought the seat covers there.
Read your car's manual often, it contains interesting things. Rarely does anyone look at this useful book. Subscribe to the channel, write what you would like to know about. Good luck to everyone on the roads!
Varieties
Like many other systems, the automotive lighting sensor comes in several varieties. Some of them are available for purchase and self-installation, while others are found only in the factory equipment of the vehicle:
- A standard sensor can be purchased at an affordable price and installed yourself. The sensor is fixed in the passenger compartment in front of the windshield of the car, followed by connecting the relay and electrical wiring. The functionality includes adjusting the mode and intensity of the vehicle's headlights.
- A built-in light sensor is more often found in expensive foreign cars, where it performs a wide range of functions. In addition to the standard tasks of turning on and adjusting the headlights, the device can adjust the lighting inside the cabin and on the dashboard.
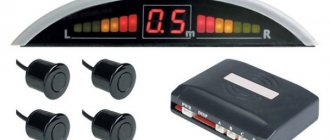
- The combined light and rain sensor is one of the most expensive models of automotive sensors, combining the functions of controlling lighting and the operation of windshield wipers. The rain sensor detects precipitation through photodiodes and photocells, instructing the wipers to begin wiping the windshield. Depending on the intensity of precipitation, the sensor can also activate the headlights, reacting to heavy rain or snow.
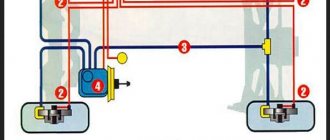
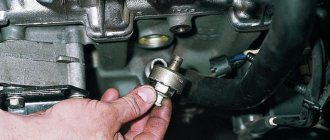
Schematic location in the engine compartment
| Numbers/current | Functionality / where they are located |
| P(F-1) / 20 | Windshield washer |
| P(F-2) / 5 | Understeering's shifter |
| P(F-3) / 10 | High beam (left headlight) |
| P(F-4) / 10 | Steering column switch (left) |
| P(F-5) / 20 | Heated seats |
| P(F-6) / 30 | parking lights |
| P(F-7) / 30 | Rear dimensions |
| P(F-8) / 7.5 | Rear fog lights |
| P(F-9) / 10 | Right turn signal repeaters |
| P(F-10) / 10 | Automated gearbox selector |
| P(F-11) / 10 | Low beam (left side) |
| P(F-12) / 10 | Direction indicators |
| P(F-13) / 30 | Power circuit |
| P(F-14) / 30 | Stop signals |
| P(F-15) / 10 | Rain sensor, external lighting, hydraulic headlight range control |
| P(F-16) / 15 | Fuel pump, charging |
| P(F-17) / 15 | Illumination of the glove box, thresholds |
| P(F-18) / 10 | Turn signal repeaters (left) |
| P(F-19) / 10 | Low beam (right) |
| P(F-20) / 10 | Heated mirrors (external) |
| P(F-21) / 5 | Instrument panel (panel) |
| P(F-22) / 5 | central locking |
| P(F-23) / 5 | Canister, air flow sensor, timing valve |
| P(F-24) / 5 | ERA GLONASS |
| P(F-25) / 5 | Radio tape recorder |
| P(F-26) / 5 | Gasoline pump |
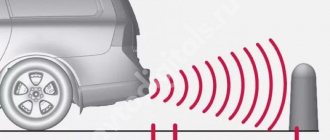
| P(F-27) / 20 | Parktronic |
| P(F-28) / 15 | Electric power steering |
| P(F-29) / 15 | Line output to tow hitch |
| P(F-30) / 20 | Reversing light |
| P(F-31) / 15 | Anti-theft alarm |
| P(F-32) / 15 | Illumination of the engine compartment, interior |
| P(F-33) / 5 | Window lifters |
| P(F-34) / 15 | Steering wheel rotation sensor |
| P(F-35) / 5 | Door program block |
| P(F-36) / 15 | Radio, diagnostic connector |
| P(F-37) / 15 | Generator |
| P(F-38) / 15 | Beep (optional) |
| P(F-39) / 15 | Daytime Running Lights |
| P(F-40) / 20 | High beam (right) |
| P(F-41) / 20 | Standard cigarette lighter |
| P(F-42) / 20 | Bus power |
| P(F-43) / 20 | Door locks, ABS, airbag |
| P(F-44) / 20 | Window lifters |
| P(F-45) / 20 | Heater fan (interior) |
| P(F-46) / 20 | Windshield wiper (windshield wipers) |
| P(F-47) / 15 | Air conditioner |
| P(F-48) / 15 | Windshield wiper (optional) |
| P(F-49) / 15 | Heated rear window |
| P(F-50) / 15 | Stability Program (ESP) |
| Name | Block pinout |
| RP 1 | Lighting, seat heating |
| RP 2 | Responsible for the cigarette lighter |
| RP 3 | Heated rear window |
| RP 4 | Front windows |
| RP 5 | Interior heater (stove) |
| RP 6 | Window lifter for rear doors |
| RP 7 | Gasoline pump |
| RP 8 | Car socket (powered by 12 Volts) |
| RP 9 | Heated windshield |
| RP10 | Heating relay |
| RP11 | Starter |
| RP12 | Cruise control |
Design and operating principle
Considering that this device can be part of the factory equipment, the light sensor is manufactured in the format of a small compact housing for installation in the appropriate position in front of the windshield in the vehicle interior. The electronic product consists of several photosensitive elements and an LED, which are sufficient for the sensor to quickly and reliably respond to changes in time of day, weather conditions, turning off street lights, or entering and exiting a tunnel. Having detected changes, the device sends a signal to the control unit, whose relay turns on the low or high beam headlights.
Using a light measuring device allows the driver not to be distracted while driving by adjusting the headlights. However, the functionality of this device also has its downsides, because many car owners get so used to the operation of this device that they lose the habit of independently controlling how the headlights on their car are turned on and off. Sometimes this turns against inattentive drivers who forget to turn on the high beams in the daytime during fog and other conditions that are not intended to be detected by the light sensor. On some brands of cars, these devices are capable of operating regardless of the engine ignition, which leads to unpleasant situations when the car’s headlights come on while parked at night, thereby draining the battery.
Reviews
| № | Positive |
| 1 | Vasily (autodrome): the car is two years old, the mileage is 26,000 km, there are no comments, the equipment is working normally. |
| 2 | Kirill (autotopic): in general, there are no complaints about the functionality of the windshield wipers, but in winter, in severe frosts, the rubber catches, the work is delayed. |
| 3 | Vitaly (Autoreview): there are no comments on the work of DD. The car is three years old, the mileage is over 50,000 km. |
| 4 | Vladlen (Avtoria): I bought a used Vesta, good condition, fourth year. Comprehensive diagnostics at the service station did not reveal any comments. |
| 5 | Konstantin (Drom): I have a budget package, there was no sensor by default. I installed it myself, and it turned out to be much easier than I expected. |
| 6 | Sergey (Driving): In winter, the brushes work late, but in general, there are no comments. |
| 7 | Vladimir Stepanovich (“5th wheel”): in four years of driving the car, I replaced the fuse (No. 38) once. In all other respects, no comments, the equipment is operating normally. |
| Negative | |
| 8 | Dmitry (autotopic): at 28,000 km the windshield wiper relay went off. I ordered a service from a service station and paid about 1,800 rubles. |
| 9 | Vitaly (otzovik.net): in the third year the digital sensor failed, replaced it with a new one. |
| 10 | Konstantin (ProAvto): dissatisfied with the quality of assembly and manufacturing of parts on the Lada Vesta. They wear out prematurely and fail. The car needs some work, even after the showroom. |
Rain and light sensor Ford Focus
Gentlemen, there is a spot on the windshield like a rain and light sensor, although maybe I’m wrong. But my lights turn on as soon as I start the car and I have to turn on the wipers myself. Maybe I’m wrong or is something not working correctly?
to s040os: It could also be a climate control sensor. You can simply check it, take a bottle of water and pour it on the windshield in the sensor area, the wipers should turn on automatically.
they don't turn on
to s040os: Are you sure that this speck is the sensor? It may not turn on the windshield wipers itself, but it can adjust the pauses between wipes depending on the intensity of the rain and the speed of movement. Turn on intermittent mode during rain and check.
With light. Do you have an AUTO position on the light switch? Perhaps your car already has a Scandinavian lighting scheme and the low beam headlights automatically turn on when you start the engine.
there is an auto sign but it doesn’t switch there and my assembly is Spanish so if so
The swing cycle regulator is located on the wiper switch; you can turn it and adjust the cycle
As far as I remember, the Spanish assembly already has Scandinavian light. And don't worry about the wipers. I have a 2009 FF2, so the instructions clearly state that the rain sensor works by turning on the intermittent operation of the windshield wipers. Moreover, on the power lever there is a roller for adjusting the sensitivity of this sensor.
to vitalek01: Thanks for the feedback, it seems that the cycle itself will be determined by the degree of humidity.
to mATr1xX: So this is how to adjust the sensitivity of the rain sensor. The more sensitive it is, the more often the wipers will work.
Thanks for the clarification guys I'll try
to s040os: Afterwards, let us know what happened and how it happened, we’ll wait.
Good afternoon Regarding the wipers, I can say for sure (I have a Spanish assembly from 2008, bought in 2009) for them to work automatically, the switch needs to be switched to intermittent mode and when water gets on the sensor they will work, and the regulator adjusts the degree of moisture at which they will trigger. However, in dry weather and especially in winter, I turn the switch to the off position, since the wipers may work unexpectedly due to some condensation on the glass, for example, fog. As for the light, mine has a switch position in the car and only in this position does it turn on automatically; perhaps your car has “daylight” installed, which turns on immediately after starting the engine.
to Anatoli_G: Well, that's right. That's how it should work.
to Anatoli_G: Thanks for the additions.
Good evening, please tell me the rain sensor has stopped working, it used to work. Now when I move the lever to the position for the sensor to work, the wipers wave once and stop, then I move the lever to the constant operation position, the wipers constantly work when I’m just driving, as soon as I stop they start working intermittently. please tell me what could be?
SHARE THIS PAGE
SITE SEARCH
Greetings! My name is Mikhail, I want to express my gratitude to you and your site.
Thanks to you, I was able to remove the scratches my wife caused in the parking lot on my own.
It all started when my wife passed her license and began to often take my car to get to the nearest shopping center. There were no signs of trouble, but one day she said with tears in her eyes that she had rubbed herself against a pole in the parking lot. I still don’t understand how it was necessary to manage to do this, but with women everything is possible, you understand)) The scratch was deep enough, but there was no money or time to bother with painting. That's why I simply ignored the scratch.
A week ago I came across Artem Shevchenko’s blog, who in his article told how to get rid of scratches in 10 minutes. At first I didn’t believe it, but I decided to try it anyway and didn’t regret it at all. The method worked 100%, there was not a trace left of the scratch, and nothing was visible at all from any angle.
In general, I’ll keep the intrigue, for those who want to quickly get rid of scratches, come and read the article on Theme’s blog, I guarantee you won’t regret it.
Source
Diagnostics of device health
This is done by analogy with the Priora, but on the devices of the Lada Vesta there is no button that needs to be held.
Diagnostic instructions:
- Press your finger simultaneously on the two buttons on the right switch under the steering wheel.
- Turn on the ignition.
- All indicators and lights on the devices should light up, the arrows will deviate to the maximum position and move back.
- Then press the top button of the same switch. This turns on the “Soft” mode. On the right is the firmware version of the electronic unit.
Interior dimensions of the domestic model
Thanks to the impressive size of the body, the Lada Vesta managed to acquire a fairly spacious interior. Here, on both seating rows, five people of average build can sit with sufficient comfort. Trips over long distances with such a large number will proceed with comfort and in an unnoticed time.
The developers paid great attention to such an important dimensional parameter as the height inside the LADA Vesta cabin. Thanks to this, Vesta has increased the amount of space between the seat cushions and the roof lining. Tall passengers will feel quite comfortable after boarding
Also, now there is no risk of catching your head on the edge of the doorway while “immersing” in the cabin
Tall passengers will feel quite comfortable after boarding. There is also now no risk of catching your head on the edge of the doorway while “immersing” in the cabin.
The length and width of the Russian model had a beneficial effect on the amount of space available for placing the legs of the rear riders. The distance from the back of the front seats to the passenger’s knees in the rear seat row is an enviable 200 mm. Even people 2 m tall will not be able to rest against the front backrests.
“Comfort” package, is it more comfortable with it?
In this version, in addition to everything listed above, the car is equipped with:
- Electrically driven and heated exterior mirrors.
- Heated windshield.
- Parktronic.
- Front seat heating system.
In addition, the car will be equipped with a full-fledged audio system, which includes a 4.3″ diagonal monochrome monitor, a hands-free system, Bluetooth, AUX, USB, “Lada Vesta”, thanks to which it becomes a real find for those who like to travel with playing video games. salon music.
How to remove the side mirror on a Kia Rio?
Removing the side mirror is a little more complicated; you will have to use tools, but there will be no differences in the removal process between the left and right housings. For dismantling you will need:
- flathead screwdriver;
- head at 10.
The housing is removed in the following order:
- turn off the Kia Rio engine;
- Remove the negative wire from the battery terminal;
- use a slotted screwdriver wrapped in electrical tape or a plastic spatula to pry off the housing lining;
- press out the strong plastic clips (this will require some physical effort) and remove the lining;
- With your fingers (preferably with gloves) squeeze the latch holding the block of wires responsible for heating;
- move the block to the side;
- holding the element with your left hand, use your right hand to unscrew the three bolts holding the mount using a 10-mm wrench;
- remove the part.
Installing the mirror is done in the reverse order. When working, you must use gloves and do not touch the reflective element with your hands, so as not to leave marks that are difficult to wash off.
We load cubes into the trunk according to the method of the magazine “Behind the Wheel”
The manufacturer claims that the trunk volume of the Kia Rio X-Line is 390 liters. Compared to the Lada, the Kia has a good 10 centimeters lower loading height, and the trunk opening is wider. Moreover, under the floor of both cars there is a full-size spare tire. According to the methodology of the magazine “Behind the Wheel”, the compartment was able to accommodate 340 liters.
KIA-Rio-X-Line: split rear seat backrest, low loading height and wide trunk opening.
KIA-Rio-X-Line: you don't have to worry about punctures.
The declared trunk volume of the XRAY Cross is 360 liters. There is enough space in the underground for small items, but if you remove the false floor, the fastening points somewhat interfere with the placement of large containers. Using the cubes in Xray we managed to measure 308 liters.
We placed 308 liters in the trunk of the Lada-XRAY-Cross.
The Kia Rio X-line managed to fit 32 liters more into the trunk than the X-ray.
The score is 1:4, the Korean leads even further.
Disassembling rear view mirrors
The procedure below applies to both exterior and interior mirrors.
- The mirror is removed from its regular place.
- Use your hand to gently press the top edge of the mirror glass until it unrolls.
Side mirror mirror element rotates manually - A piece of rag or napkin is placed in the gap that appears between the mirror body and the glass.
- Then a flat-head screwdriver, pre-wrapped with electrical tape, is inserted into this gap.
The latches holding the mirror element are bent with a flat screwdriver - The latches holding the mirror are pryed with a screwdriver and removed from the protrusions.
- The mirror glass is carefully removed.
Popular worlds
Finally, I would like to talk about several popular myths that are associated with rain sensors on cars.
Indeed, many continue to believe in them. And this can become a problem in certain cases.
- Rain sensors are available at extra cost. In fact, these controllers are becoming standard equipment in many countries because they are directly related to safety. Although it happens that the first version of the car did not have them, and after the restyling took place, the sensor appeared in the basic configuration. This is simply due to the automaker meeting new requirements;
- The controller reacts to falling raindrops. This issue has already been addressed. No, it reacts not to moisture, but to refracted light;
- The system does not work at night. Infrared radiation is completely independent of outdoor lighting. Based on this logic, the TV remote control wouldn't work at night either;
- If the glass is directly replaced, the sensor will no longer be there. Also a myth. But conditional. It all depends on the specific glass. Most modern glass comes with space provided for this system;
- You cannot apply tint on the glass in the area of the sensor itself. Actually it is possible. But it’s better to cut a small hole for the controller;
- In winter this is a useless feature. If the glass is heated, that is, the snow turns into water, then the function works exactly the same as in spring, summer and autumn.
If, in addition to the rain sensor, you want to know something interesting about the light sensor, follow this link and read some rather informative material.
I think we can end here
Thank you all for your attention! Watch this video on YouTube
Watch this video on YouTube
Don't forget to leave your comments and ask questions!
Subscribe, tell your friends about us and expect a lot of new and interesting materials on our website!
The basic version, the simplest, but already pleasing with a variety of different electronic gadgets
It is equipped with the following electronic and electronic-mechanical devices that make the life of the car owner easier:
- ABS+BAS (with emergency braking assist).
- EBD (brake force distribution system).
- ESC (system that controls exchange rate stability).
- HSA (hill start assist system).
- A system that does not allow slipping - TCS.
- A system that locks the car doors the moment it starts moving, and also automatically unlocks them.
- Front airbags, and the passenger airbag can be turned off.
- Electric power steering.
- An emergency alarm that turns on in the event of an accident.
- An electric drive lock located on the trunk lid, which can be controlled from the passenger compartment.
- Electric windows on the front doors.
- Audio training kit.
- Side direction indicators on the exterior mirrors.
- The ERA Glonass system.
We disassemble the mirror to replace the Vesta turn signal
Theoretically, to replace the turn signal, it is not necessary to completely remove the mirror from the car. And yet the work is not so difficult that you need to change the turn signal and deal with fragile plastic in the canopy. Therefore, it is safer to remove it. Then we proceed according to the following algorithm:
Using a thin screwdriver, unclip the latches one by one and remove the mirror from the housing. If the glass is heated, disconnect the two terminals on the thermoelement. Now we have access to the mirror adjustment gear motor. The location of the clamps is shown in the photo.
To replace the turn signal, you need to remove the upper part of the outer plastic mirror cover. It is also secured with latches that need to be pryed off with a thin flathead screwdriver. The location of the latches is as follows:
Important! Attention! Before working with the plastic elements of the side mirrors, they must be warmed up with a hair dryer turned on at a temperature of 100-120 degrees at medium blowing power
We remove the cover and gain access to the direction indicator. It is fixed in plastic sliders and is protected from shifting by latches. We release the latches and move the pointer for dismantling.
We inspect the quality of the contacts on the terminal block. It is possible that the turn signal does not work due to oxidation of the contacts, although theoretically they are insulated from moisture with a rubber boot. Water can only get there due to the negligence of the collectors.
Disconnect the terminal and remove the non-working turn signal
We install the new one in the reverse order, being careful, and before installing the decorative cover, we check the functionality of the pointer by connecting the terminal to the battery
Characteristic symptoms of malfunctions
| Signs | Malfunctions |
| When moisture gets on the glass, the wipers do not move. | Damage to the light element DD |
| Brushes operate in the same mode, despite changing speed | Failure of the relay-breaker |
| Brushes work late | The digital controller has failed, the contact board has oxidized |
| Increased speed of windshield wiper blades | Short circuit in the on-board circuit. The relay breaker fuse has blown (No. 38) |
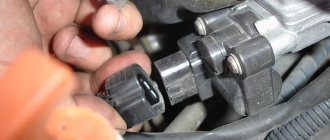
How does a rain sensor work?
The operating principle of the rain sensor is based on a comparison of the optical properties of the windshield under different atmospheric conditions, or more precisely, on the differences in the reflection of an infrared ray by a clean and moistened or contaminated glass surface.
Everything is quite simple - it consists of emitting and receiving infrared LEDs. The design and operation of such a product will help you understand the photo:
As can be seen from the above description, the structure of such a device is quite simple, which predetermines quite wide possibilities for its use.
What such a device looks like is shown, for example, in the photo:
The video will help you understand how this kind of work is done. The data presented confirm that it is easy to glue such a device, and this work can be done yourself.
Review of Manufacturer Prices
| Name / catalog article | Price in rubles |
| Lada / VAZ 285356725 (original) | From 2000 |
| Fram 2458753 (analogues) | From 2000 |
| Otex 3697412 (analogues) | From 2000 |
| *prices are current as of 05/01/2019 | |
Conclusion
The process of replacing a rain sensor yourself is not at all difficult, but it requires care on the part of the repairman. Do not violate the manufacturer's regulations. When laying the wiring, be extremely careful not to damage the insulating layer. A short circuit to ground will damage the digital controller.
Related link:
Changing front stabilizer bushings on Lada Vesta
Windshield pillar trim
You need to open it, lower the window, disconnect the terminals from the battery. Then disconnect the connector with wires. To do this, you need to pull its lock up. The part is ready to be removed from the hinges.
Tip: If the door is being removed for repairs that require disassembly, it is recommended to disassemble it while it is on its hinges. This is easier to do thanks to free access to both sides of the door.
The casing is removed to repair the mechanisms that are installed under it, or in case of some modification. The tools you will need are a flathead screwdriver and a socket wrench with a T20 (star) bit.
The following sequence of actions is performed:
- Remove the side mirror triangle. The part is pryed off with a screwdriver and the latch is snapped off. Then disconnect the block with wires;
- The doors are pryed up from the bottom, then the lampshade is removed and the wires are disconnected from it;
- Using a wrench, unscrew the three screws securing the casing from below;
- They find a plug from the top end and take it out. Unscrew the fastening screw that is screwed in behind it;
- Another screw is found and unscrewed inside the door handle;
- Carefully pry up, remove the unit that controls the exterior mirrors, power windows and central locking, disconnect the wiring from it, unscrew the fasteners located perpendicular to the door part;
- Starting from the bottom, insert a screwdriver between the door and the trim until all the latches are released.
Remove the window handle. To do this, insert a screwdriver or a spatula between its middle mount and the bottom washer, and pull the protrusion on the middle part outward. When the protrusion is pressed out, the middle part is pulled out. Then remove the handle from the slot of the window regulator, the base of the handle, and the round plastic washer.
Insert the tool between the door handle and its trim, then remove the trim. There are two bolts screwed in under it, which we unscrew with a wrench. At the very bottom of the card, find a self-tapping screw and unscrew it using an asterisk attachment. Now the casing is fixed only on plastic clips and velvet. The card is pryed up, starting from the bottom, and all the latches around its perimeter are snapped off. Then remove the card from the velvet.
The side window trim is attached to the rear parcel shelf trim. This trim is removed together with the rear parcel shelf upholstery.
How to turn on heated mirrors
Starting in 2022, AvtoVAZ has equipped the 2180 with the additional function of “electric drive and electric heating of side reflectors.”
This function is activated only after starting the engine (so as not to damage the battery) and switching on the heater to the window blowing mode (windshield and side). After this, you need to press the button on the climate console, which is responsible for heating and blowing the reflectors, rear and windshields.
To activate this function on the luxury version of Lada Vesta, you need to press the leftmost button at the bottom on the car’s climate control unit with the inscription “MAX”.
At 20-degree frost (which is usual for an Eastern European winter), the following happens:
- after 1 minute the ice on the reflectors begins to melt;
- after 2-3 minutes the ice melts completely;
- after 4 minutes the mirror is clean and dry.
Setting up the central locking
Immediately after purchasing the Lada Vesta, the central locking program was not configured on it. The doors do not close automatically when driving. They can only be closed manually by pressing the button shown in the photo.
How to program it? The procedure is as follows:
- Start the engine or simply turn on the ignition.
- Press the central locking button and hold for several seconds (5 s) until a sound signal appears (the buzzer will beep once).
- The automatic central locking system has turned on.
You can check its operation like this. You start and drive, and you hear a click on all 4 doors. The locks closed automatically. When a certain speed is reached (7 km per hour), the central locking function is activated. To disable it, you need to repeat the steps. In this case, the buzzer will beep not 1, but 2 times. Maybe many drivers are already familiar with it, but we only found out recently.
How to disassemble a side mirror on a Lada Vesta
To disassemble the side mirror at 2180, you need to do several simple manipulations. Since the Lada Vesta turn signal indicator is an electrical device, when removing the reflector it is necessary to remove the negative terminal from the battery. It is necessary to remove the trim from the car door pillar by first unclipping the upper and two lower latches. After this, you need to disconnect the wires and unscrew the three screws that secure the rear view reflectors to the door.
Once the reflectors are removed, their disassembly is almost complete:
1st step: turn the mirror element to the side until it stops to remove it (the reflector heating wires do not need to be disconnected);
Step 2: use a flat-head screwdriver to unclip the mirror element from the housing;
Step 3: To release the colored plastic trim clips, use a flat-blade screwdriver and then slide the trim to the side.
If you remove the side mirror, you can get to the mechanism that provides electrical power to the repeaters. After replacing the relevant parts, installation proceeds in the reverse order.
Messages 18
1 Topic by Axel 2015-11-05 18:00:25
- Axel
- Participant
- Inactive
- Messages: 973
- Thank you: 139
Topic: Self-installation of the backlight control
How can you implement backlight adjustment on Vesta? And how will this affect the dealer's warranty?
2 Reply from Patriot 2015-11-05 18:08:52
- Patriot
- Participant
- Inactive
- From: Irkutsk region.
- Messages: 3,156
- Thank you: 443
Re: Self-installation of the backlight control
How can you implement backlight adjustment on Vesta? And how will this affect the dealer's warranty?
3 Reply from Fan 2015-11-05 19:22:22
- Fan
- Moderator
- Inactive
- From: Smolensk region
- Messages: 1,017
- Thank you: 204
Re: Self-installation of the backlight control
How can you implement backlight adjustment on Vesta? And how will this affect the dealer's warranty?
Electrical/electronics warranty expired. And to implement it, you need to have an electrical circuit.
4 Reply from Axel 2015-11-05 19:32:05
- Axel
- Participant
- Inactive
- Messages: 973
- Thank you: 139
Re: Self-installation of the backlight control
But there’s no way without it, maybe the dealer himself will install it, is this option for installing this regulator possible?
5 Reply from Fan 2015-11-05 19:50:32
- Fan
- Moderator
- Inactive
- From: Smolensk region
- Messages: 1,017
- Thank you: 204
Re: Self-installation of the backlight control
The dealer will not interfere with the circuit diagram of the car, he can only connect to it. Radio, heating, signaling.
6 Reply from Axel 2015-11-05 19:52:46
- Axel
- Participant
- Inactive
- Messages: 973
- Thank you: 139
Re: Self-installation of the backlight control
The dealer will not interfere with the circuit diagram of the car, he can only connect to it. Radio, heating, signaling.
And the signal does not interfere? To make adjustments, simply install one regulator. What kind of intervention is there compared to installing a heater or alarm system?
Installation
To install and connect a light and rain sensor in a car, it is not necessary to seek the services of a workshop. Each set of sensors comes with detailed instructions describing the installation procedure. In most machines, the sequence of user actions is equally simple:
- The main component of the device, called the “eye,” is fixed inside the passenger compartment in place of the rear-view mirror holder. Considering how the light sensor works, for greater accuracy of the sensor, it is recommended to point it towards the driver and not towards the street. The dimming in the cabin is fixed much faster and more reliably.
- The sensor relay and control unit are connected in accordance with the diagram from the instructions.
- The last to be connected are the contacts responsible for adjusting the car's lighting. Some sensor models provide the ability to connect a button to turn the light and rain sensor on and off.
Datsun mi-DO - hatchback specially for Russia
Many will begin to argue that mi-DO is not a crossover at all. But, on the other hand, X-RAY is also a crossover at a stretch. This car offers you a very interesting appearance, which also places it in the class of tall hatchbacks. What’s most interesting is that the Russian company AvtoVAZ has warmed up this Japanese budget car on its chest. The Datsun mi-DO is assembled in Togliatti, the car has been sold in Russia for quite some time now and has already gained some appreciation. It may be a big competitor for Kalina, but X-RAY also has a lot to learn from this model:
- the car looks great, offering the buyer very interesting external features, aggression and discreet modern style without any surprises;
- the interior is quite suitable for Russian travel conditions, it is very democratic, but made with a certain taste, the car is quite adequate in terms of assembly;
- the ground clearance of 160 millimeters is sufficient to overcome even the most unpleasant places, and the well-arranged torque makes trips confident;
- the only 1.6-liter engine has a very modest number of horses - the power is 87 horsepower, the unit is equipped with a manual or automatic;
- It’s interesting that the company offered a lot of configurations, but the car base is not without interesting new products and features in terms of comfortable technologies;
- the cost of the new product is 462,000 rubles for the cheapest version - you must agree, this is a very serious bid for leadership in the class of tall hatchbacks.
It’s interesting that the Datsun corporation positions its car in a certain way between Kalina and X-RAY, so there is no direct competition. However, many Russian drivers prefer the Japanese model for a number of reasons. Among this series, you can find such arguments as the work on the car by the best engineers in Japan, control of the assembly, and the development of all parts in accordance with Russian conditions. Mi-DO may not be the most interesting representative of its segment, but it offers very interesting technical characteristics and opportunities for the buyer.