14 February 2018 Lada.Online 90 353 10
AVTOVAZ first began installing side mirrors of the new SE model (with heating, electric drive and turn signal indicators) on the Lada Granta liftback. Then they began to be equipped with Luxe trim levels of the sedan. The following describes how to install and connect standard liftback mirrors with your own hands to simpler versions of the Lada Granta sedan, as well as to the Lada Kalina station wagon and hatchback.
Other options
For some users, a more acceptable option is to use a separate toggle switch. In this case, you should make sure that the current limit through the switch, which is usually marked on the housing, exceeds the current consumed by the heating system.
For those who want to install electric adjustment at the same time as heating, the best option would be to use mirrors from the Lada Kalina. Grant's original glass is large and clear. Electric mirrors from Kalina are slightly smaller, so this method is a good option for those car enthusiasts who do not like enlarged mirrors. Other drivers should be reminded that their smaller size makes up for their much greater operating comfort.
The first step is to remove the old mirrors. They are secured with 3 screws, which can be accessed after removing the decorative trim. Next, new parts are installed and wires are pulled, as described above. A wiring diagram is included with the set of new electric mirrors. The control unit should be mounted above the buttons of the power window control module.
All connections are made taking into account the algorithm described above, as well as instructions for new parts. The result is a Granta with the required option - electric drive and heated exterior mirrors.
"> Hello everyone. Today at VAZ Repair we will talk about how to install and connect heated rear view mirrors on a Lada Granta at home. The article will be supported by informative photos, as well as step-by-step instructions, which will allow you, dear readers, to carry out such tuning yourself on your car.
To work you need to have:
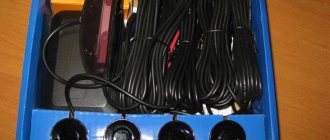
Heated mirror kit. In my case, these are heating elements made by Salina; Copper wire 0.75-1 mm long 8-10 m; Small female terminal (2 pcs.); Terminal-ring “ground for screw” (2 pcs.); Clamp terminal (1 pc.); Fuse holder (1 piece); Soldering iron, probe, several screwdrivers, needle file; Heat shrink, electrical tape.
Note: The above components may differ depending on the connection scheme you choose. In my case, the connection will be made by connecting the heated mirrors to the heated rear window. Below I will provide three alternative connection methods that can also be used.
To enlarge the image click on it!
Do-it-yourself installation of heated mirrors on a Lada Granta - step-by-step instructions
1. First of all, you need to remove the rear view mirror. To do this, bend the mirror and unscrew the latches located in a circle.
2. Next we dismantle the mirror covers. The latches are clearly visible from the side of the removed mirror.
3. After this, we proceed to removing the door card. Everything is simple here, I think you’ll figure it out. For those who still need instructions, read this article, which describes everything in detail.
4. We insert the power wires of the heating element into the hole in which the wiring is laid.
5. Next, you need to disassemble the connecting block; I’ll tell you right away - it’s not an easy task. Pushing the wiring through the block, as well as the rubber corrugation into the interior, is quite difficult. True, if you know certain secrets, you can make your life much easier. To do this, you will need a thin round file, which is very convenient for drilling a hole in the block, into which the “-” power wire for the heated mirrors will then fit perfectly. We do the same with the “+” wire.
6. Next, we pull the wire through the rubber corrugation.
7. We connect the negative wires to the ground screw near the fuse box. I connected the positive wires to the fuse holder and heat-shrink everything.
8. In the bundle of wires we find two gray wires (the first goes to the fuel pump, the second powers the heated rear window, which is what we need).
9. We connect the fuse holder using a continuous clamp and the wire we need. We install a 15 A fuse in the holder.
10. We connect the elements to the “mothers” on the mirrors, after which we connect the heated mirror elements and install the trim.
11. Assembly is carried out in the reverse order and only after checking the functionality of the heated mirrors.
Reviews
| № | Positive |
| 1. | Vitaly: There were no problems connecting the reflector. I installed it myself, the scheme is quite simple and intuitive. |
| 2. | Kirill: in winter the mirror on the left side cracked, I replaced it myself with a new one. There were no difficulties with disassembly, the design is quite simple, the connection diagram consists of two blocks. |
| 3. | Vasily: after a side impact, the right side mirror cracked. I had plenty of free time, so I installed the new one myself. At the same time, I replaced the rubber seal; it was deformed and moisture penetrated inside. |
| 4. | Alexander: after two years of operation of the Lada Granta Liftback, the insulation in the doorway on the wiring was worn out. Replaced the entire block with wires. Now the line is completely new. |
| 5. | Konstantin: when the reflector burst, I didn’t contact the experts, I installed a new one myself. The procedure is simple, the case is held on by three screws, the block with wires is connected to the standard connector. |
| 6. | Victor: the housing on the left mirror was cracked, I bought a new one at the car market. I transferred the filling myself, it turned out to be very simple. I didn’t contact the specialists at the service station, I did everything with my own hands and I advise you. |
| 7. | Gennady: the right turn signal suddenly stopped working, so I disassembled the reflector myself. The reason was poor contact at the terminal. I pressed it with pliers and everything works fine. |
| Negative | |
| 1. | Ignat: the design of the side reflectors is not perfect; they do not fit tightly, despite the presence of a rubber seal. I decided to buy a reflector block from Renault Logan, it has an identical mount. |
| 2. | Vasily: the quality of the wire insulation is poor; after two years of use, Granta replaced it with new wiring. Insulation cannot withstand freezing temperatures. |
| 3. | Sergey: I changed the left side mirror adjustment cables for the second time in a year. Low quality components. |
Conclusion The process of independently replacing side-view mirrors on the Lada Grante Liftback is not at all difficult. The design is fixed with three screws, connection to the power circuit is carried out by two blocks with wires. Following the recommendations given in this manual, replacing a new mirror will take no more than 10 minutes. Negative reviews from some owners are unfounded and are caused by violation of the operating conditions of the technical equipment and failure to comply with maintenance schedules.
Specifications
Any models must meet the following criteria:
- Clear reflection. All details should be visible even when shaking and swaying.
- Visibility. The road behind the car should be visible to the horizon.
- No color or shape distortion.
- Separating the interior mirror in case of an accident. The structure should fold or break off when hit with a head.
- Folding exterior mirrors. They should fold in the event of a sudden collision.
- Safety. No sharp corners, splinters due to damage, etc.
- Dimensions. The outer casing should not protrude beyond the vehicle body by more than 20 cm.
Product delivery options
Note! Below are the shipping methods available specifically for this product. Payment options may vary depending on the delivery method.
Detailed information can be found on the “Delivery and Payment” page.
Parcel by Russian Post
Available payment methods:
- Cash on delivery (payment upon receipt)
- Using cards Sberbank, VTB, Post Bank, Tinkoff
- Yandex money
- QIWI
- ROBOKASSA
Shipping throughout Russia. Delivery time is from 5 to 12 days.
Parcel by Russian Post 1st class
Available payment methods:
- Cash on delivery (payment upon receipt)
- Using cards Sberbank, VTB, Post Bank, Tinkoff
- Yandex money
- QIWI
- ROBOKASSA
Shipping throughout Russia. Delivery time is from 2 to 5 days. More expensive than regular delivery by Russian Post, approximately 50%. Parcel weight up to 2.5 kg
Express Parcel EMS
Available payment methods:
- Cash on delivery (payment upon receipt)
- Using cards Sberbank, VTB, Post Bank, Tinkoff
- Yandex money
- QIWI
- ROBOKASSA
Shipping throughout Russia. Delivery time is from 3 to 7 days. More expensive than regular delivery by Russian Post, approximately 100%.
Transport companies
Available payment methods:
- Using cards Sberbank, VTB, Post Bank, Tinkoff
- Yandex money
- QIWI
- ROBOKASSA
Delivery is possible to any locality where there is a representative office of the transport company. Delivery time is from 2 to 10 days. Sending large parcels is approximately 50% more profitable than by Russian Post.
Connection
Connecting the central lock
. We use a circuit of two relays so as not to go under the panel to the central locking unit:
Connecting heated mirrors
(to the wiring harness under the driver's threshold)
Connecting mirror turn signals
:
- Option 1: Pull the wire from the direction indicator on the fender.
- Option 2: To the wiring harness under the driver's threshold (blue - left turn signal; blue-white - right).
We transfer the wires from the power windows from the standard buttons to a new block with a joystick.
For Lada Kalina and Granta with heated and electric side mirrors (without direction indicators):
The new mirror has a chip with six wires, but the old one has only five. We pull the sixth contact, which is used to operate the turn signals.
The process of installing exterior mirrors from a liftback on a Lada Granta sedan is also shown in the video:
Are you considering replacing old mirrors with new ones with turn signals?
A special feature of the Lada Granta Liftback is a new modification of the side-view mirrors. By default, they are included as standard, unlike the Lada Granta Sedan, Priora, VAZ 2109, 2108, 21099.
Due to various reasons, such as an accident, collision, impact, reflectors are damaged. The replacement process is not at all complicated; every car enthusiast can do it.
In order to provide methodological assistance to inexperienced owners of the Lada Granta Liftback, we recommend following the instructions below.
Required
| Name | vendor code | Price, r |
| Heated, electrically adjustable exterior mirrors with turn signals (LED) | 4 500 | |
| Joystick/control unit from Lada Kalina (with central locking) | 11180-3709810 | 850 |
| Connector – electric mirror block (female) | CB-00090291 | 150 |
| Block for power window control unit 1118 | CB-00039007 | 50 |
| Connection block to power window button | CB-00033485 | 50 |
| 10 PIN connector with contacts for mirror control | 170 | |
| Wing turn signal plug | 21700-8212104 | 150 |
| Door card blank | 83191 3K030 | 30 |
What to do if the heating of one mirror on the grant does not work
Not much. On a cold car it was 14.5V according to standard.
Maybe there is a missing contact somewhere?
It's not a matter of network voltage. The voltage regulator has built-in thermal compensation. Unfortunately, she doesn’t understand that it’s not warm outside, but that the generator just got hot from the engine.
It is necessary to measure the voltage relative to the body on the heating elements in different modes.
It is likely that there is no difference in heating at idle and on the move (not taking into account the small difference in the voltage of the on-board network - more than 12.5 and ok) - perhaps the heating should be like that - for normal defrosting you do not need to make the glass hot - so that it does not burst over time, you just need to heat it to +5C for example and it will quickly dry under the influence of the wind. Yes, but on site it seems that the glass of the mirrors simply does not thaw
It's just an option. I don’t exclude that there is a problem, but definitely not because of 1 Volt
Yes, but on the spot it seems that the glass of the mirrors simply does not thaw. It's just an option. I don’t rule out that there is a problem, but it’s definitely not due to 1 Volt.
Heating only works when you hold the button and as soon as you release it turns off. What could be the problem?
Vanguyu - in the button!
some interesting thing is happening. Today I leave the yard in the morning, turn on the heated rear window, and instead I hear a hissing sound from behind. (the radio is turned off) out of harm’s way, I turn off the heating. Half an hour later I tried to turn it on again - it hissed again. It hissed for about 10 seconds and stopped. I'm knocking it out. I decided to turn it on again and it hissed again. it hisses on the right side under the casing somewhere according to the sensations.
I took the car to the authorities today. They puffed, but could not do anything. They told me to leave the car with them, they will make a request to the factory.
Damn, the mileage is only 3000. I bought a new car so as not to have to travel with it for repairs, and for the second month now I’ve been going to the authorities three times, and it also happens that they refuse the warranty.
Weather
An extremely common mistake made by novice drivers is that they forget about the difference in the condition of the road surface depending on the weather. Due to such mistakes by motorists, other road users may also suffer.
It is important to understand and remember that dry and wet asphalt is perceived differently by cars, adhesion to the road surface changes, and the braking system works differently. The driver must adapt to current weather conditions by choosing his driving style
Weather influences a number of factors. Namely:
The driver must adapt to current weather conditions when choosing his driving style. Weather influences a number of factors. Namely:
- acceleration;
- braking;
- clutch operation;
- braking distances;
- slip;
- distance;
- use of headlights.
When a car moves on dry asphalt, the braking distance is one distance. But if the road gets wet, this distance will increase by 1.5 times. On winter and icy roads, braking distances can increase several times. And if the driver does not take this into account, then there is a high probability of an accident and getting into a traffic accident.
Weather conditions dictate how a driver should behave while driving. The way you drive a vehicle largely depends on the condition of the road surface, the presence of precipitation, and ambient temperature. Therefore, in summer and spring, motorists adhere to the same style, but in winter and autumn they noticeably change their driving style.
Moisture, ice and puddles are very dangerous in nature, since here you can encounter such phenomena as aquaplaning, skidding, loss of control, etc. If you even hit an icy area with one wheel, the car can lose control. Driving on such roads requires extreme concentration and competent actions from the driver.
Beginners forget about this or have simply never personally felt the difference between the behavior of a car on a summer and winter road. That’s why a large number of accidents happen, sometimes for very trivial reasons.
How to equip a Lada Granta with heated and electrically adjustable mirrors?
This work requires a little more skill than, for example, installing a spoiler. Therefore, having a little skill in handling car electrics, or an assistant with such, is welcome.
Heating improvements
So, if you just need heating, then it is better to use a standard part, replacing the glass with the same one with a thermoelement, or install it yourself.
Precautions before starting work:
- Be sure to turn off the voltage of the vehicle's on-board network! (remove battery terminal)
- To prevent accidental damage to the wires when the door is accidentally closed, install limiters.
Tools and materials you will need:
- Branded mirror elements of heated mirrors;
- Insulating tape;
- Several meters of 0.75-1 mm2 wire;
- 2 terminals “mother small”;
- 2 ring ground screw terminals;
- 1 screw terminal;
- 1 fuse holder;
- Round needle file, soldering iron, set of screwdrivers, heat shrink.
Wiring
The next step is wiring. To install the wiring, you will need to remove the front door trim.
When the door is disassembled, the wires are pushed into the door through the fastening hole, and the interface block is disassembled. Through it and the corrugation, the electrical wiring is pulled into the housing. In order to simplify the task, you can drill an unoccupied contact in the block, and thus thread the plus and minus. To pull the wiring through the door corrugation, it is more convenient to use wire
Important (!) - for your own convenience, it is better to throw in extra wires
By analogy, the same work is done with the right door of the car.
To power the heated mirrors in Grant, it is recommended to use the most common way - connect to the heated rear window. This solution is used on most modern cars. The order is:
- The two negative wires from the heating are screwed onto a ground screw above the fuse block. It is not recommended to connect to ground inside the door, since electrical contact in door hinges and other moving connections is not always reliable.
- The two positives are soldered to the fuse holder (15A) and connected to the gray wire in the harness on the floor. There are 2 gray ones. The required one is found using a tester when the load is applied to the rear window heating.
Thus, Granta's heated mirrors are connected via a relay and 2 fuses. All that remains is to connect the mirror elements to the terminals and evaluate the performance of the circuit. After this, the wires should be hidden under the casing.
Other options
For some users, a more acceptable option is to use a separate toggle switch. In this case, you should make sure that the current limit through the switch, which is usually marked on the housing, exceeds the current consumed by the heating system.
For those who want to install electric adjustment at the same time as heating, the best option would be to use mirrors from the Lada Kalina. Grant's original glass is large and clear. Electric mirrors from Kalina are slightly smaller, so this method is a good option for those car enthusiasts who do not like enlarged mirrors. Other drivers should be reminded that their smaller size makes up for their much greater operating comfort.
The first step is to remove the old mirrors. They are secured with 3 screws, which can be accessed after removing the decorative trim. Next, new parts are installed and wires are pulled, as described above. A wiring diagram is included with the set of new electric mirrors. The control unit should be mounted above the buttons of the power window control module.
All connections are made taking into account the algorithm described above, as well as instructions for new parts. The result is a Granta with the required option - electric drive and heated exterior mirrors.
Dismantling process
You can limit yourself to a minimum set of tools; the main rule of work is caution and precision in the application of effort. Excessive load should be avoided, as it can aggravate the problem and cause new damage and deformation.
Excessive load should be avoided, as it can aggravate the problem and cause new damage and deformation.
To begin with, you need to disconnect the mirror directly (the procedure is not necessary), for which you remove the lock located on the pillar on the interior side. First, the upper fastener is loosened, and then the two lower ones.
After this, the screws holding the mirror are unscrewed and the wires that provide electrical control of the mirror are disconnected.
For heated mirrors, the wires responsible for supplying electricity to the heating device are also removed. They must first be disconnected from the heating coil. For subsequent connections, soldering is used.
The next set of actions looks like this:
The mirror element is retracted to its extreme position, which creates a small gap.
A flat-head screwdriver is inserted into the gap, and with light force the fixing parts are moved to the side.
- The latches are located around the entire perimeter, which needs to be taken into account.
- The mirror element is removed and replaced with a new, undamaged analogue.
After the new mirror sheet is installed, assembly is carried out in the reverse order.
Popular on the site
Currently on the forum:
This page is searched for: Heated mirrors. How to connect?.
Currently commenting:
Jet black or grey-black
I would like to know the model of injectors, the type of internal combustion engine, the power supply system of the internal combustion engine..
Dimensions and tidy do not light up. CHY, all relays and presets are in order! New button! Backlight on p
On my smartphone it freezes every once in a while, then crashes, it says the pages could not be loaded
Thanks, I think so too
Often, when opening a page, it says that there is no such page, although a few minutes ago someone
Hello! I can’t find the lower rubber bands for the injectors, I found the upper ones, they fit from ten
Do not bother. Xenon in a headlight not intended for it is definitely already a collective farm. And St.
Mine doesn't understand. Is this the end of the update or what?
Wroom.ru
Media registration certificate No. FS 77-76203 16+
Solina. You can buy car mirrors and mirror elements from us
Product delivery options
Note! Below are the shipping methods available specifically for this product. Payment options may vary depending on the delivery method.
Detailed information can be found on the “Delivery and Payment” page.
Parcel by Russian Post
Available payment methods:
- Cash on delivery (payment upon receipt)
- Using cards Sberbank, VTB, Post Bank, Tinkoff
- Yandex money
- QIWI
- ROBOKASSA
Shipping throughout Russia. Delivery time is from 5 to 12 days.
Parcel by Russian Post 1st class
Available payment methods:
- Cash on delivery (payment upon receipt)
- Using cards Sberbank, VTB, Post Bank, Tinkoff
- Yandex money
- QIWI
- ROBOKASSA
Shipping throughout Russia. Delivery time – from 2 to 5 days. More expensive than regular delivery by Russian Post, approximately 50%. Parcel weight up to 2.5 kg
Express Parcel EMS
Available payment methods:
- Cash on delivery (payment upon receipt)
- Using cards Sberbank, VTB, Post Bank, Tinkoff
- Yandex money
- QIWI
- ROBOKASSA
Shipping throughout Russia. Delivery time – from 3 to 7 days. More expensive than regular delivery by Russian Post, approximately 100%.
Transport companies
Available payment methods:
- Using cards Sberbank, VTB, Post Bank, Tinkoff
- Yandex money
- QIWI
- ROBOKASSA
Delivery is possible to any locality where there is a representative office of the transport company. Delivery time – from 2 to 10 days. Sending large parcels is approximately 50% more profitable than by Russian Post.
Courier delivery in Togliatti
Available payment methods:
- Cash upon receipt
- Using cards Sberbank, VTB, Post Bank, Tinkoff
- Yandex money
- QIWI
- ROBOKASSA
Delivery time from 1 to 12 hours.
Pickup from our warehouse
Available payment methods:
- Cash upon receipt
- Credit, installments
- Using cards Sberbank, VTB, Post Bank, Tinkoff
- Yandex money
- QIWI
- ROBOKASSA
Pickup times must coincide with store opening hours.
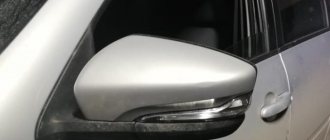
We present to your attention a set of side mirrors “Liftback” with overlays in the color of the car body with electric drive, heating and repeaters for Lada Granta, Kalina, Kalina 2 and Datsun on-DO, mi-DO. So, these original mirrors initially began to be installed on Lada Granta cars in the “Liftback” body, when such a body went along the assembly line of the Izhevsk AVTOVAZ plant. Afterwards, these mirrors began to be installed as standard on sedan cars. But the second generation Lada Kalina, as well as Datsun cars, which are produced on the VAZ platform, never received such mirrors, although as you understand, Granta, the “first” and “second” Kalina, as well as both existing Datsun models - it -DO and mi-DO - have absolutely similar door stamps and, accordingly, the mounting locations for the side mirrors. Perhaps the manufacturer believes that these mirrors are not suitable for these models from a design point of view and there are other reasons, nevertheless the fact remains a fact.
These mirrors, sold in pairs, are addressed largely to those buyers who have decided to replace the mirrors of other modifications installed on their cars with these. Or for those buyers who have similar mirrors on their Grant (VAZ 2190, 2191), but in a simpler configuration. Yes, yes, mirrors, like cars, can differ in filling. These mirrors, as they say, “come in complete mince.” Let's figure out what they contain.
Cases in body color
This is the first difference between these mirrors and the standard ones, because the body is painted in body color - this is a sign of expensive configurations.
Electric drive
This is the ability to adjust the tilt and rotation of the mirrors directly from the inside of the car. This is a very necessary function, especially in cases where the car is used by more than one driver in your family.
Heating of mirror elements
This function, in our opinion, is necessary in Russia in any case, without exception. In winter, mirrors often fog up and become covered with a crust of ice, and removing the ice from them mechanically is fraught with damage to the integrity of the surface of the mirrors.
Turn signal
This function is not mandatory, but rather simply relevant, fashionable and modern. Repeaters in the wings, in the old fashioned way, do not worsen the effect of operation, but it is believed that turn signals in the mirrors are a more practical and effective solution.
Enjoy your tuning and satisfaction with your purchase.
We indicate specific skills and abilities in the resume
Now imagine that you are writing a CV for a specific position in which you have a keen interest. Then the list of core skills should be treated as a list of specific, rather than general, skills.
Read the announcement very carefully. What do you need to be able to do to be hired for this position? Do these requests match your skills and experience? This must be indicated in the “Skills” column.
However, simply rewriting the requirements on your resume and framing them as your own skills is a bad idea. The recruiter will immediately guess that you have decided to take a “let it go” approach to your resume. Change this information, make it more specific, add something that was not specified by the employer, but could benefit this company.
For example, if you see a requirement - fluency in English, then mention the ability to organize obtaining a visa for the boss (if this is the case, of course). After all, if the employer and his assistants correspond in English, this may indicate that there are business partners from other countries, and in this case, the ability to organize a visa will arouse the interest of a possible boss.
Also remember that nowadays a recruiter will probably look for candidates using keywords, so you need to write a description of skills so that it contains phrases that are in the text of the job description.
In conclusion, I would like to recommend you an interesting article about why working on the Internet at home without investment is so attractive and how much you can earn by working on the Internet.
For details on how to write a resume correctly and what mistakes to avoid, watch the video:
I have prepared a small gift for you - a standard resume template, which you can download below:
| Standard resume template (doc, 44 Kb) | Standard resume template (doc, 46 Kb) |
PS I will be very grateful if you use the buttons:
How to remove Lada Granta mirrors
- Remove the mirror adjuster retaining bracket.
- Remove the 3 screws securing the mirror to the door frame.
- Remove the mirror.
- The photo shows the Granta side mirror assembled.
- Disconnect the connector from the power mirror wires.
- Remove the 3 screws securing the mirror to the door frame.
- Remove the exterior mirror Grant assembly.
Photo source:
Sources
- https://1ladagranta.ru/komplektuyushhie/nakladki-zerkala.html
- https://zarulemvaz.ru/zamena-zerkalnogo-elementa-na-grante/
- https://xn—-8sbabr6ahc3e.xn—p1ai/granta-remont/436-snyatie-i-razborka-vneshnikh-zerkal-granta.html
Installation
Remove the door trims and dismantle the old exterior mirrors (by removing the mounting screws). Mirrors of the new SE model are installed in place of the old ones without modifications.
To install the joystick, make a hole in the door trim using a file or a utility knife. Sample:
To stretch the wires from the interior to the doors (see connection below), you will need to drill a hole in the door rosette with a drill (or find a suitable female-male connector).
Useful video
You can get more information from the video below:
Good day to all!
Finally, the court decision came into force and I received the long-awaited payment for the accident. I waited a long time, but it was worth it. Many thanks to my lawyer Lyuba, she did everything competently and the result pleased me, although it all dragged on from 01/11/2016 to 08/08/2016 In general, if something “ugh, ugh” happens, contact me, I’ll introduce you to a good lawyer)))
In general, the repair of the ass amounted to 42k, the insurance payment was 113k (but that’s not all, because we will be sued further for a penalty). Part of the payment amount went to repay debts (repairs + insurance + small items) and the rest, of course, went to the car, well and bought my wife some goodies.
Well, the actual changes: 1. Mirrors from Granta SE and their control unit2. A little used strut (stock) and technospring springs -50 muzzle and -70 ass (new)3. Muffler and resonator (in 5 years I have never heard a current exhaust on it)4. Brake drums and brake cylinders5. Spark plugs, wires, filters (well, that's not interesting)6. Front fenders (not yet installed)7. The hood has been sent for revision (everything is incognito for now; I’ll write about how it’s done)8. Covers replaced
Let's start with mirrors. For a very long time I wanted something interesting and one day I was flipping through the page of Authority and saw grant mirrors on his 08. I immediately wanted to do the same for myself, especially since I have never seen Samara with such mirrors in our city. As soon as I saw it in the store, I immediately bought it. The installation was fun, because the fastenings are different, but it doesn’t matter, we have a drill))) and one more nuance, all the mirrors installed on the Samara that I looked at were modified in the triangle area, a part was cut off and puttied and painted. I was afraid to screw up and decided to try installing the mirrors as is, in principle it worked)) The installation is not finished at the moment, the control unit is not connected, but everything is ready for this (so far I have only connected the turn signals (for dimensions) By the way, all the necessary connectors are sold at Kuzbass market. In general, I’ll write down everything in detail later on the mirrors.
AvtoVAZ first began installing side mirrors of the new SE model (with heating, electric drive and turn signal indicators) on the Lada Granta liftback. Then they began to be equipped with Luxe trim levels of the sedan. The following describes how to install and connect standard liftback mirrors with your own hands to simpler versions of the Lada Granta sedan, as well as to the Lada Kalina station wagon and hatchback.
Sequence of actions when replacing a side view mirror yourself
- We place the car on a level platform and provide unobstructed access to the front door from the side where the replacement will be.
- We unscrew the two screws that secure the door card trim and pry the plastic clips around the perimeter.
- From the back side, disconnect the block with wires from the electric drive control unit, disconnect the speaker terminals, and remove the card.
- Using a Phillips-head screwdriver, unscrew the three screws and remove the side-view mirror from its seat.
- We replace the block with a new one and screw it into place. We lay the block with wires and connect them to the sockets. We assemble the structure.
Lada Granta RepliCar › Logbook › I installed repeaters in the Mirrors myself
Greetings) In general, the story is like this: I was talking with a friend of Sevenonstyle about alterations to my cars, I hinted at adding lighting to the interior door handles) I shared my thoughts with him)) And he went ahead of me and installed lighting in his doors)) Well, Handsome I think), and after some time he shares with me his thoughts about installing turn signal repeaters in his own mirrors), I was fired up by the thought that I would at least overtake him in this).
In General, it all started with the fact that when the door cards were removed in order to install acoustic podiums, I thought that it was possible to kill two birds with one stone, but in the end I killed three)) But about the third, the entry is above) and in the end, in order not to remove Maps several times, I decided to immediately move the turn signals to the mirrors)
The first is, of course, a theory, after reading Drive I decided that, in principle, it was feasible for my hands. I go to the Auto store and buy two repeaters for mirrors from Priora, 450 rubles each. For a piece. Okay, there are repeaters, Next you need wiring and a couple of plugs (the folder is female), I picked it up at Auto Disassembly. Then I started installing) First of all, I remove the repeaters installed from the factory on the wings, replacing them with Chrome “SE” plugs. Filmed during car disassembly of a VAZ 2110.
Next, I pull the wires into the cabin, it’s not at all difficult to do, at least on the passenger side, on the driver’s side it’s harder, but still possible. Next, I lengthened these same wires and included a double plug (male folder) in the circuit near the mirror under the door card. So that if anything happens the braid can be taken apart. There is a lot of room for wires in the Mirror. The next step was: Removing the mirrors from the car and then disassembling them into separate parts. First, I removed the top cover, it is held on by latches, it’s a bit of a hassle, but I managed) The main thing is patience, it’s better to pry the latches from the side of the Mirror itself, or rather under him.
When I took it apart, I roughly figured out what to insert where, where to cut the plastic, and I cut it a little bit many times, cut it, measured it, cut it, measured it. So as not to saw off the excess) As a result, when I fitted the repeater into the inner part of the mirror (Carrier), I secured it to it with a screw, it holds more than tightly enough. There is now even the possibility of installing repeaters from priors that are “ala Lexus”)
Next: We need to cut out a very Important part, the top Front cover. I’ll say right away that I didn’t have to cut anything out very much, but I did fit it, it’s very, very troublesome, if you want it to be beautiful, it’s better to take your time and try, I realized for myself in the end that I could have done better, but I still can’t fly into space, so I think it’s done 4))
After adjusting the front top cover and making sure that it closes tightly to the repeater, I needed to connect the wiring to the end.
I install the mirrors back on the car and insert the wires, then I solder the original + and - on each mirror to the repeater cable, and I completely pack the whole thing in hot-melt glue from a gun, the insulation is fire)
I put everything back in its place to the end and put the Door Cards in place and rejoice) All the best)) I hope I described it in detail))
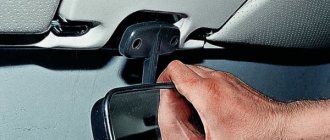
How to secure and how to glue a new one
If you have successfully dismantled the mirror yourself, then returning it back will not be difficult. As a rule, all actions are performed in reverse order.
But you should pay special attention to the selection of glue, since not everyone is suitable for this process
it is necessary to choose the right adhesive for attaching the mirror to the windshield
Glue selection
There are three types of compositions for gluing mirrors:
- chemically cured;
- light-curing;
- compositions based on epoxy resin.
A composition with resins will work well only if it is allowed to dry properly. This usually takes from 10 hours to a day. In this case, the part must be pressed tightly at all times. This approach is not very convenient, so such products are not used in everyday life.
Light-curing mixtures operate when exposed to special ultraviolet lamps. This is one of the most common methods in production. However, if you are not the happy owner of a lamp, you should not purchase such a composition. Sunlight, especially diffused light, is not able to have a sufficient effect.
For these reasons, chemically cured compounds are the most popular. A special hardener starts the polymerization process. As a rule, they consist of the glue itself and an aerosol activator, although one-component compositions are also found.
Please note that some materials cannot be used to glue the mirror
- household superglue;
- double-sided adhesive tape.
The adhesive component of both materials has such a composition that when used on glass or metal, it will not be able to harden completely. High air temperature inside the cabin or heating of the glass from sunlight will soften it and the mirror will fall off. You can use household adhesives only if the mirror fell completely unexpectedly, and now you need to urgently get to a car service center.
Max
https://homo-habilis.ru/v-garazhe/223-chem-prikleit-zerkalo-zadnego-vida-v-avtomobile
How to stick to windshield
Having selected the appropriate glue, you can begin returning the rear view mirror to its rightful place. Choose a warm day for this or install a heater in the garage: the air temperature should be between 20 and 25 ° C.
process of applying glue to the holder platform
- Clean the holder platform of any old adhesive residue.
- Lightly sand the surface of the holder to improve the adhesion effect.
- In the same way, sand the area of the windshield where it is glued.
- Degrease the holder and glass area.
- Apply a thin layer of glue to the holder.
- Spray a special activator onto the place where the part is attached.
- Place the adhesive side of the part onto the glass. Try to follow the trail left from the previous time.
- Press the mirror firmly against the glass and hold for the time indicated on the package.
- After making sure that the part is firmly in place, clean the mirror from any remaining activator and glue around the holder.
- Reinstall the windshield (if you removed it) according to the owner's manual.
Ready! If you followed all the instructions carefully, the mirror looks like it was installed at the factory or at least in a car repair shop.
How to install on bracket
If during dismantling you did not separate the bracket platform from the glass, it will be even easier to assemble it. To do this, find a fixing element: it may be a screw or a latch. After this, connect the bracket leg to the platform.
There are also special brackets that are not glued to the glass, but are installed on the ceiling or other elements of the car, for example, on sun visors.