One of the most common reasons causing the inability to start a gasoline engine is the banal lack of spark at the spark plugs. Under such circumstances, there is nothing to ignite the combustible mixture on the compression stroke, and as a result, the engine refuses to work. Depending on what kind of power system the car is equipped with, it is determined exactly how to proceed to determine the exact cause of the lack of a spark and measures to return it. We’ll talk in more detail about this problem on injection engines today. Interesting? Then be sure to read the material below to the end.
Checking for spark
Let's say your fuel-injected car has stopped responding to the ignition key and refuses to start. It is quite irrational to immediately complain about a malfunction in the ignition system. First of all, you need to make sure that it is the spark that has disappeared and not something else that has broken. To check spark plugs for the presence of the coveted “light”, you can resort to several procedures at once. Perhaps the most effective and simple ones are the following:
- The first method is a mass test. To implement it, you need to turn off the ignition, unscrew each spark plug in turn and, placing its body against ground (the metal body of the engine), try to start the engine;
- The second method is checking with a multimeter or a tester based on a piezoelectric element. This diagnostic option is quite similar to the method described above, except that the spark plug is applied not to ground, but to the contacts of the tester or multimeter. However, in this case there is no need to “turn” the starter; the spark must come from the devices themselves.
If, as a result of the above-mentioned testing methods, sparking on the spark plug is not detected, or there is a spark, but weak (dimmed, dim, dull), it is necessary to identify the cause of the malfunction. Do not forget that operating a car with a poorly functioning ignition negatively affects engine performance and significantly reduces its service life.
Note! Checking the spark on the injector is an extremely important undertaking, since such cars have very sensitive electronics. Considering this particular feature, it is important to carry out diagnostics carefully and as quickly as possible, that is, without numerous repetitions of the test and using only high-quality testers.
VAZ 2109 does not start. Checking the power system, ignition system
The real problem is when your car won't start! Let's look at everything using the VAZ 2109 as an example. If the car does not start, then the question immediately arises, “Where to start?” It can actually be quite simple.
Finding the reason
The first step is to check the fuel, spark and air.
I would advise you to first check the air supply (compression and valve timing), you can also start by checking the ignition system.
The marks on the pulleys may match, but the compression may fail a little, for example: on one cylinder there is 10 atm, on the second 9.5 atm, on the third 7 atm, and on the fourth 8 atm, this can only be corrected by engine repair. Of course, it is worth getting serious about repairing the engine, but for now we need to put it off, since we will need to start the car. Having such compression, the engine will work and even not bad, but at idle it will be under pressure.
VAZ 2109 will not start - a method for finding reasons
VAZ 2109 does not start: start checking with a spark, Hall sensor and the condition of the spark plugs. Then measure the compression, check the timing marks, fuel pump and starter.Read more
Checking the power system
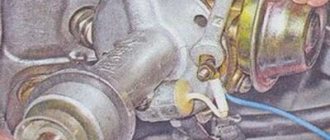
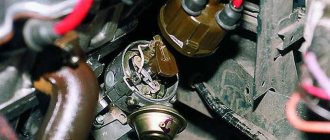
Next, we begin to delve into the power system. You will need to make sure that the carburetor is at the correct level, the pump is supplying fuel properly, and the idle air valve is working without failure. Therefore, everything is in order with the fuel supply. Also, do not forget to check the spark plugs; after a couple of attempts to start the engine, they will probably flood.
Checking the ignition system
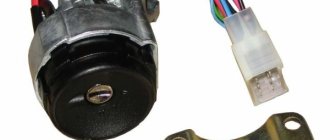
Since the previous failure options were not confirmed, then the problem needs to be looked for in the ignition system. To carry out a routine check, simple instruments are useful; they can be bought without any problems at any auto store. But first you need to understand the structure and operation of the ignition.
And so, in our case, the VAZ 2109 has a contactless ignition system. This system includes:
- reel,
- distributor,
- switch,
- Hall Sensor.
The coil is connected to the battery with one terminal, and the second to the output transistor of the switch. The switch opens the output transistor when the signal drops to zero. At this moment, a high voltage current of approximately 25 kV appears in the secondary winding of the coil, and a current of more than 300 V appears in the primary winding. As a result, a high voltage voltage appears on the spark plugs, resulting in a spark appearing on the plugs.
But for a discharge to occur, the coil must be charged. Before the control pulse from the Hall sensor, the switch predicts when it needs to be shorted to ground in order to charge it.
Moreover, he does this in such a way that the charging time of the coil remains approximately unchanged. Otherwise, the coil will overcharge. To do this, the switch calculates the required period of the pulses that come from the Hall sensor. In other words, everything depends on the engine speed, the higher the speed, earlier the commutator begins to close the coil, but the time of the closed state will not change.
Now you can start testing. First of all, you need to check the spark on the candles - you can use a special spark gap for this. There is no result.
This means the hall sensor or switch may be to blame, or ground or power to the switch. To avoid guessing for too long, let’s use AZ-1.
AZ-1 is an emergency ignition; it can be used in the rain or when driving through puddles. In other words, we can call it a substitute for a hall sensor.
The MD-1 sensor is an instant diagnostic, useful for checking the functionality of the ignition coil, hall sensor and ignition switch.
First of all, we used MD-1. This sensor is connected instead of the switch, as soon as it is hooked up, you need to turn on the ignition, do not start it:
- If the “P” LED lights up, this means that the ignition relay and ignition switch are working properly.
- LED “K” is on - the primary winding of the ignition coil is not damaged.
- turn on the starter: if the LED “D” blinks, it means the Hall sensor is in working condition.
If it does not blink, you will have to use the AZ-1 device and connect it instead of the Hall sensor.
Such devices for instant diagnostics of non-contact ignition systems are sold on the Internet for literally 100 rubles. But if you do not have the opportunity to purchase one, then you will have to spend much more time and check each sensor separately with a multimeter.
Everything works, but the engine doesn’t want to start. After a thorough inspection of the ignition coil, carbon traces were found where the high-voltage wire was connected. Replaced the coil and wire. The engine immediately started working as before.
I hope this real-life incident will help you find the reason why your car won’t start either.
Causes of sparking problems
If there is no spark on the injector, and not, for example, on a carburetor or gear motor, you will have to try to identify the reasons for its loss. This is due to the fact that there are slightly more factors influencing spark formation in injection systems and they look more multifaceted. If we summarize the general list of possible causes of the problem, then it is worth highlighting the following most common ones:
- The spark plug or spark plugs are flooded with fuel - there is either no spark or very weak, the spark plugs themselves are wet;
- The spark plug or spark plugs are faulty - there is no spark at all, deposits on the contacts are usually black or white;
- The crankshaft sensor, ignition module, ignition coil, switch or distributor is faulty - there is no spark at all, the engine shows no signs of “life”, the injector does not work correctly;
- High-voltage wires have broken through or there has been a loss of contacts - one or two spark plugs do not work, the rest are fully operational;
- The injector electronics (ECU or wires) are faulty - the unit does not work correctly, there is no spark at all spark plugs;
- The injector nozzles are clogged - there is no spark at the spark plugs of specific cylinders, the injector is not working correctly.
Please note that for a complete and most accurate diagnosis, it is necessary to carry out several procedures at once:
- Naturally, check for a spark;
- Assess for the presence of the symptoms described above;
- Check for relevant errors on the dashboard or on-board computer screen;
- Check the potentially faulty unit (disassembly, cleaning, diagnostics with a multimeter, etc.).
If, based on the results of all diagnostic procedures, the problem is not identified, then, most likely, a visit to the service station cannot be avoided. Otherwise, it is quite acceptable to carry out repairs yourself, of course, if you have the proper skills, abilities and tools.
Basic information about the ignition system of a VAZ 2114 car
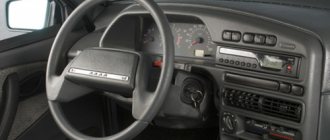
The VAZ 2114 brand car is built on the basis of the VAZ 21093 platform and is its improved version. There is a new steering wheel, an updated instrument panel, an adjustable steering column, a new heater and power windows. Changes related to the abandonment of the carburetor in the design of the VAZ 2114 car with an injection engine began to occur much later compared to foreign manufacturers, but these changes turned out to be quite useful.
On cars with an injection engine, the fuel mixture is supplied using a computer through special nozzles. Most likely, every car owner has ever encountered a problem when there is no spark on the high voltage wires, but the driver can hear how the fuel pump functions, then pay attention to the ignition system of your vehicle. One of the most common problems with a car's ignition system is that there is simply no spark at high voltage wiring.
During operation of the machine, some malfunctions of electrical components may occur and this may affect the functioning of:
- Instruments, and this does not make it possible to control the ignition system and other components;
- power unit, thereby making it impossible to develop standard power;
- Light fixtures and convenience mechanisms, which include lighting, heating and power windows.
The main breakdowns encountered by the ignition system of a VAZ 2114 car:
- Reduced vehicle power;
- Failure during the development of vehicle engine power;
- Idle speed instability;
- Violation of the normal functioning of the cylinder.
You need to start looking for the cause of malfunctions in the ignition system with the formation of sparks on high voltage wiring.
How does the spark formation process occur in a VAZ 2114 car?
If you hear the fuel pump operating, but there are no sparks on the high-voltage wiring, then check the functioning of the ignition system. The system is checked for the presence of sparks on high voltage wiring, and for this a special device called a spark gap is used. The use of this device is considered more comfortable, because most engines with an injector use static ignition distribution with simultaneous transmission of high voltage to two spark plugs.
Bringing the car back to life
As for why a spark disappears, everything is probably very clear. Now, it would not be amiss to consider the order of her return. The reality is that in most cases, getting the spark back is a simple matter and just involves carefully checking the broken car. To be more precise, to normalize sparking it is required:
- Firstly, check the spark on the injector using the method described above, make sure that it has disappeared, and, at least indirectly, try to determine the cause of the malfunction;
- Next, it is enough to assess the current circumstances and act based on them. As typical situations, we suggest considering solutions to the following problems:
- the spark plug is wet, the presence and strength of the spark are unimportant, the carbon deposits are correct (brick color) - wipe the part and screw it back in;
- the spark plug is wet (not always) and the carbon deposits are incorrect (white or black) - clean, dry the part and try to start the engine, if there is no result, change the spark plug and deal with problems in the fuel system (cleaning the injector, checking the ECU, etc.);
- the spark plug is wet, there is no spark at all, the color of the soot is not important - we try to change the part, if there is no result, we check the ignition system and the operation of the injector.
In principle, in theory there are no particular difficulties in repairs of this kind. Despite this, it often causes difficulties in implementation for inexperienced motorists. To solve these, you need to act in the order described above, but if something doesn’t work out, it’s better to turn to professionals at a service station. This approach to repairs will not only save time, but also guarantee trouble-free operation of the car in the future.
Perhaps this concludes the most important information on today’s issue. We hope that the material presented was useful to you and provided answers to your questions. Good luck in operating and maintaining your car!
Malfunctions in the ignition system of the VAZ-2115 are always upsetting, because any of them leads to frequent malfunctions of the car’s engine. The main sign by which one can suspect a malfunction in the ignition system is weak caviar or its complete absence.
NO SPARK IN THE VAZ 2114 CAR
Probably, many car enthusiasts have encountered a problem when there is no spark , so if the vehicle engine does not start, but the driver hears the functioning of the fuel pump in the tank, then you need to pay attention to the ignition system.
One of the most common problems with a car's ignition system is the lack of a spark on the wires leading to the spark plugs, as a result of which the fuel does not ignite. That is why the main topic of today’s article will be the following questions:
Why are there no sparks on the armored wires? What to do if there are no sparks on the high-voltage wiring of the VAZ 2114?
Naturally, in addition to these questions, we will consider several more and here are a few of them:
- What is the ignition system of the VAZ 2114 car injector?
- Diagnostics of the electronic part of the VAZ 2114 system;
- The main breakdowns encountered by the ignition system of a VAZ 2114 car;
- The main signs of failure of the ignition module of the VAZ 2114 injector;
- Diagnostics of the ignition module VAZ 2114 injector;
- Algorithm for removing and installing the ignition module VAZ 2114 injector;
- How to check whether sparks occur or not?
- What to do if there is no spark on a VAZ 2114 car?
Battery check
A characteristic feature of a problem battery is a change in the sound of the signal. Even if there is a problem with the battery, the lights on the dashboard usually react when the starter rotates. In such a case, the reason why there is no spark may be a low battery charge or broken contact at the terminals.
If the terminals become oxidized, they should be cleaned and securely fastened. You can also apply graphite grease to them; it will prevent the terminals from oxidizing in the future. If the battery is simply discharged, it must be fully charged.
Checking the control unit
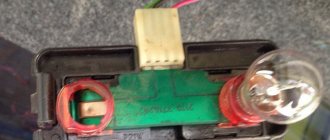
If the VAZ 2114 does not have a spark in cylinders 1 and 4, and the spark plugs, armored wires and ignition module are working properly, then the last reason remains - a breakdown in the electronic control unit. This is easy to check - just connect to the unit using a light bulb with two wires. If the light blinks periodically, then the unit is working; if not, then the problem lies with it.
In this case, you should disconnect the unit, open its case and remove the board, then carefully inspect it. Very often the breakdown of this device is the burnout of the transistors (they look like the largest electronic components with three legs). If one of them looks burnt, it should be replaced.
For this you will need:
- tester;
- soldering station or hair dryer;
- tweezers (preferably with ceramic tips);
- low-melting solder.
First you need to check the transistor using a multimeter. If it shows no signal, then the element will need to be unsoldered, and in its place soldered a new one - similar or similar in its properties (transistors can be purchased in stores for radio amateurs or ordered from China, for example, from Ali. In the latter case, they will cost less than 15 rubles).
Transistors should be desoldered and soldered using a soldering station or a single hair dryer, since they are made in chip design
If soldering is carried out with a soldering iron, then it should be done extremely carefully and using low-melting solders
After the transistor is replaced, the electronic unit will need to be assembled and installed in place, and then try to start the car. If all 4 cylinders work properly, then the problem has been resolved; if not, then you should continue your search and check all other electronic components of the device with a tester. If additional parts are found to be faulty, they should also be re-soldered.
If such a check does not show results or the task of finding burnt elements turns out to be too difficult, you will need to replace the unit with a new one - similar or similar in characteristics.
True, if an immobilizer is installed on the car, then the burnt-out unit should be replaced exclusively with exactly the same one (installing even a close analogue will lead to the fact that the car simply will not start).
High voltage wires
Next you need to visually check the high voltage wiring. There should be no visible damage or disruption of the insulating layer. If the wiring is in good condition, you should check the wiring to the spark plugs.
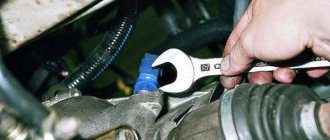
To do this, you need to remove the tip from the spark plug wire, bring it to a place on the body without paint and start the car. When the starter rotates, a bright spark with a bluish tint should appear. If this does not happen, you should check the ignition coil.
At the same time, the spark plugs do not fail. If there is a spark in the spark plug wiring, it is possible to check any of the glow plugs. To do this, you need to unscrew the suspicious spark plug from the block and put the spark plug wire on it. Next, you should touch the place on the body without paint with a metal part and, by rotating the starter, determine whether there is a spark or not.
Replacement of spark plugs must occur in a timely manner, in accordance with the maintenance of your car model. For VAZ-2115 - approximately every 20 thousand kilometers.
No spark VAZ 2109 injector Drive4U
Lada 2115 4 Unique Logbook Headlight hydrocorrector has run out
Camshaft and crankshaft position sensors. Replacing the timing belt, replacing the VAZ pump, replacing oil seals. Photo. A brief overview of camshaft and crankshaft position sensors. Camshaft and crankshaft position sensors. Replacing the timing belt, replacing the VAZ pump, replacing oil seals, replacing the alternator belt, How to change it yourself. There are probably no car owners left who do not know the purpose of the crankshaft position sensor. The VAZ 2109 injector crankshaft sensor is sometimes called a synchronization sensor, because it is thanks to it that the operation of the control unit is synchronized with the power unit. Replacing the timing belt, replacing the VAZ pump, replacing oil seals. What is an injector:
Fuel pump weight. Replacing the fuel pump for a VAZ 2109. Damn! Photo. This mass creates a lot of problems. If the bolt becomes loose, you will not be able to start the car. Fuel pump weight. Hatch cutout! Without removing the gas tank. Replacing the fuel pump for a VAZ 2109. Damn! What is an injector: operating principle and device? You will learn all this in our section. Fuel pump VAZ 2109 carburetor: appearance Removing the gasoline pump In this section we publish videos devoted to the principles of operation of the auto injector, and everything related to it.
Crash test of VAZ 2114 and VAZ2109, the results are shocking! Fuel pump weight. Photo. How wretched our auto industry is! Crash test of VAZ 2114 and VAZ2109, the results are shocking! This mass creates a lot of problems. If the bolt becomes loose, you will not be able to start the car. Fuel pump weight. What is an injector and what is the operating principle of the injection system? You will learn about all this in our section. In this category of the site you will find video materials devoted to the principles of operation and design of an auto injector, and everything related to it.
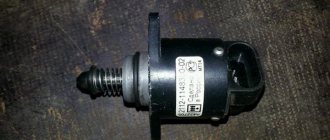
Coolant Temperature Sensor DTOZH Volkswagen Passat B3 and B4. Knock sensor. Malfunction of the knock sensor. VAZ. LADA. Photo. Coolant Temperature Sensor, also known as DTOZH, Volkswagen Passat B3 and B4 - protective screen. Coolant Temperature Sensor DTOZH Volkswagen Passat B3 and B4. Knock sensor. Malfunction of the knock sensor. Symptoms of faulty motor control on VAZ fuel-injected cars. Let's look at the main symptoms of a knock sensor failure and how to check its functionality. Warning: Do not try to pull out or push in the valve with your hands, this may damage the idle speed control. To do this, you need to use a diagnostic device or a special monitor.
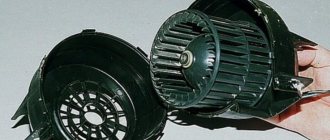
Ignition coil. How to check the ignition coil. Checking the ignition coil directly on the car. Photo. How to check the ignition coil for functionality. Ignition coil. How to check the ignition coil. A car arrived with three cylinders, the cause of everything turned out to be the ignition coil. We are testing it. An important nuance. Infinity, in this case, can also mean no response from connecting the ohmmeter. In other words, if there was a number 1 on the device and it did not change when ringing, this is infinity. Checking the ignition coil directly on the car. What is an injector and what is the principle
Distributor
When looking for problems with the distributor, you need to take a close look at the inside of the cap. If there is damage, it should be replaced. If there are no problem areas, wash with gasoline. You can check the central contact of the distributor by moving it slightly to the side.
The integrity of the rotor insulation is easily checked by placing the central high-voltage wire at a distance of 5 mm from the rotor electrode and closing the breaker contacts with the ignition on. Sparks appearing in the gap mean that the rotor is not working and needs to be replaced.
How to check the ignition coil.
Lada Kalina Sedan my first car Logbook Phase sensor
Inspect this mechanism for oil stains and cracks. If the surface of the coil is not perfectly clean, wipe off the dirt with a dry cloth, otherwise it may cause high voltage leakage
Also pay attention to the ignition system wires; they must be dry and without external damage. Move the high-voltage wires with your hand and try to start the car
If this does not work, then you will have to check the ignition system more carefully. To diagnose the condition of the spark plugs, take two high-voltage wires, having first removed them from the distributor cap. Place the wires at a distance of 5-7 mm from the car engine and wait for the reaction. If the system is fully operational, then when the starter is cranked, a blue spark will appear in this gap. If there is no spark or a color other than blue, check the ignition coil.
The coil is checked in the same way. Remove the wire that goes from the coil to the distributor-breaker (distributor), and, by analogy with checking the spark plugs, with the starter running, bring the wire to the ground of the car. If there is no spark from the coil, then it is faulty. Connect the ignition coil to an ohmmeter to check for breaks in the wires. Check the primary and secondary windings. The absence of holes will be confirmed by the ohmmeter readings: 3 Ohms and 7000 Ohms in the primary and secondary windings, respectively. If the resistance is less than standard values, then you are most likely in danger of replacing the ignition coil.
Check the correct connection of the coil wires and its insulation. If the wires are tangled together, correct this by untangling them and positioning them correctly. Use an ammeter to check the current in the circuit. To do this, connect the contacts of the distributor and turn on the ignition. The current strength displayed by the device should not be higher than that set for your car. If the current value is greater than the standard value, it means that there is a break in the coil winding caused by a short circuit.
A malfunction in the operation of the ignition coil most often occurs when the ignition system is turned on when the engine is turned off. As a result, the insulation of high-voltage wires overheats, cracks, and crumbles over time, thus causing a short circuit.
If a faulty ignition coil is detected, it can be repaired or replaced with a new one. Repairing the ignition coil consists of separating the mechanism into parts; checking for cracks, chips, scratches; cleaning up damage; restoring the ideal surface of the shell by gluing them with a special compound.
Replacing the ignition coil with a new coil with exactly the same characteristics is possible. Connect the ignition coil with the utmost care, take special care to ensure the correct connection of the wires. Otherwise, the contacts may overheat and short circuit.
The appearance of a spark, correct readings of the ohmmeter and ammeter, indicate the serviceability of the unit being tested, and the breakdown of another component of the ignition system. The lack of a spark in the car system can also cause the following problem: the car does not start - the starter turns, there are cases when replacing the ignition switch helps.
Low voltage circuit
Using a 12V lamp, you can check the low voltage circuit. The lamp must be connected with the first contact to the low voltage terminal, and the second to the car body. Next, you need to close the distributor contacts and start the ignition. If the circuit is OK, the lamp will light when the contacts open and go out when the contacts close.
If the lamp does not light up when the contacts are opened, this means that the problem is in the low voltage wiring or in the ignition coil, or rather, in its winding.
Sources used:
- https://swapmotor.ru/ustrojstvo-dvigatelya/net-iskry-inzhektor.html
- https://ladaautos.ru/vaz-2115/pochemu-net-iskry-na-vaz-2115-inzhektor.html
What to do if there is no spark VAZ-2109 carburetor reasons
The reasons why the spark disappears on a VAZ-2109 carburetor type car may be the following:
- faulty Hall sensor;
- the switch burned out;
- break in the ignition coil;
- high-voltage wires are worn out;
- the candles became unusable;
- The timing belt is worn.
From the very beginning, if the disappearance of the spark is detected, you should review all contacts and the condition of the electrical wiring. If you find oxidation on the connector, it must be cleaned with sandpaper and rechecked for the presence of a spark. High-voltage wires should be checked for integrity using a special device - a tester.
A breakdown in the ignition switch can be diagnosed using a standard automotive lamp. One of its contacts must be connected to the body body or carburetor engine 2109, and the second contact must be connected to wire “B+” from the ignition coil. If the light is on, this indicates that the ignition switch is working properly. In this case, you need to go to the ignition coil.
The serviceability of the Hall sensor can be checked using a voltmeter or, again, a light bulb. At the moment the distributor rotates, the filament in the light bulb should change the intensity of the glow.
The simplest way to check for proper ignition of carburetor VAZ-2109
If there is no spark in the car, you can find the reasons in another way. This technique does not require the use of a special device or tool. In this method, the entire ignition chain is tested, without taking into account the Hall sensor. To carry out this work, we need a small wire with insulated ends and a nail or paper clip.
First of all, we disconnect the high-voltage cable from the distributor. During checking, it must be positioned approximately 10 millimeters from the minus of the car. Next, turn on the ignition. Disconnect the connector from the Hall sensor and connect its end to the middle contact, to which the green wire is connected. We short the other end of our wire several times to ground. At the moment of short circuit, sparks should run between the ground and the end of the wire. If there is a spark in a carburetor VAZ-2109, we can conclude that the Hall sensor is faulty or there is no contact. Often, inside the distributor itself, the plate frays the wires or the connector simply becomes loose. In addition, there are cases when, when checking, we see the presence of a spark, but when connecting the wire to the spark plug caps, there is no spark. This indicates the need to replace the slider inside the distributor. Some carburetor-type VAZ-2109 are equipped with an ignition interlock circuit, which may also become unusable (or there is a malfunction in the switch).
Before performing the test, you need to prepare the following set of tools:
- figured and flat screwdrivers;
- insulated pliers;
- control with a wire or tester;
- spare spark plug.
To protect yourself from electric shock, you should wear dielectric gloves.
Verification process:
- We turn off the ignition, after which we check the high-voltage wires for breaks, and at the same time check for good contact in the connections with the distributor and the ignition coil.
- We carefully inspect the condition of the wires between the distributor and the switch, and also check the wires from the ignition coil to the switch.
- With the ignition switch on on a carburetor VAZ-2109, you need to check the presence of power in the system. To do this, take a test lamp, connect one end to ground, and the other to the “B+” contact of the coil. The glow of the control lamp indicates the presence of power.
- Using a rubber glove, disconnect the middle high-voltage wire from the distributor. We put a spark plug into its tip and touch the engine ground with the metal part. When cranking the starter, sparks should flow from the spark plug.
- Unscrew the screws of the distributor and remove its cover. We check for cracks and damage, and also check the condition of the coal. If the cover is damaged or cracked, it must be replaced.
- We inspect the condition of the slider in the distributor. Quite often it happens when there is no spark due to a breakdown of the interference suppression relay or breakdowns in the housing of the ground slider.
- We check the crankshaft by rotating the starter. If the slider is stationary, the reason for this is a broken timing belt or the drive itself is faulty.
- We check again for the presence of a spark.
- If once again there is no spark in a VAZ-2109 carburetor type car, you should check the high-voltage ignition wiring, as well as the spark plugs themselves. To do this, you must use a known good spark plug. If there is still no spark, change the high-voltage wire.
No spark VAZ injector, 8 valves
The other day, out of the blue, the car (Kalina 1.6, 8 valves) began to shake terribly. Diagnostics showed misfires in cylinders 1 and 4. After a little checking (see how to check correctly here), I came to the conclusion that there was no spark. And only in cylinders 1-4.
Next, in order to find out the reason for the loss of spark, I will go in order.
The first thing to check is the spark plugs. The spark plug looked normal, so I didn’t have much hope that replacing it would fix the situation. And so it happened - the new spark plug still refused to produce a spark.
The second is checking high-voltage wires. They are checked with a conventional multimeter in resistance measurement mode. The resistance should be within 15 kOhm. The wires also turned out to be fine.
Third, and probably most important, is the ignition coil. She, like no one else, is responsible for the spark. Its operability is also checked with a multimeter in continuity and resistance measurement mode. First you need to check the resistance between pins 1-4 and 2-3. It should be about 4 kOhm. If the tester shows infinity, then the coil is broken and must be completely replaced. Next, check the resistance between pins 1a and 1b. There shouldn't be a break here. And the last thing is to check the central contact for breakdown to the housing. The tester should show infinity.
My reel passed the test perfectly. It seems that all the main parts are working properly, so why is there no spark? After digging a little on the Internet, I realized that I still need to check the circuit from the ECU to the coil itself.
A 3-pin chip is placed on the ignition coil, therefore you need to check these 3 wires. The central contact is +12V, which is constantly supplied when the ignition is on. The extreme contacts - 1a and 1b - provide a control signal (negative) at the moment when a spark is needed. How can all this be checked? Very simple - using a regular light bulb.
We connect the lamp to the central terminal and contact 1a and ask a partner to crank the engine a little (first remove the fuel pump fuse and relieve the pressure in the rail). When cranking the starter, the lamp should flash. The same procedure must be done with pin 1b - the lamp should also blink.
When I turned on the ignition, the lamp started to light up, just constantly on (pin 1b and central). This means that the control wire has a short to ground somewhere or that the transistor (VT1) in the ECU is broken. To find out, we need to find the ECU, disconnect the wiring harness from it, find the wires we need (1b) and test them for integrity.
Having found the contact diagram, I found out that contact 1b goes to pin 5 of the ECU, 1a goes to pin 2, 3 goes to ground of the ignition circuit. I rang them for integrity - they were all intact. I called ground and everything is fine too. Therefore, you need to check the transistor in the controller itself.
My car has a January 7.2 controller. Inside there are 2 transistors that pass control signals to pins 1a and 1b of the ignition coil. So one of these transistors was broken, i.e. was constantly in the open position.
How to check the transistor for serviceability? It has 3 pins - 2 of which are soldered. It is necessary to ring each outer terminal with the central one. In both cases, the tester should not beep. The contacts must not be closed.
Now all that’s left to do is to unsolder the broken transistor (its marking is gb10nb37lz), solder a new one in its place and rejoice at the spark that appears.