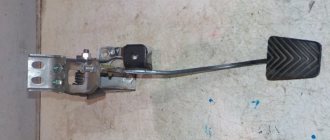
The clutch is one of the most loaded mechanisms, designed to connect the gearbox input shaft to the flywheel of the internal combustion engine crankshaft. The clutch is engaged and disengaged by means of the clutch pedal, which can be “connected” to the release bearing mechanically or hydraulically.
One of the common malfunctions on cars with manual transmission is a stiff clutch pedal, when the driver needs to apply noticeable force when pressing. In this case, there may be several reasons why the clutch is tight: fastening of the pedal itself, problems with the clutch drive, malfunctions of the clutch mechanism, etc. Next, we'll look at the signs that indicate a hard clutch pedal is a symptom of a problem, as well as the causes of a tight clutch.
Types of clutch drive
The clutch is not one part of the car, it consists of several parts. Among them: drive/driven discs, release bearing, release clutch, fork, drive, clutch basket. Due to the large number of components, the unit fails faster, but there is also a dependence on its type:
- Cable - is mechanical, the pedal and fork are connected by a cable, which is activated by pressing the foot. The fork presses on the bearing, which opens the discs.
- Hydraulic - bearing pressure is controlled by fluid. The pedal is connected to a hydraulic circuit; when pressed, pressure is created in it. It affects the hydraulics of the release bearing, which opens the discs.
The cable mechanism is simpler in design, but it also breaks more often due to its component parts. There the cable may fray or the bracket may break.
Attention! Even a slight breakdown of the cable assembly will lead to deterioration in pressing. If you do not pay attention to this, the problem will worsen and develop into a serious malfunction.
Diagnosis of clutch faults VAZ 2110 2111 2112
Cause of malfunction
Elimination method
The clutch slips (does not fully engage) When you sharply press the gas pedal, the engine gains speed, but the car hardly accelerates - this is especially noticeable when driving uphill; the smell of overheated friction linings may be felt; fuel consumption increases
Oiling of the flywheel, pressure plate, friction linings of the driven disk
Thoroughly wash oily surfaces with white spirit or gasoline and wipe them dry. Replace the heavily oiled driven disk. Eliminate the cause of oiling (oil leakage through the cuffs (oil seals) of the engine or gearbox)
Severe wear or burning of the friction linings of the driven disk
Replace the driven disk assembly
Damage or jamming of the clutch drive
Remove jam. Replace drive if necessary
The clutch moves (does not disengage completely) It is difficult to change forward gears, the reverse gear is engaged with noise. Gearbox is OK
Incorrect clutch drive adjustment (full pedal travel is too small)
Adjust the drive. Replace the deformed clutch fork
Clutch cable jamming
Lubricate the cable with engine oil. If this does not help (the cable wires are frayed, the sheath is damaged) - replace the cable
Loosening of rivets or breakage of friction linings, warping of the driven disk (end runout more than 0.5 mm)
Replace the drive
Severe and uneven wear, scoring on the working surfaces of the flywheel or pressure plate
Replace flywheel. If the surface of the pressure plate is damaged, replace the housing with the pressure plate assembly (“clutch basket”)
Jamming of the driven disk hub on the splines of the input shaft of the gearbox
Clean the splines from dirt, remove minor damage with a file. If there is significant wear or damage to the splines, replace the transmission disc and/or input shaft. Before assembly, apply CV joint grease to the splines
Distortion or warping of the pressure plate
Replace the housing with the pressure plate assembly (“clutch basket”)
Wear of the diaphragm spring blades at the point of contact with the release bearing
Replace the housing with the pressure plate assembly (“clutch basket”)
Jerks when starting off
Clutch cable jamming
Lubricate the cable with engine oil. If this does not help (the cable wires are frayed, the sheath is damaged) - replace the cable
Jamming of the driven disk hub on the splines of the input shaft of the gearbox
Clean the splines from dirt, remove minor damage with a file. If there is significant wear or damage to the splines, replace the transmission disc and/or input shaft. Before assembly, apply fresh CV joint grease to the splines
Driven disk deformation
Replace the driven disk
Loose fastening of the friction linings of the driven disk, severe wear or cracks on the linings
Replace the driven disk
Loss of elasticity of the spring plates of the driven disk
Replace the driven disk
Significant settlement or breakage of torsional vibration damper springs, wear of windows for springs
Replace the driven disk
Seizures on the working surfaces of the flywheel or pressure plate
Replace the flywheel or clutch housing with pressure plate assembly (clutch basket)
Oiling of the working surfaces of the friction linings of the driven disk
Thoroughly wash oily surfaces with white spirit or gasoline and wipe them dry. Replace the heavily oiled driven disk. Eliminate the cause of oiling (oil leakage through the cuffs (oil seals) of the engine or gearbox)
Rattling, knocking or noise when engaging the clutch
Significant settlement or breakage of torsional vibration damper springs, wear of windows for springs
Replace the driven disk
Driven disk deformation
Replace the driven disk
Loose fastening of the friction linings of the driven disk, severe wear or cracks on the linings
Replace the driven disk
Increased noise when disengaging the clutch
Worn, damaged or leaking clutch release bearing
Replace bearing
How the clutch works, what are its typical malfunctions, and how to avoid them
An important element of a manual transmission is the clutch, which serves to briefly disconnect the engine from the transmission. In addition, the clutch is a kind of damper that protects the engine from overloads. How does it work and how to extend its life?
How does the clutch work?
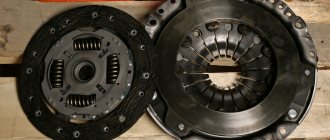
Most passenger cars with a manual transmission use a dry single-plate clutch. Its design is quite simple: it consists of two mutually adjacent disks - a drive (basket) and a driven one, a release bearing and a drive system. In the single-disc version, the transmission input shaft fits into a splined clutch in the center of the driven disk, and the surfaces of the engine flywheel, driven disk linings and basket pressure disk fit tightly together. Due to this, the transfer of power flow from the engine to the gearbox is ensured, and a working clutch calmly “digests” all the power developed by the engine.
In everyday life, the clutch drive disc, which includes a pressure plate (with a smooth shiny surface), a diaphragm spring (petals in the center) and a casing, is called a basket
When you press the clutch pedal, the release bearing acts on the plate springs of the basket, causing the surfaces of the driven and driving discs to separate. Accordingly, the input shaft is disconnected from the flywheel - that is, the engine and gearbox are physically disconnected, which allows you to change gear or engage neutral. When the clutch is engaged (the pedal is released), the release bearing stops pressing on the leaf springs, and the discs close again, and the damper springs in the central part of the driven disc dampen the torsional vibrations that occur during movement.
The four damper springs of the clutch driven disc are clearly visible, as well as the worn friction linings
When the clutch operates normally, it does not attract attention to itself. But if it malfunctions, the driver, for example, will not be able to shift gears or move away. What problems are possible?
What malfunctions can occur during clutch operation?
So, what problems in clutch operation can you encounter in practice? Firstly, this is an incomplete release of the clutch - as experienced drivers say, it “leads”. When you press the pedal, the surfaces of the flywheel and the driven and driving disks do not open completely in this case, and attempts to change gear are accompanied by the crunching and grinding of the synchronizer carriages, because complete separation of the gearbox and the motor does not occur.
The opposite problem is clutch slipping: that is, its incomplete engagement. In this case, the surfaces of the flywheel, driven disk and drive disk, on the contrary, do not fit tightly against each other and slip, which can cause a characteristic smell of burnt friction linings of the driven disk, and an attempt to suddenly pick up speed only leads to an increase in crankshaft speed. In this case, only a small part of the power is transferred from the engine to the wheels - until the wear of the surfaces becomes critical.
If the clutch “slips”, instead of the car, only the tachometer needle “accelerates”
Finally, malfunctions such as the occurrence of vibrations and extraneous sounds when the clutch is turned on and off are also possible.
What causes clutch malfunctions?
Usually, every clutch problem that arises has its own background. For example, the clutch may begin to slip due to severe wear on long vehicle runs, when the friction linings of the driven disk are worn out, and the working surfaces of the basket and flywheel are worn out.
Secondly, the clutch can simply be “burnt” - for example, due to inexperience or after prolonged overload. This, for example, happens to fans of long, “rocking” rides on the roads or in deep snow, as well as to fans of sudden starts with the gas pedal to the floor.
What to do?
So, your pedal has fallen or is slipping, what to do in such cases? You have no other choice but to solve the problem. You have two options: turn to professionals for help and spend money on a service station, or take the initiative into your own hands and fix the problem yourself. Next, we will tell you how to do it yourself.
Cleaning system elements from oiling
First of all, you need to disconnect the battery, since to clean the flywheel and other elements of the system, you will need to dismantle the gearbox. And since when dismantling the box you will need to disconnect the electrical connectors, the battery should be disconnected. Remove the gearbox. If you do not have enough experience and knowledge for this, then it is better to seek help from a service station. Next, you need to unscrew the screws that secure the flywheel. Try to keep it from turning when you remove the screws. Remove the flywheel and clean it with white spirit or acetone. You can also use gasoline for these purposes. Do similar actions with the pressure and driven disk if these components are oily. Before direct installation, cleaned elements must be wiped dry.
Please note: if the driven shaft is too oily, it would be more advisable to replace it, since in practice cleaning the element rarely helps. It is also necessary to eliminate the cause of the oiling. In VAZ 2110 cars, oil leaks can occur through the gearbox or engine seals. Reassemble everything in reverse order.
Clutch replacement
One of the reasons why the pedal fails may be the inoperability of the clutch.
- After removing the gearbox using a wrench, you will need to unscrew the six bolts that secure the clutch housing to the flywheel. If you have difficulty unscrewing the screws, tap the heads with a hammer. The screws must be unscrewed evenly, not one by one.
- Having done this, you can dismantle the driven and drive shafts. If you see mechanical damage on these elements, then, most likely, the clutch is slipping precisely because of this. You need to change disks.
- Install a new mechanism. In this case, the driven shaft must be installed with the protruding side facing the drive pulley. Mount the centering mandrel.
- Insert the frame into the crankshaft hole. In this position you need to secure the drive pulley of the device. Again, this should be done evenly, tightening the screws one turn at a time rather than one at a time.
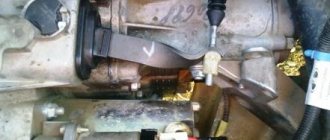
Drive replacement and adjustment
- If the pedal in your VAZ 2110 has failed or is slipping, then one of the most common reasons for this may be a failed cable. To replace the cable, you need to remove it from its installation location, namely the bracket, which is installed directly on the gearbox.
- Unscrew the nuts that secure the cable to the bracket. To do this, you will need wrenches 2 and 19. Loosen the bolts and remove one part of the cable from the installation location. After this, it must be disengaged from the fork, which engages the clutch.
- Now the cable must be disconnected from the pedal. Open the hood and locate the cable housing, which is located next to the vacuum brake booster. The casing must be removed, but before doing this, unscrew the fastening bolt with a Phillips screwdriver. Next, pry up with a screwdriver and remove the locking bracket. After this, the cable can be removed.
- Perform a visual inspection of the bushing onto which the cable is attached. If excessive wear occurs, this component must be replaced. Do not forget to lubricate the new cable lead, as well as the place where it connects to the pedal, with grease. For this you can use the traditional “Litol-24”.
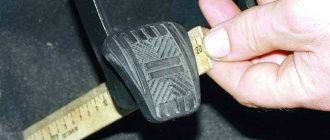
- Now you need to adjust the cable. To do this, take a ruler and, placing it against the pedal, place it perpendicular to the floor. Measure the distance from the floor to the pedal using a ruler. If it is more than 16 cm, then the cable needs to be adjusted.
- Under the hood, loosen the control nut at the end of the cable. The adjusting nut is also located here. You need to rotate it until the full pedal travel does not exceed 13 centimeters. 12-13 cm is the optimal full travel for the VAZ 2110 clutch pedal.
- Sit in the driver's seat and press the accelerator as far as it will go several times, then measure again. If necessary, adjust it again. Tighten the control nut and slide the rubber stop sleeve all the way.
Basic mistakes when repairing clutches
The most effective repairs are possible in a service station, where technicians will perform diagnostics, repair broken components and configure the system to factory settings. Self-repair, like tuning, is undesirable, because it leads to a number of mistakes:
- Pouring brake fluid or WD-40 into the cable jacket will not soften the movement, but will serve as destructive factors for the protective sheath.
- Replacing the entire basket except the fork - the new basket will create too much resistance, causing the tired fork to break. The tight lever will simply stop working.
- Using cheap analogue parts - wanting to reduce the cost of clutch repairs, drivers often choose Chinese alternatives.
Interesting! In fact, counterfeits either do not have an effect or break down quickly enough, which requires new injections of money.
If the clutch pedal on a car becomes difficult to press, this means problems with the corresponding system. It is necessary to check the clutch basket, cables and forks, or cuffs, if we are talking about the hydraulic version, and replace all problematic components.
To do this, it is best to contact professional technicians; they will carry out diagnostics and repairs. If you try to fix it yourself, you may not take into account the nuances and provoke even bigger breakdowns that require significant expenses.
Let's sum it up
Taking into account the above information, it becomes clear that there are many reasons why the clutch pedal is tight or the clutch is hard. In the process of troubleshooting, you should step by step check the pedal mechanism itself, and then move on to the clutch elements, cables, rods, etc.
Finally, we note that often before the clutch pedal becomes tight, characteristic signs indicate problems that have appeared (traction disappears, jerks, vibrations, noises, etc. appear). For this reason, when the first signs of clutch malfunctions appear, a complete diagnosis of all its elements is necessary.
Ignoring this rule often leads to the fact that a tight or hard clutch pedal can come as a surprise to the driver while on the road. The clutch pedal also fails, the clutch may not “grab”, etc. To avoid such unforeseen breakdowns, the quality of the clutch must be checked at every scheduled maintenance.
Troubleshooting the clutch drive
As a rule, when one of the signs of a clutch drive malfunction appears, it is necessary to accurately determine the malfunction. If the problem is in the clutch mechanism, it is better to change the entire clutch kit, and not limit yourself to just the part that has failed.
Methods for eliminating some clutch faults:
- a malfunction of the clutch release clutch bearing is eliminated by lubricating or replacing the bearing;
- problems with the hydraulic drive require replacing the fluid and bleeding the clutch;
- wear or contamination of the driven disc linings, wear or weakening of the pressure springs is eliminated by adjusting the pedal free play, as well as by replacing the driven disc pads or deformed springs.
If problems with operation and a tight clutch pedal remain after repair, we can identify a number of other reasons why the clutch is tight. Among them are:
- clutch cable wear;
- dirt, corrosion in the cable jacket;
- lack of lubrication on the clutch fork shaft.
Let us also add that it is important to replace the clutch release fork as a complete set with the clutch assembly when it becomes deformed or worn out. If this is not done, the plug may burst or bend during operation.
Let's summarize
If the check shows that the free play is normal, but you doubt your competence in adjusting the unit, contact a service station. Incorrect settings can cause rapid clutch failure. If you want to complete the work yourself, you can find the necessary information on the vehicle manufacturer’s website or in its service book
It is important to complete the work in a timely manner so as not to get into an unpleasant situation on the road. Monitor the service life of clutch parts, for example, the service life of the driven disc is 100 thousand kilometers
But, if a motorist has an aggressive driving style, it can decrease by 2-3 times.
How to fix the problem
Knowing that the system is faulty, you need to take measures to repair it. First you need to determine the breakdown, because it is likely that only one part has broken.
Additionally!
It is better to change the “clutch” completely; although this will cost more, the entire system will work effectively.
Without wanting to spend money, you can solve minor problems yourself:
- lubricating or replacing the release clutch bearing;
- replacing fluid in the hydraulic drive with subsequent pumping;
- changing the driven disc pads or springs if the elements are worn out, weakened or deformed;
- replacing the basket and all parts with a new assembly recommended by the vehicle manufacturer.
Even if these steps are taken, the tightness may still remain. Then you need to try to replace the cable, clean its jacket from dirt and corrosion, and also lubricate it with machine oil. Hydraulic systems can also have cylinder failures, which is also quite serious.
Broken clutch cable
In any case, the most accurate diagnostics can be carried out in services where the nodes are disassembled and their suitability for use is determined. There, the car will be put in order and the stiffness of the lever, which interferes with comfortable driving, will be corrected.
Methods for solving the problem
If the clutch pedal fails while driving a car, then there are not many ways to solve the problem. We recommend that you familiarize yourself with all the methods so that in the event of a corresponding breakdown you know how to behave.
Replacing the cable
To replace the cable, you will need the cable itself, as well as wrenches and pliers. It is advisable to use a spanner or open-end wrench, this will be much more convenient.
But if you don’t have a box and open-end wrench on hand, you can also use a regular wrench:
- Open the hood of your car. In the engine compartment you need to find the very place where the cable is attached to the tip. Since a break occurred, most likely the tip remained in the installation location, and the cable itself was dangling. You need to remove the tip using a wrench.
- Then get inside the car and disconnect the cable directly from the clutch pedal. Remove the cable.
- Take the new cable and install it in place of the old one, the entire assembly occurs in the reverse order.
- You need to measure the free code of the pedal, and then adjust the installed element. The free play should be no more than 3 cm, and the total should be no more than 14.7 cm. The accelerator travel is adjusted using the nuts on the end of the cable in the engine compartment.
1. Unscrew the fastening nuts
2. Remove the locking bracket
3. Adjust the new cable
If the spring breaks
If the return spring bursts, the procedure will be different. To replace, you will need the spring itself; if you do not carry it with you, you will have to go to the nearest spare parts store.
How to change a spring:
Open the hood and use a wrench (it’s more convenient to use a spanner) to unscrew the cable nut
You need to extract it. Carefully, so that the remains of the old return spring do not fall apart, remove them. Please follow all safety rules. Take the new part and install it in place of the old one
This also needs to be done carefully, since in this case it is very easy to damage your hand or fingers. Then reinstall the cable. Tighten the nut. After this, adjust the free and overall travel of the pedal. Start the engine and try to drive it.
1. Unscrew the fastening nut.
2. Remove the spring and replace it with a new one
How to get to the service station on your own?
Of course, it will be better for the driver if this breakdown occurs near his home, then you can consider yourself lucky. But if this happened on the road, and the nearest service station is not so close that you could push the car to it, then this is already a problem. But there is a way out of every situation, so if the clutch pedal fails, you can still get to the nearest service station, and now we’ll tell you how.
To drive in first gear - if you need to restore the pedal's functionality, you can do the following:
- The gearshift lever must be moved from neutral to first gear. In this case, the gas must be released.
- Start turning the key in the ignition. When the engine tries to start, apply gas, but do it so that the car does not stall.
- When the car starts to move, do not try to change to the next gear. This is fraught with breakdown of the gearbox, and its repair, believe me, will cost more than calling a tow truck.
In general, the same method allows you to start moving at second speed.
But before you do this, check out some important points:
- When the pedal fails, do your best to stop the car on a downhill slope or on a straight road without the car rolling backwards.
- Warm up the engine before driving.
- Before you start moving, carefully consider your entire route, because you need to take into account all the nuances. This includes the number of intersections, traffic lights, where you should turn from and where, and so on. It will be more convenient to drive only on the main road, so that you don’t have to stop to let other cars pass.
- Turn on the warning lights (hazard warning lights).
- Avoid unnecessary maneuvers and remember that no one knows about this problem except you. It’s better to stop once again and repeat the procedure than to create more serious problems for yourself.
- If you are not sure that you can cope with such a task on your own, then maybe it makes sense to call a tow truck or tow the car to a service station?
We recommend: Features of adjusting and setting the ignition of the VAZ-2106
Mechanics
Mechanically, the clutch operation process is extremely simple. Let's analyze it from the moment the movement begins. After starting the engine, the car is in neutral gear (starting the engine in gear is bad manners). The clutch is depressed all the way - this means that it is turned off, the driven and pressure plates have separated, that is, a moment is created to change gear. The gearshift lever is moved to position 1, and first gear is engaged.
The pedal is smoothly released (the clutch is engaged), at this moment the most important thing happens: the distance between the pressure plate and the driven one is constantly decreasing, and the force transmitted by the engine has already set one disk in motion, which makes the moment of “collision” of the two disks become difficult. If the pedal is released abruptly, they will quickly touch, which means that the disc will pause (imagine walking and tripping over a stone - much the same thing happens with an engine).
The engine may stall, or in the best case, the car will simply “bite.” At such moments, the “petals” on the driven disk suffer greatly - the more “flattened” they become, the closer the time for replacing the “hitch” is. If the discs come into contact smoothly and the driven disc is slowly set in motion, the car starts from a standstill.
Adjustment instructions
Adjusting the clutch cable of the Lada Granta
The Lada Priora is equipped with a clutch cable with a ratcheting mechanism. The cable is backlash-free and does not require adjustment, but manufacturers recommend this be done during every maintenance.
Clutch cable
To adjust the cable on the Lada Priora, you need to prepare a screwdriver and a ruler. The procedure then consists of the following steps:
- To perform work, you must open the hood.
Engine compartment of Lada Priora First, you should disconnect the mass air flow sensor and remove the air filter.
Engine compartment without air filter
- After this, a cable will be visible, at the end of which there is a plastic clip.
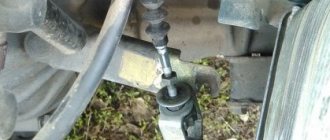
- Before adjustment, it is necessary to set the cable to its original position: overcoming the resistance of the spring, push the cable clamp forward until it stops in the direction of movement of the car.
- This clamp should be pulled towards you and the distance between it and the plug should be measured, it should be 27 mm.
We measure the distance using a ruler - The distance is adjusted by turning the tip counterclockwise. In this way, an increase in distance can be achieved.
- Twist the clamp until the distance is 27 mm. Accuracy is very important here.
- Now you can release the cable and place it in the fork.
- After completing the steps, you need to get behind the wheel and press the pedal three times until it stops.
- Then again you need to measure the distance, it must be exactly 27 mm, otherwise we adjust until the desired distance is achieved.
- Next, you should insert the tip into the groove of the mechanism fork and release it. Thanks to the spring, the tip driver clamp is installed without any gap.
- After adjusting the cable, you need to return everything to its place, start the engine and check the operation of the mechanism.
After adjustment, the clicks disappear and the clutch release pedal operates softer.
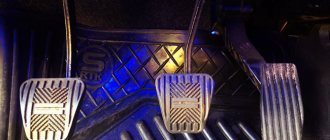
Clutch pedals
When the clutch pedal travel is large, the clutch is not completely disengaged, so it still comes into contact with the flywheel of the power unit. When the stroke is low, the driven disk does not turn on completely, which leads to slipping and loss of torque.
You should measure your pedal stroke if the following symptoms occur:
jerks appear when starting to move; noise and shock when shifting gears; the pedal gets stuck.
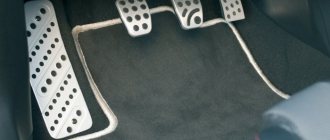
The symptoms described indicate that the mechanism requires adjustment. You can diagnose its operation on Priora yourself. To do this, start the engine, slowly release the PS and start moving. If, when the PS is released, the car immediately begins to move, this means that there is no free play. If the car does not budge even with the pedal fully released, then its travel exceeds the norm. The brake pedal should be at the same level as the brake pedal. In this case, its full stroke will be in the range of 125-135 mm. Fluctuations up to 160 mm are possible.
We measure the free play of the pedal
When making adjustments, loosen the first cable adjusting locknut located in the engine compartment on the bracket.
Locknuts for adjusting free play
By tightening the second locknut, the distance and stroke of the PS are adjusted. Thus, the desired result is achieved. After completing the procedure, the first locknut is tightened.
If you adjust so that the brake pedal is located above the brake pedal, then the clutch will barely leave the floor. If it is lower, it will set almost at the very end. If the PS is located too high, the basket wears out faster. The ideal option is that the brake and clutch pedals should be at the same level.
In order to extend the life of any mechanism, you should use it carefully. You should not constantly keep your foot on the PS; it is better to place it on the left on the floor. During each technical inspection of the Lada Priora, it is recommended to monitor the free movement of the PS and the clarity of gear shifting and, if necessary, make adjustments.
When adjustment is required
Adjusting the VAZ 2114 clutch may be required in the following situations:
- The clutch has been completely replaced.
- The clutch was repaired and its individual elements were replaced.
- The clutch travel is too large or, conversely, insufficient.
Troubleshooting the clutch If everything is clear with the first two reasons, then in the latter case you should perform simple measurements. To do this, you need to measure the distance between the minimum and maximum positions of the pedal (that is, in situations when the pedal is pressed to the floor and when the pedal is freely released). The optimal value of this distance is in the range from 12 to 13.5 cm. If in fact it turns out to be larger or smaller than the specified dimensions, it is recommended to make an adjustment.
If the clutch travel exceeds 16 cm, then you should immediately stop all driving and make adjustments as soon as possible.
In addition, in some cases, too much stroke may indicate severe wear of the friction linings located on the driven disk, as well as the need to replace them.
Replacing the clutch of a VAZ 2114
Operating principle
VAZ vehicles use a single-plate dry closed clutch with a diaphragm-type pressure spring, for which the operating position is engaged.
New clutch VAZ 2114
The clutch includes the following components:
- body-protection;
- bearing switch;
- main shaft roller bearing;
- pressure disk;
- compression spring;
- flywheel;
- secondary friction disc;
- scale;
- crankcase;
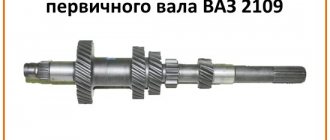
- transmission main shaft;
- plug switch;
- second bushing-switch;
- toggle switch;
- fixation bolt to the flywheel.
The operating principle of this mechanism is as follows. After pressing the clutch pedal of the VAZ 2114, the drive moves the fork, which acts on the clutch bearing. The bearing, in turn, presses on the diaphragm spring of the pressure disk. As a result of the impact, the spring petals bend towards the flywheel, and its outer edge moves away from the pressure plate, thus releasing it. The transmission of torque from the running engine to the transmission stops.
Clutch drive VAZ 2114
After releasing the pedal, the pressure disk again comes into contact with the driven disk, and through it, with the flywheel. In this case, the transmission of force is resumed (as you can already guess, the moment of rotation itself is transmitted due to the friction force).
Manufacturers and prices of analogues
- Kraft (article W05200G) – price from 3,300 rubles;
- Pilenga with a metal-ceramic disc (article CK-P4005XR) – price from 10,000 rubles (an excellent, but expensive sports kit with a reinforced mechanism with a reinforced release disc);
- Pilenga (article CK-P 4005) – price from 2,800 rubles;
- Sachs (article 3000 951 033) – price from 3,800 rubles;
- Valeo (828 222) – price from 2,300 rubles.
The Valeo kit for Priora is considered very similar to what Luk produces - it is also “soft” in feel.
Bleeding the clutch
When bleeding the clutch system, it is necessary to control the pedal. When inflated and the outlet fitting is open, it is necessary that it drops to the floor when pressing on it. It is better to perform these manipulations with a partner. When it collapses under the pressure of the assistant’s foot, a characteristic noise of gurgling air bubbles is created. This procedure must be repeated several times.
With a fully functional clutch system, the pedal returns every time it is released, but if it fails again, it means that something is wrong and it is necessary to re-diagnosis and repair.
Everything you wanted to know about the Ford Fusion but didn't know where to ask
- Unanswered topics
- Active topics
- Search
- our team
- FAQ
- Rules
- Fusion FAQ
- Articles
- Photo Gallery
- Search
- About
- User Guide
- CD6000 Guide
- Self Diagnostic
- DTC View
- Documents & Files
Causes of a tight clutch pedal on a Lada Granta car and ways to eliminate the problem
Problems with a hard lever arise both on new cars and on models with an impressive mileage. Depending on the age, the nature of the problem can vary - from a banal drive wedge to serious problems with the unit connecting the engine and gearbox.
What's the matter
Often a tight clutch pedal on a Lada Granta occurs for the following reasons:
- Mediocre performance of the diaphragm spring.
- Fork jamming.
- Release bearing jamming.
- Scratches on the surface of the cable in the working braid.
- The cable is distorted in the mounting bracket to the interior pedal assembly.
- Wedging of the driven disk.
On vehicles with a long service life, cracks may appear in the bearing drive fork and on the release support guide. The accumulation of dirt in the assembly also cannot be ruled out. Damage to the cable clamp bracket should also not be discounted.
For your information. All of these problems can result from the manufacturer allowing defective parts to be installed.
How to troubleshoot
There is no point in immediately positioning the unit connecting the box and the engine as faulty. The cost of a new set of spare parts in the form of a basket, driven disk and release bearing is high, and there will be no 100% certainty that there is a problem with this module until a thorough diagnosis of the drive has been carried out.
What to pay attention to
There are certain signs that the clutch on the Lada Grant has failed and action needs to be taken
It is worth paying attention that if the car has just been purchased, the pedal will be pressed quite easily. If this requires great effort, then this is the first indication that the clutch needs to be adjusted or replaced.
It is also worth paying attention to the appearance of extraneous squeaks at the moment when the driver presses the pedal. In addition, it should not twitch when the car owner does not touch it.
Most often, car enthusiasts are faced with the fact that the pedal travel becomes too tight. It is worth considering in more detail the reasons for this problem.
Verdict
Substandard behavior of the Granta pedal assembly is a malfunction that should be eliminated as soon as possible. The issue may be either in the drive, which here is a cable drive, or directly in the unit connecting the engine and the gearbox.
Most often, the problem lies in an unraveled cable or its limited mobility in the jacket. This problem can be eliminated by replacing the cable and/or lubricating it with oil, silicone or WD-40. The fork shaft often needs lubrication.
Less commonly, the problem is caused by a deformed or cracked fork. Wear on the leaf spring can radically change the amount of force required to release the pedal. A new clutch can also cause it to feel stiff.
This is the automatic clutch adjustment mechanism in action.
- Features of adjusting the clutch release drive of VAZ 2105, 2107 cars
thank you for what you said, I have the same shit
This is the automatic clutch adjustment mechanism in action.
How to correct it so that this noise does not occur?
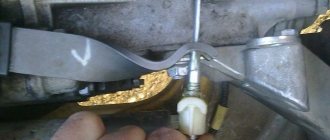
distance between the clutch release fork and the lever. The distance L should be 27 millimeters;
Symptoms of a problem
The main symptoms of a malfunction are:
- Hum, whistle and other unnecessary sounds when pressing or releasing the pedal;
- “Push” even if the working moment was caught on time.
If there is a suspicion that the clutch is faulty, then diagnostics can be done using traditional methods, without disassembling the engine compartment internals.
Slip check
We fix the car with the handbrake, engage third or fourth gear, slowly (slower than usual!) depress the leftmost pedal and press the gas at operating torque. If everything is fine with the handbrake, then the test will be true. The car has stalled, which means it’s time to change the pressure plate.
Tags
The clutch pedal is the clutch.clutch drive clutch malfunction the clutch pedal has becomeclutch repairclutch drive clutch basket.in the release bearing.with the release bearingstiff clutch pedalstiff pedal mechanismwhy is the clutch pedal liquid. The pedal is connected and the pedal becomes when the pedal is pressed, the pedal travel appears. Why is the clutch pedal? The clutch pedal is tight. The mechanism pedal is tight. Why is the clutch pedal fluid? The pedal is connected and the pedal becomes when the pedal is pressed, the pedal travel appears. Why is the clutch pedal hard?
articles read your situation