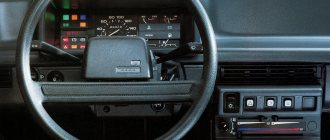
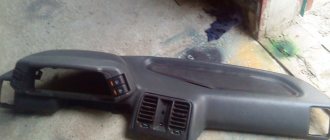
Before removing the “high” instrument panel from a VAZ 2108, VAZ 2109, VAZ 21099 car, disconnect the wire from the “-” terminal of the battery. Set the car's wheels to the straight-ahead position. Disconnect the rod from the carburetor choke lever and the speedometer cable from the gearbox. 1. Remove the steering wheel (see section 7 “Steering”, subsection “Steering column”) and steering column switches (see “Checking and replacing steering column switches” in section 9 “Electrical equipment”).
2. Pull the carburetor choke handle towards you until a draft appears, and remove the handle from it.
3. Remove the two screws securing the instrument panel console trim.
4. Remove the trim from the instrument panel console.
5. Remove the cigarette lighter socket from the socket.
6. Remove the ashtray from its slot by pressing the cigarette extinguishing plate.
7. Remove the interior heater fan switch handle.
8. Remove the three interior heater control knobs by prying the knobs with a screwdriver.
9. Disconnect the connector with wires from the interior heater fan switch under the heater control panel.
10. Disconnect the two wires from the contacts of the interior heater control panel backlight lamp.
11. Remove the headlight hydraulic adjustment handle by pulling the handle towards you.
12. Remove the instrument cluster light switch handle.
13. Unscrew the nut securing the instrument cluster lighting switch.
14. Unscrew the nut securing the headlight hydraulic corrector.
15. Push the instrument cluster lighting switch and headlight hydraulic corrector inside the panel.
16. Remove the side nozzles on both sides of the instrument panel using a screwdriver.
17. Remove one screw securing the trim on both sides of the instrument panel.
18. Use a screwdriver to pry the exterior lighting switch out of the instrument panel.
19. Disconnect the connector with wires from the exterior lighting switch. Push the connector into the instrument panel.
20. Using a screwdriver, pry up and remove the radio socket. If radio equipment is installed on a VAZ 2108, VAZ 2109, VAZ 21099 car, first remove it.
NOTE Remove radio equipment in accordance with the manufacturer's instructions.
21. Unscrew the screw securing the instrument panel trim.
22. Insert two screwdrivers to pry open the plastic tabs.
23. Lift up the instrument panel trim.
24. Disconnect the connector with wires from the cigarette lighter connector.
25. Disconnect the connector with wires from the cigarette lighter illumination connector.
26. Disconnect the connector with wires from the hazard warning switch illumination lamp.
27. Disconnect the connector with wires from the hazard warning switch and finally remove the instrument panel trim.
28. Gently press down and remove the speaker trim on the left side of the instrument panel. Be careful - the latches break off easily.
29. Disconnect the connector with wires from the heated glass switch of the trunk lid door.
30. Remove the connector from the rear fog lamp switch.
31. Remove the two screws securing the instrument cluster.
32. Remove the instrument cluster from the panel, unscrew the fastening nut and disconnect the cable from the speedometer.
33. Disconnect the red connector with wires from the instrument cluster.
34. Disconnect the connector with wires from the on-board control system.
35. Disconnect the white connector with wires from the instrument cluster.
36. Disconnect the ignition switch connector with wires from the ignition relay.
37. Disconnect the ground wire of the ignition relay.
38. Disconnect the connector with the wires of the air damper opening warning lamp.
39. Unscrew one screw of the lower fastening of the instrument panel on both sides.
40. Disconnect the connector with the glove box illumination lamp wires.
41. Unscrew the two fastening screws and lower the interior heater control panel down.
42. Remove the two screws securing the air damper guide rod to the instrument panel.
43. Unscrew two screws of the upper fastening of the instrument panel on both sides.
44. Use a screwdriver to pry and remove one plug from both sides of the instrument panel. Remove one instrument panel side mounting screw on both sides of the panel.
45. Unscrew the screw of the central fastening of the instrument panel.
46. Remove the instrument panel. 47. Install the instrument panel on a VAZ 2108, VAZ 2109, VAZ 21099 car in the reverse order. After installing the instrument panel, check the operation of the switches and instruments to ensure they are connected correctly.
Step-by-step tuning steps
Before dismantling the VAZ 21099 panel, you will need to remove the terminals from the power supply by hand. Then the decorative steering wheel trim is removed. The nut should be unscrewed so that its end is flush with the similar element of the steering column shaft. You can’t turn it away right away. Then tuning the VAZ 21099 panel involves removing the steering wheel.
After unscrewing the 6 screws that secure the lower casing, you will need to remove it. The ignition switch trim is removed. The next step involves loosening the bolt that secures the base of the switches. The last element is removed from the shaft, and 2 blocks with the corresponding wires are disconnected.
In this case, you will need to label the washer and wiper switches. The block with wires is disconnected from the corresponding levers and direction indicators. The choke should be pulled out so that a draft occurs. At the same time, the handle of the first unit is pulled towards itself. Then the bolts securing the console trim are removed from the panel and the trim itself is removed.
The cigarette lighter cartridge and ashtray are pulled out of the socket. The VAZ torpedo is equipped with a heater fan that will need to be removed. To do this, it is recommended to use a screwdriver. The block and two wires are disconnected from the fan switch. They illuminate the europanel.
Tuning instrument panel
You also need to disconnect the handles for the hydraulic headlight adjustment and the light switch. After unscrewing the nuts, the corresponding switch is pushed inside the panel. The side nozzles are removed with a screwdriver. The high panel provides for turning away the bolts for fixing the linings. The last elements are located on both sides of the torpedo.
Subsequent tuning is carried out taking into account the removal of the radio socket. Existing audio equipment is pre-dismantled. Then, using a screwdriver, the latches are removed and the cover is raised. The block and wires are disconnected from the cigarette lighter. A similar step is carried out in relation to the backlight and alarm switch.
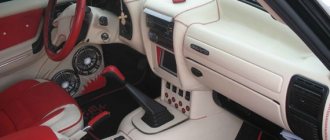
What is an instrument panel
So, the instrument panel (or in other words, the torpedo) is a part of the car located in the front part of it next to the steering wheel. It serves to hold the devices that the driver needs to control the driving process. Among the elements located on the dashboard it is worth highlighting:
- cigarette lighter;
- radio;
- upper part of the heating system;
- ventilation outlets;
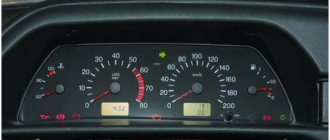
- speedometer;
- tachometer.
In addition, there are many different levers and buttons on the dashboard that allow the driver to control the devices installed here. During dismantling of the torpedo, all these elements will have to be disconnected from the power supply and removed. This procedure will allow the driver to understand how to secure the torpedo after the work is completed.
The final stage of work
The high panel of the VAZ is dismantled carefully, since there are latches on the left that quickly break. After disconnecting the block from other elements, the entire instrument cluster is dismantled. The final step involves disconnecting the cable from the speedometer. If the Europanel is equipped with additional equipment, then you need to be even more careful. Tuning a torpedo involves disconnecting the block from the following units:
- on-board control system;
- ignition relay;
- remaining panel instruments;
- backlight lamps.
You will need to unscrew the screws for the lower fixation of the torpedo on both sides. Using a screwdriver, pull out the plug and unscrew the screws for the side fixation of the torpedo. The europanel is removed at the final stage. Installation of a new structure of this type is carried out in the reverse order. Upon completion of this procedure, the operation of the switches is checked.
Often, tuning a VAZ torpedo involves dismantling the plastic and removing the panel board. In this case, you will need the following tools and materials:
- soldering iron;
- europanel or insert;
- ultraviolet light bulb;
- wires;
- light bulbs;
- cartridges;
- glue;
- marker.
Initially, you will need to remove the old europanel, remove the glass and the existing edging. The insert and arrows are carefully pulled out. Particular attention should be paid to the new insert. It is recommended to make holes with some margin. This will prevent the arrows from sticking.
Further tuning is based on dismantling the standard backlight. This may break the plastic. Initially, the board is dismantled. Experts advise first drawing on paper the existing connection diagram and connections.
The standard lighting is replaced with neon lamps. Neon is glued to the panel. A plastic protection is fixed on top. In this case, you need to check whether this structure is securely held. The block with which the neon lighting is controlled should be glued to the europanel. To do this, you can use glue or double-sided tape.
Such tuning is easy to do with your own hands. An important point is the installation of the panel and the correct connection of its devices to the network. For this, auto mechanics recommend using books on repair and operation of the VAZ 21099.
Not every vehicle owner has the right to be called a car enthusiast, but only those who care about their beloved car. Beautiful tuning of the VAZ 2109 interior is one of the ways of careful care and care, because in this way your car is given individual features and its own unique design. It is no secret that the interior of the VAZ 2109, which was tuned by hand, will look original and according to the tastes of the owner.
Reasons that can lead to disassembly of a torpedo, high panel
The reasons why the owner of a VAZ 21099 car needs to remove the dashboard can be very different. Among the main motives for carrying out this procedure are the following:
- the need to replace failed panel elements;
- carrying out repair work in the heating system of the internal part of the machine;
- repair of body parts;
- car painting;
- replacing the panel itself with a more modern version.
It is worth noting that the procedure itself is not particularly complicated and therefore even not the most experienced car enthusiast can cope with it. Moreover, today, thanks to the Internet, all its users have the opportunity to receive a hint that will allow them to carry out work with a high degree of efficiency.
Algorithm for tuning the VAZ 2109 interior
You can, of course, entrust the tuning of a car's interior to professionals, but still, work done with your own hands looks truly magnificent and your soul is always happy.
What you need to buy
If the modification work will be carried out on your own, then you must purchase the following materials:
- Vibroplast M2;
- New instrument scales (color selected depending on the owner’s preferences);
- Automotive LEDs designed for all devices;
- Self-adhesive film;
- Fluorescent paint;
- Cartridges and sockets;
- New wires;
- New, preferably from a famous and expensive manufacturer;
- Regular foil;
- Necessary tools and so on.
Experts' opinion
Alexander. It is recommended to abandon GPS navigators with external installation: there is no need to mount them on glass, as the view from the driver’s seat is significantly reduced. If the navigator is really needed, then you can create a special niche for it in the dashboard. The VAZ torpedo is quite simple and has a large amount of free space to accommodate various control units and multimedia systems.
Alexei. I installed a new torpedo from another car - a difficult job that required patience, precision and a lot of free time. I’ll say right away that you need to be well versed in the placement of important elements of your car: wiring, air ducts, and so on. Dismantling must be carried out carefully, since the original torpedo may still be needed.
Instrument panel and its tuning
As a rule, any interior tuning begins with the instrument panel, which needs to be given a delightful and stylish appearance. Of course, we should not forget about the practicality of this part of the car.
Backlight
Probably every VAZ 2109 owner dreamed of having the same lighting on his car as on imported models.
Note. The appearance of the car interior largely depends on the lighting.
Let's get started:
- We remove the standard one and disassemble it.
- We remove the instrument needles, as well as the old trim.
Note. In order for the backlight to shine better on the overlay, it is recommended to make cutouts yourself from the inside. They are easy to make using a heated knife or soldering iron.
- Take the LED strip.
- We cut it into pieces of three diodes.
- Using regular foil, the glow is uniform.
- We take three pieces of LED strip for the tachometer and speedometer, and one piece is enough for the temperature and fuel level indicators.
Note. The car's factory lighting will be retained, because it will be assigned the function of illuminating the arrows on the instrument dial. If it doesn’t look very good, you can upgrade it by gluing LEDs in place of the standard light bulbs. It also doesn’t hurt to tint them slightly so that they aren’t too bright.
- All necessary contacts are connected to the contacts on the plate of the factory backlight lamps.
- Before connecting the contacts, we determine their polarity.
- To stabilize the current and power the LEDs, it is best to use a driver.
- We supply a current of 12 volts and check how everything works.
- If everything is good, we calibrate the hands.
Refinement of the panel
The instrument panel can be made much brighter and more original if it is modified and modified. Started:
- We purchase beautiful numbers, ordinary light bulbs with sockets, paint, an ultraviolet lamp and a scale panel.
- When removing the panel, do not forget about the black plastic around the glass.
- We disassemble the standard insert for the arrows and make the holes much wider than those made in the standard one.
- We take out the board with the light bulbs.
- Instead of the usual ones, we insert neon bulbs.
- We insert plastic on top for protection.
- We screw in the instrument lighting bulbs, running them parallel to the neon lamp.
- We lay the wiring from the inside, first making holes.
- We paint the arrows twice with special fluorescent paint.
- We put the arrows in their place.
- We check everything and if there are no problems, we reassemble in the reverse order.
Working with LED Parts
After making the holes, you can move on to the lighting itself. It will be located like on foreign cars, that is, from the inside. In specialized services, such a service costs several thousand rubles, so in order to save money, we will do it ourselves.
As we noted earlier, our lighting will be made on the basis of a regular LED strip. We cut it into several uniform pieces. As a result, we should have several tracks with 3 diodes on each. For uniform illumination, we make a reflector from foil. For the tachometer and speedometer we need 3 pieces of tape. For the remaining elements (scale of fuel level, coolant temperature, etc.) one piece is enough.
Sound insulation and cladding
After the dashboard tuning has been carried out, it’s time to start. So:
- We dismantle all interior elements and standard trim.
- We cover all the necessary surfaces with sheets of vibroplast (how to carry out high-quality sound insulation is described in detail in the article “VAZ 2109 interior sound insulation”).
Note. Typically it takes about 14 pieces of insulating material measuring 0.6 x 0.9 meters.
- After soundproofing, we trim the interior.
- First of all, we change the covering on the ceiling (professionals advise gluing it twice, leaving an interval of 5 minutes).
Note. When upholstering the interior, it is imperative to take into account the color scheme and do not forget to glue the doors, dashboard, area next to the gearbox and other parts of the car.
Visor modification
As noted at the beginning of the article, the standard visor on the VAZ-2109 does not fit the dashboard of the VAZ-2110, and therefore it will have to be improved. In the photo below we present a clear example of how, using epoxy, trimming and special other “individual” means, you can obtain the required window configuration. In the end, just paint the visor black and everything will look as if it were a standard visor.
And this is what the finished version looks like:
Agree that such an instrument panel looks much more pleasant. At night, with the backlight on, we get this view:
Steering wheel and its tuning
All experts and professionals believe that the safest is the stock steering wheel of the vehicle. It is this wheel that was developed by the manufacturer and it is this wheel that has passed the necessary tests in accordance with the design of the car. As a last resort, it is recommended to replace the steering wheel with a wheel from the same manufacturer, a newer model. In particular, comfortable and “grippy” steering wheels from the VAZ 2115, etc. are perfect for the VAZ 2109. On the other hand, if the owner wants more, then you can always purchase any “steering wheel” on the market, both from a renowned manufacturer and a steering wheel handicraft wheel.
Still, as mentioned above, the best option is to install a standard steering wheel with braiding, which we will analyze carefully. Needless to say, this steering wheel looks great and feels very comfortable in your hands, thanks to the increased thickness of the rim.
Braid
A leather steering wheel always looks amazing. It is always pleasant to the touch, looks presentable and expensive. In addition, the leather “breathes,” so to speak, which affects comfort while holding the steering wheel on long trips. Let's start wrapping the steering wheel with leather ourselves (this procedure is very expensive for craftsmen):
- First, we cover the steering wheel with cling film to make a stencil.
- We wrap paper or better masking tape over the film.
- Draw the seams with a marker on the tape.
- We cut the tape along the markings, doing it very carefully.
- We remove the stencils, of which there are three.
- Cut out patterns from paper.
- In the leather blank, in places where seams are provided, add 5 mm (along the perimeter of the steering wheel rim, on the contrary, remove 2 mm).
- We sew the leather together, leaving a minimum amount of thread behind the seam, and cut off the rest.
- We sew a seam around the perimeter of the resulting workpiece.
Note. It is best to sew with synthetic threads, which provide strength and proper quality.
- We apply the leather blank to the steering wheel.
Note. To reduce the effect of protruding seams on the front side, grooves can be cut into the steering wheel underneath them.
- We thread the thread, like a lace in a shoe, using a needle.
- We pass the thread through the eyelets of the seams on different sides of the braid.
Note. It is not at all necessary to use glue, since the tightened braid is already securely fixed.
- We fix the thread at the end of the procedure.
- We put all the removed parts and elements back in place.
Replacing the steering wheel
If the steering wheel is replaced with a new one, the work process will look like this. Started:
- Disconnect the negative terminal from the battery.
- Remove the key from the ignition switch.
- Turn the steering wheel until the steering shaft locking lock engages.
- We apply the corresponding marks on the steering wheel and instrument panel.
- Take a screwdriver and pry off the horn cover trim.
- Then we remove it.
- Unscrew the two screws and remove the cover (use a curved screwdriver).
- Now you need to arm yourself with a 24mm socket and unscrew the nut that secures the steering wheel (we do not unscrew the nut completely, but several turns).
- We pull the steering wheel towards ourselves along the shaft splines.
Note. At this stage of work, a problem may arise related to removal. In this case, an assistant will help by applying light blows to the steering wheel with a hammer, always through a special drift.
- Unscrew the nut and remove the steering wheel.
- We transfer the marks from the old steering wheel to the new one.
- Installing a new steering wheel.
The above instructions are an easy tuning of the interior of a VAZ 2109. There is also a more complete one, where the carpet, gear knob, pedal attachments, buttons, etc. are subject to modernization with your own hands. In the process of work, you must definitely use video and photo materials. The price of tuning components is not high and modernization will not cost much.
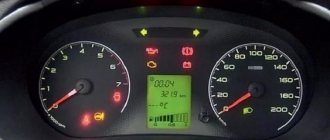
On the topic of tuning the backlight of the VAZ 2109 dashboard, the option of LED backlighting without serious intervention in the tidy was considered. There we simply replaced the backlights with LEDs, so although there is an effect, over time you want more. The expectation for more comes down to the fact that on the next generations of Samar devices and on foreign cars, the instrument dials are illuminated from the inside, and it looks as if the numbers and instrument scales themselves are glowing. The instrument panels of the VAZ 2109 and VAZ 2108 are illuminated by lamps that emit their light onto the dials from the outside, from the pointer side, while the brightness and detail of such illumination is low.
Let's try to illuminate the instrument panel from the inside, like on foreign cars, using the tall panel of the VAZ 2109 as an example. It should be noted that tuned instruments from specialized companies are quite expensive, so you can save a lot of money by modifying the instrument panel yourself.
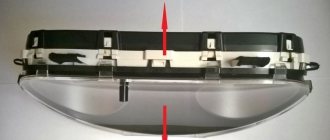
To do this, we need a light-transmitting overlay on the instrument panel, like this one:
We remove it from the car and disassemble the instrument panel, remove the instrument arrows and remove the old trim. In order for the illumination light to fall on the overlay from the inside, we make cutouts on the surface under the overlay. This can be done using a heated knife or soldering iron.
Now let's do the lighting itself. It will be organized on the basis of an LED strip. We use tape, which is cut into pieces of three diodes. To make the glow uniform, we make a reflector from ordinary foil.
For the speedometer and tachometer we take 3 pieces of tape; one piece is enough for the fuel level and coolant temperature indicators.
We keep the standard backlight, as it illuminates the arrows of the instrument scales. It can also be modernized by gluing an LED strip to the standard place of the backlight lamps, tinting it a little, otherwise the backlight will be too bright. You can tint it using a tint film or a black marker, as described in this article. It is advisable to leave the standard filter in place; the backlight light will be soft and uniform, with a slightly bluish tint.
We connect all this backlight to the contacts of the plate of the standard backlight lamps, having previously determined their polarity. To stabilize the current, when powering LEDs, you can use
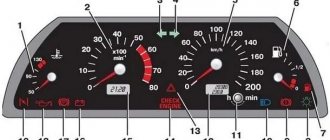
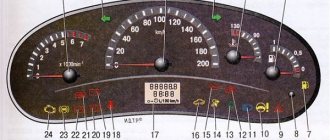
The dashboard of a modern car should contain maximum information. In the modern world, having only a speedometer, tachometer and fuel level indicator is bad manners. What to do when you already have a favorite car, VAZ 2109, VAZ 21099 or VAZ 2108, when speed and rpm readings become scarce and you want to get more information about the operation of the car’s systems? To do this, you should install an electronic instrument cluster.
The electronic instrument cluster for VAZ 2108, 2109, 21099 is not only the output of the data from the above devices in a beautiful digital form, it is also an on-board computer. The electronic instrument cluster for VAZ 21099, VAZ 2109, VAZ 2108 has various functions. For example, it warns about oil pressure, the condition of brake and coolant fluid, the condition of the battery, overspeed and revs, engine temperature and many other indications and functions. Many electronic combinations of devices VAZ 21099, VAZ 2109, VAZ 2108 have pleasant little things, such as an alarm clock, clock, date and day of the week, outside temperature, calendar.
There are electronic instrument clusters with parking sensors. Parking sensors are sensors on the car's bumper with signals output to the electronic instrument cluster. Parking sensors help you park your car in hard to reach places. An electronic instrument cluster is installed in place of the standard dashboard, in the old and European panels.
- Gamma GT;
- Flash;
- State.
All of them differ from each other in color, location of the electronic dials of the speedometer and tachometer, and the presence of various indicators.
The electronic instrument cluster of the VAZ 2108-099 has diagnostic functions. The system will conduct computer diagnostics for errors, if any, and report it. The ECP, like an on-board computer, can update the software to more current versions.
Of course, the presence of an electronic instrument cluster in a VAZ 2109, VAZ 21099, VAZ 2108 is not only a tribute to fashion, it is, first of all, comfortable control, feedback from the car, it is prestige, it is the level of a European or American car. The convenience of driving with an electronic transmission will always please you. Using the steering column switch, without being distracted from the controls, you can view statistics on speed, distance traveled, remaining gasoline, and fuel consumption per hundred kilometers. Set reminders for spark plug maintenance, oil changes, and filters. The calendar will notify you that maintenance is due soon. With an electronic instrument cluster, you will experience a completely different level of driving.
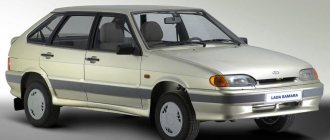
The VAZ 2109 panel is made of a special energy-absorbing material. It consists of an overlay and, in fact, the panel itself.
It is made of plastic. Its thickness is 3 mm. The overlay is essentially reinforced with a special metal frame. It has a reliable energy-absorbing layer made of polyurethane foam. On the outside it is lined with a special decorative film. The car can be equipped with low and high VAZ 2109 panels, as well as a “European panel”.
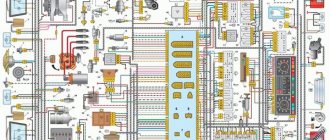
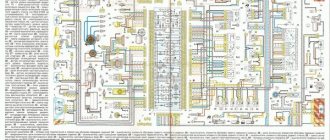
The high panel of the VAZ 2109, like the low one, has certain features that should be taken into account when installing them. The installation method and the high panel are almost identical, since the mounting points, as well as the connections of the air ducts of the automobile ventilation and heating system, are the same. The differences concern only the wiring harness connections. (shown in the photo below, follow the link to read even more about it).
Car dashboard cover
Another way to get rid of low-quality plastic in the car interior is to cover the dashboard. As a rule, leather or a high-quality substitute is used for this. It is quite difficult to do the covering yourself; the plastic, which was previously part of the interior design, will serve as the basis.
Sidebar: Important: It is recommended to carry out the covering only after creating all the necessary niches for installing additional equipment. Otherwise, costs increase significantly.
When choosing a material, you need to abandon fabric, since the front panel is constantly exposed to direct sunlight and is often exposed to greater impact than other upholstery elements. When choosing a color, you need to give preference to not bright shades that will not be very noticeable. Quite often you can find examples of tuning that use bright fabric: red, blue and other colors. Note that this option looks quite attractive, but during a long trip the driver and passengers will be very tired.
How to do easy tuning of the VAZ-2109 dashboard with your own hands
During the salon of the domestic “nine”, tuning its “tidy” becomes a truly irreplaceable element. Beautiful modifications can be done with your own hands. To do this, you will need to make a new dial on a computer using special design programs and printing the picture on a printer.
However, first you need to clearly think through the appearance of the dials for the car's tachometer and speedometer, as well as for all the sensors that remain. Once the dials are printed, they need to be laminated, and then you can start removing the instrument panel.
To do it correctly, you must first remove the steering wheel pads and also mark the steering position relative to the shaft. Then carefully unscrew the fastening nut.
Next, you can remove the steering wheel and unscrew the screws that are located in the area of the car lower casing. After this, you will have to disassemble the steering column. When the instrument panel is removed, you should unscrew the arrows from the old speedometer and tachometer. Subsequently, they will be attached to the updated dials.
During this time, you can also repaint the dials and hands in bright colors. Regular spray paint cans are suitable for this. At the same time, it is better to make the dial a rich black color.
You can make it matte using special products. In this case, the arrows need to be painted in bright pink or original red-burgundy tones. After the painted plates of the machine dial have dried, they are completed with an old or pre-prepared scale and removed hands.
In a situation where the owner wants to modernize the instrument panel in a more modern way, he should also use a special (original, as in the video) backlight. You can add an original touch using a fluorescent marker, but more on that below.
Every driver of a domestic car wants to make the instrument panel of his VAZ-2109 as bright and original as possible. Here is one of the options for how beautifully you can modify this element of the machine.
You will also need a fluorescent marker or paint. It will change color if exposed to ultraviolet light. This technique is often used in modern nightclubs. You will also need ordinary light bulbs with sockets, like those in the “tidy”. no need to change, they will remain in place. Everything you need is there, you can get started.
First you need to remove the plastic, then the dashboard. Also, don't forget about the black plastic that surrounds the glass. We disassemble the standard insert, as well as the arrows. Most often, there are no holes in the new insert. Therefore, you will have to do them. For the arrows, the holes will be needed wider than in the standard trim. Otherwise, the arrows will start to stick.
Next you need to dismantle the lighting that is installed. The work should be done carefully so that the plastic is not damaged. We take out the board with the light bulbs. We install a neon light bulb instead of the usual ones, and stick a plastic protection on top. It used to have factory bulbs screwed in. Don't forget about the control unit for the new neon light bulb. Be careful not to reverse the polarity at all times.
If this happens, nothing will shine. Next you need to screw in the instrument lighting bulbs. This should be done in parallel to the neon lamp. We lay the wiring from the inside; first, for this you need to make holes in the partitions.
Let's check if everything is correct. The light bulbs inside should be adjusted. Next we put on the overlay and seal it. After these steps, all we have to do is paint the hands with a purchased fluorescent marker or paint. It is advisable to repeat painting after 10 minutes. After this, the arrows can be installed in their place. This completes the tuning.
Check the work, otherwise you will have to disassemble everything. If there are no problems, you can assemble everything in strictly reverse order. After this, the VAZ 2109 will be equipped with a colorful panel like good foreign cars. If desired, you can use fluorescent paint to paint the dashboard trim in the place where the needle reaches its limit. It looks very nice.
Fuel level sensor
Especially for those car owners who want to see accurate data and are looking for a suitable type of sensor, we offer a table for your reference:
The optimal choice would be the sensor number 2108-3827010-01. Its reading is approximately as follows: the middle of the scale indicates a level of 20 liters, and the red zone begins when the tank contains about 5 liters of fuel.
In any case, when you buy a sensor, test it for resistance: the best option for you is a sensor that shows 360 ohms when the tank is empty.
Video review of the dashboard on the VAZ-2109:
Source: auto-cool.com
note
We are not in a hurry to throw away the standard suspension, since it will illuminate the arrows of the instrument scales. But it can also be modernized. To do this, you need to glue an LED strip in place of the lamps. Many car enthusiasts note its very bright glow, so we add additional tint film to the diodes. If you don’t have one, you can use a black marker - the result will be the same. In this case, the standard light filter remains in place, and the backlight shade will be soft and uniform with a white-blue color.