The Daewoo Nexia is an example of excellent modernization and processing of a car that has already outlived its usefulness. South Korean engineers, taking the old Opel Cadet as a basis and example, were able to change it and refine it so that the resulting car is still relevant today and finds its fans. The car is quite popular in the CIS countries, especially considering that it is produced by an almost domestic company, UzDaewoo.
The car is quite comfortable and fully satisfies consumers of a certain group. But today we are not interested in the engine, gearbox or interior of this car, but in its curious braking system, the structure of which we have to understand.
General principle
The braking system of any car has its own purpose, and is to reduce the speed of the car as quickly and effectively as possible until it comes to a complete stop at the request of the driver. This happens due to the generation of braking torque, the force of which is the opposite of the rotational force of the wheel and acts on it at the point at which the wheels come into contact with the asphalt.
Any car is designed to have several braking systems, the Daewoo Nexia includes the following:
- Parking lot.
- Emergency.
- Working.
We will consider them in order. The parking brake system is responsible for keeping the car stationary when parked for long periods in one place. It is usually called the handbrake, and it is also an emergency one. If the working brake system fails, pulling the handbrake in time means trying to save your life and everyone who is driving in the same car with you. A stationary state is achieved through standard brake mechanisms that are used on the rear wheels of the Daewoo Nexia.
When the driver pulls the lever, he pulls a special cable that clamps the rear wheels and fixes them in this position. And a special ratchet prevents the lever from going down. The working system is activated by pressing the pedal and is the main one; when driving, it is most often used. This braking system can provide a smooth reduction in the speed of the Daewoo Nexia; it is impossible to use the parking system in this way. But the handbrake is very convenient to use when you need to start on a slope without rolling back. This may be necessary when there is a car behind you and rolling back can cause an accident.
Replacement instructions
When replacing drum pads, all parts of the repair kit are changed.
- Put the car in first gear and lock the front wheels.
- Lower the handbrake.
- Remove the rear wheel.
- Pump out the brake fluid from the reservoir.
- Remove the brake drum.
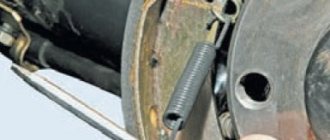
- Disconnect the tension spring.
- Clamp the shank onto the support post with pliers, press on the washer and turn. The support strut and the front pad spring must be removed along with the shank.
- Remove the front trim and clearance adjuster.
- Remove the tension spring and the spacer bar.
- Pull back the rear cover.
- Remove the release lever from the handbrake cable.
- Remove the spring to adjust the gap.
- Remove the shackle and adjustment lever.
- Clean the spring, shackle and regulator lever. Install on new brake pads.
- Apply refractory lubricant to the friction points of the front and rear brake drum linings with the brake shield.
- Coat the threads of the strip with lubricant and tighten the nut.
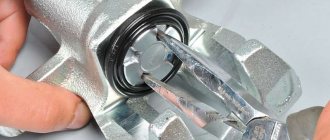
- Compress the brake cylinder pistons using pliers. Install the brake linings.
- Install the brake drum.
- Press the brake pedal until the clicking noise stops. The gap between the drum and the brake linings is adjusted. The regulator makes clicking noises. The gap is considered set at the moment the clicks stop.
- Install the wheel.
The brake lining material contains asbestos fibers that are dangerous to humans.
Do not clean pad parts with dust-generating tools (dry brush, pad grinder, compressed air jet).
To remove dirt, use only a damp cloth.
The brake pads on the second wheel are changed in a similar way. After replacing the brake pads, you need to adjust the parking brake system.
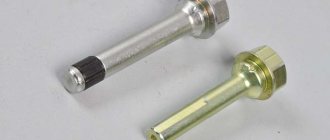
Manufacturers also recommend replacing springs, support struts and spacer bars. The listed parts are not sold complete with pads. You need to take care of purchasing them separately.
How the system works
The Daewoo Nexia car received a very interesting brake system; in order to make it easier for us to understand it, we will divide it into two subtypes and consider each separately:
- Executing mechanism.
- Drive unit.
Working mechanism
The braking system of this machine has both types of working mechanisms at its disposal: disc and drum brakes. In general, the mechanism is needed to block the rotational movement partially or completely, as desired by the driver. All mechanisms are installed in direct contact with the wheel, so that the moving part is in engagement with the wheel, and the stationary part can be pressed against the moving one.
Disc brakes are installed on the front axle of the car, and drum brakes on the rear axle.
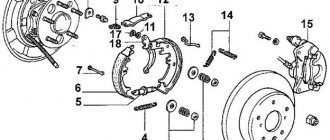
The disc brake system includes:
- Brake disk.
- Pads.
- Caliper.
The caliper is mounted on a special bracket above the rotating disk. The caliper has special grooves for the drive working cylinders. Also located inside are the pads, which are pressed tightly against the caliper body using springs. Each pad has friction linings made of friction-resistant material. The brake disc is bolted to the hub and rotates with the wheel. When braking, it can become very hot, and cooling is carried out by the oncoming air flow of the Daewoo Nexia car. Some cars are equipped with ventilated discs that have special holes on their surface.
Very expensive cars can also be fitted with ceramic brake discs, which are more susceptible to friction and can reduce braking distances to a minimum.
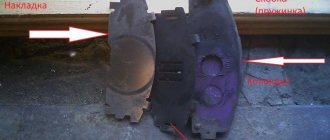
The drum mechanism has the same principle - deceleration due to friction - but has a completely different layout. Here, the drive working cylinders and shoe mechanisms are located inside the drum housing. The drum has the appearance of a flat plate with wide edges, which is screwed to the hub and also rotates with it. Inside there are pads, which are also supported by a spring in their original position. The working cylinders are also located there. The brake pad here is somewhat different in appearance from those in the disc version and has a wider cross-section of the plane.
Drive mechanism
The drive of the Daewoo Nexia is hydraulic, that is, the brake system is activated by the pressure of the compressible fluid in the circuit. The brake actuator is also a control element of this system; the entire braking system is controlled by pressing the pedal and the force that the driver applies to it.
When the driver presses the brake pedal of a Daewoo Nexia, he creates the first pressure, which is transmitted to the master brake cylinder using a cable. The latter has a cylindrical shape and is located vertically.
In its upper part there is an expansion tank, under it there is a piston, which, by its movement, pumps up pressure in the brake circuit. The circuits of this braking system are strictly separate: one for the front axle, the second for the rear. When the driver presses the pedal and this force is perceived by the brake cylinder, the valve in its part closes and the fluid in the circuit of the Daewoo Nexia is in a completely sealed state. The piston begins to move down and thereby creates pressure. To prevent the driver from pressing the brake pedal with all his might, there is a vacuum booster, which creates additional force on the piston instead of the person. Therefore, you have to touch the pedal very lightly. When the fluid pressure reaches the working cylinders, they expand and press the pads against the disc and drum, due to this the Daewoo Nexia begins to slow down. When the pedal is released, the brake system relaxes, the piston in the main brake rises up and the valve opens, allowing excess fluid to flow into the expansion tank.
Replacing rear pads on a Daewoo Nexia - replacing rear brake pads on a Daewoo Nexia n150
Replacement of rear pads on Daewoo Nexia is carried out infrequently, since when braking 70% of the load goes to the front ones. The problem with diagnosing brake pads on a Daewoo Nexia is that they can only be examined after removing the brake drum. Brake failure is a dangerous failure. If the pad comes off the pad, the wheels can lock even at high speed. For this reason, more and more car manufacturers are no longer installing drum brakes, but they are still used on Daewoo Nexia.
Replacement frequency
No one can say for sure after what period it is worth replacing brake pads, since it depends on a large number of conditions:
- Quality of the lining;
- Condition of the brake drum and cylinder;
- Serviceability of the sliding mechanism;
- Vehicle operating conditions;
- Driver's driving style.
Attention! If the drum is severely damaged, the pads will quickly fail.
Brake pads can last 5-100 thousand kilometers. The service life depends on the above factors and luck. Therefore, their serviceability must be closely monitored. You can identify failing pads by the sound from the brake drum, as well as by the intensity of braking.
Pad selection
- At the moment, there are no problems with choosing and purchasing pads, since pads suitable for Daewoo Nexia are found on a large number of cars: Daewoo Lanos, Espero, Nubira, as well as on some budget Chevrolet models, which are descendants of the Opel Kadett.
- The advantage of drum brakes is their cost and ease of maintenance.
- Some models of brake pads, sorted by descending price:
- The highest quality and most expensive are Ferodo FSB-335. These German-made pads are popular in Russia, although they do not sell very well. The price is about 5 thousand rubles.
- Another German model is Zimmermann. They cost 4 thousand rubles, which is twice as expensive as the original ones.
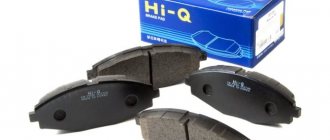
- Factory pads Hi-Q SA-055 from a Korean manufacturer. The quality is not much inferior to their German counterparts, but they cost only 2 thousand.
- Onnuri is also a Korean model, but costs a little less – 1.5 thousand.
- Rider is a model from a Hungarian company. The cheapest on this list.
Prices are approximate.
They may vary in different regions of the country, and also become more expensive/cheaper over time.
When dismantling old brakes, it may turn out that it is not only the pads that need to be replaced. It will not be superfluous to buy a complete repair kit, which includes almost all components of the brake mechanism. It costs around 500 rubles.
Tools necessary to replace rear pads on Daewoo Nexia n150
- Wheel chocks;
- Two jacks;
- A set of spanners and heads for them;
- Pliers (if available, it is recommended to use long-nose pliers);
- Mild steel hammer;
- Screwdrivers; WD-40;
- Silicone grease resistant to high temperatures.
Replacing rear brake pads on Daewoo Nexia
Dismantling algorithm
- For convenience, use a viewing hole or drive the car onto a lift.
- Install wheel chocks on the front wheels.
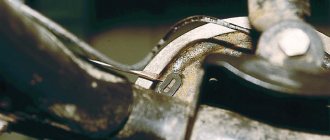
- Apply lubricant to the rod and loosen the parking brake cable tension nut.
This is done in two ways: using a socket with an extension or removing the heat shield. - Using a jack, raise the car on both sides so that the rear does not touch the ground.
- Remove the wheel by unscrewing the mounting bolts.
- Disconnect the hub cap and unscrew the nuts.
- Unscrew the countersunk screw and remove the drum. If you can't remove it, carefully knock the drum down with a hammer.
- Important! Before disassembling the mechanism, remember the location of all parts!
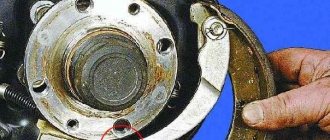
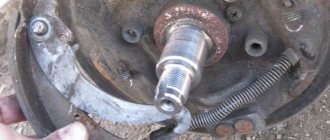
- Disconnect the spring from the adjusting device and from the support post by rotating the cup 90 degrees while holding the support post.
- Remove and clean the support post.
- Disassemble the mechanism on the second side in the same way.
- Disconnect the tension spring from the top. First from the front block, then from the rear.
- Move the pads apart from above and unhook them from the handbrake cable.
- Take them out and inspect their condition.
- Clean the shield from dirt and corrosion, apply lubricant.
Assembly algorithm
Important! Replace the springs with new ones, if possible. If there are defects on the springs, then it is unsafe to put them back.
The assembly algorithm resembles the dismantling algorithm in reverse order.
- Start connecting the new block to the rear of the handbrake cable.
- Secure it with a tension spring.
- Return the cleaned support post and its spring to its place; to install the post, you need to turn the bowl 90 degrees again.
- Attach the front block.
- Secure it with a holding post and a spring with an automatic closing mechanism.
- Check for correct assembly.
- Lubricate the hub and replace the grease in the bearing.
- Install the drums and wheels.
- Press the brake pedal several times until the parts of the mechanism are in the desired positions.
- Adjust the handbrake.
Attention! Remember to lubricate moving parts that require lubrication, such as the hub or bearings. The lubricant must be resistant to high temperatures.
Check the drums carefully for wear. If you install new parts in worn drums, their service life will be noticeably reduced.
Remove the side of the excavation if you are installing old drums. And if the surface wear is more than 20 centimeters, the brake drums also need to be replaced.
Replacement instructions
When replacing drum pads, all parts of the repair kit are changed.
- Put the car in first gear and lock the front wheels.
- Lower the handbrake.
- Remove the rear wheel.
- Pump out the brake fluid from the reservoir.
- Remove the brake drum.
- Disconnect the tension spring.
- Clamp the shank onto the support post with pliers, press on the washer and turn. The support strut and the front pad spring must be removed along with the shank.
- Remove the front trim and clearance adjuster.
- Remove the tension spring and the spacer bar.
- Pull back the rear cover.
- Remove the release lever from the handbrake cable.
- Remove the spring to adjust the gap.
- Remove the shackle and adjustment lever.
- Clean the spring, shackle and regulator lever. Install on new brake pads.
- Apply refractory lubricant to the friction points of the front and rear brake drum linings with the brake shield.
- Coat the threads of the strip with lubricant and tighten the nut.
- Compress the brake cylinder pistons using pliers. Install the brake linings.
- Install the brake drum.
- Press the brake pedal until the clicking noise stops. The gap between the drum and the brake linings is adjusted. The regulator makes clicking noises. The gap is considered set at the moment the clicks stop.
- Install the wheel.
The brake lining material contains asbestos fibers that are dangerous to humans.
Do not clean pad parts with dust-generating tools (dry brush, pad grinder, compressed air jet).
To remove dirt, use only a damp cloth.
The brake pads on the second wheel are changed in a similar way. After replacing the brake pads, you need to adjust the parking brake system.
Manufacturers also recommend replacing springs, support struts and spacer bars. The listed parts are not sold complete with pads. You need to take care of purchasing them separately.
Good luck on your journey.
- Improvement of Nexia. Install the gas stop of the trunk lid.
- Daewoo Nexia - spare parts catalog
- In cold weather, the car doors do not unlock.
- Cigarette lighter splitter. We install it correctly.
- Air conditioner radiator. We protect in winter on Daewoo Nexia.
: Do-it-yourself replacement of rear brake pads.
Something strange about your repair kit. I took one from the Opel Astra, one in the same with my family. But the worst problem is with the plates that fix the spring for pressing the pads to the shield; they are very flimsy. It's good that now you can buy them separately.
In this set the plates are just solid, but the lower spring is not so great, I left the old one.
I also changed the pads today... the result is that the handbrake is gone. What did I miss?
The handbrake is adjusted in two places: 1. Under the car, adjust the cable tension (located under the thermal shield of the resonator, unscrew 4 nuts, remove the shield and there is a 13 key nut there), tighten and release the rocker arm on which the cables are attached. 2. A mechanism for automatically adjusting the gaps between the pads and the drum (after assembling the brake mechanisms, you need to press the brake pedal several times, clicks should be heard until they stop) this is done by turning the adjusting nuts on the sliding spacer bars. The arm of the parking brake release lever rests on these same bars.
If the travel of the parking brake lever is normal (no more than 5 clicks), then the tightening of the cables is normal; if more needs to be tightened, but the parking brake still does not hold, then you should remove the drums and look at the adjusting nuts of the spacer bars. If the nuts remain fully tightened, then the automatic clearance adjustment mechanism did not work. (Re-read the article above and check the correct assembly). You can adjust it manually, rotate the nuts by the teeth with a screwdriver, periodically trying on the brake drum (so that it fits onto the pads with minimal clearance). There may also be a problem with the parking brake cables; it happens that in some places the shell is destroyed and, due to internal corrosion, the cable stops moving in it and, accordingly, tightens the release lever.
How to check DBP using computer diagnostics
Everything you need for independent computer diagnostics is presented in simple language in the Chevrolet Diagnostics section.
In this way, you can quite simply assess the condition of the sensor.
Here you need to pay attention to two parameters - barometric pressure and absolute pressure in the manifold. Why two? Because DBP is not really DBP
Because DBP is not really DBP
It measures not only the absolute pressure in the manifold, but also the ambient pressure. This is necessary in order for the engine to operate adequately not only in ordinary terrain, but also, for example, in mountainous terrain, where atmospheric pressure decreases as altitude increases. And different atmospheric pressure has different effects on processes in the engine, so the ECU must know this same pressure in order to apply certain corrections in engine control. More details about the work of DBP and what processes affect its readings can be found here
We will touch on this parameter a little lower. Now let’s start checking DBP using diagnostic charts.
When the engine is not running, then the pressure in the manifold is equal to atmospheric pressure, which can be seen in the graphs
As we see, this is so. So at this stage everything is fine.
With the engine running and idling, the pressure in the intake manifold drops by almost 70% and should be 30-35 kPa
When you press the accelerator pedal, the pressure in the manifold inevitably increases. Therefore, DBP should signal this. If the damper is open to a large angle with the current load on the engine (acceleration, driving uphill, etc.), then the pressure in the manifold will increase to atmospheric
If the DBP, when pressing the accelerator pedal under load, practically does not change its readings or does so with a large delay, then you should definitely understand the reason for this behavior, since this is a malfunction. For example, if the engine speed under heavy load has already risen to more than 2000 rpm, but the DBP does not respond to this, showing low pressure in the manifold, then this is not normal.
Note: When you press the gas pedal at idle and there is no load on the engine (air conditioning, heated rear window, etc.), low readings (22-25 kPa) are adequate. That's how it should be! I'll try to explain it in simple language. When you press the gas pedal, a sharp surge in readings occurs - this is the DBP working to change the conditions in the manifold and the engine has not yet had time to spin up and “take in” the air that entered through the slightly open damper.
Then the engine gained speed and it is easy for it to rotate and develop further speed, since nothing interferes with it (no load). The higher its speed, the more it sucks air into itself, creating even greater vacuum in the manifold, since we do not open the damper completely, but only to maintain the speed we want.
Under load (we start, accelerate, turn on the air conditioner), the operating conditions change. It is no longer so easy for the engine to develop speed and it does so more slowly and does not have time to suck in the incoming air. Because of this, the pressure in the manifold increases. We press the pedal even harder, demanding revolutions from the engine, it strains and develops revolutions slowly. As a result, we open the damper completely and the pressure in the manifold becomes almost atmospheric. That is, the higher the pressure in the manifold, the heavier the engine. This is nothing more than an “engine load sensor”, and not a “sensor for calculating air mass”, which I wrote about above.
Here's another interesting point. Only here the DBP shows a very high barometric pressure, which in his opinion is as much as 112 kPa. Although a maximum pressure of 108 kPa was recorded on our planet!
It is clear that the sensor is showing false readings and this needs to be corrected. The first step in case of such symptoms is to check and clean the mass from the ECU to the engine. In the Chevrolet Lacetti it is located under the starter. Here it is written about the Lacetti masses.
Types and properties of fuel fluid
Any brake fluid has 93-98% of the main composition and from 2 to 7% of additives, which, in fact, are the key component for imparting the declared characteristics. In general, if you look at it this way, the properties of brake fluid depend on the combination of its components. Depending on the composition of the base, TJ is divided into 3 groups.
Types of brake fluids:
- Mineral (mineral oil LHM). They consist of alcohol and castor oil.
- Glycolic. Developed on the basis of polyglycols and their esters.
- Silicone. Manufactured from silicon-organic polymer products.
Regardless of the type and composition, all brake fluids are divided into two classifications.
TJ classification:
- By viscosity.
- By boiling point:
- for “dry” liquid (without water);
- “wet”, which contains 3.5% water.
If the boiling point exceeds the permissible norm, then there is a risk of a vapor lock forming in the system (as a result of moisture evaporation), which can lead to breakdown and failure of the brake pedal.
Good luck on your journey.
: Do-it-yourself replacement of rear brake pads.
Something strange about your repair kit. I took one from the Opel Astra, one in the same with my family. But the worst problem is with the plates that fix the spring for pressing the pads to the shield; they are very flimsy. It's good that now you can buy them separately.
In this set the plates are just solid, but the lower spring is not so great, I left the old one.
I also changed the pads today... the result is that the handbrake is gone. What did I miss?
The handbrake is adjusted in two places: 1. Under the car, adjust the cable tension (located under the thermal shield of the resonator, unscrew 4 nuts, remove the shield and there is a 13 key nut there), tighten and release the rocker arm on which the cables are attached. 2. A mechanism for automatically adjusting the gaps between the pads and the drum (after assembling the brake mechanisms, you need to press the brake pedal several times, clicks should be heard until they stop) this is done by turning the adjusting nuts on the sliding spacer bars. The arm of the parking brake release lever rests on these same bars.
If the travel of the parking brake lever is normal (no more than 5 clicks), then the tightening of the cables is normal; if more needs to be tightened, but the parking brake still does not hold, then you should remove the drums and look at the adjusting nuts of the spacer bars. If the nuts remain fully tightened, then the automatic clearance adjustment mechanism did not work. (Re-read the article above and check the correct assembly). You can adjust it manually, rotate the nuts by the teeth with a screwdriver, periodically trying on the brake drum (so that it fits onto the pads with minimal clearance). There may also be a problem with the parking brake cables; it happens that in some places the shell is destroyed and, due to internal corrosion, the cable stops moving in it and, accordingly, tightens the release lever.
The handbrake works, I adjusted it with a ratchet. I made a minimum gap between the pads and the drum. The result is 5 clicks - the car stops. And the braking became better.
Everything is correct. Spacer bars and parking brake and the gap between the pads and the drum. It is necessary to ensure that the adjustment is carried out automatically.
In the bottom photo, signed “Assembled feed mechanism.” At the lever of the eyeliner mechanism there is a part, a plate made of spring steel bent in half with a hole, I sat and figured out what it was for, on one of the forums I found that it is a stop….
Ilya, there really is such a part in repair kits, but I didn’t find it in catalogs or “primer books”. How I installed this plate can be seen in the photo, I assume that it serves to press the double-armed lever away from the block so that it does not fall between the block and the spacer bar. If you have other opinions or information, please write.
Ilya, Sergey, in my opinion it needs to be placed on the spacer bar, putting the “male” on the fork after the leading nut. There seems to be a groove on the “mother” fork for the tail of this thing.
Sergey, when ordering one 94525222 we get 2 castle washers?
Yes, the set includes 2 washers.
Livingstone, I tried this part on the spacer bar, tried it in different versions, installed it in the way that seemed to me in the most optimal place, but I won’t say that this is the only correct option... If someone knows more, tell me, correct me.
This site uses Akismet to reduce spam. Find out how your comment data is processed.
Replacement process
- Jack up the car and remove the front wheel.
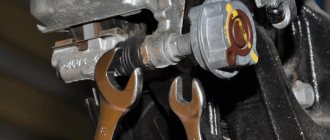
- Using a screwdriver as a lever, separate the pads from the drum and, unscrewing the mounting bolts of the fingers, remove the “original” caliper.
- Regarding the brake hose: it is better to disconnect it while the “hydraulic vice” of the car is fixed. Take the hose into a pre-prepared jar (for dripping liquid).
- Then remove the pads along with the pressure plates. If the brake disc also requires replacement, remove it too.
- Next, using the repair kit, install new spare parts.
- Carry out the work in reverse order. To secure the hose, be sure to buy a new copper or aluminum washer, as it is compressed during operation.
The purchased kit also includes pads. Codes for purchase through Exist.ru: 96234339 and 96234340. A kit intended for the repair of Daewoo cars, consisting of pins, seals and brackets, made in China, goes under the code 93740249. The replacement occurs on the other side in a similar way.
Front brake system Daewoo Nexia
Tightening torques for brake cylinder threaded connections
| PROGRAM | N•m | lb-ft | Pound-inch |
| Brake pipes | 16 | 12 | — |
| Master cylinder nuts | 18 | 13 | — |
| Dosing valves | 22 | 16 | — |
Pad selection
The choice of rear brake pads for Lanos should be approached carefully, because not only braking while driving, but also how the parking brake will work depends on them.
96226110 – this is the original catalog number of the Chevrolet Lanos rear brake pads. The average cost in the Russian Federation is 2000 per set.
There are quite a lot of manufacturers that produce analogues, but we will consider only those that, based on experience, are installed by car owners.
| Manufacturer's name | vendor code | Average price in rubles in the Russian Federation |
| Denckermann | B120077 | 1000 |
| Pilenga | BS-P 8835 | 1500 |
| Mando | MLD04 | 1500 |
| Koreastar | KBSD-003 | 1500 |
| NiBK | FN11622 | 1500 |
| Jurid/Bendix | 362218J | 1800 |
| TRW | GS8543 | 1800 |
| Delphi | LS1622 | 1800 |
| Brembo | S 59 513 | 1800 |
| Goodwill | 2115 RB | 2000 |
| Nipparts | J3500900 | 2000 |
| Valeo | 562078 | 2000 |
| Textar | 91044900 | 2000 |
| Blue Print | ADG04116 | 2000 |
| Ferodo | FSB4017 | 2000 |
| Sangsin | SA055-N | 3000 |
Preparing for repairs
Before replacing the rear brake pads (Daewoo Nexia), be sure to perform the following manipulations:
- Place wheel chocks under the front wheels.
- Loosen the mounting bolts on the rear wheels.
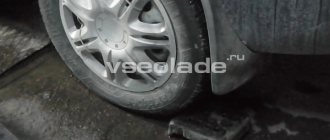
- First jack up one side of the car, then the other. Your goal is to hang out the entire rear of the car.
- Remove the wheels.
- Remove the nuts that secure the rear brake drums.
- Carefully, trying not to damage, knock down the drums.
After carrying out these manipulations, you can begin replacing the rear brake pads
Your Daewoo Nexia will be like new! Pay attention to the inner surface of the drums - if it is uneven, you will need to sharpen the parts. This should only be done on a lathe.
After such an intervention, it is necessary to carry out balancing so that there is no axial runout after installation.