December 13, 2020 Lada.Online 14 119 11
Replacement of rear brake pads on Vesta should be done as a set on wheels of the same axle. Installation of brake pads from different manufacturers or different types on wheels of the same axle is not allowed. How to replace the pads with your own hands is described in the technological instructions.
Required
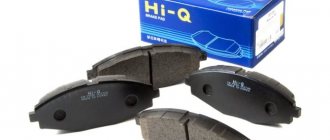
: brake pads (drum brake), article number 440609415R (see other pads).
Signs of Brake Pad Wear
We list the signs and symptoms that, if detected, require work to replace the pads:
- If the braking distance of the car has increased.
- If the wheels brake unevenly (the driver feels this).
- If, when you press the brake pedal sharply, a knocking and beating noise appears (your foot on the pedal feels like the pedal is vibrating).
- If you hear a squeaking sound when you press the brake.
If such signs are detected, it is advisable to quickly eliminate these problems. Damage to the pads and brake disc can be checked by visual inspection:
- if the brake pad lining has become too thin (thickness has decreased);
- if there are cracks, chips, or deep scratches on the linings or pads;
- if the thickness of the brake disc has decreased significantly.
- if the thickness of the pad, although normal in thickness, is worn unevenly;
- if a rim appears around the perimeter of the brake disc (the thickness of the disc has decreased, but the rim at the edges remains).
If the rubber rings on the pistons are worn out, then operating pressure will not be created. To do this, you need to replace the brake master cylinder repair kit. This is not difficult to do; you can do it yourself.
Brake caliper design
Car enthusiasts are not always good experts in the field of car maintenance and sometimes do not know all the intricacies of the technical standards that are required for the effective operation of cars. Calipers are cleaned annually or every 40,000 km of the vehicle. The frequency and types of work differ significantly from servicing a conventional brake.
The device consists of pads, brackets, pistons and sliding pins that press the pads against the rotors during braking. Over time, the pins consume all the lubricant, and the sliding process is disrupted, after which the following “problems” appear in the car:
- The brakes do not make contact with the rotor, causing the pads to wear unevenly.
- The pad constantly interacts with the rotor, which creates heat that destroys the brakes.
- The brakes become weak due to the fact that the linings do not lie on the entire working surface.
The device is an integral part of the braking system. When the brake pedal is depressed, fluid flows from the master cylinder to the calipers, putting pressure on the piston inside, thereby pushing the pads against the metal discs and stopping the car. The key role is to create friction with the rotors, thereby braking the wheel. There are two types of devices: floating and fixed. Floating - Moves in and out, creating friction with the rotors. Brake grease washes away on wet roads. Metal parts are susceptible to rust, so it is recommended to clean them to improve the performance of your car.
It is advisable to carry out cleaning annually. In expensive cars, brake discs are made of cast iron. Conventional brake systems are very sensitive to corrosion and must be thoroughly cleaned during mandatory equipment lubrication procedures. Rust residue in critical areas can cause brake problems.
Causes of brake pad wear
In this case, the reasons are understood as various factors that influence in one way or another the surfaces of the brake pads, brake discs and drums.
We list the main reasons due to which the greatest wear of pads occurs:
- roads, quality of road surface;
- driving style (calm, moderate driving or jerking and drifting);
- climatic conditions (frost and heat);
- Poor quality pad lining material.
Many people don’t know how long it takes to change brake pads. The service life of brake pads on cars with manual transmissions ranges from 30 to 50 thousand km. The service life of brake pads on cars with an automatic transmission ranges from 25 to 30 thousand km. And you need to check the condition of the brake system at least every 10 thousand kilometers. Basically, until squeaks, rattles, and beating of pads appear, the brakes are not checked.
For special vehicles or cars that are often driven through sand, mud, and water, naturally, it is necessary to carry out diagnostics and replacement more often.
Did you know that a faulty car steering rack can be identified by 5 signs?
Which pads need to be changed more often?
Since the main load falls on the front wheels, when braking, the front brake pads are loaded more, so they wear out faster than the rear ones. The front pads have to be changed 2-3 times more often than the rear ones.
When replacing brake pads, they must be changed in pairs, that is, do not change only one at the front or one at the rear. Install the kit immediately. Timely replacement of pads will increase the service life of the brake disc, and the disc itself will serve for a long time. When replacing brake discs, the cost of repairs to replace pads with discs is much more expensive.
During repair work to replace brake system parts, you should also check the guide boots and rubber boots for integrity. It is especially important to check the brake system pipes and hoses.
If you decide to take the city driving test in your own car, then do not forget to prepare: drive along the exam routes several times, adjust the mirrors, seat, brakes, etc.
Repair
Having figured out the main reasons why the car may not slow down, you can begin repairs. Specifically, in this article we will look at repairing car calipers with our own hands. If everything is clear with the first case, for repairs you just need to clean the calipers from dirt, and everything will be operational again, then in the second case you will have to work.
You can solve the problem with the second breakdown only after searching for information specifically for your car, because there is no universal way to fix this problem.
Unfortunately, these are not the only problems that may cause your car to fail to slow down. Another reason why the wheel may not brake or, on the contrary, may not release, is considered to be a faulty cuff. The cuff is installed as a spring, which returns the brake piston to its place. Over time, the cuff loses its elastic properties and ceases to return the piston, which presses the pads to the brake disc. In this case, the disc will begin to overheat, which will lead to dire consequences on the road. You can check that the cuff does not return the piston only after raising the car.
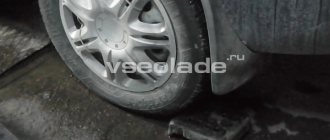
On a fully functional car, the wheel spins without difficulty, even if you rotate it by hand
Particular attention will need to be paid to ensure that the wheel rotates completely immediately after the brake pedal is released. Fortunately, this problem can and even needs to be fixed with your own hands.
The main advantage of fixing all problems yourself is budget savings and personal experience in car repairs. So, if something happens on your car that the cuff does not return the piston to its place, then you need to look for the reason. Most often it is hidden in the boot of the brake piston. The first thing you need to look at is the brake disc and pads. The brake disc should not show signs of overheating or signs of severe rubbing. If the disc is heavily worn, it will need to be replaced immediately with a new one. After inspecting the disc, you can begin to inspect the pads.
After the discs and pads have been inspected, we proceed to inspect the caliper piston. This can be done by just looking under the boot. There should be no marks, scratches, or even rust on the piston body; if any of these are present, then you need to disassemble the caliper. In stores that sell car parts, you can find a repair kit for car calipers. Most often, it only includes elastic bands and gaskets. In fact, a piston for a caliper is not so easy to find, so it is best to use an analogue from other cars, which will be similar in diameter and other parameters.
How to change front and rear brake pads
Replacing the front and replacing the rear brake pads are different, because the front has disc brakes and the rear has drum brakes.
General replacement procedure (disc and drum):
- Open the hood and unscrew the brake fluid reservoir cap.
- Jack up either front side and remove the wheel.
- Clean the brake disc from dirt.
This is what brake disc pads look like on a Skoda Octavia car
- Unscrew the bolts of the guide caliper and brake drum to gain access to the pads.
- Use a screwdriver to remove the pads.
- We install new pads in pairs.
- Then you need to bleed the entire brake system.
This was the general procedure for replacing brake system parts. Now let's look at how to properly change brake pads on the front and rear wheels.
Assembly and adjustment of brakes with a hydraulic drive of a GAZ-51 car
To assemble the brake mechanism of a GAZ-51 car, you must perform the following operations:
- insert two adjusting eccentrics into the protective brake disc, put the springs on them from the outside and tighten the nuts;
- assemble the wheel brake cylinder, installing a spring, two cuffs, two pistons, put on sealing covers and install the brake pad stop pins;
- screw the wheel brake cylinder assembly to the protective disc;
- install the pads, secure them with brackets and insert support pins with eccentric bushings and a tension plate; Screw locknuts with spring washers onto the fingers from the reverse side;
- put on tension spring 6 pads;
- attach the protective brake disc 7 to the steering axle flange (front wheel) or to the axle housing flange (rear wheel) and install the brake drum;
- Screw the air release valve with plug into the wheel cylinder from the side of the protective disk and attach the hydraulic drive hose fitting.
Rice. Brake mechanism of the GAZ-51 car: 1 - bracket; 2 — brake pad; 3 — eccentrics; 4 — block thrust pin; 5 — wheel cylinder; 6 — tension spring of pads; 7 — protective brake disc; 8 — support fingers; 9 — tension plate; 10 - lock nut; 11 — eccentric nut; 12 — eccentric spring; 13 — hole for the hose fitting; 14 — valve plug; 15 — air release valve.
To assemble the brake master cylinder you need:
- install into the cylinder sequentially the exhaust 13 and check valves 14 assembled with the exhaust valve spring 15, the check valve spring 16 with the support washer, the front rubber cuff 18 and the piston 21 with the star-shaped plate 19 and, the rubber o-ring 22 at the piston support washer 23 and the locking spring ring 24;
- insert a wire with a diameter of 5-6 mm into the compensation hole 12 and make sure that it is free and not blocked by the front cuff;
- install gasket 4 and screw on reservoir cover 10;
- secure the protective rubber casing 1 on the cylinder washer with a clamping ring, insert rod 2 and secure the second end of the protective casing to it;
- attach the cylinder to the frame, connect the cylinder rod to the brake pedal and screw in the hydraulic drive fittings;
- fill the system with brake fluid; To do this, pour liquid into the cylinder reservoir and sequentially pump all the wheel brakes, as indicated above, in order to remove air from the system.
Rice. Main brake cylinder: 1 - protective rubber casing; 2 — rod; 3 - reservoir; 4 and 5 — gaskets; 6 - mesh; 7 - plug; 8 - holes connecting the main cylinder to the atmosphere; 9 - reflector; 10 — master cylinder reservoir cover; 11 — bypass hole; 12 - compensation hole; 13 — exhaust valve; 14 - check valve; 15 — exhaust valve spring; 16 — check valve spring; 17 - cylinder; 18 — rubber cuff; 19 — star-shaped plate; 20 — holes in the piston; 21 - piston; 22 — rubber sealing ring; 23 — support washer; 24 - spring ring.
Do-it-yourself replacement of front brake pads:
- Select the recommended brake pads for your specific vehicle make and model.
- Then prepare a set of automotive tools, place the car on a level place, place wheel chocks (shoes) under the wheels and jack up the wheel.
- Unscrew the brake reservoir cap to relieve pressure in the system.
- Unscrew the guide caliper bolts. If there are still fixing brackets, then remove them with a screwdriver. If there is a brake pad wear sensor, disconnect it.
- Use a thick, strong flat-head screwdriver to separate the pads. To do this, insert a screwdriver between the pads to press the brake piston and remove the worn pads.
- Clean the places for installing new pads and install them.
- Carefully lubricate the caliper guides and at the same time do not allow oil to get on the surface of the pads.
- What was unscrewed during disassembly, we screw it back.
- Install the wheel and remove it from the jack.
- Bleed the brake system.
Possible problems and their causes
As mentioned above, if the installation of new pads is carried out by an inexperienced car enthusiast, then problems may arise during future operation. These include:
- Overheating of brake discs. The main reason for this is the “wedging” of the caliper guides. In such a situation, the pad cannot fully interact with the working surface of the disc. Uneven pressure resulting from deformation of the pad leads to overheating. Its premature wear can also be a cause.
- Creaking and grinding of pads. The reason for the appearance of such sounds during operation of the brake system may be a violation of the integrity of the boot of the main piston, the use of low-quality consumables, the absence of cuts or bevels on the surface of the pad, excessive overheating of the disc or its wear. Extraneous noise can be eliminated in various ways, depending on the specific reasons.
- “Sinking” of the brake pedal. This phenomenon can be caused by damage to the cylinders, a lack of working fluid in the system, or poor-quality assembly. Most often, the pedal fails after replacing the pads due to the carelessness of the car enthusiast who installed them. Inexperienced intervention in the system will most likely cause air to enter or working fluid to leak out.
- Knock when braking. It can be caused by play in the caliper guides, wedging of the piston, bending of the brake disc, or loosening of the cable in the parking brake system. Another reason for the appearance of such extraneous noise can be the anti-lock braking system, if it is included in the design. To check this, you need to pull the fuse from it, which will “turn off” the ABS, but the brakes will continue to function.
- Vibration. It may be caused by deformation of the brake disc. It may be caused by excessive heat during operation. The fact is that during intense braking, the pads can be pressed too hard against the disc, creating enormous pressure and temperature. This can cause the disk to lose density and change its shape. It is worth noting that sudden cooling of the disk can also cause deformation in certain places.
Taking into account the above reasons, you can adjust your driving style in such a way that the service life of discs, pads and other elements of the brake system will increase several times. An inexperienced driver can protect the braking system from such problems to some extent by installing ABS.
Do-it-yourself replacement of rear brake pads:
- Place the car on a level place, put the “shoes” on it and jack it up.
- Remove the wheel.
- Remove from the handbrake.
- Remove the bolts that secure the brake drum.
- Remove the brake drum. To do this, sometimes you have to knock on it quietly, because it happens that the pads are skewed and the drum cannot be removed.
- Take a photo or remember how the springs should be installed. If the springs are installed incorrectly, the pads will not be able to separate all the way.
- Release the handbrake cable.
- Disconnect all springs and links using a flathead screwdriver.
- Remove the rear brake pads and install new ones. The order of assembly is inversely proportional to disassembly.
- Put the wheel on, do not immediately remove it from the jack. This is needed for verification.
- Put the handbrake on and try to turn the rear hanging wheel. If the handbrake does not hold, then you need to adjust the parking brake cable. If everything is done correctly, with the handbrake set all the way, the rear wheel will not spin.
- We remove the car from the jack.
Replacing the caliper repair kit
The most difficult and responsible operation when repairing calipers is replacing the caliper repair kit. During this operation, all seals and rubber parts of the caliper are changed.
To begin with, you must purchase a repair kit for the caliper of your car. To do this, in a car store you will have to tell the seller the make and model of your car, the year of its manufacture and other information that the seller asks.
To carry out repairs using a repair kit, you first need to dismantle the caliper. After that, transfer it to the workbench and completely disassemble it
A very important note - the place where the caliper is disassembled must be as clean as possible. Even the smallest grain of sand getting inside the caliper threatens its early failure
When disassembling the caliper, it is recommended to write down or photograph the places and methods of installing certain parts.
In most cases, you will need to replace the following rubber products:
- Brake cylinder seal;
- Brake piston boot;
- Guide boots;
- Guide seals;
- O-ring of the bleeder fitting.
If there is deep corrosion on the working surface of the brake piston (with the formation of cavities), then the piston must also be replaced.
Reassemble the caliper in the reverse order of disassembly. After this, the caliper must be installed on the car, the guides lubricated and the brakes bled. As you already know, you will need an assistant or a special device for this.
Video on replacing brake pads (step by step):
This video shows the complete process of replacing front disc brake pads. This replacement procedure is suitable for cars of the VAZ 2109, 2110, 2111, 2112, 2113, 2114, 2115, Kalina, Granta, Priora, Vesta, X-Ray family.
How to replace rear brake pads, watch this video.
Greetings, our dear readers! It's very nice to watch how you become more and more numerous. This means that our work is not in vain!
The topic of our material today will be the replacement of brake pads, signs of their malfunctions and types of these elements. I hope you find it interesting and useful.
Even as a young man who first received an old Zhiguli from his father, it didn’t matter to me what kind of car it was, what year it was made or how much horsepower there was under the hood.
Dad put forward the condition that once the car was transferred to me, it would be at my complete disposal and under my responsibility. In other words, if you love to ride, you also love to repair Zhiguli.
Every driver should understand that the main thing is not to accelerate, but to be able to brake in time. VAZ, Nissan, Chevrolet, Toyota, Opel, Mazda or Skoda cars can accelerate from 20 to 100 kilometers per hour in 20 seconds, or spend literally a few seconds doing so. If everything is fine with the brakes, there will be no problems, it will not be difficult to reduce the speed to zero.
But the brake system, like many other automotive components, wears out over time and fails. Usually this happens gradually and only in special situations can a breakdown occur without preliminary symptoms of a problem. Therefore, I suggest you discuss such a topic as replacing brake pads and consider what indicates the need for replacement, when it is necessary to change and which elements are best to choose.
Drum brakes: how they work and how to repair them
Drums, of course, long ago lost the evolutionary war to discs, but to this day they are quite actively used on inexpensive and lightweight machines. All Ladas, Renault Logan, VW Polo sedan, Skoda Rapid, Daewoo Matiz - the list of completely modern models using these archaic but durable brake mechanisms will be very long. This means it’s useful to know how they work, why they break and how they are repaired. After theoretical preparation, we will go to the repair zone, where we will examine the drums of a rare Chinese sedan Chery Jaggi, better known in Russia under the name QQ.
Drum brake design
Drum brakes have not changed fundamentally since their mass appearance in 1902 thanks to Louis Renault. True, those brakes had a cable drive, and therefore they were exclusively mechanical. Plus they did not have automatic adjustment, so the driver had to regularly check the gap between the pads and the drum. But the fundamental design, I repeat, has changed minimally.
We will describe here the most common, classic design of the drum brake mechanism. There is a brake flap that is rigidly attached to the rear axle housing or wheel axle, and it does not rotate. There is also a drum that is attached to the wheel hub and rotates with it and the wheel.
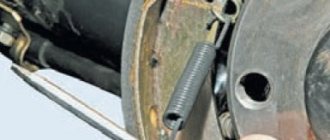
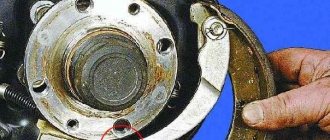
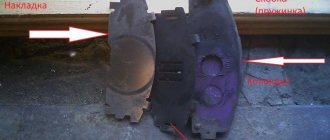
The brake pads are installed on the brake flap. On one side, the pads rest on the axles, on the other, on the pistons of the working brake cylinder (this is clearly visible in the photographs). When the brake pedal is pressed, the brake fluid pushes the pistons in the working cylinder apart, which in turn pushes the brake pads apart. The pads are pressed against the surface of the drum and the car slows down. Friction linings are glued or riveted to the pads. To prevent the pads from falling out, pressure springs are installed.
A nice feature of this design is that one of the pads has the property of wedging (it is called active). To give an example, imagine a car wheel, spin it well and try to insert an object between the wheel and the arch with your hand: on one side the object will be pushed out, and on the other it will be pulled even more into the space between the wheel and the arch, thereby wedging wheel. The same situation applies to the pads.
The second block (passive) is repelled by the drum, and its efficiency is lower than the first - this, on the contrary, is an unpleasant moment. To compensate for the difference, the friction lining of the passive pad is larger in size than the active pad.
The downside of a jammed pad is that the braking force does not increase in proportion to the force on the pedal. Simply put, you press the brake pedal and get a completely different, much greater deceleration than expected. This is not the case with disc brakes.
To ensure that the pads return to their original position after braking, return springs are installed on them. Often, if the rear brake mechanism is drum, then the same pads are activated when the parking brake (“handbrake”) is applied. One of the pads has an additional lever to which a cable is attached, when moving the cable the pads are moved apart.
On modern cars, the drum brake mechanism is self-adjusting. That is, you don’t need to crawl under the car every few thousand kilometers or after repairs, like on a ZIL 130, to measure the gap between the friction linings and the drum.
In the photo: ZIL-130 '1966–74
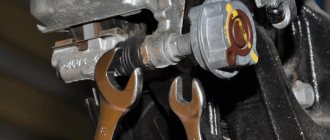
However, even on modern cars the parking brake still needs to be adjusted. Therefore, the spacer strut, thanks to which the pads are moved apart when the handbrake is tightened, tends to lengthen or shorten due to the rotation of the nut (it is also clearly visible in the photo). Another positive aspect of drum brakes is the working surface area of the friction linings - in any case, it is larger compared to disc brakes.
But due to the specific operating conditions (see above), the wear of the linings is uneven, which means that the force will also change with wear. In turn, no one bothers to increase the working area of the linings by increasing not only the diameter of the drum, but also its width, and this is an indisputable plus. This is skillfully used by truck designers, for whom it is more important to brake 20 tons within the limits of decency than the delicate connection between the driver’s foot and the acceleration of the vehicle’s deceleration.
Moreover, even if a car has disc brakes installed all around, then with a high degree of probability the handbrake brake mechanism is implemented using a drum circuit. They simply make a groove in the disc and create their own small drum and place it inside the pad.
A few words about outdated drum brake designs. In search of simpler and more effective design options, engineers, in order to solve the problem with a block that does not wedge, came to the conclusion that it is possible to install two working cylinders on two opposite sides of the brake flap (as on the GAZ 24 and many other cars with drum brakes in front and behind). In this case, both pads became jammed, but only when moving forward.
When replacement is required
To begin with, let me remind you that the block consists of two main components. This is the lining (aka friction) and the body itself. It is the friction element that performs the most important function, that is, it brakes the brake disc. Therefore, it gradually wears out naturally. Replacing the pad is only a matter of time. Previously, they only changed the linings themselves, but now they simply dismantle the entire block and put a new one in its place.
When exactly it will be necessary to replace disc brakes or change the drum, no one can say for sure. Wear and performance depend on a number of factors:
If we talk about the pads on the front wheels of a car, they can last approximately 10-15 thousand kilometers. This is a completely normal indicator for an average car in our conditions (road quality, weather, etc.).
And the pads installed on the rear wheels last longer, since the load on them is slightly less. This is if the main load in the car falls on the front brakes, and not the rear. They usually live 30-60 thousand kilometers, and sometimes more.
Installing rear disc brakes is a popular modification for a car because they are more efficient and reliable. Some cars are already equipped with disc brakes. Therefore, when buying a Ford Focus, Renault Logan, Hyundai Solaris, Volkswagen Polo or Passat, Kia or Audi cars, pay attention to how the brake system is designed on them and what it consists of.
There is one general rule for everyone. Brake pads should not be worn more than 1.5 millimeters from their original size. If wear exceeds one and a half millimeters, this will negatively affect the quality of braking, and you risk damaging other components of the system. Plus, the car will start making unpleasant sounds that will literally irritate you every time you press the brake pedal. There is no need to think about what to lubricate or where to turn the wrenches, as long as the creaking goes away. An unusual sound is a clear sign of wear. You will lubricate new components of the brake system during the replacement process.
Now there are so-called smart pads. Their peculiarity is that they have a wear indicator. When the time for replacement comes, that is, the block is ground down to the maximum permissible value, a characteristic squeak appears. From it, the driver easily understands that it is time to change this device, otherwise trouble will not be avoided.
Characteristic signs of wear
Yes, you can periodically send your car to a car service center, of which there are a huge number in the cities of St. Petersburg, Moscow and many others. But before going to the service station, you should understand why such measures and diagnostics were needed in the first place.
Some evaluate the current state of the elements with their own hands. Moreover, self-diagnosis looks quite simple:
- the front wheels are removed one by one and the condition of the pads is checked;
- if the thickness is below the acceptable level, it’s time to change;
- on the rear wheels, the drum is additionally removed to measure the thickness of the pad;
- the disk is cleaned of dust and dirt;
- measurements are taken using a caliper;
- The thickness of the brake disc must be at least 10.8 mm;
- If the pad is worn out only on the left or right, it still needs to be replaced in pairs.
Brake caliper piston - device, purpose
If the brake system breaks down, the car owner immediately checks the brake caliper piston and adjacent components. This is justified because this device affects the safety of vehicle operation and ultimately the preservation of people’s health and lives. But what else do we know about calipers and their operation?
Brake caliper piston and other system elements
If we consider the brake caliper design as a whole, we should remember that this is a unit that, with the help of pistons, ensures uniform pressing of the pads.
The very design of disc brakes requires them to operate in critical temperature conditions.
Between the pad and the disc, as a result of friction, the surfaces of the parts are heated to a temperature of 500-600 degrees Celsius.
Considering the design of a disc brake with a floating caliper, one should note its characteristic features.
Its movement relative to the disk during braking occurs in such a way that it can quite easily provoke various malfunctions in the form of critical accumulations of dirt, corrosion, and jamming.
In such situations, the pads wear out quickly and fuel consumption increases. A more reliable design is considered to be a fixed version of the caliper, where there is no movement of it relative to the disc.
Front and rear brake calipers
The design and design of the front brake caliper is an open unit, allowing it to be effectively cooled while driving.
It consists of a disc mounted on the wheel hub and the caliper itself. The sockets house cylinders that are installed in a certain position using special clamps.
Inside the cylinders there are pistons sealed with rubber rings.
In order to protect the internal cavity from dust and dirt, a brake caliper guide boot is installed. The outer cylinder contains a special valve that removes excess air.
The rear brake caliper has a more complex design due to the presence of an additional handbrake mechanism. Thus, the braking system of the rear wheels can operate from two drives - conventional hydraulic and mechanical, which provides additional operation of the parking brake.
The integrity of the brake caliper protection is the key to safety.
A preventative repair that your brakes may need to prevent serious problems is replacing the brake caliper boot, which protects the exposed parts from the penetration of moisture, dust and dirt particles, and other chemically active substances. If this small part is not maintained in good condition, then any dirt that gets inside will ruin your complex structure.
However, before removing the boot, you must disconnect the rear brake caliper piston. To remove it from the body, it must be unscrewed from the rod, which is an integral part of the handbrake. The front part of the brakes will be a little simpler.
Many car enthusiasts repair brake calipers with their own hands. However, in modern cars, the design of this system is a rather complex mechanism, the repair of which most often requires the help of qualified specialists.
Replacing the boot - we try to do it ourselves
In what order should I get to the boot and replace it? Remove the cap from the caliper that protects the guide head (also called the “finger”). We take a suitable hexagon, turn it out and take it out. Now we have access to the boot itself, we remove it too.
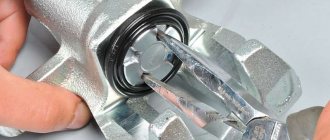
If there is dirt underneath, it needs to be washed thoroughly, preferably not only from the visible part of the caliper surface. If possible, press in the piston; usually a special tool is used for this.
This will prevent damage to the system inside, where sand will scratch the inner surface of the caliper and the outer piston.
When you have washed everything well, you can return the piston to its usual place and check its progress. If it now moves smoothly and there is no sand grinding inside, then you have achieved your goal, you can install the boot and assemble the system.
But once you are under the car and look into the caliper, you can remove it and check it completely for defects.
Choosing new pads
You understand perfectly well why you should replace your pads after showing signs of wear.
Do not forget to simultaneously check the disks and the condition of the handbrake, even if your car has an electronic handbrake. A failure of the handbrake is also not a problem, so its components will also need to be replaced if they fail.
When the pedal fails, the brakes squeak, make noise, overheat and after several braking stop responding normally to the pedal, things are bad. Cars with ABS are extremely dependent on the condition of the entire braking system. Therefore, extraneous vibration, wear of friction linings and problems with discs can lead to loss of control, decreased pedal response and emergency situations.
It's one thing to choose brakes on a bike and change them. Working on a car is something completely different. Therefore, I would advise you to contact a trusted car service center. They are well aware of the procedure for replacing pads. The cost is not that high. How much a replacement costs depends on several components.
You can buy yourself a new set of pads yourself. I suggest you find out what pads are currently produced and how to choose them wisely.
Let's start with two main criteria.
- Operating temperatures. For a regular passenger car, this parameter is selected at approximately 300-350 degrees Celsius. If we are talking about fans of sporty and aggressive driving, as well as owners of powerful fast cars, then you will need more durable pads - about 800 degrees.
- Friction coefficient. Until the pads reach operating temperature, which is about 200 degrees Celsius, the coefficient remains low, which is why the pads will wear out quickly. Experts recommend focusing on an indicator of 0.3-0.5. The higher the coefficient number, the better the car can brake.
The next point is the material from which the block is made. There are several of them, and they have their own characteristics.
- Semi-metallic. More than 40% of the composition is high quality metal. Use iron, copper or graphite. Inorganic components are also added to ensure excellent heat transfer and long service life. But at sub-zero air temperatures they brake poorly and wear out faster.
- Organic. Consist of glass, resin, rubber, Kevlar and carbon. Soft, effective, silent. But they don’t like moisture and create a lot of dust when braking.
- Low metal. The composition resembles organic ones, but with the addition of steel or copper. They wear out quite quickly and are expensive.
- Ceramic. The most effective, but also the most expensive. They brake perfectly, are not afraid of temperature and moisture, and are made of metals and ceramic fibers.
If you notice the first signs of wear, do not delay with replacement. When the price for work at a service station confuses you, you can try changing the pads yourself. Photos and videos are kindly offered by YouTube users, as well as various sites where there are similar photo reports and video tutorials.
What kind of pads are on your car and how often do you change them? Write about it in the comments, ask questions. Subscribe, don’t forget to tell your friends about us and expect a lot of new, interesting and useful materials.
(No ratings yet)
Did you like the article?
Subscribe to updates and receive articles by email!
We guarantee: no spam, only new articles once a week!
Any car owner can change the front brake pads themselves in a garage or in the field. This step-by-step instruction will help you change brake pads correctly and without errors. Even those who first decided to swing the pads with their own hands will be surprised how simple and quick the procedure is.
Assembling and adjusting air brakes
When assembling the brake mechanism, perform the following operations:
- A shaft with an expanding fist is installed in the protective disk.
- Install the brake pads, insert two support pins of the pads with eccentric journals. A plate is put on the finger heads and locking brackets are inserted. On the reverse side, spring washers are put on the fingers and the nuts are tightened. In this case, the support fingers are installed so that the marks on their ends are directed one towards the other.
- Put on the tension spring of the pads.
- Install the brake drum.
- Insert the worm gear into the brake lever, screw in the worm and secure it with a sleeve. Insert the worm stopper and its spring and screw in the plug. Screw the brake lever cover onto three bolts, install it on the splines of the expansion knuckle shaft, install a support washer and install a cotter pin in the shaft hole.
- Assemble the brake chamber. To do this, a rod with two springs and a support washer, a diaphragm are installed in the brake chamber body and screwed to the cover body. A nut and plug are screwed onto the end of the rod. After assembly, the chamber is tested for leaks under a pressure of 8-9 atm, and the joints are covered with soapy water. Leakage results in the appearance of soap bubbles.
- Place the camera in place and connect its fork to the brake lever using a pin and a cotter pin. For the front brakes, the rod forks are connected to the lower holes of the levers, and for the rear brakes, to the upper ones.
- The control valve assembly is mounted on the frame and its lever is connected to the brake pedal rod.
- Connect the hoses to the brake chambers, to the control valve and to the cylinder.
What tools are needed to replace brake pads yourself.
- jack
- wheel wrench
- wrench with a set of heads of different diameters
- a tool for pressing in the brake caliper piston (caliper releaser). You can make such a tool yourself.
- Flat screwdriver. You will need a large screwdriver like an impact driver and a small one to
As you can see, the set of tools you will need is minimal.
Attention ! Before you start replacing brake pads, make sure that the new pads fit your car, in other words, make sure that you bought the right pads.
Replacement with disk
Many experts, including myself, say that replacing drum brakes with disc brakes is associated with a large number of problems:
- The first problem is adapting the hand brake mechanism to the disc mechanism. The design is too different, so connecting the old manual brakes to the new ones will not work. There are two solutions here - either figure out how to remake the old mechanism so that it works, or install a new one. The first option can only be performed by a mechanic with extensive work experience, and not everyone will undertake it. The second option is simpler and more accessible, but its cost is not small. You simply purchase and install a hydraulic handbrake on new mechanisms.
- The second problem is choosing a mechanism suitable for replacement with the required dimensions and to effectively cope with braking. So that there is no difference in diameter or studs. Why buy brakes that won't fit or will work worse than what you had? At the same time, you should not forget to demand quality certificates for purchased mechanisms. This is the only way to be sure that these are reliable branded parts.
- The third problem arises after replacing mechanisms. The fact is that any design changes in the car that affect control and so on must be included in the technical data sheet and the insurance document for the car. This is the only way you can avoid fines and other troubles from the traffic police and misunderstandings among the mechanics who will have to service your car.
- Fourth and most difficult, you may be denied registration of a vehicle if they consider that after modernization the machine no longer meets safety standards or the requirements of operating regulations. Therefore, first find out whether such a change in the design of your car can be registered, and then start thinking about how to change drum brakes to disc brakes.
If you don’t mind your nerves, money and time, you can get started, no one is stopping you.
These are all friends, subscribe to updates if you haven’t already and share the information with your friends via the link, it won’t hurt for them to subscribe either, see you.
Tips for use
Car care includes periodic inspection of important components and mechanisms of the vehicle. The brake system is one of the most important; its inspection for wear and possible malfunctions is mandatory.
Every 20 thousand km you should check the pads, springs, levers, etc., measure the brake fluid level, check the condition of the cylinders, seals and pipes for integrity and possible leaks.
When installing new pads, experts advise “rolling in” them:
- Find an empty section of road.
- Accelerate to the permitted city speed and slow down to 10 km/h, repeat the acceleration and reduce the speed at least 10 times. At the end of the procedure, drive another 5 km at a calm pace.