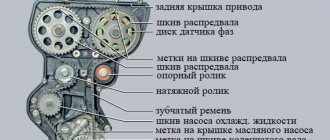
Modern car enthusiasts rarely use this socket for its intended purpose. Additional devices such as phone chargers are connected to the cigarette lighter socket. However, over time the device breaks down.
If you have the necessary knowledge and tools, replacing the cigarette lighter on a Lada Kalina car is a simple procedure. For repairs, you only need a standard set of hexagons, a screwdriver, pliers and a soldering iron. Read the article about why a malfunction occurs, how to identify it and replace the device, and why you should pay attention to the fuse.
Reasons why the cigarette lighter does not work on Kalina
This device on the car may break down over time. The main causes of cigarette lighter malfunctions are:
- Short circuit in the VAZ Kalina wiring circuit. A short circuit can appear due to various nuances: incorrect connection of the alarm system, faulty battery, “fatigue” wiring or moisture on the contacts. The fuse trips.
- Overheating of the heating element itself. The spiral may burst.
- The cigarette lighter on Kalina sometimes does not work due to poor contact in the socket itself.
- When connecting additional devices, the cigarette lighter fuse may blow. You need to disassemble the front panel and get to the block to check the serviceability of the circuit.
Replacing the cigarette lighter on Kalina 1st or 2nd generation
The repair process is practically the same for these Lada models. It is also relevant for the Grant or Priora family. To replace the cigarette lighter with your own hands on Kalina 1st or 2nd generation, just follow the following procedure.
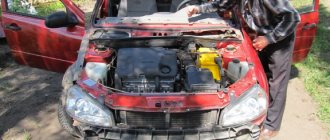
- Open the hood, find the battery and disconnect the negative terminal from it. It is recommended to remove it, because the mass is powered through the car body. If you turn off the plus, it will touch the body.
- We unscrew the three mounting bolts around the parking brake handle, which is located on top of the central tunnel. We dismantle the hand brake limit switch.
- We unscrew the rear fastening screw and additional screws on the sides.
- Remove the cover from the gear lever, and then lift the tunnel cover. Now you can remove the Kalina cigarette lighter itself.
- We disconnect the power plug coming to the electrical wiring circuit.
- We press the special latches that hold the cigarette lighter. After it pops out, it can be replaced.
- We install a new part on the Lada Kalina. After replacement, we carry out the assembly process. We perform all steps in reverse order.
The principle of installing piston rings on a VAZ 2107 car
When all the steps are completed and the connecting rod along with the piston are removed, it is necessary to clean them of carbon deposits and dirt.
After a preliminary inspection, you need to remove the piston rings. It should be noted here that the rings will have to be replaced, so you should not be afraid of breaking the parts that came off. Now installing new rings, you need to start with the oil scraper ring. First of all, install the expansion ring, which is made in the form of a flexible spring with a rod or an octagon-shaped plate. When a new ring is installed on the piston, you should gradually push it through and periodically measure the gap, because it must be a certain distance.
If at the extreme point the gap is more than 0.4 mm, then the ring must be changed, and if it is less than 0.25 mm, then the whole problem is in the lock and it should be sharpened. If the gap size is normal, then install the ring. Moreover, it should be taken into account that the locks should not coincide, but rather have a difference of 90 degrees between themselves. This procedure should be performed with all rings on all pistons.
When the replacement is complete, before installing everything back, pay attention to the gaskets and also clean the engine. These operations will improve engine performance
If compression is insufficient, the VAZ 2106 engine loses power and begins to consume excessively not only gasoline, but also oil. In the best case, you can get by with a simple replacement of the piston rings, in the worst case, a complete overhaul of the engine, starting from turning the cylinders, replacing the piston group and ending with repairing the car’s crankshaft.
If you decide to change the rings yourself, there should not be any special problems when performing this repair. Of course, you will need a considerable list of tools to do this as quickly and conveniently as possible. And also, it is necessary to perform a number of preparatory work to get to the pistons:
- Remove the cylinder head of the VAZ 2106
- Remove the pan to gain access to the crankshaft and connecting rod mountings
Personally, I carried out this procedure with the engine removed, since the car was almost completely disassembled. But everything can be done even with the engine installed, but then it is most convenient to carry out repairs on a pit or a lift.
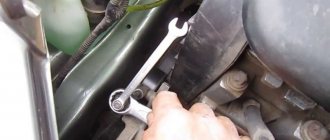
So, after the pan cover is removed, you can take a 14mm socket with a wrench and unscrew the two nuts securing the connecting rod cover. This is shown more clearly below:
When both nuts are unscrewed, you can remove the cover by hand; it can usually be easily removed without any problems:
Then, with a certain force, you need to press the connecting rod bolt with your hand or even with the handle of a hammer:
Until the piston comes out from the back of the cylinder. It will roughly look like this:
This should be done quite carefully so as not to damage either the piston itself or the cylinder walls:
Next, you can begin to remove and replace the piston rings if the cylinders are not yet worn out. To do this, carefully pry the edge of the ring with your fingernail or finger and remove it from the piston groove:
And carefully turn the ring until it is completely free from the groove:
After all the rings, both compression and oil control, have been removed, you can measure the clearance by inserting them into the cylinder and inserting a feeler gauge into the hole between the two edges:
If the values exceed the nominal values, we replace the rings with new ones. After which you can install all the parts in the reverse order of removal.
It is worth paying special attention that when installing the rings, their locks should be directed in different directions for greater tightness of the cylinder
Replacing the socket in the Kalina cigarette lighter
The device may not work due to a faulty seat. You should replace the socket of a broken cigarette lighter on a Lada Kalina by following the same procedure.
- Disconnect the terminals from the battery.
- Remove the gearshift lever casing and the central tunnel cover by unscrewing the screws holding the decorative plastic.
- Disconnect the contact chip and then remove the socket.
- Replace the part with a new one.
- Reassemble in reverse order.
Detailed step-by-step instructions are presented in the profile video.
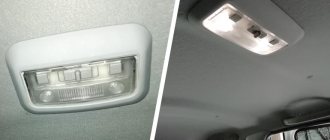
How to change the Kalina cigarette lighter lamp
The heating element itself has additional lighting around the socket. The backlight sometimes burns out when the fuse trips. Therefore, it is necessary to replace the cigarette lighter bulb on Kalina. The order of procedures begins in a similar way.
- Remove the contacts from the battery.
- We get to the fuse block, where we take out number F20.
- We unscrew all the screws holding the gearbox housing and lift it. It will be most convenient to put the box in 4th gear.
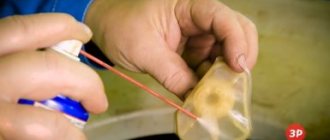
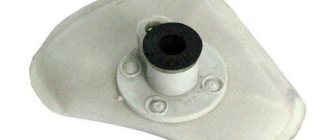
- We hook the device by the green filter and pull it out along with it.
- Turn it clockwise to disconnect the clamps.
- We dismantle the metal base.
- We take out the plastic green case.
- We find a cartridge with a paw. We take it out and replace it with a new one.
- We assemble in reverse order.
The video will help you replace the Kalina lamp.
Stories from our readers
“Fucking basin. "
Hi all! My name is Mikhail, now I’ll tell you a story about how I managed to exchange my two-wheeler for a 2010 Camry. It all started with the fact that I began to be wildly irritated by the breakdowns of the two-wheeler, it seemed like nothing serious was broken, but damn it, there were so many little things that really started to irritate me. This is where the idea arose that it was time to change the car to a foreign car. The choice fell on the melting Camry of the tenth years.
Yes, I had matured morally, but financially I just couldn’t handle it. I’ll say right away that I am against loans and taking a car, especially not a new one, on credit is unreasonable. My salary is 24k a month, so collecting 600-700 thousand is almost impossible for me. I started looking for different ways to make money on the Internet. You can’t imagine how many scams there are, what I haven’t tried: sports betting, network marketing, and even the volcano casino, where I successfully lost about 10 thousand ((The only direction in which it seemed to me that I could make money was currency trading on the stock exchange, they call it Forex. But when I started delving into it, I realized that it was very difficult for me. I continued to dig further and came across binary options. The essence is the same as in Forex, but it’s much easier to understand. I started reading forums, studying trading strategies. I tried it on a demo account, then opened a real account. To be honest, I didn’t manage to start earning money right away, until I understood all the mechanics of options, I lost about 3,000 rubles, but as it turned out, it was a precious experience. Now I earn 5-7 thousand rubles a day. I managed to get the car buy after half a year, but in my opinion this is a good result, and it’s not about the car, my life has changed, I naturally quit my job, I have more free time for myself and my family. You’ll laugh, but I work directly on the phone)) If If you want to change your life like me, then here’s what I advise you to do right now: 1. Register on the site 2. Practice on a Demo account (it’s free). 3. As soon as you get something on the Demo account, top up your REAL ACCOUNT and go to REAL MONEY! I also advise you to download the application to your phone, it’s much more convenient to work from your phone. Download here.
Second cigarette lighter in the car
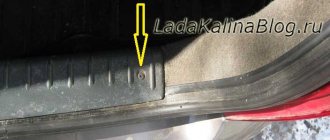
The easiest way, perhaps, is to install a cigarette lighter instead of a socket for a portable lamp . For those who don’t know, it’s located a little below the immobilizer. It already has a permanent “plus”, you just need to remove the socket (don’t forget to disconnect the battery), slightly increase the diameter from 25mm to 26mm and install an additional cigarette lighter in the socket.
Another method demonstrates how you can install
a cigarette lighter in a VAZ 2110 tunnel . In stores you can find a cigarette lighter kit with a hinged cover, wiring and fuse. Secure it to the tunnel using the self-tapping screws that also come with it. If there is a need to install several cigarette lighter sockets at once , then you can use Chinese tees with wiring.
For example, cut off the connector and simply solder it to the wire of the standard cigarette lighter. Route the wiring into the glove compartment, where you can place the tee socket. Placing a second cigarette lighter next to the standard one or under the immobilizer is also not a problem:
Additional cigarette lighter in the trunk
Those who read the configurations of foreign cars may have noticed the item: a second cigarette lighter in the trunk of the car . It acts as an outlet into which you can connect various devices that may be useful on the road.
Why do you need a cigarette lighter in the trunk of a car ? Many people use a car vacuum cleaner, compressor, refrigerator, inverter, flashlight, etc.
The connection of the cigarette lighter in the trunk is similar (in parallel with the standard one or separate wiring from the battery through a fuse).
Either a regular cigarette lighter or a tee, which was discussed above, can act as a socket in the trunk.
Cigarette lighter repair
If the device on a Kalina car does not work, this is not always evidence of a breakdown of the part itself. Therefore, before replacing the cigarette lighter, it is necessary to check the most common locations of other faults. It is worth making sure that the appropriate fuse is intact or that there is constant contact with the ignition. These places should be checked before proceeding with replacement or full repair.
Frequent malfunctions
There are certain reasons why the Kalina device may not work. The most common of them.
- Burnt fuse. The block with it is located under the front panel. We are interested in the fuse element number F20.
- Broken filament.
- Triggered fuse protection against overheating and fire.
- Corroded contacts responsible for the terminals and ground connections.
Installing an additional cigarette lighter (12 V) in Kalina
This is a convenient device. It is often used to connect various chargers for mobile gadgets or laptops. There are even splitters with USB connectors. Therefore, installing an additional cigarette lighter is a popular procedure. Already now there are devices on the market with a standard socket input, but with an output for several connections.
The cost of such devices for Kalina is 1 – 1.5 thousand rubles. When replacing, you need to remember that you do not need to overload the car’s wiring by connecting several devices at once - the fuse will blow under increased load. Some “craftsmen” solve the problem differently. A more powerful fuse is placed, but this is dangerous due to wiring burnout and fire. Therefore, everything should be done according to the instructions.
New cars > Cigarette lighter >
Did you like the material? Share with your friends:
Have questions about car repairs? Ask them in the consultation section, to do this, click on the link below.
auto mechanic
Complete information on the electrical equipment of the Lada Kalina car, including the following modifications: VAZ 1118 - 5-door sedan (2004 to 2011), VAZ 1119 - hatchback (since 2006) and VAZ 1117 - station wagon. Also reviewed is the Lada Kalina Sport, a sporty version of the hatchback produced since 2008. There are diagrams of all blocks, including the location of relays and fuses, which allows you to carry out minor repairs of auto electronics and replace burnt-out elements yourself. At the end of the reference book there is a link to a PDF album of schemes.
Addition block
The relay block is responsible for the following functions and components.
You need to know which guards protect which elements. This is especially true if one of them is responsible for two or three nodes. For example, if you discover that the cigarette lighter does not work (usually some device is connected through it, for example, a DVR), you should check the radio. If it does not turn on, then it is necessary to replace fuse F20. You can replace the damaged element yourself. There is no need to contact a car service, since after replacing the fuse everything should work.
Problem with Kalina's cigarette lighter. Solution
Kalina cross cigarette lighter fuse.
Fuse box | mounting block Lada Kalina
CIGARET LIGHTER DOES NOT WORK on #Kalina #Prior #VAZ
The cigarette lighter on the Priora does not work
Automatic brightness adjustment route on-board computer 150 is connected to the output of the vehicle dimensions. Electrical diagram of a Lada Kalina car, cigarette lighter fuse for a sedan body or electrical diagram for cars with hatchback and station wagon bodies. It must be positioned optimally, conveniently for yourself, and most secretly for a potential attacker. The mesh can be checked without a pressure gauge, although in a fire hazardous manner. You understand, it doesn’t turn.
You can also test the regulator by removing the sensor and connecting the connector. The front door withstood the load, and the windshield pillar had a large fracture. Similar requests and complaints are far from uncommon. With these simple methods and means, it is not difficult to transform your car; replacing the clutch slave cylinder, release bearing and cup, as well as the release heel is also done if during inspection there are doubts about the performance of the part. After cooling, the pin is lubricated through the holes in the piston bosses. If the filter has outlived its useful life, dust and dirt can easily penetrate. E should always be in excess, because there are many different creams and gels for this evil disease. And to install new lenses, you will have to grind the corrugation of the glass.
There is a desire to throw out the regulator from the Nafik circuit and connect the tube from the main one directly to the tee of the rear wheels.
General diagram of VAZ-1117, VAZ-1118, VAZ-1119
Elements of the instrument panel harness connection diagram
1, 3, 4, 5 — blocks of the tidy wire bundle to the front harness; 2, 8 - the same for the rear “pigtail” of wires; 6, 7, 9, 10 - continuation of the direction to the assembly unit; 11 — power supply for the lighting control device; 12 — set of instruments; 13 — toggle switch for the electric motor of the stove; 14 — power supply to the air supply box; 15 — ignition switch Lada Kalina; 16 — immobilizer block; 17 — block of the dashboard wiring harness to the ignition system wire bundle; 18 — cigarette lighter power supply; 19 — alarm switch; 20 — rear window heating switch; 21 — brake light switch; 22 — alarm light breaker; 23 — adjustment of computer modes ; 24 — windshield wiper control; 25 — VAZ horn switch ; 26, 27 — heating and ventilation control lighting lamps; 28 — glove box lighting; 29 — power supply to the on/off button in the glove compartment; 30, 31 — pinout for the standard radio; 32 — power supply to the electric motor of the stove; 33 — heater resistor network; 34 - electric amplifier control unit.
Selection of piston for VAZ Zhiguli cylinder
- Repair manuals
- Repair manual for VAZ 2107 (Zhiguli) 1982+.
- Selection of piston to cylinder
The calculated gap between the piston and cylinder (for new parts) is 0.05–0.07 mm. It is determined by measuring the cylinders and pistons and is ensured by installing pistons of the same class as the cylinders. The maximum permissible gap (if parts are worn) is 0.15 mm.
| Rice. 3–25. Main dimensions of piston, connecting rod, piston pin and piston rings |
NOTE The piston diameter is measured in a plane perpendicular to the piston pin, at a distance of 52.4 mm from the piston crown (see Fig.
).According to the outer diameter, the pistons are divided into five classes (A, B, C, D, E) every 0.01 mm, and according to the diameter of the piston pin hole - into three categories every 0.004 mm. The piston class (letter) and the piston pin hole category (number) are stamped on the piston bottom
If a used engine has a gap exceeding 0.15 mm, then it is necessary to re-select the pistons to the cylinders so that the gap is as close as possible to the calculated one.
Spare parts include pistons of classes A, C, E. These classes are sufficient to select a piston for any cylinder, since pistons and cylinders are divided into classes with some overlapping sizes.
↓ Comments ↓
1. Vehicle operation and maintenance
1.0 Operation and maintenance of the vehicle 1.1. Vehicle operation 1.2 Vehicle maintenance
2. General information
2.0 General data 2.1 Technical characteristics of vehicles 2.2 Controls and monitoring devices 2.3. Ventilation control and interior heating
3. Engine
3.0 Engine 3.1 Removal and installation of the engine 3.2 Disassembling the engine 3.3 Possible engine malfunctions, their causes and methods of elimination 3.4 Engine assembly 3.5 Bench tests of the engine 3.6 Checking the engine on a car 3.7. Cylinder block 3.8. Pistons and connecting rods 3.9. Crankshaft and flywheel 3.10. Cylinder head and valve mechanism 3.11. Camshaft and its drive 3.12. Cooling system 3.13. Lubrication system 3.14. Supply system
4. Transmission
4.0 Transmission 4.1. Clutch 4.2. Gearbox 4.3. Cardan transmission 4.4. Rear axle
5. Chassis
5.0 Chassis 5.1. Front suspension 5.2. Rear suspension 5.3. Shock absorbers
6. Steering
6.0 Steering 6.1. Inspection, check and adjustment of steering 6.2. Steering mechanism 6.3. Steering rods and ball joints 6.4. Swing arm bracket
7. Brakes
7.0 Brakes 7.1. Checking and adjusting the brakes 7.2 Possible malfunctions of the brakes, their causes and methods of elimination 7.3 Bracket for the clutch and brake pedals 7.4. Vacuum booster 7.5. Brake master cylinder 7.6. Front brakes 7.7. Rear brakes 7.8. Rear brake pressure regulator 7.9. Parking brake
8. Electrical equipment
8.0 Electrical equipment 8.1 Electrical equipment diagram 8.2. Battery 8.3. Generator 8.4. Starter 8.5. Ignition system 8.6. Lighting and light signaling 8.7. Sound signals 8.8. Windshield cleaner 8.9 Headlight cleaner 8.10. Heater electric motor 8.12. Control devices
9. Body
9.0 Body 9.1. Doors 9.2 Possible body malfunctions, their causes and methods of elimination 9.3. Hood, trunk lid, bumpers 9.4. Body glazing 9.5. Windshield and headlight glass washers 9.6. Instrument panel 9.7. Seats 9.8. Heater and ventilation of the body interior 9.9. Body frame repair 9.10. Paint and varnish coatings 9.11. Anti-corrosion protection of the body
10. Modification and equipment of VAZ-2107 cars
10.0 Modification and equipment of VAZ-2107 vehicles 10.1. Car VAZ-21072 10.2 Car VAZ-21074 10.3. Car VAZ-21073-40
11. Applications
11.0 Appendices 11.1 Appendix 1. Tightening torques for threaded connections* 11.2 Appendix 2. Tools for repair and maintenance* 11.3 Appendix 3. Used fuels and lubricants and operating fluids 11.4 Appendix 4. Basic data for adjustment and control 11.5 Scheme
Detailed electrical diagrams of car components
Instrument panel wiring harness wiring diagram
Electrical connection diagram for the wiring harness of the ignition system Lada Kalina 11174, 11184, 11194
Electrical connection diagram of the front VAZ-11184 wiring harness
Electrical connection diagram for rear wiring harness VAZ-11184
Useful: Connection diagram and pinout of the VAZ power window button
Diagram of electrical connections of the additional rear wiring harness (tailgate wiring harness) and the wiring harness of the license plate lights of the LADA KALINA 11174 car.
Electrical connection diagram for rear wiring harness VAZ-11174
Electrical connection diagram of the front VAZ-11174 wiring harness
Electrical connection diagram for rear wiring harness VAZ-11194
Wiring diagram for fog lights
1 - fuse in the assembly block; 2 — immobilizer output; 4 — rear fog lights; 4— external optics control unit; 5 — ignition switch; A - to power supplies.
Lada Kalina fuse and relay diagram
The main mounting block for the vehicle's relays and fuses is located on the left side, behind the exterior lighting control panel. By pulling the tab on the left side of the instrument panel, we open the cover of the mounting block.
| 1 | 10 | Instrument cluster, immobilizer (APS-6), reverse lamp switch, direction indicators, automatic climate control system controller (luxury) |
| 2 | 30 | Window lifters Lada |
| 3 | 10 | Ignition switch (terminal 30), hazard warning switch |
| 4 | 20 | Wiper switch, wiper relay, front wiper motor, rear window defroster switch, airbag control unit, rear wiper, heated seat relay coil |
| 5 | 25 | Heater, electric power steering control unit, windshield wiper switch (window washer) |
| 6 | 20 | Sound signal |
| 7 | 10 | Brake light switch, interior lighting, on-board computer (instrument cluster), light control module (LCM), immobilizer (APS-6) |
| 8 | 20 | Heated rear window relay |
| 9 | 5 | Side lights on the right side, glove compartment lighting, immobilizer (APS-6) |
| 10 | 5 | Left side parking lights, license plate light, parking light indicator |
| 11 | 7,5 | Rear fog lamp, immobilizer (APS-6) |
| 12 | 7,5 | Right low beam, right light corrector gear motor, light switch, immobilizer (APS-6), light control module (LCM) |
| 13 | 7,5 | Left low beam, left light corrector gear motor, light switch, immobilizer (APS-6), light control module (LCM) |
| 14 | 10 | Right low beam, high beam indicator |
| 15 | 10 | Left high beam VAZ |
| 16 | 10 | Right fog lamp |
| 17 | 10 | Left fog lamp, light control module |
| 18 | 15 | Seat heating relay |
| 19 | 10 | ABS, light control module (LCM) |
| 20 | 15 | Cigarette lighter VAZ 1117/1118/1119 |
| 21 | 10 | Reverse lockout solenoid |
| 22 | 15 | Electrical package control unit, anti-theft system |
| 23 | — | — |
| 24 | 7.5 | A/C compressor clutch relay |
| 25 | 30 | Electrical package control unit |
| 26 | 25 | ABS |
| 27 | 5 | Spare |
| 28 | 7,5 | Spare |
| 29 | 10 | Spare |
| 30 | 20 | Spare |
| 31 | 50 | Electric power steering |
| 32 | 40 | ABS |
| Car relay | ||
| R1 | headlight washer | |
| R2 | Window lifters | |
| R3 | Starter VAZ 1117/1118/1119 | |
| R4 | Auxiliary relay (rear window defroster, heater, wiper and washer switch) | |
| R5 | Hazard warning and direction indicators | |
| R6 | Wiper | |
| R7 | High beam | |
| R8 | Sound signal | |
| R9 | Fog lights | |
| R10 | Heated rear window | |
| R11 | Heated seats | |
| R12 | Air conditioning compressor |
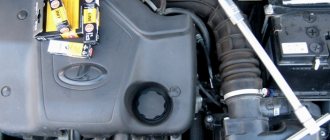
The engine control systems fuse box is located in the center console - under the protective cover.
- Diagnostic connector.
- 15 A. Main relay circuits (winding of the cooling system electric fan relay, canister purge valve, air flow sensor, speed sensor, oxygen concentration sensor, ignition coil).
- 15 A. Fuel pump, fuel pump fuse.
- 15 A. Constant power supply circuits of the controller (ECU).
The relays are located in the lower right part of the console, where the fuses for the electric fan of the Lada Kalina cooling system are attached.
Before replacing the fuse, the cause of the blown must be determined and eliminated. To avoid failure of engine control system elements, do not install fuses with an increased current rating or homemade bugs. Sometimes the fuse thread remains intact, while the connection inside the fuse is broken. It is impossible to determine such a malfunction by eye, and then you can assess the condition of the fuse using an ohmmeter.
You can download a PDF with color diagrams of the Lada Kalina in high quality using the link
AvtoVAZ
Version 24.10.16 beta
| Car reference book |
Moving the site to a new domain.
General diagram of the electrical equipment of the VAZ 1117/1118/1119 Lada Kalina General diagram of the electrical equipment of the VAZ 1117/1118/1119 Lada Kalina
Description of the ELECTRICAL DIAGRAM
Note. This diagram does not show the connection points and wiring harness terminals. Along with the letter designation of the color of the wires, the designation of the number of the circuit element to which the given wire is directed is used, for example “6”.
Why doesn't the cigarette lighter work?
Perhaps the fuse was blown due to too much load from the compressor, charger or cigarette lighter splitter. This is one of the most common and easily fixed problems in Lada Kalina. You will need to open the fuse compartment cover to the left of the steering wheel and replace the blown one. Typically used before. 15 or 20A regular flag.
Another common reason for the cigarette lighter not to work is the unbending of the metal contacts inside it. For example, you often use a charger or power strip. Because of this, the contacts inside the cigarette lighter are unbent. In order for it to work again, you just need to bend them. This must be done carefully using a thin flat-head screwdriver without shorting the contacts, otherwise the fuse will be blown out.
If you decide to completely replace the cigarette lighter, you will need to dismantle the console from the handbrake to the instrument panel with the gearbox cover, only then can you remove the device.
prikur
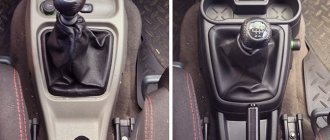
Pay attention to the different installation heights of the ground contact. Pay attention to the different installation heights of the ground contact
YOU CAN IF YOU ARE CAREFUL ENOUGH
1. If you decide to connect additional equipment to the cigarette lighter or socket (and the instruction manual does not object to this), estimate the current consumed by it: it should not exceed 10 A at 12 V, which corresponds to a power of 120 W. 220 V voltage converters or adapters for laptops, vacuum cleaners, coffee makers, seat heaters, compressors, mini-washers, and polishers can become dangerous. Be sure to read the documentation that comes with them.
2. Chargers for mobile phones, ionizers, adapters for navigators, miniature TVs in good condition consume obviously less current. To ensure that this happens, do not buy illegal products from roadside peddlers - there is a high probability of stumbling upon devices of poor quality. Save pennies - you may lose your car. By God, it’s safer not to be greedy and make a purchase in a dealer’s company showroom or a reputable store.
3. The plug must be held tightly in the socket (or socket) and should not shoot out of it at the slightest wobble. It’s a good idea to repeat this check on the road, especially if the road is bumpy. In addition, when you touch the plug, you can feel overheating. It is good if an additional fuse is installed inside the electrical consumer (look for instructions about this in the instructions for the device).
4. The coiled wire of the connected device should not be too tight. If you cannot relieve the tension by moving the electrical consumer, try to stretch the wire with your hands; It will work better if you heat it up with a hairdryer. The springing effect will weaken and the wire will no longer pull the plug.
5. Do not leave the car unattended with the equipment connected, especially if the cigarette lighter (or socket) does not turn off when you remove the key from the ignition. This is perhaps the most important thing to control in order to prevent a fire.
Is a cigarette lighter dangerous?