For a car with high mileage, corrosion of the bottom is a common thing. Mechanical damage, high humidity, and deicing agents destroy iron over time. The metal turns to dust. Driving such a car is dangerous, the car needs repairs. It is not profitable to contact a service station; the technicians may overcharge you. Having a welding machine, it is easy to weld the underbody of a car in the garage. It is important to take into account some nuances and adhere to technology. It is more convenient to carry out the work together; a partner will help fix the patch before tackling.
VAZ 2114 replacement of rear jacks
Having carefully examined the bottom, I roughly imagined what spare parts we would need.
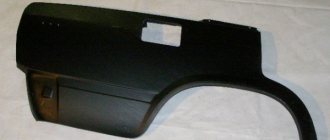
Moreover, from below, from the pit, everything didn’t look as scary as it actually turned out. Everything looks intact, but point your finger and fuck it. Rear arches (short), complete sets of sills (3 parts) and all jacks were purchased.
Prepared grinder, welding, shurik. I took a couple of cans of primer, a couple of bottles of zinc (rust converter), degreaser, 2 cans of bitumen mastic, 3 bitumen mastic in cans, 2 large cans of Movil, and some little things: new plugs in the bottom, brushes, etc. I decided to start with the worst part - the passenger side. I disassembled the interior, removed the seats, all the plastic, carpet and factory Shumka. This is the picture I saw
you can immediately see the hole on the right approximately 15x5 in size
driver's side. There are no visible holes, just rust.
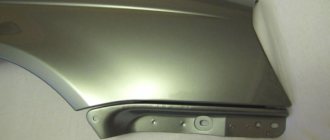
the rear is more or less in good condition
I filled everything with zinc and began to slowly pick at the passenger side.
I picked it with my finger and found a hole like this
here you can see the whole nightmare that I was able to observe
I cut off all the corrosion with a grinder and began preparing patches.
At the same time I took up the threshold. I drilled holes in the welding areas, beat off the old threshold from the amplifier with the body with a chisel
Primed the parts and drilled holes for welding
I sawed off the threshold with a grinder. I didn’t cut it all off and cook it all at once. I left the pillar intact so that the body remained geometrically straight - so that the roof did not collapse and the doors would later fit together along the gaps. Otherwise it can take everything away without a threshold)
I chipped away at the old amplifier with a chisel and saw this
started installing the amplifier
This is the picture we get when looking at it from below. The jack is dead.
Well, I started welding the part (which goes to the bottom from the threshold) and the threshold itself.
welded patches in the cabin
this is what happened in the end
I moved on to welding the rear sill and jack. Along the way, I discovered and patched a hole in the arch.
this is where the hole was found
rear sill welding
Well, this is what ended up happening on the passenger side. The threshold assembly was welded, the jacks were replaced and patches were installed in the right places.
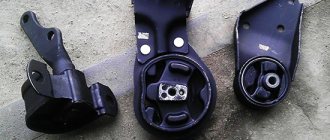
body center and rear jack
passenger side front
The driver's side turned out to be a little better, I also overhauled the sills and replaced the jacks (they turned out to be dead there too). There were no large patches on the bottom; I only had to put one small 15x15 in the area of the feet.
Source
Do-it-yourself body welding
It is quite difficult to weld a body on your own. This requires skills in working with welding equipment and the ability to accurately determine areas that need correction. You need to carefully inspect the body and do an analysis of the iron that is susceptible to corrosion. Thus, body repair can be divided into local and complete.
A complete repair involves replacing most of the car body, while a local repair involves removing rust in individual places. If a car enthusiast is familiar with the principles of welding, then carrying out a complete repair will not be difficult for him. But for novice welders it is better to start with local problem solving.
If the body rots in a place that is invisible to others, for example, on the bottom, then any material can be used as a patch. The main thing is that it is suitable in quality and thickness. If the corrosion site is located on the outside, it is best to use the type of iron from which the car body is made. It is important that the seam is invisible.
If a small area has suffered from corrosion, you can do without welding. It is enough to use special mixtures. They contain epoxy resin and fiberglass. The effect of such a repair will be no worse than that of welding, and the aesthetically similar patch will look better. To increase reliability, you will need to glue the welding joints from the inside of the crack.
To protect the body from corrosion, its condition should be constantly monitored. To prevent rotting from becoming a real problem, you need to wipe hard-to-reach places dry after each car wash. And after driving through puddles and snow, remove adhered dirt. If all this is done regularly, the car will last quite a long time.
The article describes an interesting method for solving the problem with rotten thresholds. Perhaps someone will need it for VAZs.
Cars often have problems with thresholds. This depends on the age of the car, and is also affected by various weather conditions. Water, dirt, and car sills begin to rot. There is a different attitude towards car repair now. Previously, to make a high-quality threshold for several years, it took at least two days, or even more. I want to describe a method of how to quickly repair a car threshold in 5–6 hours. The time also depends on what to do with painting the threshold or not. In this repair, I want to leave the top of the threshold and cut off only the lowest part, the most rotten, and also cut off the lower part of the second repair threshold and put it in place of the rotten one. To begin with, I change the threshold, and in the future I will make sure that the doors coincide with it. Although there may not be any problems since I will only be cutting off the bottom part, one way or another there may be some minor problems because the replacement threshold is not original. My car is M2141 or Moskvich 41.
Features of repair and replacement of the bottom of a VAZ 2114 and 2115 car
The VAZ 2114 car was produced by the Volzhsky Automobile Plant in the period 2001-2013. The bottom of the VAZ 2114, unlike the sills, was not a common consumable. If immediately after the purchase the driver carried out routine inspections and fully protected the body from the aggressive effects of salt reagents and moisture, parking and overnight stays of the car in the open air were limited.
An exception is an accident or collision with an obstacle, as a result of which the bottom is deformed from mechanical damage.
How to cook thresholds on a VAZ 2114
If the sills on a VAZ 2114 are rotten, in addition to replacing the main element, you will also have to re-weld the bottom by cutting out the old metal and installing patches. Step by step process:
- The connector or the lower part of the box is welded.
- The amplifier is installed.
- The outer part is welded by arc welding.
- Welding seams are cleaned with a grinder, primed and puttied.
- After 12 hours, anti-corrosion agents are applied to the bottom and outer part, and at the final stage, painting is carried out with auto enamel.
It is not recommended to operate the car for 24 hours until the paint has completely dried.
Design Features
Model 2114 was built on the basis of the VAZ 2109, it is a restyled version. The hatchback received a new steering column, a modernized dashboard, an updated one and a half liter engine, redesigned for Euro 2 protocol. The VAZ 2114 shares the same wheelbase with the Nine, 2460 mm. The configuration of the bottom panel is the same for the models.
Are there any differences between 2114 and 2115
The VAZ 2115 model is considered a related model. The hatchback is built on the basis of the VAZ 21099 with various transport sizes and shares one wheelbase with the entire Lada Samara family. The standard dimensions of the bottom and sills for VAZ 2108, 2109, 21099, 2113, 2114, 2115 models are the same and interchangeable.
The bottom of the VAZ 2114 structurally consists of the following parts:
- central reinforced panel;
- driver's side panel;
- side passenger;
The factory stock bottom is a one-piece stamped part, primed and painted black. The polyethylene coating acts as protection.
How to replace the thresholds of a VAZ 2109 with your own hands
If a significant part of the thresholds is damaged by corrosion, then there are no options other than completely replacing these body elements. To carry out repair work you will need the following list of tools and materials:
- semi-automatic welding machine;
- new thresholds;
- Bulgarian;
- drill;
- sandpaper;
- putty and primer;
- anti-corrosion compound (mastic).
Features of replacement and preparation for it
When planning body repairs, you need to understand that the design of the VAZ 2109 thresholds consists of the following elements:
- outer box;
- inner box;
- amplifier
The outer and inner boxes are the outer walls of the threshold. The outer element goes outside and is located under the door, and the inner one is located in the cabin. The amplifier is an element located between two boxes inside. Most often, the outer frame is subject to corrosion, and when replacing thresholds, this particular body part is in mind.
Even though new parts are used when replacing thresholds, they still require preparation. From the factory they are covered with shipping primer, which must be cleaned before installation, i.e. the metal must shine. This is done using sandpaper or grinder attachments. After cleaning, the elements are degreased and coated with epoxy primer.
The final preparation of the thresholds comes down to drilling holes with a diameter of 5–7 mm for welding in the places where the parts adhere to the body.
Preparatory procedures also include the dismantling of doors, aluminum sill trims and interior elements (seats, floor covering, etc.). Before the immediate start of work on removing the old thresholds, a metal corner is welded to the racks from inside the cabin. It will provide rigidity to the body and prevent it from deforming after cutting off the thresholds.
Step-by-step replacement instructions
Having prepared everything you need, you can begin the repair. The procedure consists of the following steps:
- Place the new threshold on top of the old one and outline it with a marker.
Video: replacing thresholds on a VAZ 2109
Damage to the sills by corrosion on the VAZ “Nine” is common. These body elements can be replaced by every car owner who knows how to use an angle grinder and semi-automatic welding. If you don’t have such experience, then it’s better to trust the specialists. Only in this case can one hope for high-quality repair work and a long service life of the thresholds.
When repairs are required
For all VAZ models, the body was made of black or low-carbon steel of class 08Yu, 08KP. The parts were not galvanized, but were coated with a polymer anti-corrosion composition; the film protected the bottom from moisture for up to 6 months, then natural oxidation processes began. After the purchase, drivers had to carry out thorough anti-corrosion treatment of the metal.
Repair or complete over-welding of the bottom of the VAZ 2114 will be required in the following cases:
- It is impossible to jack up the car; the jacks fall through.
- The floor in the car became uneven, the metal sagged from corrosion.
- The driver's seat cannot be adjusted; when the doors are closed, increased gaps appear.
- Noticeable areas of corrosion on the sills and wheel arches. If you lift the car onto an overpass and check it with an awl, the anti-corrosion layer from the bottom will fall off, and traces of rust will be clearly visible.
Threshold repair process
First, I will have to remove the driver's door, the left wheel, and also the front fender of the car. Next, you need to jack up the car, remove the front wheel, and then the wing. I need to remove the latter to make it easier to remove the car doors. My fender is screwed to the hood with six screws. From inside the hood, you also need to pull the “saber” and lower the bumper to free the lower part of the wing. It is fastened from the inside with two screws and one near the door. I unscrew them.
After all the screws are unscrewed—I have 9 of them—the wing is almost free. True, mastic can hold it. To do this, you need to take a tool like a pry bar and try to slightly move the wing from the inside. Gradually I swing it from all sides. After it comes off a little, you can remove it.
After removing the wing, the rack must be cleaned of rust, dirt, plaque and other foreign bodies. In principle, you don’t have to clean it, but I usually always do it. I clean the wing strut at the end of the work, when I install it. Now we need to do the basics and repair the car sills.
Now that I have access to the door hinges, I begin removing it. The doors should be wetted in advance with WD grease and then begin to carefully knock out the hinges. More often than not, when I remove the hinges, I usually knock them down. If the top loop starts to rest against the wall, you will need to bend the ends a little. This happens sometimes. After the door is removed, I proceed directly to repairing the thresholds.
I will cut the threshold right along the corner where it is connected to the upper threshold. I will attach the new one to the top one, a couple of millimeters higher. If he performs, then we will have to come up with another line. I hope there won't be a protrusion.
Before cutting off the threshold, I still decided to remove the rear passenger door in order to avoid damaging it when cutting and installing the threshold. During the inspection, I decided to slightly adjust my repair plan, namely, to completely change the upper and lower thresholds. There you still need to remove the plastic, but this is very easy to do. I think everyone can handle this. Next, I carefully cut off the old threshold.
After I cut the sill off the fender strut, I remove all the old sealant because it's clogged up in places. If moisture gets into it, it will stagnate. After I cleaned off the sealant, I tap the rack so that all the dirt comes off and the rust falls down. Then the rack must be cleaned of all remaining debris. I have a problem with the stand, it has two or three layers, the layers are broken, and the metal just sheds.
Near the left wings (front and rear) I make an amplifier. I weld two plates, right on the roundness of the wings at the back and front. At the back, I welded a plate onto the inner layer of metal, and welded the second one, which I prepared, onto the outer layer. I did the same on the front.
Then I do the first fitting of the new threshold. To do this, I hang the wing again and also the door to improve control. You don’t have to fasten it, just hang it. Well, whoever is not lazy can fix it. I measure it in order to look at the corner of the threshold on the front wheel. The wing should not catch or hit him. My threshold has completely met.
Next, I again remove the wing and door, and begin the actual cooking of the threshold itself. I “grab” it from below in different places. I usually weld the left side, right and center first. Then I hang the doors and fender again to measure the gaps when measuring the threshold.
Everything turned out well for me. It happens that the gap remains a little larger than expected, but this is not a big deal. The main thing is that the gap is not very large. And there, as the customer says. Next, I remove the doors again and weld them completely. All that remains is to sort out the insides a little and make sure that dirt does not fly inside. It will be necessary to close this place under the wing later.
After everything is closed inside, putty, primer, and painting are used. The putty will also cover all welding and other marks. It is advisable to putty immediately, while the metal is fresh. Because if, for example, you come the next day, the metal will already be slightly covered with rust or dust. I cover all welding seams with putty.
I would also like to remind you that usually, when dealing with thresholds, the inner frame needs to be touched and changed too. The inner box is the inside of the threshold. Usually, when you touch the inner box, you need to disassemble the floor and remove the driver's seat. But, since my car is in good condition, I don’t touch the inner box.
After the first layer of putty had dried, all the tubercles from welding became visible. I smoothed them out with putty. After the second layer has dried, I prime the welded threshold before painting.
One more thing is very important: before painting, you need to take the car outside or to a less dusty place. Because it often happens that when painting a car, dust rises from the floor, it can settle on the paint, and then there will be problems. Dust can appear on the paint, like dirt on a table. After I took the car to a place where there is no dust, I paint our sills, as well as the fender.
Preparation for repair
Repairing the underbody of a VAZ involves a set of measures:
- preparation of the necessary material and tools;
- interior dismantling;
- installing the car on a lift or repair plane;
- cutting out rotten elements of the bottom during partial or complete replacement of a part, if it is necessary to completely digest the body;
- patch welding or bottom welding;
- anti-corrosion treatment;
- installation of interior, replacement of sound insulation, additional work.
To repair the body yourself, you will need to prepare the following materials and tools:
- A new bottom or part of it for a complete replacement, metal patches for a partial repair. It is recommended to take industrial steel with a thickness of up to 1-1.2 mm. The standard metal on the body of the VAZ 2114 has a thickness of 0.9 mm for the bottom, 0.8 for the sills.
- Angle grinder, grinder with a set of replaceable discs from metal, for processing a weld seam, stripping metal from corrosion, to a soft attachment for grinding soil.
- Welding machine. For self-repair, it is recommended to use a semi-automatic machine using wire in a carbon dioxide environment.
- Electric drill, set of drills.
- Sound insulation sheets.
- Metal brushes, coarse and fine sandpaper, chisel, set of screwdrivers.
- Zinc-based primer, putty, set of spatulas, anti-corrosive agent for final processing.
The first stage of work is dismantling the interior and lifting the car onto the overpass.
Craftsmen do not recommend carrying out repairs in a pit; it will be inconvenient for the driver to weld the body and treat the surface. The most convenient option is to lift the car on hangers or turn it on its side.
Dismantling the interior
The bottom 2114 is a stamped part that is welded to the reinforcements of the side members and hinged panels along factory lines. Original replicas require no trimming and are ready for installation. Description of replacement in stages:
- The fuel is drained from the car and the battery is removed.
- The electrics are turned off, the front and rear doors are dismantled.
- The chairs and flooring are pulled out, and the sound insulation is removed.
- All plastic lining of the pillars is dismantled, the dashboard must be covered with a thick piece of rags.
- The glass is sealed on both sides with thick paper.
- An inspection is carried out from the inside, rusty areas are tapped with a hammer, and the scale of work is determined.
The cost of repairs at a service station for a VAZ 2114 starts from 15,000 rubles. When replacing them themselves, owners can save at least 10,000 rubles. Repair kit price for independent work:
- replica – 3500 rub.
- anti-corrosion kit – 1000 RUR:
- rental of electric welding ─ 1000 rubles;
- sound insulation sheet ─ 300 rub.
Metal cutting process step by step:
- Use an angle grinder to clean the bottom from dirt and used anti-corrosion.
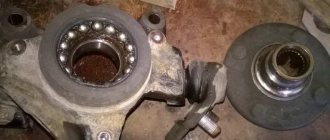
- Check the general condition of the metal and jacks.
- In case of partial replacement, cut out the rusty places with a grinder or chisel, and prepare patches.
- Sand the metal until white.
- Drill out spot welding points if the entire part is being replaced.
It is recommended to cut the metal for patches using metal scissors. Welding cutting is used if the driver has experience in welding. Otherwise, you may end up with a patch with convex edges, and the metal will be inconvenient to weld to the body.
Tools and materials
To weld the bottom, in addition to welding equipment, you will need consumables. When choosing which metal to cook with, you need to consider two points:
- thin steel is more difficult to weld; experience is needed to choose a temperature regime that eliminates the risk of burns;
- Thick iron is more difficult to process.
The patches are made of metal with a thickness of 1 to 2 mm - these are the optimal parameters.
What you will need when working:
- welding machine, when working with manual arc welding you will need thin electrodes, maximum size 1.6 mm; for a semi-automatic machine you need copper wire and carbon dioxide;
- grinder with cutting and grinding attachments;
- gas welding plus carbide, oxygen for cleaning rust from hard-to-reach places;
- regular or electric metal shears, they are used to cut out patches;
- electric drill;
- a hammer, used to tap the bottom of the car to identify defects;
- a chisel or hammer drill to remove sound insulation;
- screwdriver or screwdriver.
The bottom is viewed on an overpass or in an inspection hole in good lighting. The metal is tapped with a hammer to test its strength. A lift will be needed to provide access to the damaged areas.
You will need a rust converter, soundproofing coatings; anti-corrosion compounds; primer for metal; solvent or other degreasing compound.
Unexpected expenses
It is necessary to provide for the purchase of spare parts. Their necessity is determined after inspecting the car. During repair work, dilapidated elements of the machine are replaced:
- rotten and bent sills, they are removed first, and during installation they control the geometry of the body;
- floor spars;
- floor panels, they are mounted from below;
- brake and fuel pipes stuck to the metal.
Carrying out repair and welding work
Repairing the underbody of a VAZ 2115 is quite difficult. Under the bottom of the car there is a fuel system, brake system and muffler pipes. When replacing an entire part, these systems must be completely removed and reinstalled after welding. Experienced tinsmiths recommend not dismantling the muffler elements, but cutting them out, after repairing the bottom, boiling the part and installing it in place.
If the underbody is partially repaired, there will be no need to remove the fuel and brake system pipes. When cutting out entirely, it is recommended to cut out the bottom not along the factory welding line, but leaving an allowance of 1-2 cm. The new element is welded with an overlapping seam, which increases the rigidity of the body and the durability of the weld seam.
Replacing parts or the entire bottom
Repairs begin with inspection and repair of thresholds. Rotting of the central part of the body begins with corrosion of the sills and wheel arches, so if rust has destroyed parts of the bottom by 30%, then we can confidently say that the sill is rotten by 60% and requires complete replacement. The bottom of the VAZ 2114 consists of the following elements:
- underbody panels under the seats;
- threshold extension;
- crossbars;
- side member amplifier;
- space for a jack or jacks;
- central support platform;
After cleaning the underbody from anticorrosion, the jacks, side members and panels under the feet of the driver and passenger are inspected. These are the most vulnerable parts. If the general condition is satisfactory, then it is recommended to cut out the problem areas and install the original floor parts from the repair kit. The process of partial overcooking of the bottom in steps:
- Drill out the spot welding points and cut out the rusted metal with a chisel.
- Clean the edge of the future weld with a grinder and treat with a degreaser.
- Attach the original part or the cut out patch. The metal patch should protrude 1 cm beyond the edges of the trim; welding will be carried out overlapping.
- Spot weld the edge of the metal. Weld the patch in increments of 2 cm welding, 4 cm skip.
It is not recommended to weld a one-piece sealed seam; when the engine vibrates, the body experiences torsional loads, and the solid seam may crack.
A complete replacement of the bottom of the VAZ 2114 is required in 50% of cases of body repair. However, experienced drivers warn about the danger of independently repairing the entire bottom, which remains the main part of the supporting body. If you don’t have experience, you can disrupt the geometry of the car, and even the slightest misalignment threatens that it will be impossible to set the wheel alignment and the car will start to drive sideways, the tires will quickly begin to wear out, the engine mount may come off, fuel and oil consumption will increase, etc. Beginners are advised to cut out the bottom in parts and replace only the part that is rotten.
Before the bottom is completely re-welded, all pipes of the fuel, brake and exhaust systems are dismantled. On VAZ 2114 cars, after three to four years, all pipes and fittings of the fuel and brake systems are corroded and acidified. It is almost impossible to remove the element; service technicians recommend cutting out the metal hoses and, after working on the bottom, installing new pipes made of brass or copper. The advantages of such hoses over metal ones are obvious.
- The softness of the metal will allow the hoses to be bent and installed exactly in the bottom pockets.
- If the bottom is changed in parts and the master has to tap out the place for the pipe himself, the brass tube can be installed at any angle and secured to a special coupling.
Algorithm for replacing the entire bottom:
- Drill out spot welding areas.
- Use a chisel to cut out the bottom. You can use a grinder, but it is recommended to tap the metal with a chisel or hacksaw blade.
- Leave 1 cm of the old bottom to allow for overlapping welding of the new element.
- Reinforce the side members with additional metal panels.
- Place the bottom from below and grab the points.
- Cook in 3-4 cm increments.
- Clean the weld seam with a grinder or metal disc.
Threshold repair process
First, I will have to remove the driver's door, the left wheel, and also the front fender of the car. Next, you need to jack up the car, remove the front wheel, and then the wing. I need to remove the fender to make it easier to remove the car doors. My fender is screwed to the hood with six screws. From inside the hood, you also need to pull the “saber” and lower the bumper to free the lower part of the wing. The wing is also fastened from the inside with two screws and one near the door. I unscrew them. After all the screws are unscrewed, I have 9 of them, the wing is almost free. True, only mastic can hold it. To do this, you need to take a tool like a pry bar and try to slightly move the wing from the inside. Gradually I swing the wing from all sides, and after it moves away a little it can be removed. After the wing is removed, its strut usually needs to be cleaned of rust, dirt, plaque and other foreign bodies. In principle, you don’t have to clean it, but I usually always clean it. I usually clean the wing strut at the end of the job when I install it. Now we need to do the basics and repair the car sills.
Now that I have access to the door hinges, I begin to remove it. The doors should be wetted in advance with “WD-lubricant” and then begin to carefully knock out the hinges. More often than not, when I remove the hinges, I usually knock them down. If the top loop starts to rest against the wall, then you will need to bend the ends a little. This happens sometimes. After the door is removed, I proceed directly to repairing the thresholds.
I will cut the threshold right along the corner where it is connected to the upper threshold. I will attach the new threshold to the top one a couple of millimeters higher. If he performs, then we will have to come up with another line. I hope there won't be a protrusion. Before cutting off the threshold, I still decided to remove the rear passenger door in order to avoid damage to it when cutting and installing the threshold. During the inspection, I decided to slightly adjust my repair plan, namely: completely change the threshold, both upper and lower. There you still need to remove the plastic, but this is very simple and easy to do. I think everyone can handle this. Next, I carefully cut off the old threshold.
After I cut the sill off the fender strut, I remove all the old sealant that was there because it was clogged in places and if moisture gets in, it will stagnate. After I cleaned off the sealant, then I tap the rack so that all the dirt comes off and the rust falls down. Then the rack must be cleaned of all remaining debris. I have a problem with the stand; it has two or three layers, the layers are broken, and the metal simply falls off.
Next, I make an amplifier in the places near the front and rear left wings. I weld two plates, right on the roundness of the wings at the back and front. At the back, I welded a plate onto the inner layer of metal, and welded the second one, which I prepared, onto the outer layer. I also did the front.
Then, I do the first fitting of the new threshold. To do this, I hang the wing again and also the door to improve control. You don’t have to fasten it, just hang it, and that’s it. Well, whoever is not lazy can fix it. I measure it in order to look at the corner of the threshold on the front wheel. The wing should not catch or hit it. My threshold is completely fine. Next, I again remove the wing and door and begin the actual welding of the threshold. First, I “grab” it from below in different places. I usually weld the left side, right and center first. Next, I hang the doors and fender again to measure the threshold to measure the gaps.
I did well. It happens that the gap remains a little larger than expected, but this is not a big deal. The main thing is that the gap is not very large. And then what the customer says. Next, I remove the doors again and weld them completely. All that remains is to sort out the insides a little and make sure that dirt does not fly inside. It will be necessary to close this place under the wing later. After everything is closed inside, putty, primer, and painting proceed. The putty will also cover up all welding and other marks. It is advisable to putty immediately while the metal is fresh. Because if, for example, you come the next day, the metal will already be slightly covered with rust or dust. I use putty to cover all welding work.
I would also like to remind you that usually, when dealing with thresholds, the inner frame needs to be touched and changed too. The inner box is the inside of the threshold. Usually, when you touch the inner box, you need to disassemble the floor and remove the driver's seat. But since my car is in good condition, I don’t touch the inner box.
Next, after the first layer of putty had dried, all the bumps from welding became visible, and I smoothed them out with putty. After the second layer of putty has dried further, I prime the welded threshold before painting.
One more thing is very important: before painting, you need to take the car outside or to a less dusty place. Because it often happens that when painting a car, dust rises from the floor, and it can settle on the paint, and then there will be problems. Dust can appear on the paint, like dirt on a table. After I took the car to a place where there is no dust, I paint our sills and at the same time the fender.
Of course, I didn’t have time in 5-6 hours, I had to spend more time, but one way or another, I didn’t delay it for a day.
I hope I helped everyone who needs it. Happy repairs.
How to change the thresholds of a VAZ-2109 car
Although the body does not affect the vehicle’s progress, the driver will not be pleased if its elements begin to fall off while driving. High humidity, reagents and climate conditions can have a bad effect on the bottom and sills of the VAZ-2109. Do-it-yourself replacement of VAZ 2110 thresholds: video. How to change the rear struts on a VAZ 2114 with your own hands (video). Owners are often faced with the need to replace these parts due to rust that has appeared during normal use.
Final processing
Primer, anti-corrosion treatment, installation of new sound insulation and installation of the interior with electrical connections are the final stage of work on the bottom. For external treatment, you will need bitumen mastic or anticorrosive Body 930. The product has a budget cost and is highly resistant. The mastic forms a dense but elastic protective layer that does not allow moisture to pass through and protects the iron. Final work step by step:
- Clean weld seams.
- Treat welding areas with a primer containing zinc.
- Cover the inner surface with mastic and install new sound insulation.
Rotten metal destroys the skimmer sheets in 3-5 months, so if the car needs the bottom to be overcooked, the sound insulation definitely needs to be changed.
During operation, during routine inspection, it is recommended to periodically remove the plugs in the parts and pour the oil composition into the internal pockets.
How to treat the bottom after welding
Before applying corrosion protection, primers are first used. They are applied to clean surfaces according to the instructions and dried. The primer ensures reliable adhesion of steel to anti-corrosion. Manufacturers offer various compositions:
- Tectyl is produced in three modifications: a) classic creates an organic microfilm; b) Tectyl zinc provides an additional zinc coating that protects the metal from the action of salts; c) Tectyl NT zinc is intended for intensive use in urban environments;
- Movil is an economical product that has proven itself for half a century;
- bitumen mastic is produced on a rubber, polymer, mineral-shale and polymer basis;
- Dinitrol based on polymer rubber.
Cost of the kit and work with it in the service
The service station carries out the full range of work to restore the body. You can weld the bottom of a VAZ 2115, the price of work without the cost of dismantling, materials and components starts from 15,000 rubles. It is also permissible to change rotten jacks, sills and replace part of the bottom, the cost of work is up to 10,000 rubles.
Repairing the underbody, like any other part of the body, is classified as labor-intensive and complex. The cost of the repair kit must be added to the cost of the work.
- original floor from AvtoVAZ - from 3,000 rubles;
- bottom with thresholds ─ from 5,000 rubles;
- sound insulation ─ from 500 rubles per 1 sq. meter;
- anticorrosive ─ from 600 rubles per 1 kg.
Simple calculations show that self-repair will cost three to four times less, but only if the driver understands the complexity of the work and has minimal skills in using electric welding and working with metal.
Source
Preparatory work
When the iron is rotten in several places, it is easier to digest the entire bottom. In some cases, replacement is more profitable than installing a large number of metal patches. Repairing the underbody of a car with your own hands begins with the preparatory stage. Areas with large defects are cut out, small ones - just cleaned of rust. When it is difficult to reach with a grinding wheel mounted on an angle grinder, turn on gas welding.
The seam areas on the machine and patches are coated with a rust converter, then cleaned to a shine. After this it is degreased. The patches are adjusted to the bottom configuration using heat, the metal is easier to deform, or special bending devices.