I have long wanted to replace the license plate light bulbs on my Kalina with LED ones, but I haven’t had the time. And then, finally, it happened - one of the lamps burned out. I bought a couple of LED ones at the market, came home and got to work.
As it turned out, the work is very simple and straightforward; you don’t even need to unscrew any bolts. This example is suitable for owners of Kalina sedan, station wagon and hatchback.
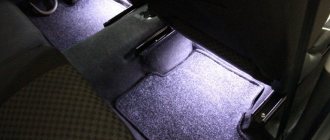
Replacing interior lighting
For such purposes, you can choose both LED and neon. A modern popular novelty is LED strips of different colors, suitable for interior lighting.
special stabilizers are used that can extend the service life of the lamps, as well as create a flickering effect for the light and music. Replacing interior lighting is more difficult, so you should not carry out this activity yourself.
. Lighting and illumination of a car significantly affects the perception of the appearance and design of the car.
Delivery by Russian Post (1st class)
- Attention! 1st class delivery is only possible for small items weighing up to 2.5 kg.
- Delivery time: 2-5 days depending on the distance of your locality from Tolyatti.
- Delivery cost from 250 rub. depending on the weight, distance and declared value of the parcel (order).
Delivery by one of the transport companies with a representative office in your city. Delivery time: 2-10 days depending on the distance of your locality from Togliatti. The most convenient and fastest way to deliver orders of different sizes. Delivery cost from 250 rub. depending on weight and delivery distance.
What kind of lighting do you prefer?
Built-in Chandelier
Orders are sent by transport companies based on 100% payment for the order.
Expert opinion
It-Technology, Electrical power and electronics specialist
Ask questions to the “Specialist for modernization of energy generation systems”
Kalina license plate light - All about Lada Granta The fact is that any traffic police officer has every right to fine a person who is driving a Lada Kalina with unlit license plates. Ask, I'm in touch!
Addition block
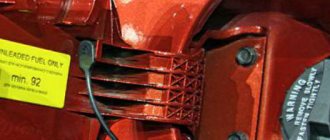
It is located on the bottom right of the instrument panel, near the heater air duct, and is also covered with a lid. The cover is attached to a screw; to remove it, you need to unscrew this screw. To dismantle the relay block itself, wrench No. 10 is useful.
The relay block is responsible for the following functions and components.
- Turn on the engine cooling fan (low and high speed).
- Main relay.
- Fan fuse.
- Fuel pump switch relay.
You need to know which guards protect which elements. This is especially true if one of them is responsible for two or three nodes. For example, if you discover that the cigarette lighter does not work (usually some device is connected through it, for example, a DVR), you should check the radio. If it does not turn on, then it is necessary to replace fuse F20. You can replace the damaged element yourself. There is no need to contact a car service, since after replacing the fuse everything should work.
If any fuse or relay malfunctions, you must remove the blown element and put a new one in its place. The blocks must be restored or assembled in the same sequence as they were disassembled.
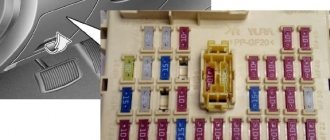
The Lada Kalina fuse box is located in the cabin, on the left side, under the cover where the light control switches are located. If something doesn’t work for you electrically, I recommend that you first check all the fuses responsible for a particular power circuit; in most cases, the culprit is a blown fuse, and only then look for the problem in the components themselves.
We attach photographs of the Lada Kalina fuse box, which were recently installed on Kalina:
So, let's look at which fuses and relays are responsible for what in our Kalina.
Circuits protected by fuses F1 - immobilizer control unit, hazard warning switch, instrument cluster F2 - power windows F3 - hazard warning switch F4 - Windshield wiper F5 - Heater, electric power steering control unit F6 - Horn F7 - Instrument cluster, interior lighting F8 - rear heating glass F9 - Side lights (right) F10 - Side lights (left) F11 - Immobilizer control unit F12 - Low beam (right) F13 - Low beam (left) F27 - electric power steering control unit (large red 50 A) F28 - control unit ABS system (in this case, an empty space, since ABS is not installed) F14 - High beam (right) F15 - High beam (left) F16, F17 - Fog lights F18 - heated seats F19 - ABS F20 - cigarette lighter F21 - Reverse lock F22 - Electrical package control unit F23, F24, F25 - reserve F26 - ABS
Purpose of the relays installed in the block: K1 - headlight washer K2 - activation of the power window circuit K3 - activation of the starter K4 - additional (ignition relay) K5 - direction indicators and hazard warning lights K6 - windshield washer and wiper K7 - high beam K8 - horn K9 - front fog lights K10 - heated rear window K11 - heated front seats K12 - reserve
Please note that all fuses are colored differently depending on the amperage (Amps) they are rated for - it is important to respect these values to avoid short circuits. To replace, use tweezers that are inserted into the mounting block
Two types of mounting blocks were installed on Kalina, let’s look at each of them:
Replacing license plate light bulbs Kalina
- Delivery time: 3-7 days depending on the distance of your locality from Tolyatti.
- Delivery cost from 550 rub. depending on the weight, distance and declared value of the parcel (order).
We cooperate with:
If you do not know which method of delivery of goods will be more convenient for you to use, then place an order for any method, and when our manager contacts you to confirm the order, he will recommend you the most optimal method in terms of cost and delivery time for your order. No matter what region of Russia you live in, there is always a profitable and convenient delivery method for you.
The lead time for placing orders with “In Stock” items is 1-4 business days after receipt of funds (orders are not generated on Saturday and Sunday). Lead time for orders including painting services: 3-8 business days. The lead time for placing orders and “made to order” items is 14 days; you can check with the manager for more detailed information.
Delivery is carried out throughout Russia and the CIS. Orders for pickup are placed on the website, the processing time is on average 1-4 business days, after the items arrive at the pickup point, the manager will notify you when you can receive your order.
Main reasons
Consider in detail the most basic reasons for such a breakdown.
Fuses blown
The fuses in the mounting block have burned out (F12 - right side, F13 - left side). Their rating is 7.5A.
F12 - left headlight, F13 - right headlight
The fuses in the photo are marked with an arrow. (top - left headlight, bottom - right headlight)
In this case, the voltage regulator may be faulty. As a result, a power surge occurred and both fuses were blown. It is necessary to check the voltage of the electrical circuit under load.
If you are on the road at the time of a breakdown, you can install a “bug” instead of fuses.
Carefully insert a piece of wire into the fuse connectors, preferably one, the left fuse. In this case, do not put the cover of the mounting block back on, as you will have to conduct a visual inspection; the wire may begin to heat up.
Low beam bulbs burnt out
“Right low beam” burned out
The low beam bulbs burned out, both of them at once, either a coincidence, or a short one, or the low beams were not turned on at idle. At high speeds, the current is greater, so both can burn out at once. The voltage regulator may also be faulty.
The low beam contact relay is broken
Location of the contact relay in the mounting block
The low beam may not turn on due to a broken contact relay. This breakdown is a very common reason. Due to the design of the relay and its low cost, the contact group may become stuck.
- Open the fuse box (mounting block).
- We take out the relay number K9.
- It is advisable to take a known good relay for a test drive. Or you can lightly tap the old relay with a key or coin.
- Reinsert the contact relay.
- Checking the low beam operation.
Light control module failure
Light control module on Grant
This fault should be checked last. The cost of a new part is about 900 rubles, so the easiest way is to replace the module with a known good one, for example, take it from another car.
If your high beams also do not work, then check whether voltage is coming to the MUS.
Examples of replacing light bulbs on certain car models
Lada Kalina"
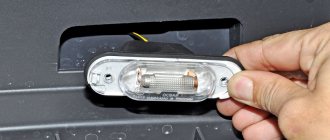
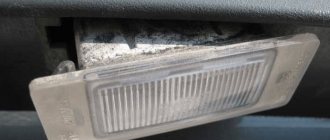
If the license plate on the Kalina becomes poorly illuminated, this means that it is time to replace the lamps. This is not difficult to do. If you follow the algorithm below:
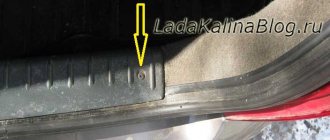
- To begin with, on the right side you will need to press on the flashlight itself, slightly moving it to the left. It should simply come out even with light pressure.
- Next, the lampshade is pulled out simultaneously with the power wires. It is this step that greatly simplifies the process of replacing power lamps on a Lada Kalina car.
- Then you need to slightly lift the plastic clamp up, and then remove the plug that provides power.
- The lamp housing must be unscrewed by rotating carefully. This way you can easily pull out the lamp base.
- The next step is to pull out the lamp, slightly pulling it to the side. Then the lampshade will be very easy to remove from the base.
- In place of the burnt out light bulb, another one is immediately put in place.
- Next you need to repeat all the steps in reverse order.
That's all, all that remains is to check whether the light is on after changing the bulb.
Hyundai "Solaris"
Changing the license plate lamp in a Hyundai Solaris is also easy if you do everything in the right order. In this model, 2 lights are installed for illumination, located under the trim on the trunk lid itself. These lights are closely related to each other. To change light bulbs in Solaris, you need to follow the algorithm below:
- The first step is to remove the upholstery from the trunk lid. For this purpose, you need to use a reliable screwdriver to pry up the cover; it can be easily found in the trunk handle.
- Next, when using a Phillips screwdriver, remove the screws securing the handle, and then remove it.
- Using the same screwdriver, unscrew all the pistons that secure the trim to the trunk lid itself. First, the pistons are removed, and then the upholstery is completely removed.
- The lamp socket is turned clockwise only until it stops, and after that it is important to press it and unscrew it together with the bulbs from the housing. You need to pull the socket exactly to the length at which it will be easier for you to change the lamp.
- The lamp is removed from the socket very easily. Simply pull it out by the flask.
Toyota Corolla"
If there is a need to replace the license plate lamps in a Toyota Corolla car, then you need to proceed in this sequence:
- To begin with, it is important to lower the lens of the flashlight for the easiest access to the lamps. This is done by pressing on the tongue, as a result of which the diffuser easily falls down.
- The light bulb socket rotates counterclockwise, this is done to make it easier to remove.
- The next step is to unscrew the screws, they hold the lighting elements, after which you can lower the flashlight.
- Then the paw holder is removed. To do this, it is important to rotate it counterclockwise as well.
- All that remains is to remove the lamp from the socket.
- After changing the number bulb on the Corolla, the entire process of assembling parts is carried out exclusively in the reverse order.
Expert opinion
It-Technology, Electrical power and electronics specialist
Ask questions to the “Specialist for modernization of energy generation systems”
Replacing license plate lighting bulbs Kalina In addition, the basis for a fine is not only the lack of license plate lighting, but also incorrect installation of the lights. Ask, I'm in touch!
"Lada Priora" - the people's car
"Priora" is a very popular and prestigious domestic model. This car is very common due to its low cost and prices for auto parts. Any car owner should know how to change the license plate light bulb on a Priora. There are two lamps in the niche of the rear license plate and you can replace the light bulb in them without removing the lamp. By the way, a W5W type bulb is installed here. To quickly and correctly replace, you need to do a couple of steps. Firstly, open the trunk, and secondly, carefully inspect the area where the license plate is located. After which we find the wires going to each of the lamps.
Now we will turn the light bulb counterclockwise, remove the socket and insert it into the light bulb. Reattach the cartridge by turning it clockwise.
The second replacement option is to pull the lamp out towards you, prying it off with a flat screwdriver. Do this carefully - the lampshade may be damaged.
Other lamps in the station wagon and hatchback
To illuminate additional equipment in Kalina-2, lamps of standard size C5W are used. They are:
The interior is illuminated by a C10W lamp, and additional side lamps are equipped with T4W lamps.
Light bulbs and body turn signals
The side turn signals are equipped with incandescent lamps without a socket (W5W). And H11 lamps can be installed in the front fog lights. Successful replacement.
The fact is that any traffic police officer has every right to fine a person who is driving a Lada Kalina with unlit license plates. In addition, the basis for a fine is not only the lack of license plate lighting, but also the incorrect installation of the lights.
Ceiling lamp
All illumination of the room is carried out by the lampshade into which the lamp is directly installed. It is the lampshade that scatters the light and fully illuminates the license plate of the car. It happens that when dismantling or in the process of replacing lamps, the lampshade may break. If this happens to you, then do not panic, lampshades are sold at any auto parts store.
Catalog number of the Priora lamp: 2170-03717010-00;
Its price is: from 100 to 200 rubles;
You should also not forget about the lampshade gasket; it is necessary to protect against moisture getting into the interior.
Gasket catalog number: 2170-03717012-00;
Cost of laying: from 20 rubles;
The lampshade is the same for all Lada Priora models.
Tail lights and lamps
The following elements are used as brake light lamps in Kalina-2: lamps with a P21W socket and a transparent bulb. Replacing such an element will not be difficult.
Brake light bulb, VAZ-2192/2194
The rear turn signals are equipped with the same bulbs as discussed above. Their bulb is colored yellow (type PY21W).
The reversing light in the hatchback is provided by a lamp of the following standard size - R10W. If we talk about the station wagon, they use lamps of a different type - W16W. They do not have a metal base.
Energy
14) counterclockwise, remove it together with the lamp from the flashlight body and remove lamp 2 (Fig. 14) by pulling it towards you.
Expert opinion
It-Technology, Electrical power and electronics specialist
Ask questions to the “Specialist for modernization of energy generation systems”
How to make light at VAZ The details for paying for the order are sent to you by E-mail and SMS message after confirmation of the order by our managers, and the details are also presented in your personal account. Ask, I'm in touch!
Why do you need to change the license plate lamp?
- Firstly, they shine much brighter . This is noticeable even to the naked eye. And at the same time they consume much less energy, which leads to at least insignificant savings.
- Second, they don't get so hot . Having removed the old lamps, you may have noticed some melted plastic near their seats. It is not good. This definitely shouldn’t happen with diode lamps.
- Well, the last thing is a beautiful appearance . Agree, the bright, white backlight of the license plate looks much better than the standard one.
Installation Tips
- When buying new elements, it is worth paying attention to the fact that in addition to sizes 36 mm, which are suitable, there are also sizes 41 and 38 mm, which are not suitable.
- They have polarity, so before replacing elements on the Chevrolet Niva, you should turn on the backlight and only then carry out the installation.
- If, when examining the light bulb, the bulb turns black, but continues to shine, it should also be replaced as it will soon fail.
- Try to avoid moisture, as the device will quickly fail if water gets in.
Replacing the license plate light bulbs on the Lada Kalina is a simple task, so you can easily handle it yourself. By changing the lights yourself, you will not only save money on the services of workshop specialists, but you will also be confident in the excellent quality of the work.
Step #1
Step #2
Step #3
Step #4
Step #5
Results
You learned how to change the license plate light bulb on popular cars. Rest assured that on other car models there is nothing difficult and everything is done in the image and likeness of our examples. By the way, by eliminating such minor malfunctions with your own hands, you save money, because auto repair shops charge quite a lot of money for such procedures, several hundred rubles, depending on the region. So why spend money on such trifles if it is absolutely not difficult for even the most inexperienced driver?
Options and methods for installing LEDs for license plate lighting
The first method involves replacing typical lamps with diode lighting elements. The second method is based on the installation of auxiliary LED devices. Almost every service station provides installation services for lighting fixtures on cars, however, this task can be handled without the help of professionals.
Replacing standard lighting elements with diode ones yourself
For high-quality lighting, choose powerful light bulbs, preferably with lenses. Their price is higher than conventional diode ones, however, the quality of their luminous flux is better.
DIY tuning LED license plate lights
Additional illumination of license plates is carried out by car owners when they are insufficiently illuminated by standard devices, or as a way to improve their car with tuning parts.
Most often, LED strip is used for tuning. Let's look further at how to make license plate lighting with your own hands.
Parcel by Russian Post
A convenient and fast way to pay for an order for customers who have Yandex Wallet. Payment is made to the store's Yandex Wallet number, which will be provided to you by the manager or website after placing your order. The commission will be 0%.
Expert opinion
It-Technology, Electrical power and electronics specialist
Ask questions to the “Specialist for modernization of energy generation systems”
Relay and fuse block Terms for generating orders with items In stock 1-4 business days, after receipt of funds on Saturday and Sunday, orders are not generated. Ask, I'm in touch!
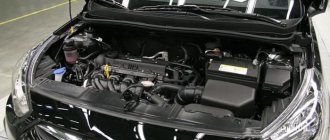
Power fuses
The main power fuses and the diagnostic connector are located under the cover next to the cigarette lighter.
I hope this article will help solve your electrical problem. Just in case, take with you spare fuses and, if possible, relays, then you won’t have to look for them at the most inopportune moment or during auto shop hours.
You can also read about Lada Granta fuses, if you have such a model in your fleet.
Interpretation of fuses in the center console
| Designation on the image | Current strength, A | Protected Circuits |
| F1 | Main relay circuits (winding of the cooling system electric fan relay, canister purge valve, air flow sensor, speed sensor, oxygen concentration sensor, ignition coil) | |
| F2 | Fuel pump, viburnum fuel pump fuse. | |
| F3 | Electronic control unit (constant power circuits) |
The system relays are assembled into a block and installed under the center console. The block contains a fuse for the electric fan of the engine cooling system.
Additional relays and a fuse are located on the right side at the bottom of the instrument panel.
To get there, you need to remove the right panel of the instrument panel console
And use a socket wrench to unscrew the nut securing the relay block
Then remove the block.
Designation of the engine control system relay block
1 — fuel pump activation relay; 2 — fuse for the electric fan of the cooling system (50A); 3 — relay for turning on the electric fan of the cooling system (low speed); 4 - main relay; 5 - relay for turning on the electric fan of the cooling system, high speed)
Video: Kalina license plate light does not light up
- Operate the vehicle only if the vehicle optics are in good working order. You can only install additional lighting on the rear of the car yourself.
- By law, every car must be equipped with rear license plate lights. White and pale yellow lanterns are permitted. It is prohibited to use red, blue, orange and other colors of illumination, which are often used by motorists to improve their vehicle. This may result in penalties.
- An exception to the rule are cars that are not equipped with standard rear license plate lights. If this fact is indicated in the technical documentation, then penalties for the lack of lighting do not apply to the car owner.
- Inappropriate illumination of the front sign threatens to deprive your license for a period of six months to a year. For the same violation regarding the rear number plate, a financial penalty will be imposed.
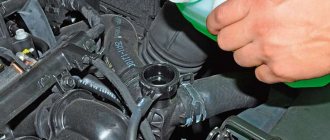
One day, I decided to solve the problem radically - convert the entire system to LEDs! After all, LEDs have a much longer service life and, importantly, lower energy consumption with greater light output.
Examples of replacing light bulbs on certain car models
Lada Kalina"
If the license plate on the Kalina becomes poorly illuminated, this means that it is time to replace the lamps. This is not difficult to do. If you follow the algorithm below:
- To begin with, on the right side you will need to press on the flashlight itself, slightly moving it to the left. It should simply come out even with light pressure.
- Next, the lampshade is pulled out simultaneously with the power wires. It is this step that greatly simplifies the process of replacing power lamps on a Lada Kalina car.
- Then you need to slightly lift the plastic clamp up, and then remove the plug that provides power.
- The lamp housing must be unscrewed by rotating carefully. This way you can easily pull out the lamp base.
- The next step is to pull out the lamp, slightly pulling it to the side. Then the lampshade will be very easy to remove from the base.
- In place of the burnt out light bulb, another one is immediately put in place.
- Next you need to repeat all the steps in reverse order.
That's all, all that remains is to check whether the light is on after changing the bulb.
Hyundai "Solaris"
Changing the license plate lamp in a Hyundai Solaris is also easy if you do everything in the right order. In this model, 2 lights are installed for illumination, located under the trim on the trunk lid itself. These lights are closely related to each other. To change light bulbs in Solaris, you need to follow the algorithm below:
- The first step is to remove the upholstery from the trunk lid. For this purpose, you need to use a reliable screwdriver to pry up the cover; it can be easily found in the trunk handle.
- Next, when using a Phillips screwdriver, remove the screws securing the handle, and then remove it.
- Using the same screwdriver, unscrew all the pistons that secure the trim to the trunk lid itself. First, the pistons are removed, and then the upholstery is completely removed.
- The lamp socket is turned clockwise only until it stops, and after that it is important to press it and unscrew it together with the bulbs from the housing. You need to pull the socket exactly to the length at which it will be easier for you to change the lamp.
- The lamp is removed from the socket very easily. Simply pull it out by the flask.
Toyota Corolla"
If there is a need to replace the license plate lamps in a Toyota Corolla car, then you need to proceed in this sequence:
- To begin with, it is important to lower the lens of the flashlight for the easiest access to the lamps. This is done by pressing on the tongue, as a result of which the diffuser easily falls down.
- The light bulb socket rotates counterclockwise, this is done to make it easier to remove.
- The next step is to unscrew the screws, they hold the lighting elements, after which you can lower the flashlight.
- Then the paw holder is removed. To do this, it is important to rotate it counterclockwise as well.
- All that remains is to remove the lamp from the socket.
- After changing the number bulb on the Corolla, the entire process of assembling parts is carried out exclusively in the reverse order.
Expert opinion
It-Technology, Electrical power and electronics specialist
Ask questions to the “Specialist for modernization of energy generation systems”
Toyota Corolla The fact is that any traffic police officer has every right to fine a person who is driving a Lada Kalina with unlit license plates. Ask, I'm in touch!
"Hyundai Solaris" - mastering Korean cars
This model of the Korean automaker is no less popular. This foreign car is profitable and prestigious, and also has a wonderful appearance. If you look at how to replace the license plate light bulbs on a Solaris, then at first glance it will become clear that the backlight is implemented using two lamps. It is almost the same as the previous car.
How to change license plate light bulbs on a Solaris is described in more detail below.
To gain access to the wiring located on the trunk lid, you need to dismantle the trim in the right place, namely on the edge where the license plate is located. In order to do this, you must use a wide screwdriver or a metal ruler, insert it into the seam between the iron and the sheathing, and smoothly remove the latches. Do this carefully, do not damage the latches, but if this happens, do not despair, they can easily be found on sale and replaced.
Once we see the wiring harnesses and sockets, we can repeat the steps above: turn the socket counterclockwise, replace the lamp, install the socket back and turn it clockwise.
How to do everything yourself
- To begin with, the lamp shade itself is disassembled, this is done starting from the middle, using a thin screwdriver.
- The standard lamps must be unscrewed very carefully, as it is quite easy to damage the place where the lamp is attached to the car body.
- The next step is to install a new LED or incandescent bulb.
- After the new lamp is screwed in, you can reinstall the lampshade. Before installation, it must be thoroughly degreased.
- When the installation process is completed, you need to check whether the license plate light is working. If everything is done correctly, then the license plate will have bright lighting.
Useful tips Connection diagrams Principles of operation of devices Main concepts Meters from Energomer Precautions Incandescent lamps Video instructions for the master Testing with a multimeter