Do-it-yourself adjustment of engine valves on a Renault
Valve adjustment is identical on models Renault Logan, Simbol, Kanggu, Sandero, Lada Largus 1.4 8V and 1.6 8V (K7M and K7J).
To begin adjusting the engine valves, you need to remove the air filter housing and valve cover. The valves are adjusted on a cold engine. Engine disassembly.
You need to start by removing the air filter housing.
Unscrew the four mounting bolts.
When the air filter housing is unscrewed, carefully lift it and disconnect the hose going to it for the breather.
We remove the air duct and move it to the side. We also remove the hose from the second breather. Disconnect the armor wires and the ignition module connector.
It is also necessary to free the corrugation of the electrical wires.
To release the corrugation, you need to disconnect this clamp.
The wires are held on two such clamps. In the same way, disconnect the second clamp and take the wires to the side. It is not necessary to remove the ignition module from the cover. Now we have access to all the valve cover bolts. Before unscrewing them and removing the valve cover, you must thoroughly blow everything out with compressed air from the compressor.
First, we tear off all the bolts on the valve cover, and then unscrew them.
When the bolts are unscrewed, assess their condition. If they are worn, replace them. The tightening torque of the bolts on the valve cover is not very large, so their threads do not stretch and they can be used for a long time.
So, after removing the valve cover, we need to jack up the right side of the car for convenience. Before this, you must put the car on the handbrake and engage fifth gear.
When the car is jacked up, we have the opportunity to turn the crankshaft and, accordingly, the camshaft by the wheel to the position we need.
Valve adjustment process.
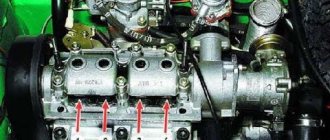
Let's look at an example of adjusting the intake and exhaust valves using the fourth cylinder as an example. The remaining valves are adjusted according to the same principle. So, to adjust the valves, you need the rocker to move away from the valve to the maximum distance.
Now our camshaft presses on the rocker with its cam, so when turning the camshaft with the help of a wheel, we make sure that the cams on the camshaft are relative to the part of the rocker on the other side.
Now let's measure the gap.
The most important thing that can be said about clearances is that there is a lot of information on the Internet about these engines, what clearances are recommended. There is a lot of information that the intake valve clearances are recommended to be 0.1-0.15mm, and the exhaust valve clearances are usually 0.25-0.30mm.
We will set the gap using a feeler gauge on the intake and exhaust valves to 0.25mm. We check the gap with a feeler gauge.
The feeler gauge should move with little resistance between the valve and the adjusting bolt. If the gap is slightly increased, then the valve needs to be tightened a little, and vice versa.
How to adjust the gap.
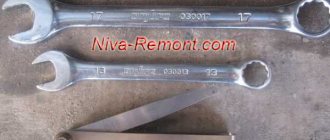
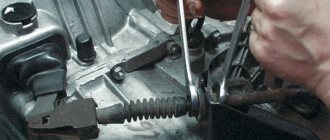
To adjust, we need pliers, a 10-mm spanner and a feeler gauge. First, we tear off the locknut and release it.
Now grab the adjusting bolt with pliers and tighten it a little.
Check bolts for wear.
Attention. When the car's mileage is more than 150-200 thousand kilometers, it is necessary to check the condition of the adjusting bolts.
This can be done as follows: unscrew the adjusting bolt, turn it over and evaluate the wear.
It will be immediately obvious in what cases it needs to be replaced. If the bolt is worn out, it will be very difficult to adjust the gap, and sometimes it is completely impossible, since the gap will float.
Now we adjust the exhaust valve in the same way as the intake valve.
We install the camshaft so that the cam is opposite the rotor. The most important thing is not to make a mistake at this point, otherwise you will not adjust the gap correctly, and it will be increased or decreased. Now let's do the same procedure for adjusting the valves. First, we check the gap based on whether it is increased or decreased. We set it to the 0.25mm mark.
The locknut should be tightened taking into account that the adjusting bolt may be compressed some distance.
If everything is fine, then you can tighten the lock nut, and then check the gap again, the feeler gauge should pass in the gap with little resistance. We perform this operation with all valves.
A few tips.
Sometimes it is necessary to make an increased gap on the intake valves, but not more than 0.27 mm, since this is the maximum gap. If the car is on gas, it is recommended to adjust the valves every 15 thousand kilometers, since the valves may become pinched there. This will lead to unstable operation and floating engine speed.
If you have a torque wrench, it is better to use it when tightening the bolts.
Reassembly.
Once the valves are adjusted, you need to start putting the engine back together. Install a new valve cover gasket.
I would like to note - do not use a paper gasket. Although they are sold in stores, you should only use metal ones. Nothing will happen to the metal gasket under the valve cover, since it is impossible to pinch it.
It stays in one position and does not deform when the valve cover is tightened. The main thing is not to strip the threads on the bolts. Install the valve cover.
There are several nuances when tightening the bolts on the valve cover, just like on all cars. The valve cover bolts are tightened from the center and crosswise. First, tighten the bolts by hand until they stop.
When all the bolts have been tightened, you can begin tightening.
Tighten the bolts in three passes. Then we collect the wiring and everything that was removed from the engine. When everything is assembled, you can start the engine after adjusting the valves.
Draining waste fluid
To drain oil from a Lada Largus, it is desirable to have a pit or overpass, since the main actions will take place from below the car. Therefore, we place the car above the technological ditch, go down into it and remove the engine protection from below. To do this, you need to unscrew the 6 bolts under the head by 10mm.
When everything is ready, we proceed directly to the drain:
- Raise the hood, then find the filler neck on the engine and unscrew the plug (Fig. 1). Fig. 1 Oil filler neck
- Now we go down under the car and place a waste container in the drainage area. You can use a cut canister or an old bucket.
- There are many complaints about the original drain plug regarding unscrewing, so it is better to prepare a new one for replacement (order code 21120101106100). The old one can be unscrewed with a 8mm hexagon, but there is a high probability that the splines will be torn off. Therefore, first you can take a hammer and gently tap it through a wooden plank. After this, the plug should come out easier. If the plug does not fit anywhere, you can use a gas wrench; it is located below the pan, so there is a place to grab it (Fig. 2).
- Now you need to unscrew the oil filter. You can try to do this from above from the engine compartment. It seems like there is access, but the filter often sticks, you don’t have enough hand strength, and you can’t get to it with a puller (Fig. 3). Fig. 3 Oil filter on top
- Another option is to do it from below; installing a puller here will not be difficult (Fig. 4). But before that, it is advisable to unscrew the crankshaft position sensor using a 10mm wrench. We also remove the wires going to it. Now you shouldn’t break anything, you can unscrew the filter itself. Fig. 4 Oil filter from below
To unscrew the filter element, it is advisable to have a special puller. If it is not available, you can try to unscrew the filter using improvised means. For these purposes, you can use, for example, an old alternator belt, a regular belt, a bicycle chain or a simple screwdriver.
Unscrewing the oil filter using improvised means. This method will allow you to drain as much of the oil as possible, after which you can proceed to further actions. The main thing is not to forget, everything that we unscrewed must be put back in place.
Adjusting thermal clearances in valves
First, select a level area on which to place the car. Next, use a jack to release one of the front wheels and engage fourth speed. In the engine compartment, remove the air filter, first disconnecting the pipes from it. Next, remove the spark plug high-voltage wires, remove the connector connected to the ignition module and carefully move all the wire harnesses towards the passenger compartment. Be sure to wipe the valve cover: this must be done so that any dirt on it is not transferred inside the mechanism. If you think that the ignition module is bothering you, remove it too. Further steps:
- Transferring the pistons to top dead center (TDC). To achieve this, spin the freed front wheel so that the Latin letter “F2” appears on the edge of the camshaft drive gear. In this case, the piston of the 1st cylinder (you need to count from the flywheel) will be in the TDC position, then both the intake and exhaust valves will be closed.
- Arm yourself with 0.2 and 0.4 mm probes. Using the first of them, check the valve operating on the inlet, the second - on the outlet. The feeler gauge should fit into the gap between the valve and the adjusting screw with little force. If this is not the case, the mechanism should be adjusted.
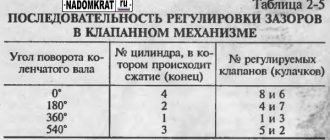
- Take pliers and tighten the adjusting nut with them. Unscrew the locknut with an open-end wrench to “10”. Achieve the required gap and secure it with a nut.
- The order of adjustment for cylinders is: 1,3,4,2. That is, the rocker should touch the camshaft cam within the smallest radius when viewed from the center of rotation.
- After completing the procedure, carry out a control check of the gaps and, if necessary, adjust those that do not meet the standard.
Your request has been accepted!
You will receive a notification when the product goes on sale to your contacts.
Valve adjustment on a Lada Largus car is performed on a cold engine; you will also need a new valve cover gasket.
Engine 1.6 16 valves Lada Largus - description, characteristics, reviews
The new Lada Largus is equipped from the factory with two engines - 8- and 16-valve units with a power of 87 and 106 hp. respectively. There is a lot of debate on the Internet about which of these engines is better and more reliable, but let’s leave this matter to the “experts from the forums” and let’s talk about the Lada Largus 1.6 16 valve engine.
Initially, Lada Largus cars were equipped with K4M engines, which we are familiar with from the Renault Logan car.
This is a fairly reliable 16-valve unit with a volume of 1.6 liters and a power of 102 hp. In the fall of 1017, this engine was replaced by the domestic 21129. The latter has a slightly higher output of 106 hp, otherwise it is the same 16 valves and 1.6 liters of volume. This was done in order to save money - a VAZ engine was cheaper to produce than a Renault engine. Let us remind you that prices for Largus with a 16-valve engine start at 641,400 rubles.
The VAZ 21129 engine is also well known to us from cars such as the Lada Vesta (and all its derivatives - the SV station wagon, SV Cross, Cross sedan), Kalina and Granta. Outwardly, it looks very similar to the previous 16-valve AvtoVAZ engines, namely the 21127 engine. However, despite the external similarity, these engines are still different. In the next paragraph we will look at the main differences.
Engines
The designers have provided three power units for installation on this car, these are two eight-valve VAZ 11189 and K7M from Renault, as well as a 16-valve French engine K4M. The working volume of these engines is 1600 cm3, which is considered optimal for this class of cars. The power of the VAZ engine is 87 horses, the French engine can produce up to 90 hp. With. Both power units have an injection power system and comply with Euro-5 environmental standards.
This French engine began to be installed on domestic cars after Renault acquired shares in an automobile plant in Tolyatti.
This engine became the next in a series of modifications to the K7 series engines; its piston stroke was increased, rocker arms were added to the valve mechanism, and the diameter of the clutch and flywheel was increased. Average fuel consumption is approximately 7.2 liters per hundred kilometers.
Manufacturers declare a service life of 400 thousand km, but repairs often occur at 350 thousand km. The motor is combined with a manual gearbox having 5 stages.
VAZ 11189
This is a higher quality and modified VAZ 11186, which is installed on other VAZ passenger cars. It also has an injection power system and can deliver up to 87 hp. With. Its cost is lower than that of a French engine, which is why it is installed on most cars.
The average fuel consumption of the VAZ 11189 is slightly higher, it is equal to 8.2 l/100 km. As a disadvantage, experts note the shorter service life compared to the French engine, it is equal to 200 thousand km. Both engines bend the valves when the timing belt in the timing drive breaks.
Engine Lada Largus 1.6 16 valves - technical characteristics
| Manufacturer | AvtoVAZ |
| ICE index | 21129 |
| Years of manufacture | 2015–present |
| Volume, cm3 (l) | 1597 cm3 (1.6 l) |
| Power (hp) | 78 kW (106 hp) |
| Torque Nm (rpm) | 148 Nm (at 5800 rpm) |
| Weight, kg | 110 kg |
| Compression ratio | 10,5 |
| Nutrition | injector |
| Motor type | in-line |
| Injection | distributed electronically controlled |
| Ignition | coil for each spark plug |
| Number of cylinders | 4 |
| Number of valves | 16 |
| Cylinder head material | aluminum alloy |
| Cylinder block material | cast iron |
| Cylinder diameter | 82 mm |
| Piston stroke | 75.6 mm |
| Fuel | AI-92/AI-95 |
| Environmental standards | EURO-5 |
| Fuel consumption | highway – 5.3 l per 100 km |
| combined cycle 6.6 l per 100 km | |
| city – 9 l per 100 km | |
| Oil consumption | maximum 0.1 l/1000 km |
| Motor life | stated 200,000 km |
| real 300000 km | |
| Adjustment of valves | hydraulic compensators |
Disadvantages of the Lada Largus 1.6 16 valve engine
1. The first and most unpleasant drawback that the 1.6 engine from Lada Largus has is increased oil consumption. Although, according to the manufacturer’s stated data, the maximum oil consumption should not exceed 100 ml per 1000 km, in fact this figure can be 2.5 times higher. Of course, this problem will not affect many at all, but for many it will be an unpleasant surprise. However, you should not immediately run to a car service center and ask to have the engine rebuilt due to increased consumption. You may simply have chosen the wrong engine oil.
2. The second significant drawback is the bending of the valves when the timing belt breaks . Yes, engine 21129 bends the valve when the timing belt breaks. Unfortunately, nothing can be done about this problem. There is only one way out - timely change the timing belt and rollers and monitor their condition.
3. The third drawback is the knocking of the hydraulic compensators. Since valve clearance is regulated by hydraulic compensators, they tend to knock. This can occur both on a cold engine and on a hot one. Most often, this problem is caused by low-quality engine oil or its untimely replacement. But this drawback exists and does exist.
Consequences of incorrect adjustment
The optimal value of thermal clearances was determined by analyzing the operation of the valve mechanism, gas distribution system and carrying out accurate calculations. With an increased distance, noise appears when the engine is running, especially when it is not warmed up, due to shock loads that negatively affect the entire timing system. This can lead to desiccation of the valve, its jamming, and when it meets the piston at TDC, the gap bends the valve on Largus.
Large thermal gaps do not allow the combustion chamber to be effectively filled with the working mixture, which reduces engine power and impairs the efficiency of its operation.
Too small thermal clearances reduce compression, lead to strong heating of the valve and seat and lead to their burnout. In such a situation, not only does camshaft wear increase, but more serious damage to the timing system may also occur. In both the first and second cases, the result of incorrect adjustment will be the replacement of valves on the Lada Largus, and the entire set will have to be changed
The valve mechanism is an important part of the engine timing system. Modern 16-valve engines are equipped with hydraulic compensators that automatically maintain the required thermal clearance throughout the entire service life of the vehicle. But most cars use traditional valve mechanisms. Adjusting thermal gaps is not a very complicated procedure that almost every car enthusiast can do. But special attention should be paid to this operation, since if the adjustment is incorrectly performed, a major overhaul of the engine may be required.
Selection of engine oil for the Lada Largus engine 16 valves 1.6 l.
Probably one of the most pressing topics on forums is the choice of lubricants for engines. So that no one says that we are advertising and promoting motor oils here, I will not indicate specific brands of motor oils in the article, but will only provide recommendations from AvtoVAZ.
The manufacturer recommends using motor oils with viscosity in the 1.6 Lada Largus 1.6 engine:
5W-30 / 5W-40 / 10W-40 / 15W-40.
Oils with a viscosity of 5W30 and 5W40 are ideal for use in cold regions, such as Siberia, while oils of 10W-40 and 15W-40 are only suitable for use in the warm season or in hot climates. At low negative temperatures, the starter may not “crank” oil that is too thick. And if it turns, there is a high risk of the seals being squeezed out by the thickened lubricant.
But there is also a recommendation for using 0W-40 oil. This viscosity is suitable for those who have bought a new car or use it in the coldest regions. Viscosity 0W-40 provides excellent fluidity and lubrication of rubbing parts at any low temperatures.
But it is not enough to select oil based on viscosity alone, as there are other criteria. First, you need to understand that there are oils for gasoline or diesel engines, as well as universal ones. In our case, we need to focus either on gasoline oils or universal ones. These oils are designated by the letter S according to the API. For example, API SL or SN are oils for gasoline engines. But API SN/CF is a universal option, suitable for both gasoline and diesel.
AvtoVAZ recommends using engine oils according to API no lower than SM and ILSAC no lower than GF-4. You can also use oils of a class higher than those recommended.
External speed characteristics of the 1.6 Lada Largus engine compared to the engine from the Lada Vesta - 21179.
Below is a graph of the power and torque of engines 21129 and 21179 and maximum power. The graph clearly shows that engine 21129 produces a maximum torque of 148 Nm at 4200 rpm. And at 5800 rpm we see a maximum power of 78 kW. Of course, these figures do not reach the 21179 engine, but it is felt that AvtoVAZ did a good job of tuning and modernizing the engine.
Service regulations for internal combustion engine VAZ 21129
At a mileage of 2,500 km, the manufacturer recommends that everyone undergo the so-called zero maintenance and then be serviced once every 15,000 km. The forum advises to reduce the interval to 10,000 km.
Lada Vesta: maintenance and repair
To replace, you will need about 3.5 liters of 5W-30 oil, as well as an appropriate filter. The spark plugs and air filter are changed every 30,000 km, and the auxiliary belt is changed every 90,000 km. The timing belt is designed for 180,000 km, but it is better not to pull it for too long, otherwise it will bend the valve if it breaks. This unit is equipped with hydraulic compensators and does not require valve clearance adjustment.
Update:
starting from July 2022, plugless pistons are installed on this engine.
Reviews about the Lada Largus 1.6 liter engine. 16th grade
Vladimir, Novosibirsk.
Hi all. I bought Largus for work. (I have a business, a small printing house). I took it on a 16-valve engine. Before that I went to 8th class. I liked how the 16-cl. works. - quieter, softer, smoother. The vibrations from it are many times less. The sound is nicer, it rides better. It seems like the difference is in hp. small, but you can feel it. In general, I recommend purchasing a Largus with a 16-valve engine.
I recently bought a Largus with a 1.6L 21129 engine. I’ll say right away that I was afraid of the timing belt breaking. I've encountered this before - the timing belt broke on a previous car. The consequences are sad. I wanted to take one with a viburnum engine, but at the last moment I changed my mind due to the fact that the 8-valve on Largus also bends the valves. In the end, I decided to choose what I liked best - 16 cells. I will change the belt after a maximum of 50 thousand km. Because more is already dangerous.
Pavel, Novorossiysk.
We own Largus 16 valves and 8 valves at our office. 16 - the bug eats oil, 8 the bug does not. We took it at the same time, both had about 80 thousand mileage - about the same. Oil consumption is about 200-300 grams per thousand.
Lada Largus: checking and replacing the timing belt of a 16-valve engine
Because spark plugs
needs to be changed during routine maintenance, it is better to combine these operations, because it will be easier to turn the crankshaft when checking the belt. The surface of the toothed part of the belt must be free of folds, cracks, undercuts of teeth and separation of fabric from rubber. The reverse side of the belt should not have wear, exposing the cord threads, or signs of burning. There should be no delamination or fraying on the end surfaces of the belt. The belt must be replaced if traces of oil are found on it.
To assess the condition and replace the timing belt, the right support of the power unit should be removed.
We remove the power unit protection and the right mudguard of the engine compartment.
Adjusting valves Largus 8 valves video
Good day everyone! Today I adjusted the valves at Largus. I have a K7M motor, so there are no problems with adjustment. Moreover, he has already done this. During the initial measurement of the valves, I went a little crazy. There were gaps, intake: 0.1 all around; exhaust: 0.15; 0.10; 0.15; 0.10! This is absolutely brutal! Last time I adjusted thousand. 30 years ago, I set everything according to the manual. How is that?! To hell with the intake ones, but the exhaust ones are so tight... I opened up all the gaps. Inlet: 0.20 in circle, outlet: 0.30. The car seemed to breathe. There was vibration from the engine and the gearshift knob - everything went away. The revs fluctuated a little, and that also went away. I haven't liked the exhaust lately, there was some popping noise, and that went away too. I decided to look at the MAP pressure through HBO. It was 0.38-0.40. It became 0.32-0.33.
Adjusting thermal clearances in valves
First, select a level area on which to place the car. Next, use a jack to release one of the front wheels and engage fourth speed. In the engine compartment, remove the air filter, first disconnecting the pipes from it. Next, remove the spark plug high-voltage wires, remove the connector connected to the ignition module and carefully move all the wire harnesses towards the passenger compartment. Be sure to wipe the valve cover: this must be done so that any dirt on it is not transferred inside the mechanism. If you think that the ignition module is bothering you, remove it too. Further steps:
- Transferring the pistons to top dead center (TDC). To achieve this, spin the freed front wheel so that the Latin letter “F2” appears on the edge of the camshaft drive gear. In this case, the piston of the 1st cylinder (you need to count from the flywheel) will be in the TDC position, then both the intake and exhaust valves will be closed.
- Arm yourself with 0.2 and 0.4 mm probes. Using the first of them, check the valve operating on the inlet, the second - on the outlet. The feeler gauge should fit into the gap between the valve and the adjusting screw with little force. If this is not the case, the mechanism should be adjusted.
- Take pliers and tighten the adjusting nut with them. Unscrew the locknut with an open-end wrench to “10”. Achieve the required gap and secure it with a nut.
- The order of adjustment for cylinders is: 1,3,4,2. That is, the rocker should touch the camshaft cam within the smallest radius when viewed from the center of rotation.
- After completing the procedure, carry out a control check of the gaps and, if necessary, adjust those that do not meet the standard.
How to remove the belt?
- Before performing actions, we determine the position in which the camshafts are present.
- For this purpose, we dismantle the air intake manifold resonator and remove the plugs that are present in special openings on the left end of the block head. It is convenient to remove the plugs using a screwdriver.
- Now, by rotating the crankshaft, we reach the position of the camshafts when their marks on the ends of the gears coincide with the upper plane of the head surface (viewed from the end of the engine).
- To immobilize the camshafts, we use a device installed in the corresponding grooves on the designated shafts.
- To check the correct position of the crankshaft, we resort to the hole located under the oil pressure monitoring sensor inside the unit. In normal mode, this hole is closed with a plug.
- After turning the protective plug into the hole, we screw a control bolt, the length of the threaded part of which is 75 mm, and the size and type of the thread itself is “M10”. If the crankshaft is in the correct position, then we see the possibility of completely screwing in this bolt, which will subsequently rest against the surface of a special pad located on the shaft. This action will also help secure the shaft from the risk of turning during repair operations.
- Now we loosen the tension on the belt drive. For this purpose, we “arm ourselves” with a size 13 wrench and loosen the nut securing the tension roller. We relieve tension in the belt by turning the designated roller against the clock.
- The loose belt is completely removed from the LADA Largus.
- Next, we take advantage of the opportunity to remove the tension mechanism and support roller (we also replace them). To dismantle the roller itself, we use a Torx wrench with size T50 in our tool kit.
You will need: remove the generator belt, the right wheel and the plastic shield of the engine compartment, prepare a “10”, “17” key, a “19” socket, and a screwdriver.
Procedure:
- _x000D_
- Remove the plastic engine cover. _x000D_
- Remove the timing drive protective cover by unscrewing the three fastening bolts. _x000D_
- Timing diagram. _x000D_
remove the plastic casing of the Lada engine remove the plastic timing casing Lada timing diagram 8 valves Set the piston of the first cylinder to the top dead center position:
- _x000D_
- Turn the crankshaft clockwise by the bolt until the mark on the toothed pulley aligns with the antennae on the rear timing cover. _x000D_
- Remove the window plug at the top of the clutch housing and make sure that the mark is not located opposite the scale slot. _x000D_
- Secure the crankshaft from turning by inserting a screwdriver through the window between the flywheel teeth. _x000D_
Turn the crankshaft clockwise until the timing marks are aligned, check the alignment of the timing marks, insert a screwdriver into the flywheel
- _x000D_
- Remove the bolt securing the generator drive pulley while holding the screwdriver. Remove the generator drive pulley. _x000D_
- Loosen the tension roller nut. Remove the timing belt by turning the pulley so that the belt is loosened as much as possible. _x000D_
- Remove the tension roller by unscrewing the nut securing it. _x000D_
remove the generator drive pulley remove the timing belt Lada Kalina 8 valves remove the timing belt tensioner pulley Lada 8 valves Have you noticed that the timing belt is eating or slipping? The reason may be a defective belt, rollers, or a pin that is overtightened.