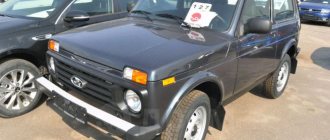
Car owners are well aware that the VAZ 21214, 21213 (Niva) fuse box is a critical detail that requires detailed study. Knowledge of the electrical circuit allows you to avoid many problems and carry out timely diagnosis of breakdowns. Since the family has existed for many decades, it has managed to go through a number of radical changes - the transition from carburetor to injection engines, for example. This did not entail a radical change in the location and content of the mounting blocks, of which there are two in the cabin and one under the hood.
Fuses for Niva 21214
Today, almost every person has a personal car, and, of course, at the moment it is difficult to imagine our life without a car.
Thanks to it, we can move around the city or highway without any restrictions. However, situations very often occur when something breaks down in a car. No matter how sad it may sound, in cars from the VAZ company various parts break very often, and sometimes you have to fix them yourself, because prices at car dealerships are quite high. This article will look at fuses on Niva 21214 cars with an injector engine, how to repair or replace them.
Fuses are one of the most important parts in any car, as it is thanks to them that the vehicle does not suffer any significant damage. In addition, fuses are precisely those elements of the Niva that, in the event of any voltage drop in the electrical circuit, take the entire blow, preventing the occurrence of serious malfunctions. A very important, however, very fragile part that very often fails, which is why it has to be replaced. The process of replacing or repairing a fuse is extremely simple and does not require special professional skills or tools.
Recommendations
I replaced the ignition switch contact group, now everything works as before!Thanks for the advice!
And also interesting: Do-it-yourself modifications to the Niva 2121 “
The dimensions from the factory work without ignition. I often forget to turn it off, I lock the car, and the lights are on and the lights are on. Of course there is no stove.
And in principle, you shouldn’t turn on the heater fan until you start the engine!
And my dash doesn't light up and the heater fan doesn't work when the ignition is off. How it should be!
The tidy should light up when the lights are turned on.
It doesn't light up for me. Only when the ignition is turned on.FLASH-X3!
Either there is a problem in the lock, or in the button for turning on the dimensions (headlights), there is simply nothing to break.
The heater fan will never run without ignition. Not provided.
The backlight has a power supply system independent of the ignition.
The key in the ignition switch must be turned to marks III and I. If the key is at mark 0, nothing will work. Even the light.
If the key is in the required (III and I) position and nothing works... there may be either problems with the lock or contact group, or the wires are mixed up when connecting, if the lock was turned off.
thanks, do you think it’s the ignition switch? I’m just leaning towards that too...
The heater fan will never run without ignition. Not provided.
The backlight has a power supply system independent of the ignition.
The key in the ignition switch must be turned to marks III and I. If the key is at mark 0, nothing will work. Even the light.
If the key is in the required (III and I) position and nothing works... there may be either problems with the lock or contact group, or the wires are mixed up when connecting, if the lock was turned off.
I have a 21st Niva
It doesn't matter what kind of field. The electrics on all classic vases are similar and unchanged. And the stove motor does not turn on without the ignition.
I understood why I thought it was turned on.
The heater fan will never run without ignition. Not provided.
The backlight has a power supply system independent of the ignition.
The key in the ignition switch must be turned to marks III and I. If the key is at mark 0, nothing will work. Even the light.
If the key is in the required (III and I) position and nothing works... there may be either problems with the lock or contact group, or the wires are mixed up when connecting, if the lock was turned off.
Without a key, I only have stoplights that light up when I press the brake pedal)
My car works halfway without a key.
The heater fan will never run without ignition. Not provided.
The backlight has a power supply system independent of the ignition.
The key in the ignition switch must be turned to marks III and I. If the key is at mark 0, nothing will work. Even the light.
If the key is in the required (III and I) position and nothing works... there may be either problems with the lock or contact group, or the wires are mixed up when connecting, if the lock was turned off.
The problem was solved by replacing the ignition switch contact group!thanks for the advice)
Read news about the new Niva
- Diagram and location of the fuse box Niva VAZ-21213 and 21214
- The modernized Lada Niva Legend (4x4) 2021 was shown on the Internet
- Lada 4×4 Bronto - sales stopped, new details » Lada.Online - all the most interesting and useful about LADA cars
- Description of the instrument panel Lada 4×4 (VAZ 2121, 2131) » Lada.Online - all the most interesting and useful about LADA cars
- LADA Niva – Operating manual – Official LADA website
- Chevrolet Niva gasoline consumption per 100 km
- Buy LADA (VAZ) 2131 (4×4) 2022 in Rostov-on-Don, low price for Lada 2131 (4×4) 2022 on the Avto.ru website
- Diagram and location of the fuse box Niva VAZ-21213 and 21214
Location of fuses in Niva 21214
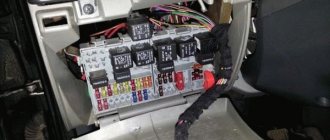
As a rule, the location of the fuses, or fuse mounting block, is located in different places in each car, so you should first find out where the fuse is located. In most cases, the safety block is located under the dashboard, where the dashboard is.
In the Niva-21214 car it is located to the right of the steering wheel, under the panel. When working with the fuse box, you should be careful, as any careless action can damage the fuse box, making subsequent repairs much more expensive.
Video from Alexey Komzikov “Review of VAZ 21214 injector”
https://youtube.com/watch?v=R0NbHslHqns
This video shows a review of the domestic car VAZ 21214 injector.
We replace the fuses of the electrical circuit on a VAZ 2121 and Niva 2131 with an injection engine if they burn out, or the unit itself is removed for a complete replacement or when performing other work in which its presence will interfere with the progress of their work. Prepare a standard set of tools, and then perform the following sequence of actions:
- Before performing work, you must disconnect the minus terminal from the battery.
- The fuse box is located inside the car and is hidden by a protective cover. Using a Phillips screwdriver, unscrew the two screws securing the casing and remove it.
Now we remove the burnt out one and replace it
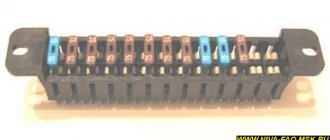
Please note that on the back of the unit there is a fuse for the power supply circuits of electric fans with a rating of 30 A; it is green. The rest are rated 15 A and are blue.
To remove the block itself, use a socket head to unscrew the two nuts that secure it.
- Now you can remove the block. Next, disconnect the block with the power wires from it.
- We replace the unit, after which we carry out the installation in the reverse order.
At this point, the repair work to replace fuses and the unit on the VAZ 2121 and Niva 2131 vehicles has been completed.
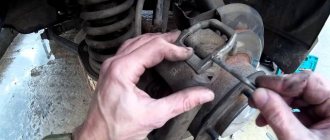
Removal of the safety block on a VAZ 2121 and Niva 2131 car is carried out in order to replace it in the event of a breakdown, which most often manifests itself in the form of oxidation of the contact terminals of the fuses, mechanical damage to the housing, short circuit of wires, as well as when performing other repair work in which its presence will interfere the progress of their implementation. Prepare a standard set of tools, and then perform the following sequence of actions:
We snap off the two plastic clips and remove the cover first from the main unit and then from the additional one. After which, if necessary, we replace the blown fuses
Please note that the system uses two types of fuses of different rated current, that is, with a thin mustache and a thick one. Therefore, they must be installed in strict accordance with the used
The marking on the rated current and, accordingly, the protected circuit is indicated on the covers on the outside or inside.
Next, use an eight-inch socket to unscrew the nuts securing the blocks to the bracket studs and remove them from the studs.
Now you need to disconnect all the wires from the unit. They must first be marked so that they are not mixed up during subsequent assembly.
At this point, the repair work to remove the fuse blocks on the VAZ 2121 and Niva 2131 vehicles has been completed. Make the necessary repairs, then install in the reverse order.
Sources
- https://avtozam.com/vaz/niva/vse-o-bloke-predohranitelej/
- https://remladavaz.ru/zamena-predoxranitelej-i-bloka-vaz-2121-niva-2131
- https://remladavaz.ru/kak-snyat-blok-predoxranitelej-vaz-2121-niva-2131
Types of fuses
Over the entire period of its existence, this segment of car elements has changed more than one type. The most common ones are:
Flat fuses are considered a relatively new type. They are used in almost all new cars. They became widespread due to their increased level of reliability and relatively low cost.
The next item will be ceramic fuses, which used to be very popular, but have lost their position due to low efficiency.
The oldest of all types of fuses are glass. They are small cones made of glass. This type of fuses is practically not used today due to the low level of reliability.
These are the most common types of fuses, however, there are others, but less popular.
Replacing the safety block on a VAZ 21053
Replacing the block
Before you start replacing, you need to purchase a new block and stock up on a special ring wrench for “13”. The actions are performed in the following order:
- remove the block body, which is secured with screws, using a screwdriver;
- move the pads connected to the bottom of the block (on new cars they are located under the hood, and on old cars - just to the left of the steering wheel);
- using a “10” wrench, unscrew the block clamps;
- install a new fuse block.
It is important to know: before installing a new safety block, you must carefully inspect the old one. You can usually notice contacts bridged with each other
On the new block it is necessary to bridge them in the same way and secure them well.
By contacting a car service, you are dooming yourself to significant financial costs, since the work of changing the safety unit is done manually.
Be careful and do not mix up the placement of jumpers
Then carefully insert the first fuse into the block and continue placing the next ones, following the diagram as a guide. Remember that if placed incorrectly there is a risk of burning the new block
This guide will allow you to figure out the fuse box yourself, so you'll never be stuck halfway to your destination. Plus, you can save a lot of money. Every self-respecting motorist needs to know how to replace fuses. After all, doing everything yourself is not at all difficult.
https://youtube.com/watch?v=CacS-nQT5Zg
Fuse arrangement in a Niva 21214 car
In Niva 21214, the fuse device has a rather non-standard appearance. There is a spare one under the main fuse box, which takes over its role if the main one breaks down. Also, this car has a slightly changed role of fuses in the chain of operation, namely in their purpose. The table shows several similar examples of fuses with descriptions.
| Fuse name | Protected circuit |
| F1 | Responsible for the operation of the dimensions, license plate, lighting of the glove compartment and luggage compartment. |
| F2 | Responsible for the steering column switch. |
| F3 | Seat heating fuse. |
| F4 | Responsible for the fog lights on the left side. |
| F5 | Fuse for power windows. |
| F6 | Responsible for portable lighting. |
| F7 | Responsible for the engine cooling fan and the operation of the sound signal. |
| F8 | Responsible for the cigarette lighter. |
| F9 | Regulates the operation of the recirculation unit and the cleaning of the windshield. |
| F10 | Backup fuse can be used to charge the battery. |
| F19 | Operation of the central locking system, alternator winding, reversing lights and brake light. |
For a more detailed study, you should familiarize yourself with a more structured diagram.
This car also has a second unit, which is located above the gas pedal and includes 4 relays responsible for: interior light, proper operation of the rear lights, rear window heating switch, wipers, high and low beam.
In addition, the car has a relay unit responsible for engine control. The elements of this block are: relay for the starter, fuel pump (fuel pump), cooling fan (right and left) and the main master relay.
Engine control system fuses
Purpose and parameters of fuses in the block (from left to right):
- 1 — ensuring the start of the electric motor of the right fan (rated 30 A);
- 2 — similar fuse-link for the left fan;
- 3 - fan relay, as well as the injection system control unit, control of injection nozzles and ignition coil (rated 15 A);
- 4 - system for reducing gas toxicity - heating of lambda probes, fuel vapor trap valve and sensor for measuring the volume of air entering the engine (rated 15 A);
- 5 - diagnostic connector for monitoring the operating parameters of the injection system.
On some VAZ 21214 with an ABS system, a fuse block with 7 inserts is installed.
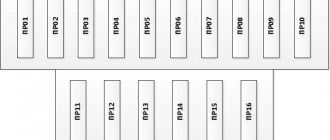
Block Niva Urban
Assignment of fuses (numbering starts from the door opening).
| Number | Rated current, A | Purpose |
| PR01 | 15 | Sensors on the engine, gasoline vapor trap, starter |
| PR02 | 15 | Fans, engine operation systems (control unit, ignition, injectors) |
| PR03 | 30 | Fan starting system |
| PR04 | 15 | Gasoline pump |
| PR05 | 5 | ABS unit |
| PR06 | 40 | Likewise |
| PR07 | 25 | Likewise |
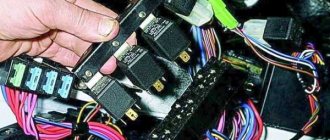
Engine Control Relay Box
The engine control relay diagram is shown in the photo.
Engine control relay
The block contains the following relays (from left to right):
- 1 — ignition activation;
- 2 - main relay, which serves to start all engine systems;
- 3 — starting the right fan on the radiator;
- 4 — start of the left fan;
- 5 — ensuring the operation of the fuel pump;
- 6 - safety element of the fuel pump power supply circuit with a rating of 15 A.
Relay block diagram above the gas pedal
The diagram of the block with the relay, which is located slightly deep in the instrument panel and is responsible for lighting the car, is shown in the photo.
The purpose of the relay in the block (from left to right) is given in the table.
| Position | Purpose |
| 01 | Rear fog lamps |
| 02 | Heated glass on the rear door |
| 03 | Low beam |
| 04 | High beam |
Replacement
In the event of a breakdown, the fuses must be replaced in time to avoid serious problems with important components of the car in the future. The replacement process is quite simple. To do this, you simply need to remove the blown fuse and replace it with a new one.
Thus, further proper operation of the circuit for which he is responsible will be established. A very important nuance is the full compliance of the fuses (blown and new) regarding their markings and the output voltage. Otherwise, if this aspect is not taken into account, any of the elements included in the circuit that this fuse protects may burn out.
As a result, it must be said that the fuse is one of the most important parts in any car and Niva-21214 is no exception. In this regard, it is recommended to constantly monitor the condition of the mounting block and fuses. After all, if their work proceeds without any failures, then the risk of any serious electrical malfunction is reduced to almost a minimum. Thus, the key to a successful motorist is careful care of his car, and, of course, timely repair of all its components, including fuses.
Additional relay block
This block is located above the gas pedal.
Scheme
Description
- Rear fog lamp relay
- Rear window heating relay
- Low beam relay
- High beam relay
A little higher, above the block, a relay can be installed - a breaker for the turn signals and hazard warning lights.
Separate fuses and relays can be installed under the hood: on cars with ABS, on the left side of the engine compartment near the ABS hydraulic unit, a block with fuses is additionally installed that protect the elements of the anti-lock brake system and the starter relay not far from the starter itself.
Fuse box VAZ 2131 injector decoding
The table and figure are taken from the manual for 21213.
Heater fan motor. Relay (winding) for headlight cleaners and electric motors for headlight cleaners in all brush positions except the initial one. Relay (coil) for turning on the heated rear window. Rear window wiper and washer motors. Windshield washer motor.
Windshield wiper relay and motor. Turn signal lamps and relay-interrupter for turn signals and hazard warning lights (in turn signal mode). Turn signal indicator lamp. Rear lights (reversing lamps). Generator field winding (when starting the engine) and battery charge indicator lamp. Differential lock warning lamp. Parking brake system warning lamp. Warning lamp for insufficient brake fluid level. Oil pressure warning lamp. Coolant temperature gauge. Fuel level indicator with reserve indicator lamp. Tachometer. Brake light switch control circuit (from 2011) Clutch pedal position switch (from 2011)
Left headlight (high beam). Indicator lamp for high beam headlights.
Right headlight (high beam).
Left headlight (low beam).
Right headlight (low beam).
Left front lamp (side light). Right rear light (side light). License plate lights. Side light indicator lamp.
Right front lamp (side light). Left rear light (side light). Instrument cluster lighting lamps. Illumination panel for heater control levers. Cigarette lighter lamps. Switch illumination lamps.
Direction indicators and relay-interrupter for direction indicators and hazard warning lights in hazard warning mode. Rear window heating element and relay (contacts) for its activation
Sound signal. Plug socket for portable lamp. Interior lighting lamps. Rear lights (brake lamps). Rear lights (fog light).
Electric motors of headlight cleaners at the moment of start-up and at the moments when the brushes pass the initial position. Relays (contacts) for headlight cleaners. Headlight washer motor.
Cigarette lighter (cars of different years of production may be on the 10th or 13th fuse).
According to the publication “On Your Own,” the rear lights (fog lights) are connected to the 13th fuse. The 13th fuse is rated 16 amps, and the 10th is rated 8 amps.
The following table and figure for 21214 are taken from the book “On Your Own.”
Electric fuel pump relay (contacts). Electric fuel pump.
Main relay. Electric fan relay (winding). Electric fuel pump relay (winding). Vehicle speed sensor. Canister solenoid valve. Oxygen sensor. Mass air flow sensor. Controller.
The text was scanned by Alex-Niva and Zhustrik, processed by ALER.
And my SUD fuses are located like this: 1 - fans 30A 2 - ch. relay, etc. 15A 3 - controller 15A 4 - fuel pump 15A I checked it directly on the car by the colors of the wires.
And from the letter: I have a 2000 car (July). By the way, alutv has a 2001 car, which means that at least until the end of 2001 the fans were on the same fuse and relay.
For fuses: 1 - electric fan No. 1 30A 2 - electric fan No. 2 30A 3 - controller 20A 4 - fuel pump 15A I looked at several more 2003 cars. release. 3 and 4 fuses are different (20 or 15A), and 1 and 2 are all 30A and are responsible separately for each fan.
From the Lead FAQ.
According to the conference, the separation of the connection of electric fans 21214 into two circuits (two relays and two fuses) occurred by the second half of 2001. For example, such a division has already been made in a car manufactured on 08.2001 (information given by Avenir99).
Addition from katzyn.
According to the ECM fuses on cars with a 7.9.7+ controller from left to right: 1. Cooling fan 30A 2. Cooling fan 30A 3. Ignition relay 15A 4. Electric fuel pump 15A
Also under the casing there is a 7.5A controller fuse taped to the harness. Probably, on machines with a 7.9.7 controller, the purpose of the fuses is similar.
On cars with controllers 17.9.7/M74 (data from the AvtoVAZ Information Letter): 1. Cooling fan 30A 2. Cooling fan 30A 3. Ignition coil, power supply for fan relay control, controller, injectors 15A 4. Mass air flow sensor, DF, heating of both DCs , KPA, DS 15A
There is also a separate 15A electric fuel pump fuse, the location of which is not specified. Voltage is supplied to fuses 3 and 4 through the ignition relay.
Addition from yonnex001
The manual says that there are 5 fuses in the ECM fuse box near the driver's left foot:
But in fact there are 4 of them:
The ECM fuse has blown. But he did not completely disappear, but moved to a new place. The ABS fuse is also adjacent to it (if the car has ABS):
Can you see it in the photo below? where they are now: under the dashboard, to the right of the steering column, above the gas pedal. The ECM fuse is located behind the ABS fuse and is not visible in the photo. For the ECM, a medium fuse of 7.5 A (brown) is used, for ABS - a maxi fuse of 40 A (orange):
After I repaired the generator, changed the silent blocks, changed the oil, adjusted the ignition and carburetor. Some procedures are not described here, such as bleeding the brake system, replacing handbrake cables, replacing the heater core, flushing the cooling system and replacing the coolant.
I wanted to go for a ride, I drove out of the gate and turned on the headlights, and then I noticed that the backlight did not light up, the headlights did not turn on (a day ago I checked everything was working), after a couple of minutes I felt a pungent smell from under the panel there was light smoke, some kind of devilry
I turn off the headlights and drive the car back.
It was in the evening and I left it as is. I thought it was something in the tidy because there was smoke coming from there. After some time (it was already before winter), I had to move the car, started up and warmed up, I saw the low fuel level indicator lamp blinking strangely, and I could hear clicks from somewhere below. Is the switch clicking or something?
, moved the car, put the handbrake on... and then bam everything on the dashboard went out, the tachometer did not show.
I started to figure it out, first of all I checked the fuses - it was as if the same 2nd fuse had melted, but why weren’t the headlights and lights on?
Another strange thing was that when the headlights were turned on, the engine stalled.
Possibly bad contacts? (block, wires)
.
I looked at the 8-pin block behind the tidy, and found that the power wire leading from the generator to the cabin had become charred (in my opinion, for the lighting) and the block itself had melted, brown came out of the hood, pink came out of the block (no photos, lost somewhere) . This wire was charred simply due to poor contact; this could be seen with the naked eye. Having examined the relay, I again found a charred wire on the low beam headlight relay, again a power wire from the generator. Now it’s clear why the backlight and headlights weren’t on
I stripped the wires, crimped them with new terminals, tinned them with a soldering iron, and connected them.
I bought terminals, wires, heat-shrinkable tubes, 12-volt LEDs (you can also use 3-volt ones, but then you need five resistance) And then that means... It was in the evening, there was nothing to do... I won’t describe the soldering process itself, following the links above, everything is there, diagrams and options how to do what. I’ll just say what I decided to do: a block with LEDs, conveniently in case of a fuse burnout it will be immediately visible. The most important thing is to decide where the plus comes and where the minus, in a standard block + comes to the lower contacts, minus from the upper contacts. In order not to confuse anything, we do the same (+ for the lower ones, - for the upper ones), respectively, solder the long contact of the LED to the lower contact (where + is), the short one to the upper one (where -).
Lada Niva (aka Lada 4x4) traces its history back to its creation in the 1970s, having managed to gain authority all over the world. A vehicle with all-terrain capability and comfort comparable to a passenger car. The car is popular not only in Russia, but also in Germany, as well as other countries in Europe and the world.
The history of the car's creation can be read here.
Fuse box - located to the left of the steering column under the instrument panel. Despite the fact that it’s 2015, and these cars have been fuel-injected for several years, they are nevertheless equipped with finger fuses.
Mounting block Lada 4×4
Location of standard wiring fuses
Mounting blocks for Lada 4×4 2018
The main and additional units are located in the cabin to the left of the steering wheel, under the instrument panel. The blocks contain fuses of the “Cylinder” size, ten and six fuses, respectively. The ratings and purpose of the fuses are indicated in Table 4 “Circuits protected by fuses”:
Fuse block of standard size “Standard”. The block is located on the left side under the upholstery and contains fuses that are designed to protect engine control system devices. The ratings and purpose of the fuses are shown in Table 5:
The fuse and relay box is located on the left side of the steering column under the instrument panel. The block contains two “Standard” size fuses, which are designed to protect the circuits of the electric fuel pump, electric windows and electric mirrors. The ratings and purpose of the fuses are shown in Table 6:
The fuse and relay box is located on the right side of the steering column under the instrument panel. The block contains one “Maxi” size fuse and two “Standard” size fuses, which are designed to protect the circuits of the hydraulic unit of the anti-lock braking system. The ratings and purpose of the fuses are shown in Table 7:
Attention!
The relay and fuse diagram may differ depending on the configuration and production date of the vehicle. Current diagrams of the mounting block are presented in the operating manual for the date of manufacture of the car (download from the official website for 3-door or 5-door).
Why does a fuse or light relay or any other constantly blow out? Before replacing it with a similar one, you must first find and eliminate the cause of its burnout. This could be a short circuit, incorrectly selected rated current, etc. Use electrical circuit diagrams to troubleshoot problems. Questions on this topic can be asked on the forum.
Diagram and location of the fuse box Niva VAZ-21213 and 21214
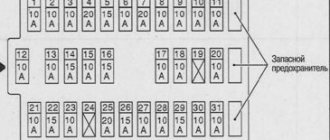
In this material we will introduce you to the Niva fuse box 21213 and 21214 , the purpose of the fuses, and the nuances of the additional VAZ-21214 fuse box, which is responsible for the injection system and is located in a separate block on the left side under the instrument panel. Externally the block looks like this:
The fuse numbers in it are as follows:
And here’s what a separate injection system unit looks like; by the way, it contains the electric fan fuse , including:
Below are the assignments of the Niva fuse blocks , both the main one and the injection system:
| Number | power A | Purpose of the fuse |
| Fuse box located under the control panel | ||
| 1 | 16 | Heater fan - electric motor Headlight cleaner and headlight cleaner motor in all wiper positions except the initial position Heated rear window - on relay (winding) Rear window cleaner and washer Windshield washer |
| 2 | 8 | Turn signal, turn signal and hazard warning signal breaker relay - turn signal mode Reversing lights Windshield wiper (gear motor and relay) Generator - field winding Warning lights: brake fluid level, oil pressure, carburetor choke, parking brake Coolant temperature gauge Gauge fuel level, reserve indicator lamp Voltmeter |
| 3 | 8 | High beam - left headlight, control panel warning lamp |
| 4 | 8 | High beam - right headlight |
| 5 | 8 | Low beam - left headlight |
| 6 | 8 | Low beam - right headlight |
| 7 | 8 | |
| 8 | 8 | Side lights: right front and left rear Lights: instrument panel, cigarette lighter, switches and interior switches |
| 9 | 16 | Turn signal and relay hazard warning light interrupter Hazard warning light indicator Heated rear window: heating element and switching relay (contacts) |
| 10 | 16 | Horn Light socket Interior lighting Brake light - tail lights |
| 12 (13) | 8 | Fog lights - rear |
| 16 (15) | 16 | Cigarette lighter |
| For VAZ-21214, the injection system fuses are located in a separate block on the left side under the instrument panel. | ||
| 1 | 30 | Cooling fans |
| 2 | 15 | Electric fuel pump |
| 3 | 15 | Control block |
| 4 | 15 | Main injection relay |
Attention, on the fields of later years of production, the connection diagram for the second, lower fuse block is slightly different. Instead of the traditionally two fuses involved, as many as four are involved. Here is a photo and diagram of the differences:
We hope that this information was useful to you if you encounter problems with the electrical equipment of NIVA. We will be glad to see you in the Niva owners club on our forum.
Location and electrical diagram
The fuse block (hereinafter referred to as the fuse block), unlike traditional models of the domestic automobile industry, is located in the vehicle interior. In particular, it is located on the driver's side under the steering wheel. If any electrical circuit element in a car stops working (lamps, interior lights, heater, power windows), then car owners first check the power supply elements. As a rule, the problem is resolved by replacing the fuse.
What does the power supply circuit itself look like? This question may be of interest to Niva owners. Below we will look at the electrical circuit of the unit with a description of all the components responsible for the operation of certain devices in the car.
In accordance with the diagram, we will consider the meaning of the BP elements. This electrical circuit is universal for all Niva cars.
It should also be noted that in VAZ 21214 injector cars there is another power supply unit with injection system components. It is located separately from the main power supply on the left side under the steering wheel.
In the case of the first described power supply unit, if the elements of the device begin to fail, this will in no way threaten the performance of the car, of course, with the exception of breakdowns of some components. However, in the case of the second power supply, if at least one component shorts out and does not work, the VAZ 21214 injector engine will not start.
Tuning options
The choice of options for tuning is not particularly large:
- Install a device from another car. In this case, you will need the services of a qualified electrician, since the connectors will have to be redone. You can also install a digital version of the tidy - it will be more than original.
- As a tuning option, you can install LED bulbs instead of regular ones. Many car owners choose this option because it is less expensive and the easiest to implement.
- Another tuning method is to install original instrument scales on the speedometer, tachometer and other sensors. Moreover, you can buy such scales either ready-made or make them yourself in accordance with your preferences.
1. Tidy with LED lighting
2. Digital control panel
3. Tidying with the so-called. wells