02/28/2022 21 163 VAZ 2107
Author: Ivan Baranov
The problem of failure of the clutch fork in a VAZ 2107 car can be considered a disease of these car models. This kind of breakdown often occurs among owners of “Sevens”, and they have already learned how to solve it without dismantling the gearbox. Therefore, now we will tell you how to replace the clutch fork without removing the VAZ 2107 gearbox.
[Hide]
How to install the clutch fork without removing the box
The clutch on a car with a manual transmission is an important and responsible unit. At the same time, large loads on the clutch and natural wear lead to the fact that during operation, individual elements fail.
Not often, but in addition to the basket, clutch disc and release bearing, the clutch fork may also need to be replaced. Next, we will look at what a clutch fork is, why it fails, as well as how to change the clutch fork and how to install the clutch fork without removing the gearbox.
Video “Replacing the aircraft in a VAZ 2107”
In this video, the author explains how to replace a broken element in a classic car.
The clutch is an important component of the transmission system. In turn, the clutch fork is an indispensable element that allows the parts to slowly connect and turn off the torque.
The content of the article:
Each mechanism of the car is interconnected, the engine transmits torque to the gearbox, which in turn to the wheels. But it is worth remembering that there is a clutch mechanism between the engine and the gearbox. How quickly the gears will change and pick up speed will depend on its serviceability and quality of work.
The clutch fork is one of the mechanisms that helps change gears, but due to various circumstances, this part sometimes fails. Let's consider the principle of troubleshooting, the principle of replacement and the cost of work.
When and how to replace the clutch fork?
First of all, if the clutch fork fails, you will not be able to drive the car normally, since the clutch simply will not work. Of course, you can get to the repair site if you know how to drive without a clutch. However, we are not talking about normal operation of a vehicle with such a breakdown.
The clutch actually connects the engine and the gearbox, and this connection can be interrupted by pressing the clutch pedal in the passenger compartment. It is necessary to interrupt the transmission of torque from the engine to the gearbox to change gears. The clutch also reduces shock, vibration and other loads, protecting the engine and gearbox.
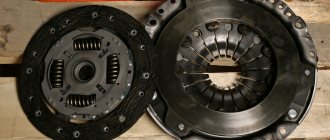
A single-disc clutch consists of the following main elements:
- pressure and driven disk;
- release bearing and its coupling;
- diaphragm spring;
- clutch forks;
Simply put, one side of the clutch assembly is attached to the engine flywheel, and on the other side the gearbox shaft is connected through a splined connection. This clutch is always closed (the discs are pressed against each other). In this case, to open the clutch (in fact, to distribute the pressure and driven disks), the clutch release drive is used.
So, after pressing the clutch pedal in the cabin, the force is transferred to the clutch drive, resulting in the movement of the clutch fork. This fork, in turn, transmits force to the release bearing, which moves, influencing the petals of the diaphragm spring of the pressure plate (clutch basket).
The petals of the spring are pressed, the outer edge of the basket moves away from the pressure plate, and tangential springs also help it press out. As a result, the disks open, and torque from the motor is not transmitted to the box. After the driver releases the clutch pedal, the diaphragm spring exerts force, the pressure and driven disks close, the torque is again transmitted from the flywheel and the transmission of torque to the box resumes.
If the car's clutch does not respond well to pedal pressure, problems with the fork should not be ruled out. At the initial stage, you can adjust the free play of the clutch fork, but you must remember that this is a temporary measure. After a short period of time, malfunctions in the clutch on/off mechanism will appear again.
If the clutch is not worn out, and there is no noise or vibration during its operation, and the clutch drive does not cause any other complaints, then the fork is often the source of problems. As a rule, a crack appears on the plug, after which the element is actively damaged.
- To verify that the fork is causing the problem, it is recommended to inspect the mechanism. To do this, the car is driven into a pit or raised on a lift, then the dirt boot is moved, which covers the clutch fork. Having adjusted the lighting (control lamp, flashlight, etc.), it is possible to inspect the plug.
- If cracks and obvious defects are visible, then they will be noticeable. Often the fork cracks in the part where the part transitions into a smooth flat surface of the part where it transitions into a flat plane. However, even if there are no cracks, the fork may still be severely worn in other places.
- Also, the clutch fork breaks in some cases (when driving, the clutch pedal drops sharply). The fork also bends from mechanical stress, that is, physical deformation of the clutch fork occurs. This occurs as a result of breakdowns of the clutch itself, since in order to bend the part, the force required is quite large.
- The clutch fork legs themselves often wear out. This often happens on cars with high mileage, where the clutch fork has not been changed for a long time. The fork legs directly affect other clutch elements, and defects at the point of their contact with the clutch inevitably lead to malfunctions.
- We also note that even a new fork may have defects, that is, when purchasing spare parts (especially non-original ones), you need to immediately inspect the product for possible defects.
Replacing the clutch fork yourself
As a rule, many car service centers may separately indicate that to replace the clutch fork you need to remove the gearbox. In fact, this is often not the case, and the service simply intends to receive additional income, taking into account the complexity and labor-intensive work of dismantling the checkpoint.
Moreover, if you know how to replace the clutch fork without dismantling the gearbox, you can do all the work yourself in a regular garage. Naturally, the guide below is general, that is, the possibility of such a plug replacement needs to be clarified depending on the specific car model.
Turning will allow you to install a new fork under the pressure spring located on the release bearing hub. Also, for ease of installation, you need to place a special hook under the spring, which you can use to lift the spring and insert a new fork.
To remove the old plug you will need:
- dismantle the clutch slave cylinder. The cylinder is removed along with the rod. After removal, the cylinder is moved to the side along with the hose to which it is attached;
- remove the protective cover from the old fork, remove the fork from the clutch housing. Then you need to inspect the casing and clean it of dirt;
- prepare for installing a new plug. Replacing the clutch fork without removing the box with your own hands does not seem difficult. To do this, you need to find a spherical pin in the clutch housing, under which the fork retainer petals are inserted;
- Next you need to locate the release bearing hub and wire spring. You need to insert the turned fork legs under the spring, and the hook mentioned above is used to tighten the spring.
- after installation, the fork should stand between the spring and the release bearing hub;
- the final stage is the reassembly and installation of all parts that were previously removed to replace the clutch fork;
- After assembly has been completed, you need to check the quality of the clutch by test driving the car. If necessary, you may also need to adjust/bleed the clutch to get the best results.
A little about the device
It is difficult to understand the cause of the malfunction if you do not have a minimal understanding of the design and principle of operation of the clutch. It is enough to understand that pressing the pedal provokes movement of the fork and release bearing. The release lever, pressed by the fork, presses on the petals of the diaphragm spring, moving the pressure plate away from the driven disc. The latter, in turn, moves away from the flywheel, thereby stopping the transmission of torque from the crankshaft to the gearbox input shaft.
The shutdown drive can be mechanical or hydraulic. In the first case, the pedal and the release fork are connected by a cable drive. The second type of inclusion requires the presence of a clutch master cylinder. By pressing the pedal, you initiate the movement of the rod, which presses on the piston inside the clutch cylinder. The displaced brake fluid, moving in the lines, presses on the piston inside the working cylinder. The piston, moving, presses the shutdown rod.
What does "leading" mean?
They say that the clutch is engaged if the clutch does not disengage completely. In other words, after pressing the pedal, the driven disk and the engine flywheel are not completely disengaged, which leads to partial transmission of torque to the input shaft of the gearbox.
Symptoms
You can assume that the clutch is slipping based on one symptom - difficulty engaging and disengaging gears. Most often, problems begin with the inclusion of reverse and first gears. The term “difficult” means both the need to apply more force to the gearshift knob and the inclusion with a crunch.
Causes
- Incorrect adjustment of the switching drive. In this case, the useful range of movement of the clutch pedal is not enough to completely separate the flywheel and the friction lining of the driven disc. Often such a malfunction is the result of unqualified repairs. To fix the problem, you need to correctly adjust the pedal free play.
- Deformation of the driven disk. The bending leads to the fact that after the pressure plate is disconnected, the friction lining in the place of the bend continues to touch the flywheel. If there is excessive axial runout, only replacing the driven disk will help. In cases of such clutch malfunction, vibration should be observed when starting to move.
- Weakening or breaking of the diaphragm spring blades. In this case, the force when pressing the clutch release bearing onto the paddles is not enough to completely disconnect the pressure plate from the driven one. As a result, even after pressing the pedal, the clutch is in a partially engaged state. Both manufacturing defects and incorrect adjustment of the release drive (when the clutch is constantly half-squeezed) can lead to breakage of the petals. Natural metal fatigue leads to weakening over time.
- Malfunction of the hydraulic clutch release system. The reason why the crankshaft is not completely disconnected from the gearbox input shaft may be hidden in the working cylinder or hydraulic line. You should monitor the tightness of the system, as due to leakage of brake fluid, the clutch may not disengage completely.
- Cable drive jamming. Over time, the cable may become frayed, which, combined with contamination, leads to limited movement. Therefore, it may seem to the driver that the clutch pedal is depressed, but in fact, the driven disk has not been completely disconnected from the flywheel.
- Difficult movement of the driven disk on the splines. Lack of lubrication, contact with various types of contaminants on the working surface and uneven wear of the splines can lead to the fact that after disconnecting the pressure plate, the gap necessary for separation will not be created between the flywheel and the pressure plate.
- Flywheel malfunction. Severe scuffing and radial distortion will prevent the friction linings and flywheel from completely detaching. The imbalance causes not only poor gear engagement, but also vibrations when starting to move.
- Bending of the fork that moves the release bearing, due to which the stroke of the rod becomes insufficient to bring the release bearing to the petals of the diaphragm spring.
If, after adjustment, problems with gear shifting have not disappeared, it is necessary to disconnect the gearbox and fully diagnose the clutch mechanism. Replacing the clutch cannot be called an easy job, but with proper theoretical preparation and the availability of the necessary tools, you can do it yourself.
What's the result?
As you can see, during the operation of the car the clutch fork is subject to wear. Although a high-quality part lasts quite a long time, by 100 thousand km the fork may fail. Even if during the inspection it was not possible to find cracks or other defects, there is a high probability of wear of the paws. In any case, the part requires replacement.
Finally, we note that quite often, along with the clutch fork, the clutch will also require replacement. The area where the fork contacts the surface is also where wear occurs. For this reason, you should make sure in advance that it is advisable to solve the clutch problem only by replacing one fork. Otherwise, you will need to re-disassemble the clutch mechanism, install a release bearing, etc.
The clutch pedal is tight, the clutch is pressed hard: the main causes of the malfunction. Diagnosis of clutch problems and repair. Tips and tricks.
The clutch pedal has fallen: why does this happen? The main reasons why the clutch pedal fails, what should the driver do if the clutch fails.
Types of clutch drive. If the clutch pedal falls, the clutch has become soft, problems have arisen with the clutch: causes and repair of major faults.
How to adjust the clutch pedal, what adjustment is needed for: clutch functions, clutch pedal adjustment (free play and total travel).
Car clutch and design overview: clutch pressure plate, driven disc, release bearing. Types of clutch drives on manual transmissions and manual transmissions.
Car clutch: purpose, types, design, principle of operation. Frequent clutch malfunctions in the vehicle transmission system, signs of problems.
Clutch disc
There is such a concept among people: “The clutch is moving or slipping” - all these are malfunctions of the clutch disc. Let's look at each of these concepts.
Sign
You are used to your car, you know how it accelerates, its speed, dynamics. One fine day, the car stops moving. In the sense that its acceleration has worsened. You step on the gas, the engine speed increases, but there is no speed. This means that the clutch is slipping.
What happens in the mechanism? The clutch discs should press tightly against each other. Only then is all the torque transmitted from the motor to the wheels. If the clutch begins to slip, it means that the driven disc is no longer pressed tightly against the drive disc, which is located on the crankshaft flywheel.
It turns out that there is a slip between the driving and driven parts, one disk slides over the other, barely clinging to each other. The moment is not fully conveyed. You accelerate, the speed increases, but the rotation is only partially transmitted to the gearbox input shaft.
This is due to:
- Excessive wear of the friction material of the disc linings
- Weakness or breakage of tangential leaf springs of the basket
- The release bearing has not moved away from the petals of the diaphragm spring due to a breakdown of its drive (fork, cable, cylinders, etc.)
At the same time, the “grip” between the discs is minimal, and the speed is high and can further increase while accelerating the car. Friction increases, the temperature of the discs rises, and a distinct smell of rotten eggs can be heard in the cabin - this is the clutch burning.
How to avoid this?
– Learn to use the clutch and gas pedals correctly. In this case, the moving parts smoothly close and the life of the mechanism, in particular the linings on the disk, is extended.
Advertising:
What is a burnt clutch and when does it start to burn?
The same smell can be felt when the car starts moving incorrectly, or when starting uphill when there are no driving skills. The discs do not have time to close tightly, and the engine speed begins to increase.
Due to loose contact, the friction linings wear out and begin to burn. If this is abused, then over time they can wear off right down to the rivets, completely. If repairs are not made, further use may lead to damage to the basket elements and require its replacement.
How to prevent this?
– Acquisition of basic driving skills, those taught in a driving school. To help figure out how not to burn out the clutch, watch the video lesson at the end of the material.
Advertising:
How to change the clutch fork of a VAZ 2107
Every gearbox has a clutch, but sometimes it fails due to the fork. Its task is to connect and thereby disconnect the torque from the wheels. This is an important thing to do in design.
In principle, all the parts in a car are important and they work together with each other. The motor transmits its torque to the gearbox, and that in turn to the axle. That is why, if something goes wrong, then everything will not work correctly. There is a clutch between the power unit and the gearbox, the quality and serviceability of which affects the speed and smoothness of gear shifting.
The fork itself is designed to help shift gears and often it wears out and needs to be replaced. This is exactly what we will tell you about, but first we will understand the principle of operation, the symptoms of the malfunction, and finally, we will touch on the replacement process.
Signs of a bad clutch
As you know, the clutch serves to transmit torque from the power unit of the car to its transmission. This unit, due to its load and constant use when driving, can fail quite often. Although during normal operation its resource is significant.
Clutch failure can lead to serious consequences. It's unsafe to say the least
Therefore, it is necessary to pay attention to the signals that the clutch usually “sends” to the driver before complete failure. What are the signs of a clutch failure?
Signs of a bad clutch
So, when the engine is not running, the clutch pedal should be pressed smoothly without any resistance. There should be no grinding or other extraneous noise. The pedal stroke should be moderate. If one of the above symptoms occurs, then most likely the clutch is experiencing problems.
After starting the engine, you must release the clutch pedal. If in this case extraneous sounds appear (noise, cutting, etc.) that disappear when you press the pedal, then this also indicates a breakdown of this unit.
One of the signs of a clutch malfunction is a characteristic crunching noise when engaging reverse gear. After starting the engine, try engaging reverse gear. The presence of a crunching or other sharp sound indicates that the pressure or driven disk has failed. Naturally, the inability to engage reverse gear indicates a breakdown that needs to be repaired urgently.
The same can be said for forward shifting. Noises or grinding noises accompanying this process indicate breakdowns. Also, a faulty clutch cannot ensure easy gear shifting.
If the car starts to move jerkily, then this is a clear sign of a clutch failure. It is especially urgent to go to a car service center if these jerks do not disappear with increasing speed.
Another important detail If, while driving quietly in third gear, you sharply press the gas, and the car accelerates sluggishly, despite the fact that the engine speed is increasing, then this is a clear sign of critical wear of the unit.
Also a clear sign of a clutch malfunction is a strong burning smell. It indicates strong heating of the friction linings of the driven disk and their burning. If such a smell appears once, this is not a sign of a breakdown. But if it appears regularly, you should think about contacting a service station.
It is worth noting possible clutch malfunctions, which are indicated by the symptoms described above:
- Deformation of the driven disk. Eliminated by replacing the latter with a new part.
- Damage or critical wear of the driven disk linings. In this case, replacement of the unit is also required.
- Wear of the disc splines also requires replacement of the latter.
- Oiling of the driven disk can be temporarily eliminated. But it is still better to replace the part.
- Wear or complete failure of the clutch release bearing. This part needs to be replaced.
- Breakage or critical wear of the damper springs entails replacement of the disc.
- The same applies to weakening or failure of the diaphragm spring.
- If the working surface of the pressure plate wears out, it is also replaced with a new one.
- If the power fork is stuck, it must be repaired or replaced. In cars with a mechanical (cable) clutch drive, unclear operation can be caused by elongation, jamming or damage to the cable, as well as damage to the lever system. Replacing the cable or failed elements solves the problem.
For machines with a hydraulic clutch, deterioration in performance is caused by air in the system or its leakage. In addition, the working cylinder cuff often fails. Clogging of the hydraulic drive may also be the cause.
In any case, you need to contact specialists to repair this complex unit.
Signs of a bad clutch
How does the clutch work?
The clutch, as we have already said, performs a very important function; it connects the gearbox with the engine and its main task is to transmit torque. But in addition to this, its task is to increase the service life of the engine and gearbox by protecting them.
The principle of operation varies, but the most famous and common is frictional. The system is simple, the work occurs using friction. But in addition to it, there is a hydraulic principle system, a fluid that drives the entire system. There is also an electromagnetic system that uses an electromagnetic field to make the entire system work. Combined mechanisms are very rare.
There is a release disk system, which is also called a basket. It's placed between the springs and the flywheel, and in the center of it all is a thrust bearing. There is also a driven disk, which is attached to the clutch, clutches and springs. In addition to all this, there are pedals, levers and the fork itself, but everything listed above is the most important.
If the pedal is released, the driven disk rubs and thereby transmits torque to the box. But if the pedal is pressed, the disc no longer rubs, but instead the fork begins to work, which goes into the flywheel.
The clutch is slipping
The obvious symptoms of such a clutch malfunction are the following: when you press the gas almost all the way down with the pedal released, the engine “growls”, but the output does not meet your expectations. In addition, you may notice a burning smell coming from the engine compartment.
Reasons for this problem:
- the pedal free play adjustment is broken;
- the friction lining of the driven disk is “contaminated” with oil. Most often, this scenario is typical for cars with high mileage, in which the oil seal or gasket may leak, or leaks in the connections may occur, causing the lubricant to splash under the bottom, ending up on the friction linings. It is in such cases that the smell of burnt oil may be present;
- friction lining wear;
- The problem may be a faulty drive. If you look under the bottom of the car, asking an assistant to depress the clutch pedal, the working cylinder rod should move, pushing the fork. If this does not happen, the breakdown should be looked for in the drive;
- In cars with a hydraulic drive, a similar malfunction occurs due to clogging of the compensation hole in the main cylinder.
When you press the clutch pedal you hear strange noises
If you release the pedal, the acoustic situation returns to normal. The nature of the sounds can be different and manifest itself from a characteristic rustling to an intermittent grinding sound with varying intensity.
- the release bearing fell due to play or lack of lubrication;
- the petals of the basket or damper springs have become unusable;
- The driven shaft bearing on the box is worn out.
The clutch pedal squeaks when pressed and does not return
Try to pull it back with the toe of your boot. If this does not help, that is, the problem does not disappear - the drive is probably jammed. Or the release bearing fell off. Sometimes this is caused by jamming of the pedal spring (most often due to prolonged inactivity) or the master cylinder rod.
The axle bushing in the place where the pedal is attached may creak - just lubricate it.
When you press the pedal hard, the clutch disengages
And if, when you smoothly press/release the pedal, the clutch does not engage (this symptom is typical for a hydraulic drive), then we can talk about the following reasons:
- the tightness of the clutch system line is broken;
- the fluid level in the system is less than permissible;
- The master cylinder cuffs are worn.
Car jerks when using the clutch pedal
If the drive is working properly, a possible reason for this behavior may be loosening of the friction linings (fastening is carried out with rivets) or their wear.
Clutch pedal is too soft
In most cases, the cause of this phenomenon is airing of the hydraulic line. It is treated by removing air from the system (bleeding the system).
What is a clutch fork?
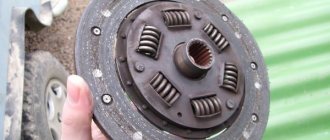
The clutch fork (hereinafter referred to as BC) is an important component of the transmission system of any vehicle. Scientifically speaking, this element transmits pressure from the slave cylinder or clutch cable to the release bearing. ensuring the movement of the car. The bearing itself is the transmission component between the clutch and the drive, which is physically located on the release clutch. It is the clutch fork that ensures the movement of the clutch and bearing.
In most cases, VAZ 2107 cars are equipped with a single-plate clutch, the operation of which is ensured by a special drive. Double-disc clutches are usually installed on more powerful vehicles and trucks. But this does not mean at all that the VAZ 2107 cannot have a double-disc element.
In any case, when you press the clutch pedal, the drive ensures the movement of the aircraft, which, in turn, acts on the bearing. The latter, as a result of moving the fork, presses on the petals of the spring element of the pressure plate. The spring bends towards the flywheel, simultaneously disconnecting from the pressure plate, thereby freeing it. At this moment, special tangential springs press the pressure plate, as a result of which the transmission of torque from the vehicle engine to the gearbox unit stops.
When the driver releases the clutch pedal, the pressure plate begins to interact with the driven components as well as the flywheel. At this time, torque is transmitted from the engine to the gearbox, which occurs due to friction forces. This process of clutch functioning is in no way possible without a working fork. The BC for the “classics”, which is 2107, is shaped like a slingshot.
New and old forks for VAZ 2107
Purpose, design and principle of operation of the clutch fork
Both types of clutch have release mechanisms built on the same principle and have approximately the same design. In addition to the diaphragm spring or pull-out levers, this mechanism includes the following parts:
• A thrust ring that presses on the levers or on the diaphragm blades; • Clutch release. It is on this that the fork rests and presses; • Thrust bearing located between the coupling and the thrust ring; • Clutch fork; • The shaft on which the fork is installed; • The shaft lever, located outside the clutch housing, is used to rotate the clutch shaft and fork.
The operation of the clutch release mechanism is simple. If it is necessary to change gear, the driver presses the clutch pedal, and with the help of the drive, the clutch fork shaft and the fork itself are rotated. As it turns, the fork pushes the clutch and, with the help of a thrust ring, compresses the thrust levers or diaphragm blades - as a result, the pressure plate is moved away from the driven disks, they are separated, and the flow of torque is broken. When the clutch pedal is released, the fork rises, releasing the thrust levers or the diaphragm, the pressure plate, under the action of springs, tightly compresses the disk pack, as a result, the transmission of torque from the engine to the gearbox is resumed.
The clutch drive used on Kama trucks does not consist of simple rods and cables, as in passenger cars, but includes a hydraulic system and a pneumohydraulic booster. The force applied to the clutch pedal by the driver is transmitted hydraulically (it is identical to the brake drive, it even uses brake fluid) to a pneumatic-hydraulic booster, where it is increased many times and supplied to the working hydraulic cylinder, the rod of which is directly connected to the clutch fork shaft lever. Thus, pressing the pedal serves only as a control signal, and the clutch is controlled by pneumatic and hydraulic systems. The pneumatic booster is supplied with compressed air from the consumer receiver, which is part of the brake system.
The use of a pneumohydraulic booster in KAMAZ vehicles greatly facilitates the driver’s work, since it is quite difficult to squeeze the clutch on your own. To disengage the clutch normally, it is necessary to apply significant force, and this imposes certain requirements on the strength characteristics of the clutch release fork, its shaft and lever.
The fork and shaft lever are made of cast iron, which resists plastic deformation well, that is, these parts, constantly working under bending loads, practically do not bend, which ensures constant clutch characteristics. However, cast iron does not withstand impacts the best, so sometimes the fork and shaft arm break and require replacement. The KAMAZ clutch fork shaft is made of steel.
The clutch release fork is a one-piece part that has two legs on one side (which, in fact, form the fork), and on the reverse side a clamp for putting on the shaft. There is a notch inside the clamp for fixation on the shaft; the fork is mounted using one bolt connection, which reliably tightens the clamp on the shaft. The clutch fork shaft lever is mounted in the same way.
Looking for problems
So, you understand that the fork is an important part and that is why you need to be able to determine whether it is faulty or not. The easiest way is knocks and noises, but it also happens that a burning smell appears. This is due to the fact that the disk has undergone deformation for some reason, but sometimes this is due to poor mounting of the engine and gearbox. Your task is to replace this part and improve the fastening.
Parts that are damaged must be replaced. In the event that there is towing, you can immediately blame the cylinders or fluid. Hydraulic fluid has most likely leaked or there are problems with the correct operation of the cylinders. If you have poor pedal response, the problem is most likely a bearing or lever issue. In this case, only replacement will help.
How to change a release bearing: stages and order of work
Replacing the release bearing, like changing the outboard bearing, is not technically difficult. The process of replacing the release bearing is complicated by the need for additional operations. In order to install a new release bearing, you need to dismantle the gearbox. In this case, you cannot do without preparatory work.
The operation is labor-intensive, so in order not to damage the gearbox you will need an additional pair of working hands, improvised tools, and a jack. It’s good if there is a garage pit or overpass. All work is carried out in three stages:
- preparatory work;
- dismantling the gearbox;
- replacing the release bearing.
To carry out the entire repair operation, the following tools are required:
- Jack for placing the car in working position.
- Bricks for fixing a car in a repair position.
- Clutch holder.
- New release bearing.
- Spanners. It is better to immediately make sure that the kit contains a key - a figure eight. It will be needed to remove the engine splash guard.
- Screwdriver for removing the release bearing.
- A reservoir for draining transmission fluid when removing the old release bearing. Any technical container is suitable for these purposes.
After the set of tools is prepared, all that remains is to place the car on the overpass. Preparatory work is the most labor-intensive stage of the entire process, which cannot be avoided. The sequence of operations in this case is as follows:
- Disconnect the battery terminals under the hood of the car.
- Next, disconnect the battery: to do this, disconnect the ground wire from the clutch housing.
- At this stage, you will need a figure eight wrench to remove the electric motor splash guard. The mudguard is rigidly attached with self-tapping screws to the side wings. Using a figure eight wrench, unscrew the fastenings of the mudguard itself and the side elements. We remove the mudguard using a screwdriver.
- The next action is to turn off the drive and reverse sensor. In this case, there will be no traction to operate the gearbox and reverse. To do this, you will need to loosen the clamp. A bolt is used as a fastening element. Using a thirteen wrench, loosen the bolt and, using a screwdriver, disconnect the clamp from the gearbox.
- The preparatory work for dismantling the gearbox has been completed. It is necessary to secure the car with bricks and a jack in the repair position. To do this, we use a jack, bricks, and stops. We loosen the wheel mounting screws, use a jack and fix the car in the repair position using bricks. Next, we completely dismantle the wheels.
This completes the preparatory work. You can begin to directly dismantle the gearbox.
How to change the clutch fork on a VAZ 2106
The mistake is that speeds begin to deteriorate greatly and fork is often adjusted to adjust the free wheel. It moves further away from the compression bearing at the crack, and adjustment is delayed for several days, sometimes even a day, depending on the condition of the fork break.
Typically, this replacement is done by removing the gearbox from the machine, which is time-consuming and time-consuming. However, there is a way to replace the clutch plug
without removing the gearbox, which seems more acceptable to motorists.
The operation of replacing the clutch fork does not apply to the arch complex and is fully capable of any motorist, provided that he is not afraid of work and is confident in his abilities.
To replace the clutch fork , you need to buy a new fork and treat it in a special way, viz. The ends of the forks must be sanded at an angle (about 45°) so that the plug can be inserted under the clamp spring on the output bearing hub. In addition, for convenience, it is necessary to make a hook to support the wire spring with the thrust bearing when installing the fork.
Before carrying out any work, ensure that the coupling sleeve is properly cracked. To do this, remove the clutch suspension cylinder with the rod and pull it out of the hose to the side. Then remove the protective cap from the plug and use a flashlight or pen.
How to replace the clutch plug without removing the transmission.
how to replace clutch fork
VAZ cars
-2101-2107 without removing the gearbox. full repair teams.
VAZ 2101-2107 Replacing a cracked clutch fork.
2101-2107 Replacing cracks in the clutch fork
.
And this. Show! Please show me how to change
This is
a fork
.
If this crack is not visible, you should place your hand on the fork leg in the direction it is running, which immediately shows where the crack is. Once the plug is cracked, it can be safely removed from the clutch cover window.
In addition, to be conscious when working on the clutch fork, take a look inside the clutch housing again. When you first turn the clutch fork, you will see a spring steel strip in the shape of a rounded "P" that serves to secure the fork to the clutch cover.
Now when you look inside the housing you will see the ball head fork support pin. Therefore, your task. get the fork petal of the castle under this ball.
Let's look further. At the steering shaft input of the transmission shaft, see bearing hub bearing and hub spring. Your task. remove the pointed ends of the fork under this spring so that the fork legs are between the spring and the hub. In this case, first press the clamping fork under the strut head (ball), and then hook the fork under the spring hub bearing.
If you have an old gearbox in your garage, you can practice on it, where all your actions will be clearly visible.
This is of course ideal, but in reality you will have to make several attempts before you can install the plug.
How to get to the desired node?
Now about how to replace the clutch correctly. If you want to get to this unit, you will have to remove the gearbox and several additional parts. To do this, you definitely need a jack, inspection hole or overpass. If necessary, you can make a homemade overpass. You cannot do without such devices, since in order to replace the clutch on a VAZ, you will have to lie under your car for almost a day.
Once you can work normally under the car, you will have to remove the transmission piece by piece. It looks like this:
- Disconnect the starter assembly - disconnect all contacts, then unscrew the three screws and remove the device.
- Next you should tackle the gear change drive. Loosen the clamp and pull out the device.
- Disconnect the cable from the speedometer and reverse wires.
- Next you will see stretch marks to the suspension arms. It is necessary to loosen their fastenings, and then move them in different directions.
- Remove the ball joints from the swing arms.
- Pull out the CV joint tip and immediately plug it with some kind of plug, otherwise oil will flow out.
- The lower part of the clutch housing protection is dismantled; there are only 3 bolts.
- To prevent the engine and gearbox from falling, supports are placed under them.
- Then unscrew the remaining supports, after which you can carefully pull out the gearbox assembly.
Clutch fork replacement process
The whole system has a fairly important mechanism, this is the clutch fork. Its task is to move the spring from the clutch, thereby turning off the mechanism. If the plug fails, you just need to change it, and this is not so difficult to do. The point is that there is no need to disassemble the box, since everything happens through the hatch.
At the very beginning, you need to initially purchase. Approach this correctly, pay attention to quality and precision. The part must be initially ground down so that the bolts can be tightened without much effort. Then, your task is to start making replacements and you need to do this carefully, since the part can be damaged.
The solution to this problem is divided into two parts, in the first we remove the old part. It is necessary to remove the return spring, then bend the cylinder and finally remove the fork. But very often there is a protective coating that also needs to be removed.
Now we need to insert a new part, but before that we need to insert the spring into the hatch and carefully push it to the end. Now we insert the fork itself and make sure that everything passes by the spring, clutch and bearing without catching them. At the end you will be greeted by a recess with spring petals that should surround the new part. If necessary, you can use a hammer, but it is better to be extremely careful with it. And finally, you need to assemble everything and tighten it well, installing it back afterwards.
Clutch selection
When purchasing a new clutch kit for a VAZ 2107, experts recommend adhering to the following criteria. When assessing the driven disk:
- the surface of the linings must be smooth and even, without scratches, cracks or chips;
- all rivets on the disk must be the same size and at the same distance from each other;
- there should be no oil stains on the disc;
- there should be no play at the junction of the liners and springs;
- The manufacturer's logo must be placed on the product in one way or another.
When choosing a basket, you should pay attention to the following points:
- the body must be stamped, without cuts or scratches;
- the surface of the disk should be smooth and even, without cracks or chips;
- rivets must be uniform and strong.
The following brands are the most popular.
- Valeo (France), specializing in the production of high-quality brake system components. The characteristic features of the Valeo clutch are smooth operation with precise ignition timing, reliability, and long service life (more than 150 thousand km). However, such a clutch is not cheap.
Valeo clutch features smooth operation with precise engagement timing - Luke (Germany). Luk clutch quality is close to Valeo, but costs a little less. The good shock-absorbing properties of Luk products are highlighted.
- Kraft (Germany). However, production is concentrated in Turkey. The Craft clutch features smooth operation without overheating and reliable flywheel protection.
- Sachs (Germany). The company specializes in the production of transmission parts. The use of non-asbestos coatings in the manufacture of clutch discs made Sachs very popular in Russia.
The choice of clutch must be approached comprehensively and the choice must be made after inspecting the product and consulting a specialist.
Replacing an element
Replacing the aircraft in a VAZ 2107 car can occur in several ways. In the first case, it is necessary to remove the gearbox, which is a rather labor-intensive process that cannot be accomplished by any driver. In the second case, you can change the element without removing the gearbox. Domestic motorists encountered this breakdown so often that they found a simpler way out of this situation.
Therefore, today you will learn how to replace the clutch fork without removing the box. But how can one determine whether the aircraft is really out of order?
How to determine an aircraft malfunction?
It's very easy to do. You just need to pay attention to all the nuances that occur while the car is moving. In particular, this is evidenced by unsatisfactory clutch performance. Often, even after adjusting it, malfunctions appear again after 1-2 days.
New fork for VAZ 2107
There are several criteria that may affect the movement:
Such a breakdown cannot be allowed to continue for a long time. Faults associated with the aircraft must be eliminated as quickly as possible, otherwise the entire system will be subjected to very heavy loads. These loads can either “finish off” the fork or negatively affect the entire clutch mechanism.
Old VAZ fork with a crack
As a rule, in such cases a crack forms on the BC 2107. As a result of its appearance in the vehicle, free movement increases and this, in turn, can affect the inclusion of gearshift lever speeds. In addition, the aircraft freewheel may need to be adjusted. Even when an element jams even slightly, the load on it increases. As a result of an increase in load, the aircraft may simply break, and its components may get caught in the clutch mechanism. Therefore, it is better to carry out work to replace the part immediately after identifying a breakdown.
To understand whether an aircraft replacement is really necessary, you need to go to an inspection pit or overpass. It is necessary to find and remove the protective boot of the fork under the bottom of your car and inspect it. It's best to do this with a flashlight so you can see the crack exactly. As a rule, it forms closer to the place where the part itself goes into the plane.
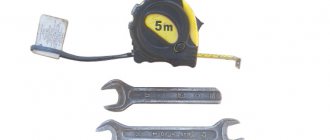
Tools
Before you begin the process of changing an element, prepare everything you might need. In addition to the new clutch fork, these are:
- set of wrenches;
- mount;
- sandpaper;
- bricks or other supports;
- flashlight.
Read more: Selling gearbox VAZ 2108 2109 used
We change the aircraft with our own hands
As stated above, we will consider the option of replacing the aircraft without dismantling the gearbox, which will greatly facilitate the work of the motorist. However, this will require disassembling the clutch. In addition, you will also have to sand the new element. On the side of the fork where the two ends are located, it is necessary to grind off the ends of the corners a little, about 45 degrees. This must be done so that the edges of the element can fit between the curved edges of the spring component and the so-called release bearing bearing.
- First you need to crawl under the bottom of the car and disconnect the driveshaft.
- After this, you need to disconnect the wiring from the reverse sensor.
- Take a wrench and unscrew the screws securing the clutch casing on the head of the cylinder block (cylinder block) and remove the car bottom cross-member.
- Now take the key to “13” and unscrew the nuts that hold the gearbox mount.
- Take a pry bar or crowbar and move the gearbox to the side opposite the engine until the gearshift lever is at the rear edge of the hole in the bottom of the car. As a result, the vehicle's transmission assembly must be located on the receiving tube. Please note that bricks or other support should be placed under the knot. This is done to prevent the element from slipping.
- After this, you will need to remove the clutch basket from the flywheel of the engine of your “seven”. To do this, you will need to take a crowbar and fix the flywheel in place, and then use a 13mm wrench to unscrew the clutch basket mounting screws one by one.
- After unscrewing the bolts securing the basket, use a crowbar to move it to the side and carefully remove the clutch disc, without putting heavy loads on it.
- Next, you need to align and remove the clutch basket.
- After this, you will have access to the aircraft. Once the basket is dismantled, the damaged aircraft can be pulled out with its protective cover. We take a new part, install it in place of the old one, assembling everything in the reverse order. Remember to then center the clutch disc relative to the crankshaft bearing. If the disc is in the correct position, the frame will slide in and out of the bearing without any problems.
To make sure that you did everything correctly, get behind the wheel and start the car. Pump the clutch pedal several times, then engage all gears one by one. Take a test ride: it is advisable to drive at all speeds, or at least up to four. After this, climb under the car, move away the protective cover of the aircraft and look at it.
Clutch drive and its types
Clutch device The drive is designed for remote control of the clutch directly by the driver from the passenger compartment.
Pressing the clutch pedal directly affects the pressure plate. The following types of drive are known:
- mechanical;
- hydraulic;
- electrohydraulic;
- pneumohydraulic.
The first two types are most widespread. Trucks and buses use a pneumatic-hydraulic drive. Electrohydraulic is installed in cars with a robotic gearbox.
Some cars use a pneumatic or vacuum drive booster to make driving easier.
Mechanical drive
A mechanical or cable drive has a simple design and low price. It is unpretentious in maintenance and consists of a minimum number of elements. The mechanical drive is installed in passenger cars and light trucks.
Mechanical clutch drive
Mechanical drive elements include:
- clutch cable;
- clutch pedal;
- clutch release fork;
- release bearing;
- adjustment mechanism.
The clutch cable, enclosed in a sheath, is the main element of the drive. The clutch cable is attached to the fork, as well as to the pedal located inside the car. When the driver presses the pedal, the action is transmitted through the cable to the fork and release bearing. As a result, the engine flywheel is disconnected from the transmission and, accordingly, the clutch is disengaged.
The connection between the cable and the lever drive has an adjustment mechanism that ensures free movement of the clutch pedal.
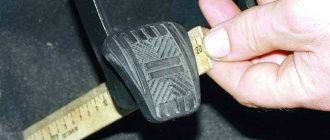
The clutch pedal travel is free movement until the drive is activated. The distance covered by the pedal without much effort from the driver when pressed is free play.
If gear shifting is accompanied by noise, and at the beginning of the movement there are slight jerks of the car, then adjustment of the pedal travel is necessary.
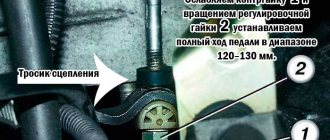
The clearance in the clutch should be within 35-50 mm of pedal free play. The standards for these indicators are indicated in the technical documentation of the car. Adjustment of the pedal stroke is carried out by changing the length of the rod using an adjusting nut.
Trucks use a lever mechanical drive rather than a cable drive.
The advantages of a mechanical drive include:
- simplicity of the device;
- low cost;
- reliability in operation.
The main disadvantage is considered to be lower efficiency compared to a hydraulic drive.
Hydraulic clutch drive
The hydraulic drive has a more complex design. Its elements, in addition to the release bearing, fork and pedal, also include a hydraulic line, which replaces the clutch cable.
Hydraulic clutch diagram
In essence, this line is similar to the hydraulic drive of the brake system and consists of the following elements:
- clutch master cylinder;
- clutch slave cylinder;
- reservoir and pipeline with brake fluid.
The clutch master cylinder is similar to the brake master cylinder. The clutch master cylinder consists of a piston and a pusher located alone in the housing. Its elements also include a fluid reservoir and sealing collars.
The clutch slave cylinder, which has a similar design to the master cylinder, is additionally equipped with a valve to remove air from the system.
The mechanism of action of a hydraulic drive is the same as that of a mechanical one, only the force is transmitted using the liquid in the pipeline, and not through a cable.
When the driver presses the pedal, the force is transmitted through the rod to the clutch master cylinder. Then, due to the incompressible properties of the fluid, the clutch slave cylinder and the release bearing drive lever are activated.
The advantages of the hydraulic drive include the following features:
- hydraulic clutch allows you to transmit force over a considerable distance with high efficiency;
- resistance to fluid flow in the hydraulic drive elements contributes to smooth engagement of the clutch.
The main disadvantage of a hydraulic drive is that it is more difficult to repair compared to a mechanical one. Leakage of working fluid and entry of air into the hydraulic drive system are, perhaps, the most common breakdowns that the clutch master and slave cylinders can boast of.
The hydraulic drive is used in passenger cars, as well as on trucks with a tilting cab.
Replacing the bearing and clutch release fork Hyundai Solaris
Auto News
Cars will become more expensive despite the strengthening of the ruble
Prices for new cars in Russia will increase by 15-20% by the end of 2022, and the strengthening of the ruble will offset the losses incurred by automakers at the height of the pandemic. This forecast was presented by experts and market participants in a conversation with Autonews.ru. 22 May 2020 13:25:00 +0000
There's no way they can sell 4,000 hail-damaged cars in Australia
The world's largest car auction, Mannheim Auctions, has been unable to find a buyer for several months for 4,000 Australian cars damaged by heavy hail in early 2022.
Lada Xray may leave the AvtoVAZ model line
It’s worth noting right away that there has been no official information about the upcoming discontinuation of the Lada XRay.
Sales of new generation KamAZ tractors have started
The Kama Automobile Plant has launched sales of the flagship KamAZ-54901 tractor, which crowns the new K5 line. The initial cost of the car is 7.09 million rubles. The truck is designed for towing semi-trailers on paved roads.
They told how much AvtoVAZ bought the GM-AvtoVAZ joint venture for
Previously, the amount of the transaction for the acquisition of a 50% stake in the GM-AvtoVAZ joint venture was not disclosed. In December 2022, AvtoVAZ bought from its partner, the American concern General Motors, half of the shares of the general enterprise GM-AvtoVAZ, becoming the sole owner of the factory.
Renault presented the updated Kaptur for Russia
Renault has presented the updated Renault Kaptur for the Russian market. Having shared platform components and a turbo engine with Arkana, the crossover received a modified interior, a navigator from Yandex and many other options it previously lacked.
The production of passenger cars in April in Russia fell by 79.2%
The production of passenger cars in Russia, against the backdrop of quarantine restrictions, in April 2022 fell 5 times (by 79.2%) to 30 thousand units, according to Rosstat data.
Volkswagen will begin producing three new models in Russia
Volkswagen will begin producing at least three new models in Russia by 2028. Their production must be mastered within the framework of the SPIC, published in the register of federal special investment contracts for the GIS Industry, which RIA Novosti reviewed.
How to replace and adjust the working cylinder on a Gazelle?
Despite all the advantages, the clutch on the gazelle leaves much to be desired - this is a real headache for every owner. Due to the imperfection of this unit, which is not characterized by durability and reliability, it is often necessary to replace, repair or adjust it.
The only good thing here is that the cost of a new clutch slave cylinder is not high, and there is nothing complicated in the repair: the slave cylinder is removed, disassembled, the element is replaced and everything is installed back.
If the problem is not the entire clutch on the gazelle, but the problem is in some elements of the cylinder, then, for example, replacing the disc will not be difficult.
Gazelle Business
But before that, it’s better to think about why the same clutch disc burns out and how to avoid it next time. Many motorists in inclement winter weather sit in a snowdrift and make a big mistake by pressing the gas pedal to the floor and thereby burning the clutch disc.
But you could just put branches under the wheels. In the summer, too, you often hear a crazy squeal of tires - are you in the habit of accelerating from a stop? The result is a burnt out clutch disc. Moreover, the disk burns so much that the metal turns blue, which is the first sign of its fragility and thinness.
Of course, normal clutch is out of the question here.
The disk is replaced as follows:
- the driveshaft is disconnected from the gearbox;
- the gearbox is removed;
- the clutch housing is unscrewed and removed;
- 6 bolts are unscrewed, the clutch basket and disc are removed;
- a new disk is installed using a centering insert;
- Everything is assembled in the reverse order (the basket is installed on the disk, the bolts are tightened, the crankcase is installed, the bolts are tightened again, etc.).
- the system is being pumped.
To make it easier to diagnose and repair the clutch on a gazelle, it is better to drive the car onto an overpass, lift or inspection pit. Also move the wrench closer to 17, screwdrivers and socket heads to 10 and 13.
Gazelle clutch slave cylinder
Replacing the clutch slave cylinder
Before removing the working cylinder on a GAZelle, you should pump out the hydraulic fluid with a syringe, and also, for convenience, remove the expansion tank. Further:
- using a 10mm socket, you need to unscrew the nuts securing the clutch barrel (from where the fluid was previously pumped out) and remove the hose;
- the aluminum tube that connects the main cylinder is disconnected, the two nuts securing the main cylinder are unscrewed with a 13 head, and we take it out;
- Using the 17th wrench, we disconnect the hose connecting the clutch slave cylinder, also unscrew the 2 securing nuts with a 13mm socket and remove the slave cylinder;
After dismantling, the working cylinder is inspected for damage and, if possible, repaired: the gazelle clutch is disassembled, the old cuffs are replaced with new ones, and a new boot is installed.
If repair is impossible, a new working cylinder is purchased, onto which a nut is screwed at the same distance as it was on the old part.
The clutch on the gazelle is assembled in the reverse order, not forgetting to also change the aluminum tubes and eventually bleed the system properly.
Clutch release cylinder for Gazelle
The working and master cylinders are pumped as follows:
- pour brake fluid into the reservoir to the brim and unscrew the fitting completely;
- press the clutch pedal 4-5 times (so that fluid flows through the tube system) and fix it;
- tighten the fitting, squeeze the pedal again 4-5 times, fix it in the squeezed position;
- put a tube on the fitting and lower it into a bottle into which the brake fluid is poured, unscrew the fitting to bleed air;
- I repeat all the steps again and again until there is practically no air left in the system;
- If necessary, add brake fluid to the reservoir.
The gazelle clutch needs to replace the hydraulic fluid at least once every 2 years, because it is hydroscopic, which leads to the formation of rust in the system.
Important! It is always better to prevent an accident due to faulty parts, so it is better to inspect more often and promptly change, in your opinion, the slave and master cylinders that are not working correctly, so that the car does not suddenly fail on the highway. Moreover, every beginner can carry out minor repairs, spending at most 2 hours on the job.
After the clutch slave and master cylinders have been replaced or repaired, do not forget to adjust the clutch pedal.
Replacing the clutch VAZ 2110 2114
First of all, we drove into the pit and removed the engine protection. There shouldn't be any problems here. All the bolts came off with a bang. The oil can be drained to reduce the weight of the box. We will not pull the drive out of it, so there is no need to drain it.
Loosen the front wheels. Unlock both hub nuts and unscrew. It's better not to put the old ones back. Buy new ones. They cost about 70 rubles.
Raise the car and place blocks or sawhorses underneath it. Remove both front wheels.
DO NOT work on a jack without reliable insurance.
Remove the clutch cable from the fork and unscrew it from the bracket located on the box. You will need two 17 keys. For convenience, it is better to remove the battery.
Disconnect the speed sensor connector.
Remove the air filter housing, having first disconnected the chip from the mass air flow sensor.
Unscrew the bolt securing the ignition module to the gearbox and another bolt nearby. It is one of those that connect the gearbox to the engine.
Unscrew the nut on the starter that holds the positive wire. Disconnect the terminal from the traction relay.
Unscrew the upper and lower starter mounting bolts, then remove it.
For prevention, you can treat Bendix with a small amount of lithol and similar lubricant.
There is another bolt at the top that holds the gearbox. It is located in the thermostat area. It is covered by fuel pipes.
This completes the work at the top.
Many people write that the “saber” needs to be removed, but we took a different route. We unscrewed the ball from the hub and the bolt that connects the lever and the stabilizer. Then simply bent the lever down. This method is suitable if the hole allows it and you are not going to completely remove the gearbox.
Move the left hub and remove the drive.
Unscrew the flywheel protective shield. There are three bolts. I don’t know why, but they were different for me. Two were unscrewed with a 10 head and the third with an eight. I still don’t understand.))) Maybe someone can tell me why this is so?
Then disconnect the shift linkage by loosening one bolt. It is recommended to pre-mark the position of the rod to make it easier to adjust the speeds later. I used this advice, but during subsequent setup, for some reason it did not work. This is such additional information)))
Now loosen one gearbox mounting bolt, which is located under the starter (it has already been removed), but not completely.
And another bolt is located in the area of the right drive. We didn't notice it during disassembly and spent a long time trying to figure out why the box wouldn't come out. Take this bolt off too, but don’t unscrew it completely. This required a good extension cord and a reliable head.
Now you need to take a jack and install it under the engine. When we start unscrewing the pillows, the motor will remain on only one and may fall, breaking the heating hoses. Place a small piece of wood between the jack and the engine to prevent damage to the crankcase. It should be installed closer to the checkpoint. It’s also better to put a block under the box, just in case.
When the engine is securely fixed, remove the cushions.
First, let's remove the rear support. You can simply unscrew it from the body. It is held on by two studs, but this method is suitable if you are sure that the nuts will unscrew easily and will not break. We didn’t experiment; we did this: There is a bolt on the pillow itself, it points towards the interior. It needs to be loosened and unscrewed a little. Then disconnect the cushion bracket from the gearbox and move it as far as possible to the side. Maybe this is the wrong way, but the studs remained intact, and we are happy)))
Now unscrew the left pillow of the box. There are two nuts, one at the top and the other at the bottom. The fastening looks like a threaded pin on both sides. Unfortunately I didn't take a photo.
Now the two of you need to move the box away from the engine and lower it onto the bent lever. Do this carefully, without damaging the pipes and wiring. The box is heavy, about 30 kg if I'm not mistaken. We had enough))).
When you move the gearbox, make sure that its guides do not fall out. They are located in the lower holes of the gearbox mounting. They look like tubes.
The box will move back about 10 - 15 cm. This is enough to replace the clutch basket and disc, as well as the bearing and fork.
When we moved the box away, we saw that three petals of the basket had fallen inside. It immediately became clear that it was due for replacement.
Let's start removing the basket. It is bolted to the flywheel with six 8mm bolts. For us, they were unscrewed with great effort. I had to use leverage. Before unscrewing, secure the flywheel from turning. To do this you will need a screwdriver or something similar.
Having unscrewed the basket and taken out the disk, we decided to change both.
Replacing cylinders
- Replacing the clutch master cylinder is necessary if installing new O-rings does not improve system performance.
- Replacing the clutch slave cylinder is necessary if brake fluid continues to leak even after installing new seals.
b – pusher of the working cylinder
To remove the working cylinder, remove the spring that returns the fork after releasing the pedal. Next, remove the 2 nuts that secure the slave cylinder to the transmission housing. Holding the working cylinder suspended, unscrew the rubber hose that fits it.
To avoid brake fluid leakage, immediately screw the new slave cylinder to the hose. To remove the master cylinder, pump out all the fluid from the reservoir. Unscrew the fitting with the copper tube that goes into the cylinder and close it with a rubber plug to prevent brake fluid from leaking out. Move the tube to the side so it is out of the way, then unscrew the two nuts securing the master cylinder to the car body. Pull towards you and unclip the joint to which the pedal is connected. Pull out the pin and disconnect the cylinder from the pedal. Install the master and slave cylinders in the reverse order. Don't forget to adjust the length of the rod that pushes the clutch fork.
After installing new cylinders, pour new brake fluid into the reservoir and be sure to bleed the clutch. To do this, put a rubber tube on the valve and lower it into a transparent container, pour brake fluid into it, then ask him to smoothly press/release the pedal 4 times. After this, ask to press the pedal again and not let go without your command. When the assistant presses the pedal for the fifth time, unscrew the valve to drain the fluid. Then tighten the valve, and then ask an assistant to release the pedal. It is necessary to pump the clutch until you are sure that the fluid comes out without air. Add brake fluid to the reservoir in a timely manner so that the cylinder does not suck air. If the brake fluid level drops too much, re-bleeding will be required.