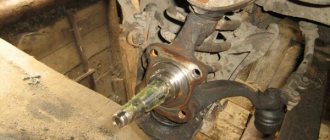
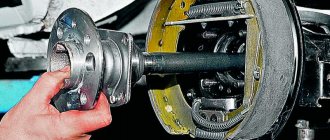
If significant play is felt when the suspended wheel is rocked or noise (howling, humming) is heard while moving, the hub bearing may have failed. The noise may become louder when cornering and on bumps. If you have signs of a bearing malfunction, it is better not to delay replacing it, as it may jam. If the bearing jams while driving, this will lead to uneven wear of the wheel tread, possibly damage to it, loss of vehicle control, and in the worst case, an accident. In this article we will talk about how to change the bearing on the rear wheel hub of a Lada Kalina car on your own.
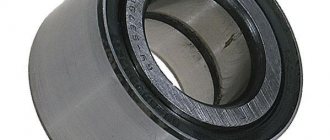
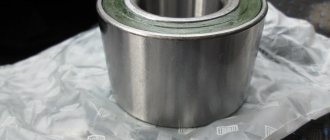
The hub is equipped with a double-row ball bearing 2 (Fig. 1), which does not require adjustment or lubrication during operation, that is, throughout its service life, it does not require any maintenance.
Rice. 1. Lada Kalina rear wheel hub : 1 — mud ring; 2 — hub bearing; 3 - hub; 4 - thrust washer; 5 — hub fastening nut; 6 - sealing ring; 7 — hub cap; 8 — retaining ring; 9 — hub axis
DIY pullers drawings
Homemade wheel bearing puller: drawings, photos, videos of a homemade device.
The author decided to make a homemade version of a tool for pressing out wheel bearings, an analogue of the one sold in stores.
Steel plates with a thickness of 8 mm and a pipe with a wall thickness of 7 mm were found as materials for manufacturing.
Wheel bearing puller drawings.
A 320 mm long stud was also needed and a nut was welded to it. I also pressed the ball from the bearing into the center of the stud.
According to the drawings, they made these:
Also two washers measuring 74 mm and 62 mm.
This is what the entire set of tools for pressing out wheel bearings looks like.
In this video, the author shows in detail a wheel bearing puller.
Composition: Puller (SB), detailing (handle, paws, etc.), specification, technological map for the cultivation of sugar beets (RP), technological map for the cultivation of sugar beets
Contents: Assembly drawing (SB) + detailing, specification.
Composition: Assembly drawing (AS), Detailing, 3D Assembly
Composition: 3D Assembly, 3D models of parts
Contents: Assembly drawing (AS), Detailing (screw, cam, tab, strip, pipe), Specification
Composition: Detailing, Specification, Assembly.
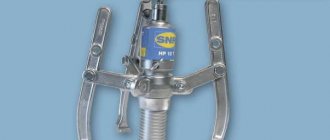
It is desirable for every man to have such a tool in the garage. Sometimes situations arise when it is necessary to repair a power tool, namely to replace bearings that are subject to a high degree of wear. You can, of course, remove the bearing with a hammer and screwdriver, but there is a risk that the threads or axle may be damaged during removal, as a rule, this usually happens. Or there is an option that the bearing is so seated on the part that even a special device cannot remove it.
Let's look at what the design of a bearing puller is
A bearing puller is a device, usually made of steel, consisting of several claws and a metal rod. This type of tool is used to firmly grip the bearing in order to remove it. The bearing removal process occurs due to tightening force. The ease of operation of the puller and the absence of the risk of injury depend on the quality of the design.
Types of mechanical pullers:
- Pullers with two gripping arms.
- Pullers with three gripping arms.
- Internal pullers.
Pullers with two gripping arms are a fairly simple and reliable mechanism. Made from high strength steel alloys. Allows you to easily control the work process.
Pullers with three claws are the same pullers with two claws, but improved. As a rule, they are made of hard alloy tool steel.
Internal pullers are used to remove coupling shafts when the part is firmly attached to the structure.
There is also another unofficial type of puller - this is a special one. As a rule, it is used to remove generators, cylinders, and motors. These pullers are exclusive, made to your specific dimensions. This is the main advantage of such a product; you can be sure that the puller one hundred percent fulfills its promises.
A quick overview of wheel ball bearing pullers
It is impossible to choose a universal kit for all types of car repairs, since the range of actions is limited:
- a variety of shapes, sizes for charging to the starting position;
- limited work space.
Cup - “Force 9T0311”
- Internal mandrels 34-80 mm.
- External mandrels 44-90 mm.
- The dimensions of the outer diameter of the cups are 44-90 mm.
- Rod (stud) with nuts.
- The plates fit a wide range of sizes.
- The steering knuckle remains in place.
- The set is included in the workshop press kit.
- Pressing-pressing takes place in one step.
Three-jaw – “KS TOOLS 630.3002”
Garage tool. Suitable for use in restricted access work areas.
- Long life if you follow the manual.
- The articulated design of the paws engages securely.
- Removing stuck parts from shafts and machine axles.
- Wide grip range - 20-230 mm.
- Maximum force - 4.5 tons.
- Screw rod dimensions: M18 x1.5 x 240.
- The dimensions of the bolts for the hinges are 19 mm.
Two-grip universal – “Kukko K-2030”
The tools from the set of the German manufacturer Kukko are well-thought-out forms of gripping mechanisms. On the traverse, the paws move along guides, and the suspension screws fix the specified position.
- Grasp the paws at an angle parallel to the axis of the tension force.
- Reliability of engagement.
- Maximum tension - 5.5 tons.
- The legs rotate 180 degrees.
- Wide grip range.
- Double acting.
- Suitable for use in confined spaces.
Hydraulic pullers
You can also find hydraulic pullers on the market. The operating principle of hydraulic SSPs is similar to jacks. Designed for repair shop mechanics, no muscle power required, speeding up the repair time. Pay attention to the quality of the metal, the rotation of the screw rod, and the condition of the hinges.
- the force of influence on the pressed-in unit reaches 20 tons,
- operation time is reduced,
- the share of physical costs is reduced.
- limitation of the working area of application,
- the price is higher than a mechanical tool.
Second phase
We will make the lower and upper supports. We need a piece of sheet steel of maximum thickness. We cut a circle in it, you can also do it with a grinder. To simplify the work, you first need to cut a rectangle from the sheet, and then sand the sharp edges and the circle is ready. You only need two of these circles.
Finishing touches on the supports. Cut a hole for the bolt connection in the middle of the top support. The hole can easily be made using a drill and then drilled to the desired size using a lathe. Let's move on to the lower support. There you also need to drill a hole in the middle. The hole dimensions should be slightly larger than the axes from which you will remove the bearings. Then we cut out the part in the form of a triangle. At this point, the stage of work on the supports is completed.
Third stage
Now you need to weld two supports to the body. The seam must be strong and airtight. Let's start working on securing the nut. We screw the bolt into the hole and thread the nut. We secure everything with a welding seam, but do not overdo it with the current, otherwise the nut may melt. It can be attached externally or internally. With the nut located internally, the overall design of the puller seems more durable and reliable. The threaded rod will act as a handle. This makes it much easier to remove the bearings.
Replacement
Having selected the set of front wheel bearings required for replacement, you can get to work.
For repairs, in addition to the standard set of tools, you will need special bearing mandrels. If they are not available, you can use a pipe of suitable diameter.
Dismantling works
By following the instructions and relying on video lessons, you can replace the front wheel bearing with your own hands.
- Loosen the tension of the wheel bolts, remove the decorative plastic plug from the hub bearing and loosen the fastening nut.
- Using a socket and lever, loosen the bearing mounting nut.
- Raise the car with a jack, and then remove the wheels from the part of the front of the VAZ 2109 where you plan to replace the bearing.
- Remove anything that might prevent you from removing the hub. These objects include the brake disc, fastening to the steering knuckle, ball joint, steering knuckle mounting bolts, and front strut fasteners. Dismantle it all and move on.
- Completely unscrew the front hub nut, remove it and remove the thrust washer.
- It is necessary to remove the hubs from the front strut bracket and remove it.
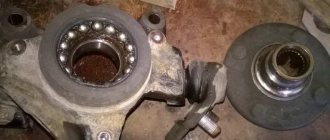
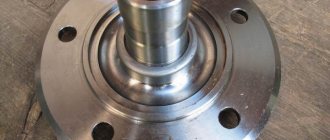
- The hub has been dismantled, so you can press the damaged bearing out of it and put a serviceable unit in its place.
- Place the hub in a vise or in any other way convenient for you.
- Using a drift that fits the diameter, press the hub out of the inner race of the bearing.
- In some cases, the outer part of the inner ring may remain on the hub. In such a situation, you cannot do without a puller. In general, it is better to work with a special tool. It will probably be found among your friends or neighbors in the garage.
- Using the same drift, you need to remove the bearing from the steering knuckle. To do this work, you will have to remove the retaining rings in advance. They can be removed with any available tool, such as an awl. Although there are special clamps for such purposes.
This is interesting: How to make a simple device for checking spark plugs
Accuracy is paramount
- That's it, you managed to remove the hub bearing.
- Carefully treat all dismantled parts using clean kerosene. Follow fire safety regulations.
- Assess the condition of the hub itself. If there are signs of damage, defects, or chips on it, it should be replaced with a new one.
- The new bearing is installed in place using a vice or press. In this case, force must be applied to the outer rings.
- Using a tool such as a hammer to drive in a bearing is strictly prohibited, as this will lead to destruction of the new part.
- After installing the front wheel bearing, perform the reassembly procedure
- Don't forget to change the hub nut.
- Once the assembly is fully assembled and the vehicle is lowered to the ground, only then should the mounting nuts be fully tightened.
Repairing the front hub when the bearing wears out or breaks is not as difficult as it might seem at first glance. Our instructions, supplemented by video tutorials, will help you complete the process yourself from start to finish.
Replacement with the rack not removed
This method will allow you to avoid subsequent collapse. Here you need to remove:
- wheel together with disk;
- caliper and the hub itself.
Replacement is carried out directly on the car, without removing the rack. Here you will have to work with a puller. The procedure is performed like this:
- unscrew the bolts from the brake drum and remove it;
- remove the ball joints;
- pull out the CV joint from the front hub, and then remove it itself using a chisel;
- the retaining ring is pulled out from the steering knuckle (it contains the outer part of the damaged bearing);
- the puller is installed directly on the fist;
- by tightening the bolt of the device, the part is pressed out;
When it completely leaves the axle, the protection is dismantled, then the hub is removed, from which the inner race is removed.
You can also remove the latter without a puller, but you will need a chisel for this. It’s also quite easy to score with a grinder and then split with a heavy hammer.
Installation
The inner surface of the fist is cleaned of dirt and lubricant (solid oil) is applied to it. The puller with the new bearing is installed in place and pressed into place. To make the process easier, it is recommended to first cool it thoroughly in the freezer.
A working unit is inserted into the fist as evenly as possible, trying to avoid distortion. After installing the bearing, put the hub back on and press it in if necessary. All other stages of work are carried out in reverse order.
The hub nut must be tightened using a torque wrench (the required force is 20 N*M).
Replacement without a puller with dismantling the rack
In this case, the entire structure must be completely removed from the car, including the steering knuckle. Replacement of a part that has become unusable is carried out directly at the rack. The advantage of this method is that there is no need to subsequently deal with wheel alignment.
All work is carried out in the following order:
- the steering tip is removed;
- the upper bolts holding the rack are unscrewed (they are located in the engine compartment);
- then it is removed from the CV joint and pulled out of the car.
The bearing is replaced and the strut is mounted in place.
Replacement without dismantling the stand and puller
In this case, it is necessary to remove the entire rotating mechanism with the hub installed.
Then she is knocked out. Upon completion of the work, you will have to check the wheel alignment. The sequence of actions here looks like this:
- the caliper is removed;
- the bolts securing the rack are screwed together;
- the rotating mechanism is removed;
- the CV joint is then removed;
- the drum is twisted from the hub;
- dismantle the protection;
- the fist, freed from other elements, is secured in a vice;
- the hub is knocked out, and then the bearing is removed.
Fourth stage
All welds will need to be thoroughly cleaned. A sanding disc can easily handle this task. It will be convenient to collect the residual slag with a wire brush. The entire product is ready, all that remains is to coat it with special anti-corrosion paint. To ensure long service life of the structure. Before using the puller, you will need to lubricate the threads to improve the quality of work.
Let's test our homemade product. Bearings from a drill are suitable for testing. As we can see, the product copes with the task. Now you can repair your instruments without fear or risk, without fear of ruining them. The design is also suitable for removing bushings. If while using the puller you notice that the axle is too thin, you can place a stand under the bearing being removed or make a smaller puller. All in your hands.
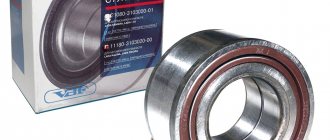
Analogue bearings
As an alternative, you can consider the products of two manufacturers:
- "Weber", product catalog code - "BR 1118-3020";
- "Pilenga", part number - "PW-P1313".
The products of these companies have proven themselves well. The cost is approximately 1 thousand rubles. The contents are identical to the original delivery.
In practice, it has been revealed that a bearing from a VAZ-2108 may be suitable for the LADA Kalina hub, but it is a few hundredths of a millimeter narrower. Experts do not advise leaning towards this alternative, since there have been cases when the product rotated inside the hub.
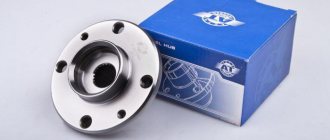
Replacing the front wheel bearing of a Lada Granta - detailed instructions with photos and videos
Wheel bearing failure is a common occurrence during the operation of domestic cars. Using an example, consider the Lada Granta car (Lada Granta, 2190, 2191, Sport, Liftback, Sedan) produced by VAZ, designed on the basis of the Lada Kalina, in terms of dimensions the car is classified as “C” class.
The front suspension is borrowed from Kalina, but is modernized. In terms of reliability, these models differ little.
The Granta wheel bearing is replaced without specialized tools, experience and knowledge.
Replacing the front bearing and CV joint of a VAZ
Review of manufacturer prices for front and rear hinges
How to choose and buy quality parts
Service center specialists strongly recommend purchasing consumables and components exclusively from specialized stores, representative offices, and official dealers.
To a lesser extent, you need to use the services of unverified suppliers who sell spare parts at an unusually low cost.
When purchasing, check the catalog numbers with the actual data specified in the operating instructions for the technical device. If such a brochure is not available, consult a specialist.
Diagnosis of wheel bearing failure Grants
The front wheel bearing on the Grant is not the most vulnerable part in the suspension, but its failure is possible after a mileage of 80,000 km or due to external and internal factors.
A front hub malfunction is determined by the following symptoms:
- Noise from the wheel while driving (damaged ball bearing parts: rolling elements, raceways or cage);
- Vibration, wheel beating, grinding noise (typical of a broken ball bearing);
- Front wheel play (the ball bearing has failed or the wheel nut is not tightened with sufficient torque).
The same signs of malfunction are characteristic of the rear wheel bearing on the Grant.
Watch the video with the characteristic noise when a hub unit breaks:
Bad bearing humming
Diagnostics of the front hub bearings proceeds as follows:
- The front of the car is raised with a jack;
- Spin the wheel by hand and check for noise;
- Check the axial play (clearance) according to the instructions.
- If you hear a noise or notice other signs, then replacing the front wheel bearing on Granta is inevitable.
- Be sure to watch the diagnostic video.
Diagnostics of the VAZ front wheel bearing
Puller drawings. Repair equipment. Tool
This topic will provide drawings of pullers and devices for car repairs, as well as drawings of special tools.
The following drawings are currently available:
Drawing of the front suspension strut rod nut remover.
Drawing of a universal screw puller for steering rod pins.
Drawing of spring ties for front and rear suspensions.
Drawing of a puller for pressing out the silent block of the rear suspension shock absorber.
Drawing of a puller for pressing in the silent block of the rear suspension shock absorber.
Drawing of a wheel bearing puller for the front and rear wheels.
Drills for knocking out wheel bearings
Photo of drifts for knocking out a wheel bearing
Mandrels for pressing in wheel bearings
Photo of mandrels for pressing in the wheel bearing of the front and rear wheels of VAZ-2108, VAZ-2109, VAZ-21099, VAZ-2113, VAZ-2114, VAZ-2115. The photo also shows rings from old wheel bearings, they also help with pressing.
Drawing of a puller for replacing rubber-metal hinges of the rear beam.
Replacement of rubber-metal hinges of the rear beam
Drawing of a puller for replacing the silent blocks of the front suspension arm.
Puller for replacing silent blocks of the front suspension arm
Device for compressing brake cylinders.
The brake cylinder compressor is made from old brake pads. Everything seems to be visible in the photo.
Photo of a device for compressing brake cylinders.
Drawing of brake cylinder compression device
Source
Replacing the wheel bearing on a Lada Grant with your own hands
On the Lada Granta, replacing the front wheel hub bearing is divided into stages:
- Preparatory activities;
- Disassembling the unit, dismantling the old part;
- Pressing in a new product;
- Assembly, performance check.
Preparing to repair the front wheel hub
Before you begin replacement, be sure to study the structure of the front suspension and strut, as well as the hub assembly. A detailed diagram with details is presented below. Please note that the bearing is located in the hub - position 2.
Prepare a set of tools according to the list:
- wheel bearing puller with a set of discs of different diameters;
- hammer with chisel;
- set of keys, head 30;
- extension for wrench (pipe);
- mandrels or set of heads;
- large and small flat-head screwdrivers;
- round nose pliers;
- torque wrench (if possible).
Reviews
| № | Positive |
| 1. | Gennady: I’ve been actively using the car for two years, there are no comments on the chassis or suspension. Once I replaced the rubber boot on the left CV joint. |
| 2. | Kirill: I have driven the car over 80,000 km, I can say that the CV joint still has service life, but it is necessary to prepare for repairs. In general, the parts are maintained within the period specified by the manufacturer. |
| 3. | Vyacheslav: the car is a year and a half old, I bought it at a dealership, no complaints. I systematically carry out technical inspections, buy original consumables, and do not skimp on preventative maintenance. |
| 4. | Dmitry: replaced the “grenades” only at 90,000 km. The service station master said that the mileage is good, not every car gets that much mileage. I believe that careful driving contributed to extending the life of the vehicle's chassis. |
| 5. | Leonid: I’m pleased with the build quality of the car, there are no complaints. Breakdowns happen, but they are insignificant, I fix them myself. |
| 6. | Vasily: if you don’t take into account minor flaws, then the car is good, better than previous generations. |
| 7. | Victor: I drove Grant for a year and a half, didn’t do any repairs, visited a service station only for diagnostics. |
| Negative | |
| 1. | Ivan: I replaced the right CV joint for the first time at 45,000 km, after which the left one needed repairs. In general, the workmanship is low, I am dissatisfied with the machine. |
| 2. | Alexander: standard CV joints are weak and poorly made. After purchasing a car, experts recommend installing foreign analogues. True, the cost is 15% more expensive than domestic ones. |
| 3. | Vladlen: after two years of active driving, I can’t say anything bad. Minor defects are present, but they can be easily fixed. |