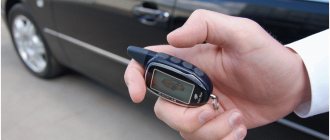
Hello, dear friends! Today we are interested in the connection diagram for the trunk opening button.
In practice, installing a button in the cabin that will automatically open the tailgate is not difficult. It's easier than many people think.
The very scheme of opening the trunk with a button is to modify the lock. An electric drive is added to it. He's an activator.
How it works
Many cars are not equipped with a trunk release button from the factory. The car owner has to do this with his own hands.
Even budget foreign cars, as well as domestic car models, can get this function. The cost of its implementation is small.
There are a number of modifications for the cargo compartment of passenger cars. Someone is soundproofing the trunk lid. Others completely insulate the trunk.
It will be convenient and correct to do automatic unlocking. In addition, the scheme for opening the trunk with a button is implemented without skill, as well as experience and special skills.
This is the meaning. A button is displayed in the interior. The driver presses it. The device operates on the principle of a push-pull mechanism. Springs will ensure the lid lifts. This way the driver won’t have to press a button on the trunk or fiddle with the key in the lock.
Another option is to display a button on the alarm remote control.
Problems when opening the trunk and their elimination
In some cases, the compartment does not unlock. If the owner encounters this problem, the following components need to be checked:
- power supply element of the remote control. Due to a low battery charge, the remote control simply does not issue the correct command or transmits a distorted dialogue code. Accordingly, the central unit cannot correctly decrypt it and execute the command. The car battery should be checked in the same way. Perhaps the reason is precisely its weak charge, which has the same consequences. A direct signal that the car did not accept the command is the lack of confirmation in the form of the dimensions blinking three times;
- trunk servo drive. Perhaps the problem is mechanical in nature. Therefore, after pressing the appropriate command, you must listen. A special click in the trunk area will indicate that the servo drive is receiving current, but it is necessary to check the serviceability of the elements (rack, gear and the lock itself), clean and lubricate them to avoid jamming. It is also advisable to diagnose hard traction.
- check the value of the function. This option may not be active for additional channel 1. To do this, you must enter the programming menu. You need to disarm the car, and then press the Valet service button five times to enter the settings mode. After turning on the ignition, the car will blink its headlights five times and sound five times. By pressing the third key, you enter the corresponding menu (AF). By pressing buttons two and three, you need to scroll through the menu to the desired function (13) and set it to parameter 1. The settings will be saved after turning off the ignition.
- firmware Modern firmware does not always interact correctly with the trunk servo drive and power relay. Sometimes downgrading to earlier versions of the firmware can solve the problem;
- safety of wires and correct connection. You need to arm yourself with a tester and a test lamp. With their help, you can check all wires for constant contact. You also need to check the correct location of the diode (plus with a white stripe - to the red wire, minus - to the black-yellow cable);
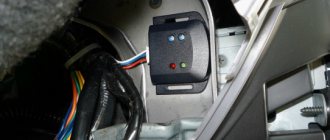
- microprocessor unit. The central signaling unit is responsible for the correct execution of commands. Due to moisture getting inside, it can short out and fail. Therefore, you can carefully disassemble the module housing and make sure there are no damaged elements. If there is moisture, it is necessary to dry it and lubricate the contacts with alcohol. It is advisable not to use a hairdryer for drying - this can damage the microcontacts and traces of the board;
- controller. If it is installed incorrectly (higher than necessary), the trunk door still opens, but not enough for the limit switch to operate and give the corresponding command to the system. You should try to lift the compartment cover by hand. If the alarm does not go off, it means that the command was executed correctly; you only need to carry out mechanical adjustment of the controller.
What do you need for work?
A similar connection diagram for the trunk button attracts many.
To realize your idea, you need to prepare materials and tools.
The set consists of:
- electric drive (activator) of the luggage compartment lock;
- universal 4-pin relay;
- fuse blocks;
- fuse;
- wires;
- female type terminals;
- trunk opening buttons;
- heat shrink tube;
- electrical tape;
- plastic clamps.
The block is placed for safety reasons. Mounted on the positive wire. The fuse can be taken as standard, 10 Ampere. Do not need anymore.
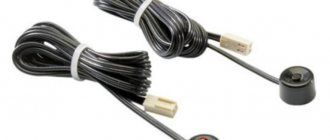
Determine the length of the wiring individually. But practice shows that 5-6 meters is enough with a margin.
Take the opening button from ten. It is considered the most reliable and also affordable. If you are tuning a domestic car, then it will definitely fit.
At any car market it will not be difficult to buy the entire set. It will cost 600-800 rubles. Maximum 1000 rubles.
Electrical diagram for connecting the trunk lock drive.
Electrical diagram for connecting the trunk release solenoid (actuator)
I drew a standard car relay, 4 or 5 contacts does not matter, I later described the omron G5LB-1-25 10A relay from a broken washing machine, but in principle they are no different except for size, winding resistance and response volume.
Let's describe the electrical circuit for connecting the trunk lock solenoid: we apply a constant plus to the 87 and 85 contacts of the relay, having first run it through a 5-10 ampere fuse, I took the constant plus from the car alarm power supply, I still pulled the wire from it. At pin 30 we hook the electric lock itself, a positive charge will run through it, we screw the second wire from the actuator onto some unpainted bolt of the car body, it will be negative. Contact 86 will receive a negative pulse either from the button or from an additional signaling channel.
The VAZ button 2822.3710-02 has three contacts, we connect the alarm to pin 3, pull the wire from pin 1 to pin 86 of the relay, and pin 2 to the car body. If the button is not needed, then we connect the wire from the alarm directly to pin 86. That’s basically the whole scheme, everything has been tested and everything works great.
Where to begin
Now to the question of how to connect the trunk release button.
You need to start by studying the instructions from the alarm. An option for those who are going to connect a button to the remote control of the car’s security system.
In the connection diagram you need to find the wire of the desired color that goes to opening the tailgate. This is usually a yellow-red wire.
If you have figured this out, then select a location for installation, and also begin the installation process itself.
Control button combination
If the power relay is not included in the kit, it can be purchased separately
It is important that the kit contains a special diode. The peculiarity of this part is that the diode passes a current of a certain charge only in one direction
Accordingly, its correct installation is required. The white strip on the part, indicating the positive side, should be turned towards the red wire, and the negative contact - towards the black and yellow negative cable. For correct connection, you must comply with the diagram below.
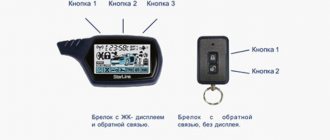
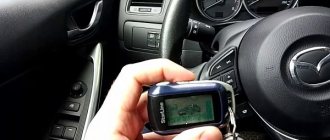
How to open the trunk using the StarLine A93 alarm key fob
After activating additional channel one, you can remotely open the luggage compartment. On the Starline A93 2Can 2Lin model and the Lada Granta car, this option is carried out as follows:
- on the key fob, press the second button for a long time until the corresponding melodic signal (at least 3 seconds);
- Then the first key is briefly clicked.
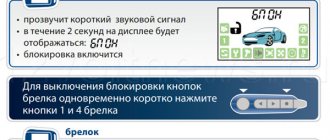
After this, the car blinks its dimensions three times and also gives an impulse to open the trunk. If the security mode is activated, all doors will remain locked, and only the shock sensor will be turned off (for closing the trunk). In this case, the open compartment door will be displayed on the key fob screen.
How to close the trunk using the Starline A93 remote control
The compartment is closed manually due to the fact that modern cars do not have closers. If the car is in security mode, then after five seconds the status will be updated and the compartment lock will be locked. In this case, the bullet will emit a sound signal, and the open door symbol will disappear from the key fob screen. You can open the trunk again either during this time, or after the next command (the second button is long, then the first is short).
What you need to know about towbar sockets: 7 and 13 pin connectors
Many people are interested in how to make the trunk open with a button. Now you'll find out.
Using the example of the timeless classic VAZ 2107, the process looks like this:
- Install a relay under the hood. The best option for placing a four-pin relay. You don't have to run the positive wire to the button. Plus, the space under the dashboard is more difficult to find. A good option is to attach it to the windshield washer reservoir. Make sure that connections and contacts are tight and insulated;
- Pull 2 more wires through the standard hole of all wires. One will go to the button, and the second to the activator;
- The wiring needs to be routed throughout the cabin. It is better to do this on the roof. And to the trunk. Or use areas where standard wiring runs under a layer of carpet;
- Carefully pull the wire through the luggage compartment to the lid. The wiring is connected to the main bundle. Fixed with electrical tape or a plastic clamp;
- Now the activator is attached to the trunk door lock. Do not forget that the electric drive works by pushing and retracting. To change the direction of movement, it is enough to change the polarity;
- To connect the activator, you need to do the following. Unscrew a couple of nuts and remove the lock. Use a drill to make a hole in the side. Place the rod there and connect it to the tongue of the locking mechanism;
- It will be correct to close the installed activator, as well as the lock using the casing. This will prevent dust and dirt from entering. Plus it will protect against mechanical damage;
- Now select the place where the button will be located in the cabin. If this is a seven from AvtoVAZ, then they usually choose a plastic trim to the left of the driver’s seat. This will allow the button to always be at hand. He quickly pressed the button, left the cabin, and the trunk was already open;
- The button is easy to install. A hole is made in the cover. A button is inserted there, and terminals are also put on. The minus is attached here, on the plastic lining fixing bolt.
Trunk actuator control circuit board
If you have a regular car relay, then you can do everything on the wires and fuse holders. But I decided to do everything carefully and make a printed circuit board; my relay is small in size and is intended just for soldering onto the board.
I drew the board diagram in the Sprint-Layout 6 program specially designed for this. Macros (sketches) for my relay and fuse are in the program, so all that remains is to place it all and connect it in the required sequence. Here's what I got.
If anyone needs it, here is the layout of my drawn board: download the archive.
Transferring the printed circuit board design to PCB
Next, we transfer the image to the textolite board; to do this, we print a board layout with a laser printer, with the toner saving mode turned off, on a glossy magazine or glossy photo paper. Don’t forget to check the mirror box in the program while printing, it’s more convenient than immediately drawing the board in a mirror image. We attach the printed image to the board and iron it.
Making a printed circuit board for trunk lock control
We carefully rub our layout on the board, then remove the paper, it is convenient to do this under running water, our print on the board will not go anywhere, unless you overdo it. There are, of course, better ways to transfer a layout image to a board, but I consider this method to be the simplest and most accessible, besides drawing the board manually with a permanent marker.
PCB etching
Next, on the prepared board, you need to remove the excess copper coating, lower the board for etching into a solution of ferric chloride FeCL3 with water (concentration by eye, or according to the instructions, 250 grams per 1 liter of water). Everything that was printed will remain, and the excess copper will dissolve. Don't forget to move the board from time to time. The etching speed depends on the concentration of ferric chloride and water temperature, as well as on the intensity of stirring, on average 30 minutes.
The printed circuit board is etched in a ferric chloride solution
Trunk actuator control board after etching
Next, we drill technological holes on the board, it’s convenient to drill with a screwdriver, in the future I want to buy a motor with a collet chuck on Aliexpress just for these purposes. By the way, here is a link to the section with mini drills, choose according to your taste and wallet, but in general you can buy a lot of useful things there, I recommend it.
Tinning and soldering electronic elements onto a printed circuit board
Next, you need to tin the board, especially the conductive paths, this will reduce the resistance of the conductor, protect it from corrosion and oxidation, and will make soldering much more convenient. We go over the board with fine sandpaper, degrease it if necessary, lubricate the tracks with soldering acid or flux, I recommend soldering acid. Using a very heated soldering iron, take a small amount of solder and move it along the tracks. All that remains is to solder the electronic components and wires onto the board.
Complete trunk lock control board
That's all for today, in the next article we will attach all this to the car to achieve our intended goal - to open the trunk using an alarm and a button in the cabin, so wait for the continuation.
Tips for owners of sedans and coupes
You should proceed according to a slightly different scheme if the trunk lid does not open in sedan or coupe cars.
- Lower the backrest all the way or even remove the backrest.
- Determine the need to remove the inner lining (in some cases you can do without this step).
- Try to get into the trunk and use the crank we already know.
- If you cannot reach the locking mechanism, you can lengthen the knob using a stick or any other object of suitable design.
Tips for Jeep and Station Wagon Owners
The easiest way to get to the luggage compartment will be for owners of SUVs, station wagons and crossovers. In such cars, the rear seat can be easily folded, allowing access to the trunk from the inside. All that remains is to find a handle for emergency opening, which many modern cars are equipped with, but not all. If this handle is missing and the trunk does not open using the buttons or remote control, then you will need to perform the following steps:
- Remove the trim from the trunk door.
- Remove the plastic panel.
- Gain access to the locking mechanism.
- Using a wrench (a special tool familiar to motorists), open the trunk from the inside.
see also
Comments 17
I have a VAZ 21053 98g, probably also a metal knee lock?
yeah, buy a new lock escutcheon and it can be drilled out with a regular drill!, so I was wondering here www.drive2.ru/l/2048857/
What did you use to drill the lock tongue?
I bought another lock and drilled it with a regular metal drill; in the previous lock from a VAZ 21053 from 2005, the metal was very hard, I couldn’t drill it out
I have this too) In general, I can’t live without it, I installed it right away when I bought the alarm, only my trunk opens completely when I press it from both the remote control and the button
hmmm, are the trunk gas struts in place?
No, it's just factory torsion bars and that's it
Maybe they are already broken, or I need to move them one notch, but I decided to try installing gas struts for the trunk from NIVA
It's good that you are going to the end! Good luck in finally completing this know-how!
Thank you! but the most difficult thing for me personally is silent locks 2109, I need to have several free days in a row, I still can’t get around to installing them
A very useful thing! Well done for deciding to do it! did you put a wire on the alarm?
no, I still haven’t figured out where to hook it on the whitefish
I found a wiring diagram for my alarm system, and a specialist came out. 3.5 s pulse wire for connecting additional. engine blocking, some other nonsense