Content
The car engine is the main power unit, on the characteristics of which much depends. Every year, the design of internal combustion engines becomes more complex and more efficient. However, this point does not apply to domestically produced cars - the installed engines are improved only in appearance, in general the design remains unchanged for many years. In order to significantly improve the driving performance of the car, the power unit should be modernized.
Sidebar: Important: With the right approach, you can significantly increase power or reduce fuel consumption, make engine operation more reliable, and make the sound more attractive.
Let's look at all the features of how to tune a VAZ 2114 engine: methods, possible improvements, problems with modernization and much more.
The adjustment process on the selected car model
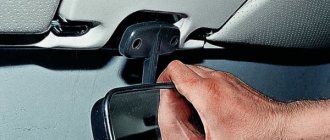
The device of the hood lock VAZ 2108/2109/21099
To begin, open and secure the hood. Let's pay attention to the lock and try to understand the principle of its operation.
Hood lock device
The photo shows the main elements of the castle:
- Lock latch spring
- Lock-nut
- Latch
- Safety hook
- Safety hook handle.
From what we saw, it follows that after we pulled the opening handle in the cabin, the cable opens the latch, which releases the lock latch. Thanks to the latch spring, the hood “jumps” up, but it is still held half-open by the safety hook. And only by pressing the handle of the safety hook, we can fully open it and gain access to the engine compartment. Quite a reliable system. At first sight…
Adjustment, although not a very difficult operation, requires patience and accuracy. Sometimes you have to repeat the same jewelry movement many times until everything starts working as it should!
Vertical adjustment of the lock
If the hood does not want to close normally (you slam it, put pressure on it, but it still closes with difficulty, or does not lock in the closed position at all), or a rattling noise appears when driving on our perfectly smooth roads (sometimes it is noticeable even just when the engine), then adjustment in the vertical direction is necessary. Namely, adjusting the length of the lock latch.
To do this, use a 19 mm wrench to loosen the lock nut on the latch, holding the latch itself from turning with a flat-head screwdriver.
Latch length adjustment
If the hood is poorly or not at all fixed in the closed position, then you need to slightly increase the length of the latch, which we will achieve by unscrewing it with a screwdriver.
If the hood rattles, on the contrary, you need to shorten the latch by tightening it several turns inward. The required latch length is determined experimentally.
Got rid of the problem? Then tighten the locknut (don’t forget to hold the latch with a screwdriver), check it again and rejoice!
Horizontal adjustment of the lock
If there are problems with opening, or if there is a metallic knock when closing, the lock requires horizontal adjustment.
Adjusting the latch position
To do this, we also loosen the lock nut and slightly move (not twist, but move) the latch in the desired direction.
When adjusted correctly, everything should close and open well. Without any effort. Ideally, the hood should slam shut completely when released from a height of 20-30 cm and snap open when pulled by the drive handle in the cabin, only being secured by a safety hook.
VAZ engine chip tuning
A change in the design of an internal combustion engine can be called a significant modernization, which will lead to a change in its basic characteristics. However, this tuning method is quite expensive; it can only be done independently if you have certain skills and experience, and the end result is impossible to predict. Some VAZ vehicles are equipped with on-board computers that regulate the operation of the internal combustion engine. The installed program determines the main characteristics of the engine: it affects power, speed limit, fuel consumption, idling and other features of engine operation.
When considering chip tuning, we note the following possible results:
- Increase power by 5-10%. At the same time, the possibility of increasing power depends on what settings were set at the factory, that is, whether a power reserve was left, as well as on the condition of the engine. There are cases when engine power was increased by 20%, which can significantly reduce the service life of the unit.
- Fuel consumption can be reduced by approximately 5%. Reducing fuel consumption will lead to a smooth increase in speed, that is, a quick start from a traffic light will no longer be possible. Therefore, this modification is suitable for the driver who is more concerned about savings than the driving sensations.
- Make idle smoother and more stable.
Tuning the VAZ 2114 engine by installing new firmware should be carried out exclusively by professionals, since mistakes made can lead to significant engine failures. Recently, there is no need to remove the on-board computer to read information from it and rewrite the program - the connection is made through a connector, for this a computer and a special adapter are used. During operation, only partial disassembly of the panel in which the connection connector was hidden is performed.
The work on flashing the chip looks like this:
1. Engine diagnostics are carried out to identify faults. 2. After determining the state of the internal combustion engine, a computer is connected to the chip. 3. When you connect a computer, tables with the configured settings are loaded. 4. The programmer loads preset settings, for example, to increase power by 10%. 5. After making the settings, the engine is tested and adjustments are made.
It should be understood that unique settings are selected for each engine, which depend on the state of the internal combustion engine and other factors. It is possible to carry out the work in question independently, but only if you have certain knowledge and experience. Mistakes made can lead to settings being reset and invalid parameters being set. It should also be taken into account that after chip tuning, it is necessary to perform engine diagnostics, since otherwise there is a possibility of severe wear due to the introduction of incorrect parameters.
Many owners of domestic VAZs of the fourteenth model make certain improvements in the design and appearance of their “horses”. For example, modifications to the steering rack, tail lights, heater, locks, cylinder head, throttle body, engine, trunk, cooling system, doors, brakes. Modifying a VAZ-2114 at home is a fun and rewarding process. Useful because the result always pleases the owner. This article will look at a few of these options.
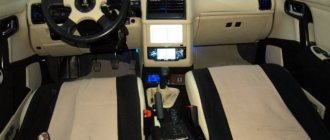
Interior improvement
Changes in the interior of the VAZ 2114 are no less varied than improvements in the appearance of the car. Here everything is subject to tuning: from the rear-view mirror and gear knob to sound insulation and the steering wheel.
The simplest tuning performed at home or in the garage are:
- installing an armrest;
- replacing the rear view mirror;
- installation of attachments for mobile phones;
- decorations.
Do-it-yourself comprehensive tuning of the VAZ 2115 interior requires time and money. Everything is removed from the interior: from the seats to the instrument panel. After this, the surfaces are glued with vibration-proof sheets. This ensures silence in the cabin.
The next stage is the trim of the doors and the entire interior. You can cover the inside of the car with anything: from fabric and leatherette to leather-suede. After the trim, the audio system and instrument panel are installed. The dashboard can be either regular or replaced with a more pleasant-looking panel.
After the instrumentation, seats are placed in the cabin. Any suitable size can be installed.
As part of tuning, you can install a sports steering wheel on your car, but such changes may raise questions among traffic police officers.
As an additional improvement to the visual component of the VAZ 2115 car, you can use LED lighting for the underbody, trunk and interior.
Modification of the rear lights of the VAZ-2114
There are many options for modifying taillights. Here are a few of the most popular:
- individual LED elements;
- LED rings;
- LED inserts and overlays.
For individual elements of LEDs, LED strips or rings are used; for the body, reflectors of different sizes and corresponding colors are excellent, which can be purchased without much difficulty in automobile stores.
The paint is also selected according to your taste and desire. In order to place the rings in separate cylinders, you can use tin cans, after carefully cutting out the desired size. If you decide to mount LED trims inside the headlights, then do not forget that they are mounted on top of the rear optics. In any of the listed options, you cannot do without soldering iron skills. If you don’t have the skills, but want to modify the taillights, then it’s better to contact a tuning studio, where professionals will do all the work for you.
Installation of electric door drives
We are talking about mechanical protection that prevents penetration into the interior. The factory version operates on the principle of central locking, but an electric drive is considered more convenient, since no one has canceled the advantages of remote control. This aspect can be modernized using a gearmotor. Its device is represented by a gearbox with gears and a rack and a DC electric motor.
For installation, it is enough to purchase a ready-made kit with a coupling and the corresponding fasteners.
Do-it-yourself modifications VAZ 2113 2114 2115 Samar
- All entries
- Community Posts
- Search
Denis Dmitriev post pinned
Do-it-yourself modifications to VAZ 2113 2114 2115 Samar post pinned
A relay is an electrical device that is designed to close and open various sections of electrical circuits with given changes in electrical or non-electrical input quantities. Show in full…
Relay types are distinguished by control signal and design. The most common are electrical or electromagnetic relays. The relay provides DC switching for a high load level, or in other words, it is a switch. Most often, the relay has five contacts, and 4-pin and 7-pin relays are no exception. All contacts in the relay are labeled, each of them has its own designation. These include a common contact, a closing contact, and a breaking contact. The relay is in a quiet state when there is no power to the coil. The coil is triggered when power is simultaneously supplied to the plus and minus contacts. A relay is an excellent “lifesaver” when installing additional equipment. An automotive relay is a special type of remote control of a switch. Using a magnetic drive, it controls electrical circuits from a distant point.
It controls electrical components such as fuel pumps, air conditioning motors and radiator fans. Relays use flexible mechanical contacts that effectively block current in the circuit they serve. Fortunately, it is easy to test a car relay and troubleshoot any problem.
Using a Relay: A relay allows you to use a small current to control a large current. Typically, the relay coil has a relatively high resistance and only requires a small electrical current to turn on the contacts. The contacts are designed to carry much more current than necessary. This means that you can use a relay if you need to make/open a path where there is relatively high current and only a small current can be supplied to the control circuit. In a car, the ignition key cannot pass a significant amount of current without being damaged. If the starter is engaged while the ignition is on, it can be instantly destroyed, so this is where a relay (also known as a solenoid) comes to the rescue. It acts as a buffer between the ignition switch and the starter. In older Ford cars, for example, the solenoid was mounted on the fender. On other vehicles the solenoid was mounted on the starter. A relay is also used to isolate two circuits. If you need to control a very high voltage circuit with a 12 volt controller, you can use a relay. Since the relay coil is generally isolated from the contacts, there is complete isolation between the "input" and "output" portions of the relay.
If the engine operates at low shaft speeds, then the voltage at the generator terminals is significantly less compared to the battery. In this case, the current that enters the parallel winding creates a very weak magnetic field, which is not enough to overcome the tension of the spring and attract the armature to the core. In this case, the contacts remain open. An increase in engine shaft speed increases the voltage at the generator terminals. If the excess voltage at the generator terminals exceeds the battery voltage, the magnetic field increases, which causes spring resistance, as a result of which the contacts can close. The entire generator load current passes through the winding, which is connected in series. When the network is powered by a generator, current flows through two windings in the direction of coincidence of the magnetic fields, which increases the force of attraction of the armature by the core. Relays are located everywhere: under the hood of the car, behind the seats, on the steering wheel, around the engine compartment and distribution block, and even in trunk. Relays act as switches that allow interruption of current to the fuel pump, radiator fan, intake throttle, air conditioning and many other circuits. They are very reliable, but continuous operation can cause their coils to break or burn out their contacts. The relay performs a common and important function during vehicle operation. The serviceability of the car relay can be checked at special terminals in a car service center.
Do-it-yourself modifications to VAZ 2113 2114 2115 Samar post pinned
How to start a cold engine: useful tips Video instructions with tips for car drivers in cold weather can be found in this article.
Winter brings additional problems to motorists. And they are connected not only with the need to replace tires and other things, but also with the fact that at low temperatures it becomes difficult to start your car. Show in full... The cold weather is beginning to set in and gain strength, and at the same time the number of motorists in yards and garages who are trying to revive their iron friend is increasing.
In such a situation, you need to know how to start a cold engine. At the very least, such knowledge will help save a lot of time and also save your nerves. And in the morning before the start of the working day, this is never superfluous.
Technical features
If you leave the car outside and the cold promises to be severe, then it is better to remove the battery and take it with you. You can name what you need to pay attention to first:
Remote trunk control
The presence of an electric drive for the luggage compartment will significantly increase the ease of use of the vehicle. Often the need to open the trunk occurs while the engine is running. For example, the driver can put things in the trunk while the engine is warming up. There are three technological options for implementing the task under consideration:
- Introduction of trunk from tens. An electric door lock drive must also be present.
- A suitable electric drive kit can be installed in the luggage compartment lid.
- The electric drive can be connected to the factory door lock.
Considering the method you choose, do not forget to consider the use of lock control buttons and alarm keys. As a result of the work done, the time savings will be amazing.
Before you go
Those who nevertheless studied at a driving school and remember the teachings of the teachers know what to do before driving a car. This is especially true for our domestic models, which do not have an abundance of sensors and a computer that monitors all indicators.
Check the levels of working fluids, oil, coolant in the radiator, even in the washer - these minor checks will give you the opportunity to never find out how a car radiator is repaired, and you will not be repairing the car yourself, much less find out how much a major repair costs jammed engine.
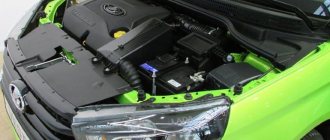
Engine compartment of VAZ 2114
Also, look under the car more often, since most breakdowns begin with minor leaks, which an attentive owner will definitely notice in time.
Driving technique
Gear shifting and clutch operation are those nuances that are definitely worth paying attention to, since the ability to change gears in time and smoothly release the clutch greatly affects ride comfort.
VAZ 2114 clutch design
In order to notice in time that a car is behaving somehow wrong, it is not necessary to thoroughly know its design, but every driver simply must know how a car’s clutch works. VAZ cars mostly have a permanently closed clutch, which means that when you press the pedal, you release the pressure and driven discs from the frictional engagement.
Clutch pedal operation
Among the nuances of operation, it is worth noting that if the clutch is not fully released, trying to pull the car up a steep climb, it is easy to burn the friction linings on the driven disk. This will entail forced repair of the clutch unit. So if you want your clutch to work happily for a long time, try to keep it less fully depressed or released, of course, without sacrificing ride comfort.
What to do if the radiator leaks
Old VAZ models still had copper radiators installed, but now not every elite model can have such a miracle, but on domestic cars the aluminum radiator has firmly secured its position. Everything is clear here, it’s a matter of the price of metal, but now how can those who don’t have a propane torch repair a car radiator with their own hands? Everything is quite simple, and many chemical plants producing various polymers have made sure that repairing a car radiator with their own hands is accessible to everyone.
Preparing a car for painting is an important step. You will learn how to work with vinyl stickers on cars in the article.
You will learn what tuning is in Dagestan in our material at https://avtopolza.ru/tyuning-russkix-avto/dagestanskij-avtotyuning/ link.
VAZ cooling system
Naturally, breakdowns of car radiators can be very different, and if it is a small leak, then the old folk method will cope with it - pour mustard into the coolant, which will penetrate and clog the small crack. After a head-on car collision, you will most likely have to buy a new radiator, since restoring the old one will cost a much larger amount. But this type of repair should be treated very carefully; it is preferable to eliminate the cause from the outside, so as not to clog the cooling and heating system with mustard or any other additives.
Professional repair of a car radiator is preferable to DIY repair, since aluminum soldering holds up much better, but modern polymers like cold welding also hold up well with proper preparation and degreasing.
Just an adjustment
Often the hood begins to close poorly or refuses to close at all due to a violation of the position of the lid or its latch. Moreover, the latter can move both in the vertical and horizontal directions. The solution to the problem is simple, and for all manipulations you only need a screwdriver and a 13mm wrench.
If the height adjustment is broken, you have to apply significant force to close the hood. And even if you managed to slam the lid, it still moves: a noticeable play remains, and while moving the hood bounces and rattles. To fix the problem, you need to loosen the locknut on the latch, holding it with a screwdriver so that it does not turn along with the fastener.
If the latch has moved horizontally, a hard blow is felt when closing the lid, and opening becomes problematic. Again, the locknut is loosened, after which the latch moves to the desired position. Before pinching the fastener, you need to check the ease of closure and its tightness; if the desired result is not achieved, the manipulations are repeated.
If the lid simply does not fit into its allotted space or the latch does not engage when closed, the hood will need to be adjusted in relation to the fenders and latch. The lid hinges; the mounting bolts are loosened. Just don’t unscrew them too much so that the hood doesn’t dangle, but sits quite firmly in place. The lid is carefully lowered; The main thing here is not to latch the lock. There are equal gaps along the edges. To do this, just move the hood slightly in the desired direction.
To be sure that the cracks are even, you can make 4 measuring pegs of the required thickness. It is very convenient to use wine corks for this (not plastic ones): they are easy to cut and do not scratch the body. When you are sure that the gaps are the same, carefully lift the hood and fix the bolts on the hinges.
The end of all such work should be lubrication of the adjusted parts and checking the functionality of the cover with the degree of tightening of the fasteners. Do not overdo it with the latter: an overtightened locknut can prevent the hood from opening freely.