Print this article Font size 16
Today, the domestic “ten” continues to confidently remain in a leading position among the most popular cars in the country. They have already stopped producing them, but this does not stop many people from driving a VAZ 2110.
The car is far from ideal, but it has a lot of positive qualities. One of them is the simplicity of the design, which allows you to perform a whole range of repair work with your own hands.
An example of a successful design that combines good reliability and the possibility of self-repair is window regulators.
Replacement
The need to replace or repair window regulators may arise for two main reasons. Namely:
- The old gears of the lifting mechanism are worn out, due to which the device ceases to perform its functions;
- The cable broke, which caused the entire system to fail.
Disassembled structure
To solve the problems that arise, you will need to go through three or four steps:
- Preparatory activities;
- Dismantling;
- Installation;
- Repair.
If you plan to simply replace the mechanisms with new ones, then you can skip the repair stage.
Although versions with mechanical and electric windows are available for the VAZ 2110, the nuances of the replacement procedure will be identical. Therefore, the instructions below are relevant for both cases.
Preparation
To begin with, we will talk about the preparatory activities that will allow you to get to the desired mechanism. There is nothing complicated here if you follow the instructions.
Although the front, rear, left and right window lifters are structurally different, the principle of working with them when repairing or replacing is similar.
- First, remove the glass lift handle. To do this, remove the stopper, which you will find under the lever washer of the handle. Using a screwdriver, the latch is moved to the side, and the stopper is removed from the plate. After this, the handle can be easily removed. Sometimes it can get tight, so take a second screwdriver and pry the device up onto the base.
- Next in line for dismantling is the armrest handle. You will need a flathead screwdriver to unscrew the plugs covering the pair of mounting screws. They are the ones that hold the armrest handle. Armed with a Phillips screwdriver, the screws are unscrewed and the handle is removed.
- Now we move on to the handle of the exterior rear view mirror, plus the handle trim is dismantled.
- At the last stage of preparatory activities, you need to remove the door trim. It is held on by plastic pistons. If they are damaged, you can always buy new ones. Don't forget to also remove the storage compartment.
Dismantling
The preparation is complete, so you can begin to directly dismantle our failed window regulators.
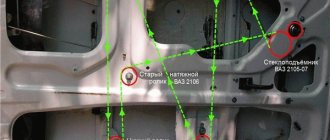
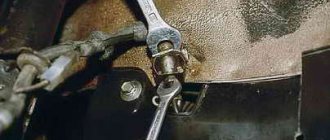
- Lower the window completely. This will allow you to get to the fasteners that connect the glass panel to the window regulator device. The device is held in place with a pair of bolts. To unscrew them you will need a 10 mm wrench;
- Next, decide for yourself what is more convenient for you to do. You can fix the glass with tape and continue the repair. Or you can remove the glass completely. The second option is not the most successful, since it will require more effort and time;
- Remove the socket from the slot;
- Using an 8 mm socket, the fastening nuts are unscrewed, which gives you the opportunity to remove the damaged window regulator.
Dismantling works
Installation
The device has been dismantled, so we can talk about several of the most important nuances of reinstalling the power windows.
- Replace the damaged element with a new one, after which assembly is performed strictly in the reverse order.
- If at the previous stage you decided to completely remove the glass rather than secure it with tape, then be sure to adjust its position during installation. This is done by displacing the bolts in the mounting holes.
- During dismantling work, the holders - pistons - often break or suffer. Therefore, before starting repairs, we advise you to purchase a set of new holders so that you don’t have to run to the stores in the middle of the work process.
- When installing your window regulator handle, make sure it fits snugly in its rightful place. If you cannot fit the handle tightly, use several rolls of electrical tape. This should help.
The process of dismantling and replacing the device
If you decide to repair the front or rear SPs or replace them, then you will probably know how to remove the device. The procedure for removing and connecting a new window regulator may vary. It all depends on the type of joint venture, as well as the design features of the car.
Let's consider the process of replacing a manual SP with an electric one:
- First, the ignition is turned off and the car battery is disconnected; this must be done in order to de-energize the on-board network.
- Then the control handle located on the car door is removed. To dismantle the handle, remove the stopper located under the special washer - all these components are located on the handle itself. Using a flat-head screwdriver, you will need to move the latch to the side and remove the locking element from the slot. These steps will allow you to dismantle the handle. If this element is installed tightly enough, then try prying it off with a screwdriver.
- After this, the armrest handle is dismantled. Using screwdrivers, remove the plugs - behind them there are screws that secure the handle. They are unscrewed with a Phillips-blade screwdriver. To make things easier, you can also remove the handle trim on the side rearview mirror. After completing these steps, you will need to remove the door trim. At this point, the preparatory stage can be considered complete.
- Next, in order to electrically install the motor, control unit and other components of the joint venture, you will need to gain access to the latches. These components are used to attach the device itself to the glass. The device is fixed with two screws; they can be unscrewed with a wrench.
- When these steps are completed, you will need to remove the glass or fix it in one position with tape. It is necessary to disconnect the socket from the slot and unscrew the nuts using a wrench; this will allow you to dismantle the old SP mechanism. To install a new system, you will need to connect the block with wiring to the plug on the mounting block. In this case, it must be connected to the back of the fuse box.
- Next, the devices themselves are installed directly with an electric motor, control module, lifting mechanism and other components. First, all the components must be installed in the car door. When the fastening studs in the frame are installed, the nuts that secure them will need to be completely tightened. When installing, be sure to use the instructions that come with the kit, as well as the connection diagram. The latter will be required to properly connect the connector with the wiring.
- When all the elements of the electrical circuit are connected, it is necessary to connect the battery terminals and diagnose the performance of the joint venture. To do this, you will need to close the contacts on the wires.
- Then the central module with buttons is installed. This device must be installed either in the doors, or on the center console, or on the tunnel that runs from the console to the rear seats. The last option is more preferable.
- Now you need to lower the mechanism with the electric motor until you see that the mounting holes of the holder coincide with the technological holes in the mount. This clip must be bolted.
- Using the control keys on the central unit, you will need to make sure whether the joint ventures are working correctly and whether there are any problems with their operation. If no errors were made during the work and all actions were performed correctly, the window regulators will work correctly. If you make mistakes, you may encounter performance problems. At the final stage, you will need to assemble the door and install the trim in place. In the place where the handle for raising and lowering the glass was located, you will need to install a plug.
Source
Installation and connection diagram for VAZ 2109 window regulators: step-by-step instructions with photos
- Before starting work, you must turn off the power supply to the vehicle's on-board network from the battery. Or we separately turn off the power circuits for the cigarette lighter and the backlight of the instrument panel and buttons, because The power supply wiring for the power windows will be connected to these circuits in the future.
- Remove the door trim. It can be removed quite easily, but it is better to stock up on mounting pins.
- First of all, we dismantle the mechanism of the standard manual window lifter, fixing the glass (for example, using office tape) in a position that provides access to the place where it is attached to the lifting mechanism.
- Unscrew the bolts securing the door glass to the standard window lifter mechanism.
- We dismantle the guide of the standard window lifter mechanism (trapezium). Unscrew the bottom nut:
- Two nuts in the middle:
- Top nut:
- The guide is free, now all that remains is to unscrew the three nuts securing our window lifter in the area of the rotation handle.
- We take out the entire door window lifter mechanism. To do this, we bring the lower pin of the guide into the hole in the door (see photo).
- By pressing with a screwdriver, we remove the upper fastening of the guide.
- Done, the window lift mechanism is disconnected. We take it out of the door cavity.
- That's it, the standard mechanism has been dismantled, let's start installing a new one. The new mechanism is attached using standard fasteners; you don’t have to drill anything new. We place the window lifter mechanism into the inner cavity of the door through the largest technological hole in an “assembled” form (otherwise it won’t fit), as if in the “open” position of the glass.
- We fasten the mechanism inside the door using two studs, which we insert into two holes that previously held the middle part of the guide of the standard VAZ 2109 window lifter. We combine them and screw on the nuts.
- The next task is to combine the mounts on the window lift linkage system with the mount on the glass. This can be done by supplying power to the power window motor contacts from an external power source, for example, any working car battery.
- When the lift mechanism is combined with the strip on the glass, we connect them using the bolts from the kit.
- It is advisable to lubricate the rubbing parts thoroughly.
- The mechanical part is complete, let's move on to the electrical part.
- We estimate the route for wiring from the door from the electric motor of the window lift drive to the installation location of the buttons - activators.
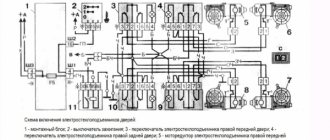
The standard place for buttons in the high panel of the VAZ 2109 is two plugs to the right of the cigarette lighter, and we install them there. The hardest part is running the wiring from the door into the rack and then out of the rack under the dash. For this purpose, there are technological holes in the rack. You may need to use a special probe. The wiring is done with a wire with a cross-section of at least 1 mm. sq. We lay the wires in such a way that they do not touch any moving parts of the door or the ESP mechanism itself. We will take power for the electric windows from the cigarette lighter. We make electrical connections according to the following diagram: When the circuit is assembled, it is necessary to connect the battery power and check the correct operation of our system. We turn on the side lights and check the correct operation of the backlight of the ESP activator keys. If the backlight does not work, swap the sockets on the contacts of the keys, indicated in the diagram as 3 and 6. You can install the window lifters in the standard way, here are two diagrams:
Connection diagram for electric windows on a VAZ 2109 with mounting block 17.3722 (before 1998)
Connection diagram for electric windows on a VAZ 2109 with mounting block 2114-3722010-60, 2114-3722010-10 and 2114-3722010-18 (new model)
You can read more about the types of mounting blocks for front-wheel drive VAZs here.
- We check the functionality of the window regulators. The glass should move smoothly, without jamming or jerking, and should not come out of the guides. To facilitate the movement of glass in the seal, it can be treated with silicone grease.
- All that remains is to reinstall the door trim.
- That's it, the installation of the window lifters is complete, let's enjoy the completed modification!
FakeHeader
To be honest, I didn’t manage to start making money right away, until I understood all the mechanics of options, I lost about rubles, but as it turned out, it was a precious experience.
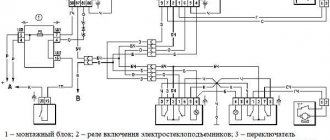
Conclusion: In order for the power windows to work without an ignition key, you need to jumper contacts 30 and 87 of relay K5 as in the figure below.
Often, power windows are installed only on the front doors.
Preparing for the installation of electric windows Before starting work, you must purchase all the elements for repair. How to do this is shown in the photo report. After this, be sure to clean the inside of the door so that there is no dust and dirt there. Let's move on to practice: I will not impose on you any specific method of making a jumper; I will describe only the most common ones. You can choose any of these methods that seems most simple and convenient to you.
We recommend: Electrolaboratory is
Replace the fuse with a new one. The sequence of actions is as follows: Remove the glass seal while the work is being performed.
Then I cut off the sides on two buttons, respectively, one on the left side and the other on the right. Next, install the power window in the door through the upper technological hole. The electric motor itself is part of a gearmotor, which also includes a worm gearbox.
Stories from our readers
Preparing for the installation of electric windows Before starting work, you must purchase all the elements for repair. Hi all! It starts with disconnecting the battery. Diagram of electric windows of a VAZ Electric windows are used to raise and lower the door windows and are installed on a part.
Remove the window lift mechanism through the door window. Connecting electrical equipment Now, in order for the power windows to work correctly, you need to connect them. We insert the black wire into socket 1 of the button connector. Black and white - into socket 7. Installing buttons from Granta on 2110 (the simplest diagram)
Repair
It is not possible to repair window regulators in all cases. Mostly, these glass lifting devices can be repaired in case of obvious mechanical fractures of the elements.
But we can still give some useful tips regarding restoring the functionality of the window regulator without replacing it.
- If the electric window motor fails to work, then the brushes or winding are most likely to blame. To verify this and fix the damage, you need to remove the motor, disassemble it and clean the outer and inner surfaces.
- For cleaning, it is recommended to use a lint-free cloth. The cloth is soaked in gasoline, alcohol or a special cleaning agent. When you buy the latter, you can use it for a long time, the efficiency is higher compared to gasoline.
- After cleaning and drying the parts, it is recommended to treat the moving elements with lubricant so that the mechanisms function longer.
- If the cable comes off the lifting mechanism, you will have to dismantle it, remove the electric motor, or unwind the cable if it is mechanical. Then the cable is pulled back onto the grooves and the assembly is reassembled.
- If a malfunction occurs in the mechanism or the electrical circuit of the device, it is necessary to study this circuit, determine the direction of the wires, and then ring them. This is the most effective way to check for electrical failure.
Lifting device diagram
Repair in most cases gives only a temporary result, so soon you will still have to make a full replacement. This is due to the fact that each part has its own service life and degree of wear. When they are reached, the window regulator stops working.
Replacing or repairing mechanical or electrical window regulators cannot be called complex undertakings. It is quite possible to cope with such tasks with your own hands.
Loading …
Do-it-yourself repair of glass control buttons in cars
First you need to remove the button block from the doors, it’s not difficult.
Renault car power window control button block
To do this, you need to pry and pull the block up, but always from the side as in the photo, where the arrow indicates.
Next, we free the buttons from the wires and remove them from the case. To disconnect the chips with wires, you need to press the locking tab on these chips in the direction indicated by the arrow. See photo. And then, swinging, we pull together the chips.
We remove the chip with wires
Next, we release the latches holding the button in the unit body - you will see them and now the front window lifter buttons are already on the desktop.
Removed block of buttons on the desktop
Types of ESP
Today, several versions of electric window lifts are produced for Lada cars:
Each model has different features, advantages and disadvantages, which determines the installation of electric windows on the VAZ 2107.
It should be noted that different manufacturers have different mechanisms in design, for this reason they should not be considered interchangeable. The cost of the kits is not very high, and forward lifts for front windows are the most popular. The standard equipment of an electric lift includes:
- lifting mechanism with motors;
- control buttons;
- wiring with plug devices;
- fasteners;
- stubs.
In addition, the delivery package includes instructions containing an electrical connection diagram.
Replacing a window regulator on a VAZ-2110
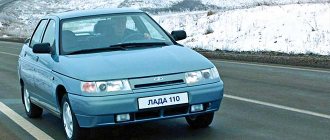
At the moment, the VAZ-2110, a domestic car model, still maintains a leading position in the market, remaining popular and in demand.
This car is practical, has good dynamics and a cozy, quite comfortable interior atmosphere. But this pretty car has a number of technical shortcomings, which, if you don’t know how to eliminate them yourself, can negate all the advantages of the model.
One of the minuses of the dozen is that the window regulators quickly fail.
It would seem such a simple detail, but when it becomes inoperative, it destroys the entire ideal pyramid of comfort, because how can you drive in the stifling heat if you can’t open the window properly?
Today we will talk about how you can replace the window regulators on a VAZ-2110 with your own hands, and possibly repair it. So, let's go.
A window lifter is a device used to move window glass and hold it at the desired point. Currently, the range of window lifters is quite wide, it includes not only many brands, but also differences in target orientation:
- front doors
- rear doors
- left doors
- right doors.
Moreover, the design for each device will be different. But in each of the listed cases there are common points; each window regulator consists of:
- grooves installed on the inside of the door frame, the purpose of which is to hold the glass sheet at a certain point
- “rails”, which are statically fixed in the door body and act as guides for the movement of glass
- seal, damper, made of soft rubber, limiting the movement of the glass sheet up and down.
There are two types of drive:
- Mechanical - consists of a simple set of parts, a pair of gears and a handle. In order to set the glass sheet in motion, you need to turn the handle clockwise (if you need to raise the glass) or counterclockwise (if you need to lower it). Physical forces are transferred to the drive roller, that’s the whole principle of operation of the mechanical device.
- Electrical is a more complex set of parts. An electric window regulator consists of a drive drum or gear and an electric motor with a built-in worm-type gearbox.
According to the lifting mechanism, window lifters are divided into several types. Moreover, in AvtoVAZ cars there are different design options for window lifters.
So, the well-known seven is equipped with a rack-and-pinion type device; by the way, the “ten” also has rack-and-pinion window lifters.
This option is good because it is easy to repair and easy to operate, but a serious disadvantage of the design is its unreliability. In addition, the rack-and-pinion type of device requires lubrication.
A more advanced design is the cable type, presented in the tenth VAZ model.
The positive point here is the fact that the possibility of glass distortion is completely eliminated. But, like rack and pinion mechanisms, cable mechanisms are also unreliable.
Although the price for them is not so high, window regulators made of galvanized metal, which cost about 400 rubles, and Metprom devices, which cost 300 rubles, enjoy a good reputation.
A standard cable window lift costs less, 250 rubles.
The new generation of mechanisms are lever ones that operate using hinges.
Their advantage is the absolute absence of noise, but this type of device only works in conjunction with an electric motor, while the first two can also be presented in a mechanical version.
The tenth model is equipped with two types of window lifters: simpler modifications of previous years come with mechanics, and modifications of later years of production come with electric windows.
But since owners of the old ten are more common among motorists, then we will next talk about how to replace a mechanical window regulator yourself, but first we will understand the most common faults of window regulators characteristic of the VAZ-2110.
By the way, the electric window lifter changes in exactly the same way; all the grooves and fastenings are similar and will fit easily.
- What most often happens in the top ten is the grinding of the lift gear, which makes the device inoperative.
- The second reason is a cable break, which disrupts the entire system.
Problems can be solved by dismantling the device and replacing defective parts, or by completely replacing the window regulator, which would be a more correct and simpler option. Now let's get to work.
How does the window lift mechanism work?
Agree, sitting comfortably in the car, lightly pressing the button opens or closes the window.
Sometimes you don’t even think about how this tricky window lifter mechanism works.
Let's take a look inside. Any average electric window regulator consists of the following elements:
- drive mechanism;
- lifting mechanism;
- window control unit.
Drive mechanism
It is an ordinary electric motor that drives the lifting mechanism through a clever system of worm and gear drives. But with him it’s not so simple.
Lifting mechanism
The fact is that engineers have come up with several options for lifting devices, or more precisely:
- cable;
- lever;
- rack and pinion
Cable
In the first case, the window lift motor acts on a flexible element - a cable, chain or belt. Actually, this is clear from the very name of the drive type.
The flexible element is secured by a system of rollers inside the car door panel, and is attached to the glass using a plate. Everything is arranged so that the cable can move progressively up and down.
In principle, this version of the mechanism is the simplest and most maintainable.
Lever
Lever devices are popular with those automakers who value compactness.
The main operating link of the mechanism, as you might guess, is a lever (one or more) connected to the window lift motor through a gear.
One of the disadvantages of the lever system is the uneven speed of glass movement.
Rail
You would think that the rail would somehow move inside the door, but that is not the case. In fact, the rail is stationary, and the electric motor itself moves along it, having contact with the glass. It is believed that such structures are the most durable.
Window lifter control unit
I would also like to mention the control unit. In the simplest case, this is the so-called direct control, when the button independently connects the motor to the on-board electrical network, activating it.
By changing the polarity of the connection, the direction of rotation of the motor changes - everything is elementary.
A more complex option is electronic control. Electronics allows you to implement various interesting “goodies”, for example, automatic opening, reverse glass movement, etc.
Thus, dear readers, we have found out how the window lift mechanism actually works. As you can see, everything is quite simple, and now there is one less mystery in the car.
Thank you for your attention, friends, and see you again! Read an interesting article about electronic window tinting
Causes of malfunction
So, we gradually approached the issue of malfunctions. What if the window regulator cannot go down or up? Before you remove the window regulator, disassemble and repair it in your car, let's look at the main reasons. If the rear or front windows do not work, the reason may be either electrical or mechanical.
Detailed design of the EP system
Electrical faults
First of all, if the window regulator has stopped working, it is necessary to diagnose the safety element responsible for the functionality of the system. If you realize that the power window is not working due to a fuse, then you just need to replace it. But if the fuse is working, then you will need to measure the voltage at the electric motor terminals. This task can be accomplished using a regular 12-volt lamp or using a tester.
We recommend: How to check the vacuum brake booster?
If you find that the driver's window or any other door does not work due to voltage, then you need to further check:
- wiring;
- relay;
- system control unit.
Sometimes a car owner thinks that the window regulator is broken if, after opening the window, it automatically begins to close until the key is turned in the ignition. As a rule, in this case the problem lies in the contacts, which should be cleaned. Much less often, but it still happens that repair of electric windows includes replacing or repairing a button.
Mechanical defects of the mechanism
If, after measuring the voltage, you realize that there is current in the system, but it does not go down or the window regulator does not work at all, most likely the problem is mechanical. As a rule, in this case, something is interfering with the device, so you will have to disassemble the door and look for the reason. Much less often, the reason lies in a failed electric motor (the author of the video is the channel In Sandro’s Garage).
How to raise the glass if the electric seal is broken - there are several options:
- Purchase a window regulator repair kit and repair the device, after which you can fully use the system.
- Try to grab the glass on both sides with your hands and pull it up. If the glass falls after being lifted, you will have to disassemble the door and place a support of the appropriate size under it.
- If you can’t lift the glass with your hands, you can take a fishing hook on a fishing line and lower it into the door card. You need to try to pry the glass and lift it.
Design features of window lifters "Tens"
What is the electric window circuit in the VAZ 2110, for what reasons does the engine or the SP control unit not work, how to replace it and how to connect the device? First, let's look at the design features of the joint venture, which may vary depending on which specific doors they are used in.
Despite these differences, joint ventures for the most part consist of identical elements; let’s look at the example of electrical systems:
- Gear motor or drive. Taking into account the electrical circuit, this device provides the signal necessary to raise the glass.
- Grooves. These constituent elements are located on the inner surface of the door frame. The main purpose of the grooves is to hold the glass in a certain position and prevent it from tilting.
- Rails. Rails are used as guide elements used to move glass. These components are installed in the door body.
- Lifting mechanism with gears.
- Seal. The rubber seal allows you to limit the movement of the glass up or down.
- Wiring. Its diagram may differ depending on the type of joint venture, but in any case, it is through wiring that signals are transmitted from the control unit to the gear motor.
- The control unit itself has buttons that transmit an impulse about the need to open or close the glass.
Separately, it is necessary to say about the drives - depending on the type of joint venture, the drives can be different:
- Mechanical type devices. Mechanical devices are structurally composed of ordinary elements, several gears and a handle. In order to move the glass to a certain position, the driver or passenger will have to turn this handle clockwise or counterclockwise. A load will be placed on the drive shaft, which will allow the glass to be raised or lowered.
- The drive can also be electric. An electrical device has a more complex structure compared to a mechanical one. The design of such a joint venture includes a gearbox, drum, control module, etc. As mentioned above, an electrical circuit is used to connect all components, which must always be in working order. Once connected, the system is controlled using the buttons on the unit.
It should be noted that the joint ventures themselves can be subdivided according to the types of the lifting mechanism itself. Cable mechanisms were the first to be used, but over time, due to multiple disadvantages, such as slow operation and low service life, they were replaced by rack and pinion mechanisms. Unlike cable ones, rack and pinion ones work much faster, but louder, and their service life is much longer due to the reliability of the design (the video was shot by Artem Aver).
Removing the door trim
First, remove the window lifter handle; to do this, you need to remove the plastic stopper located under the washer of the handle lever. By carefully prying the latch with a screwdriver and moving it to the side, the stopper is removed from the slot. After this, you can remove the handle itself, it happens that it sits very tightly on the slots, you can help with two screwdrivers, using them to hook the seat.
Next, remove the armrest handle
, there are two plugs on the top and bottom that cover the screws. Using a flathead screwdriver, open the plugs, then unscrew the screws with a Phillips screwdriver. Carefully pry up the lining of the inner door handle and remove it. It will be more convenient to do this by pulling the handle itself towards you.
If the front door is removed
, unscrew the adjustment knob of the outside rear view mirror and its trim, then remove the triangular plastic plug. Then unscrew the door lock button.
The plastic upholstery is secured using eight plastic holders (pistons) located around the perimeter of the panel. During the dismantling process, these pistons very often break, so it would be a good idea to stock up on new holders in advance. So, using a flat-head screwdriver, starting from any bottom edge, carefully release the pistons.
Thus, we remove the plastic door trim assembly with the radio speaker and a pocket for small items.
Guide on how to disassemble a window regulator
So, if you decide to replace the traditional window regulator in your VAZ 2110 with an electric one with a motor, gear unit and control buttons, then first find out how to remove the device. Only after you can remove it will it be possible to replace or install a new one.
Also, dismantling the window regulator may be necessary if it does not work and needs to be repaired:
First of all, it is necessary to dismantle the handle, which is located in the cabin. To do this, remove the stopper located under the special washer on the same handle. Using a screwdriver, you need to move the latch to the side, removing the stopper from the plate. This way you can remove the handle itself. If it is tightly installed, it may be worth trying to pry it off with a screwdriver. Next, you need to remove the armrest handle of the VAZ 2110. Using the same screwdrivers, remove the plugs behind which are hidden the bolts that secure the handle itself
Use a Phillips screwdriver to unscrew them. For greater convenience, you can remove the trim on the handle of the side rear view mirror. After this, the door trim itself is carefully dismantled. Essentially, this was preparatory work. If you are repairing or replacing power windows with electric ones with a motor, gear unit, and control buttons on a VAZ 2110, then you need to gain access to the fasteners
These elements fix the device itself to the glass. This component is secured with two bolts; they are unscrewed with a wrench. Next, you can completely dismantle the glass or secure it in the system with tape, after which you can repair or install electric windows with a motor, gear unit and control buttons. The socket is disconnected from the slot, the nuts are unscrewed with a wrench, after which the window regulator is dismantled (the author of the video is In the Life Village).
Mechanism design
Depending on the type of window lifter, there are two types of drive mechanisms: mechanical and electric. In the first case, the drive mechanism is activated using a handle/lever located on the inside of the door. By rotating the handle, the driver transmits movements to the drive gear, which begins to move.
Automotive window regulator
The electric drive is driven by a reversible motor. It, in turn, starts when you press a button located on the driver’s or passenger’s handrail. The drive uses a worm gear; with its help, the engine drives the gear of the drive mechanism (the author of the video is Sergey Zukol).
The drive is connected to a device that moves the glass. The lifting mechanism can be lever or rack type.
Lever has three subtypes:
- single lever;
- double lever;
- double wishbone wheel.
Lever devices are compact and reliable in operation. Another advantage is their ease of installation and dismantling. The versatility of the mechanism allows it to be installed on any car. The disadvantage is the inability to move the glass evenly. At first it moves quickly, then more and more slowly, and at the end even with jerks.
In a rack-and-pinion device, a plate of glass moves up and down along a vertical toothed rack. A gear is mounted on the plate, which meshes with the drive gear. Thus, the movement is either down or up. The advantage of a rack and pinion window lifter is the reliability and smooth movement of the glass. The disadvantage is the massive design, which limits its use.
Rack type device
The third type is a cable mechanism, which will be discussed in more detail below.
Replacing the front window regulator
So, as mentioned above, we start by disassembling the door:
First we find the gear motor cover;
VAZ 2112 window lifter does not work
- unscrew it with a 5.5 key;
- then dismantle the driven gear;
- we find the ESPD mounting screws that secure the engine to the gearbox housing;
- unscrew them with a curly screwdriver;
- We disconnect the ESPD wires from the block.
- Next, we push the seal, which is carried along with the device inside the electric motor housing;
- then the ESPD is disconnected from the gearbox housing.
- next you will need to remove the electrical connectors from the hole;
- We arm ourselves with a drill and drill out special rivets that secure the window regulator to the door;
VAZ 2112 window lifter does not work
- remove the fasteners;
- Now you will need to release the window regulator by moving it inside the door;
- Drill out the remaining parts of the rivets and remove them.
We install the new window regulator in the reverse order. But be sure to consider the following points:
- be sure to take care of protecting the door when installing new rivets;
- it is mandatory to install a dust and moisture protective film (as is known, it must be installed without various folds and there should not be any cuts on it);
The window regulator of the VAZ 2112 does not work
the surface itself where the film will be installed must be clean.
After this, you will need to take the final steps:
- connect the wire to the battery;
- check the operation of the window regulator;
- initiate all electronic systems.
Installing electric windows
It is believed that these types of window lifters are the most popular today. This can be explained, firstly, by the fact that these window lifters are a favorite option of tuners. In addition, today you can find more than one model of such window lifters on sale, which is very good. In fact, everyone can choose the model they like for installation and carry out the installation themselves. Basically, different types of window lifters are offered for front doors. For rear doors, they are either not suitable at all, or require independent modification. If the window regulator of the VAZ 2110 does not work, then the installation will not be so difficult:
- as was written above, first of all, you should disconnect the battery;
- after that, armed with a figured screwdriver, unscrew three self-tapping screws;
VAZ 2110 window lifter does not work
dismantle the door pocket, first unfastening its latches from the door trim.
- Now you will need to pry off the window lifter handle, or rather its lock, using a thin screwdriver (insert the tool into the hole between the socket and the lock);
- dismantle the handle together with the lock;
- then remove the socket.
- Having removed the door handle, we see two fastening screws;
- they will need to be unscrewed with a figured screwdriver;
VAZ 2110 power window does not work
remove the handle.
Now you need to move on to dismantling the handle that opens the door:
- Again, use a screwdriver to pry off the door handle, or rather, its trim;
- extract it;
- now it’s time to dismantle the button that latches the door;
The power window of the VAZ 2110 does not work
- next you will need to dismantle the handle;
- then remove the lining that hides the mirror control mechanism (for this you will need to remove 6 pistons);
- now the door trim can be easily removed, which is what we do;
- take a socket or a 10mm wrench and unscrew the bolts securing the glass frame to the lift (everything here comes with two bolts);
Power windows of VAZ 2110 do not work
- Now you will need to unscrew the two nuts of the middle fastening of the lifting mechanism;
- then unscrew the nuts of the lower and upper fastenings;
- now you will need to find three nuts securing the lifting mechanism;
VAZ window lifter does not work
It's time to remove the lower lift guide pin from the door panel.
The front window lifter on the VAZ 2112 does not work
To install a new ESPD, you should know that it must only be in the folded state, otherwise this will not be possible. You can also easily repair the mechanism if you know why the power windows on the VAZ 2110 do not work.
Installation procedure for glass lifting devices
With such a kit you can replace the electric window regulator of a VAZ, but it is better to purchase complete kits.
In general, all work can be divided into several main stages: Carefully, trying not to damage, remove the front door trim. Otherwise, the entire operation will not be possible. In principle, that's all. Don't pay attention to the orange wire in the photo - it's a mass for heating the mirrors. Depending on which company produced the product in question, it can be installed in the car door as standard, or, if it does not fit in size or other technical characteristics, it can be altered without unnecessary problems. Attach the glass frame with bolts. The speed of glass movement is very slow; if it freezes, the cable may break and the motor may fail.
It is advisable that the device be in a folded state, because, otherwise, it will be difficult to install and connect the window regulator to the on-board network of the car. If you haven’t decided which ESP for VAZ to buy and at what price, then you can read tests and reviews of electric windows, or read reviews from car owners who have already installed ESP in their cars.
Power window lifter.
You can use a button from Kalina, it is more beautiful and a little more expensive than from a VAZ. Their cost is low, so the purchase will not hit your pocket hard. Then you don't have to read further. After some time, after a lot of walking, it was finally decided to buy the first car I liked and finally go home.
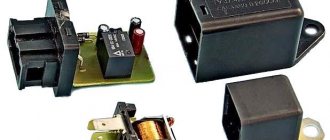
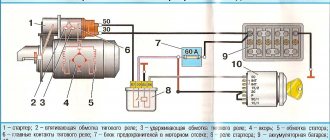
The performance of this component can be determined by replacing the problematic relay for testing with a guaranteed working one. It starts with disconnecting the battery. Very often there is a break between the body pillar and the door. Connect the wiring harness blocks in accordance with the connection diagram. The new VAZ window lifter does not work
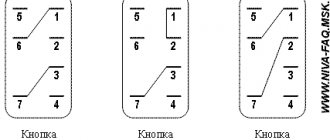
Serial connection - diagram
We connect the output of additional button 1 in the driver's door to input 6, and output 7 to input 3 of the main button on the passenger door. We cut the wires in the block connecting contacts 5-6 and 6-3. The minus of contact 5 now goes only to the backlight, and contacts 6 and 3 now take output from additional buttons 1 and 7 of the driver's door. Installation in parallel will result in short-circuiting during lifting and lowering. Power wires are highlighted in bold.
When using trigger buttons, connect all ESP motors only through a relay. When using a conventional door closer, relays are also needed, since they are not in the long-press closer block and all the current flows through the buttons and wires from them.
Choice of window regulators
Turn the block over and carefully install the block Ш1 of the harness that was prepared earlier into the desired connector. The simplest and cheapest kit includes only an electric motor with a gearbox
But the quality of workmanship and resource are very high.
Its design is similar to that of the windshield wiper gearmotor.
If the power supply circuit is broken, you need to find a place and then restore it.
Turn the block over and carefully install the block Ш1 of the harness that was prepared earlier into the desired connector. There are 2 wires coming from the closer and they are constantly closed in it
Now, in order to close the window, you have to reinsert the key into the ignition... I think you are all familiar with this situation.
They are considered the most suitable and are the most reliable. If voltage is applied to the winding, then pin 30 is disconnected from pin 88 and connected to pin How to connect a VAZ window lifter https://www.youtube.com/watch?v=fqgrYLCxnZQ
Read additionally: Who does the energy passport of an enterprise?
Reasons for refusing to work
If you are trying to understand why the power windows on a VAZ 2114 do not work, then first of all you need to make sure that the fuses are working. If everything is normal, then it is necessary to analyze the integrity of the wires between the fuse panel and the keys. If there is a break, the connection should be restored. If the machine behind you can only be activated from the main unit or does not turn on at all, then it is worth checking for current conductivity. It is recommended to do this when the system is turned off. A special tester is used for this.
Sometimes the Lada Kalina encounters the described problem. The window regulators on it do not work quite often. The button must be replaced if it does not conduct current. The same operation should be carried out when one of the nodes listens only to the signal from the door, without responding to the main unit. However, if the current is conducting, then the problem is most likely in the wiring (there may be an open or short circuit).
Elements of electric lifts
- internal components (socket, latch, handle and lining);
- window lift fastening mechanism;
- rope
- glass fastening mechanism.
In turn, electric windows are divided into:
- pulse;
- non-pulse.
Pulse ones operate in both normal and pulse modes. By normal, we mean the mode when the element rises as a result of pressing a key.
Pulse - means raising and lowering the glass with a single short press.
Advantages of impulse windows:
- 1. They have five-position control keys.
- 2. When switching the first position, it will work in a simple mode, which involves raising the glass exactly to the height you want. The second position provides for the complete opening and closing of the glass.
Non-pulse mode involves pressing a specific switch to lower the window. When the glass is at the desired level, you need to release the switch button.
To raise the glass, press another switch and hold it until the glass reaches the desired level.
You need to know that the front glass of the VAZ 2107 in its configuration resembles a pentagon, so the installation of the cable and its feeding are not the same as in classic car models.
In addition, the glass connection mechanism occurs on the fourth tension roller. Before you start installing a power window, you need to know these differences.
As a rule, window regulators are adjusted at the manufacturing plant. But when replacing or repairing this element, you need to know its components. Otherwise, the window regulators on the VAZ 2107 may produce crunching and crackling noises when opening and closing the windows.
One of the most common problems is the handle breaking!
Selecting window regulators for installation on a VAZ-2110
If you want to install electric windows on your car, you will first need to choose the most reliable device that will serve for many years without causing any problems. On the modern market you can find the following options:
- traditional cable structures, which are relatively easy to install, but differ from others by not having a very long service life, wear out quickly;
- strip devices that are not very convenient to use;
- rack and pinion window lifters, which are deservedly recognized as the most suitable and reliable in operation.
When choosing devices suitable for your car, pay attention to factors such as:
- the speed of raising and lowering the glass, which largely depends on the gear motor installed on the car;
- the ability to use the device in the cold season;
- noise level during product operation.
Taking into account all these factors, you will be able to choose window lifters that will not only work flawlessly, but also will not create any problems in specific operating conditions.
Applicability on cars
| Brand | Automobile model | Body type | Number of doors | Years of manufacture |
| VAZ | 2110 / LADA 110 | sedan | 4 | 1995 — 2014 |
| VAZ | 21108 / LADA Premier | sedan | 4 | 1999 — 2007 |
| VAZ | 2111 / LADA 111 | station wagon | 5 | 1998 — 2014 |
| VAZ | 2112 / LADA 112 | hatchback | 5 | 1999 — 2009 |
| VAZ | 2170 / LADA Priora | sedan | 4 | 2007 — 2015 |
| VAZ | 21708 / LADA Priora Premier | sedan | 4 | 2007 — 2015 |
| VAZ | 2171 / LADA Priora | station wagon | 5 | 2009 — 2015 |
| VAZ | 2172 / LADA Priora | hatchback | 5 | 2008 — 2015 |
The power window rack is a housing in which the glass movement mechanism is located - a toothed chain drive. An electric motor is fixedly mounted on the rack, driving the mechanism.
The fixedly located gear motor eliminates the possibility of damage to the electrical wiring in the door.
The window lift rack is absolutely rigid. Thanks to this, there is no rattling, vibration or resonance when raising and lowering the glass.
Window lifters are extremely lightweight and compact. They work almost silently.
They are installed in place of the guides of the standard window regulators and secured into the standard mounting holes using the fasteners of the replacement window regulators.