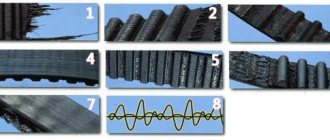
Today I came to visit my old friend, barbecue and all that, and in between, a small maintenance on his freshly painted VAZ 2114, replacement of the timing belt, rollers and pump. This car has a standard eight-valve engine and this greatly simplifies the matter, since on this engine the procedure for replacing the timing belt takes 30 minutes. In our case, the timing belt was eating up a little on the inside and one of the oil pump bolts was to blame for this, we’ll talk about this at the end of the article.
On the VAZ 2114 engine there are 8 valves, if the timing belt breaks, the valve does not bend.
Under standard conditions, the timing belt replacement interval is 60 thousand kilometers or four years of operation, whichever comes first. The replacement interval can be increased to 80 thousand with periodic monitoring of the condition of the belt, roller and pump.
Preparatory operations
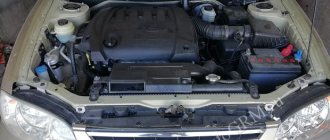
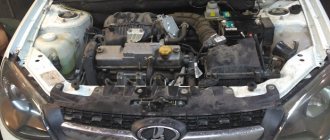
Open the hood.))
It's immediately obvious that the owner loves his car.
VAZ engine 8 valves.
If you plan to replace the pump, then let the engine cool, remove the protection and then drain the antifreeze. It is enough to drain only from the cylinder block.
Plug on the cylinder block.
Jack up the car and remove the front right wheel and plastic mudguard.
Common mistakes
- Malfunction: the belt began to whistle after replacement. In reality, it is not the belt itself that whistles, but only the roller. It had to be replaced.
- If several teeth on the old belt were torn off, the cause could be a jammed pump. Check if this is the case and replace it (drain the coolant).
Replacing the pump on the engine
- Do not install automatic roller 21116-1006238 instead of the standard tension roller.
Step-by-step instructions for replacing the timing belt
- Unscrew the two bolts from the side of the timing belt protective cover. Key for 10.
- And one in front, remove the cover. Key for 10.
- Remove the generator drive belt. Loosen the locking nut, set the wrench to 13 and unscrew the tension bolt, set the wrench to 10. Move the generator towards the cylinder block.
Alternator belt tensioning mechanism.
- If you cannot move the generator, you need to loosen the fastening nut from below. The key is 17.
Generator mounting.
Set the top dead center
- Use the crankshaft pulley bolt to turn it clockwise.
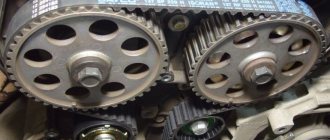
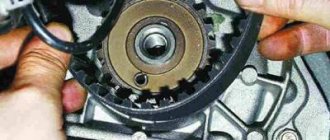
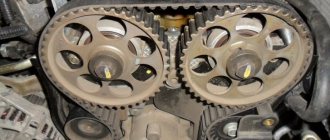
- We ensure that the mark on the camshaft toothed pulley (hereinafter referred to as simply an asterisk) matches the mark on the metal casing.
Camshaft mark.
- The mark on the crankshaft sprocket should also coincide with the low tide on the oil pump.
Crankshaft mark.
- We unscrew the crankshaft pulley bolt, having previously locked the crankshaft. We block the rear wheels, engage fifth gear and insert a screwdriver into the ventilation hole of the brake disc below the caliper. 17mm head with extension and pipe as a lever.
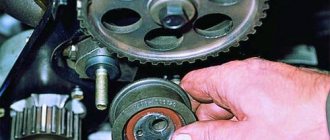
- Unscrew the nut securing the tension roller and remove it along with the old timing belt.
Fastening the tension roller.
Replacing the pump
- Unscrew the bolt securing the camshaft sprocket and remove it. The key or head is 17.
Put one round of electrical tape around the camshaft, this will prevent you from losing a key!
Fastening the camshaft sprocket.
- Remove the timing belt protective cover. We unscrew the nut and bolt by 10, as well as the three bolts securing the water pump. Head for 10.
Fastening the timing case.
- Removing the pump
Usually it gets very stuck, so a pry bar will help us here.
- Lubricate the pump gasket with a thin layer of sealant and install the pump in place. We install the protective casing and tighten all the bolts evenly.
Pump mount.
How often to change the roller and belt
The recommended replacement rates for VAZ 2114 cars, determined by the manufacturer, define the replacement period as 60 thousand km, but this statement is only true for vehicles under five years old, otherwise this figure should be reduced by approximately 15 thousand km.
The replacement period is also affected by the performance of the liquid pump, with a maximum service life of 90 thousand km. You should not take the original pump under any circumstances, because it will quickly break on its own or “eat” the belt from the outside.
Also, do not forget about the need to replace the crankshaft seals, which also have similar wear measured at 40 thousand.
Broken timing belt
Therefore, taking into account the data described above, we can come to the conclusion that it is necessary to change the belt, adjustment roller and oil seal every 40 thousand km, and after one replacement, install a new pump along with them, if no unforeseen breakdowns have occurred.
Installing a new timing belt
- We get a new timing kit, in our case from Gates.
Gates timing kit.
- For a VAZ 2114 engine with 8 valves, it contains a toothed belt and a tension roller.
- If anyone needs it, the article number on the box is as follows.
- We check that all marks match. We install the tension roller in place, but do not tighten the nut. Next, install a new timing belt, put it first on the crankshaft sprocket, then on the camshaft sprocket, tension roller and pump. We make sure that the descending branch of the belt is tensioned.
- Using a special wrench, turn the tension roller and tighten the timing belt. Tighten the nut.
- The correct tension is considered to be one in which, with two fingers, we can turn the timing belt in the longest section by a maximum of 90 degrees.
A new timing belt has been installed.
- We install all parts in the reverse order of removal. Fill with antifreeze.
This procedure is so simple that you can do it yourself even without a garage, just in the courtyard of your house.
What is timing belt?
The timing belt, also known as the gas distribution mechanism, is a part responsible for synchronizing the injection and gas distribution phases in the power unit of the machine. In order for the entire system to work as a single whole, it is necessary to align special marks, which are the point of manual synchronization of the gas distribution.
Most often they go astray when the timing belt is replaced or it breaks while the engine is running. If you do not double-check that the marks match, the engine will not operate correctly, which means you will have to remove the belt again and set everything up.
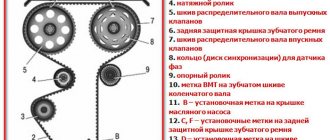
Timing diagram
TAKE INTO ACCOUNT! The timing belt has two pairs of marks, one of which is located on the pulleys, and the second near the block. They must coincide at the highest position of the first or fourth cylinder.
Causes of toothed belt wear on VAZ 8 valve engines
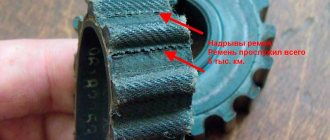
- Wear of the timing belt on the front side is the main cause of a worn pump, but sometimes it can also be the tension roller stud and, in very rare cases, the camshaft sprocket. To eliminate this problem, replace the worn part.
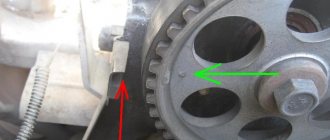
- Wear on the rear side is much less common. The main reason is the bolt on the oil pump. Over time, the belt tension weakens a little and, vibrating, it begins to reach this bolt. It’s very easy to fix this problem; we replace the Torx sprocket bolt with a regular 10mm socket, its head is smaller and the timing belt is no longer missing. The photo shows wear from the belt.
Articles
- 2108-1006120 – video. Attention: parts 2108-1006120 and 2112-1006120 are not interchangeable!
- 2108-1006129 – pin for the roller;
- 2108-1006040-10 - belt;
- 2108-1006149 – seal under the casing;
- 2108-1006146 – plastic casing.
Analogs of belts
- GATES 5521 or 5521XS (heavy duty), recommended
- FINWHALE BD-111
- BOSCH 1 987 949 559
- LEMFORDER 58-111-19 or 14458 01
- CONTITECH ST-527
- GOOD YEAR G1474 (semicircular tooth) or G1485 (trapezoid tooth)
- DAYCO 111x190/1
Analogues of the video
- GATES T42042 or T42042A (2 pcs.)
- MAPCO 23081
- FLENNOR FS99018
- LUK 531 0671 20
- OPTIMAL 0N1917
Consequences of incorrectly setting timing marks
If the ignition is set incorrectly, the following negative aspects are possible:
- If the engine has 16 valves, then they become deformed or bent during operation, accumulating damage.
- The previous problem causes damage to the cylinder head.
- The guide bushings may also become unusable.
- Cracks may appear in other engine components.
Crack in the cylinder block
- The motor overheats.
- The engine piston mechanism can burn out.
- Oil residue may appear on the spark plugs.
Oil deposits on spark plugs
- The fuel mixture loses its ignition moment.
Note! If the engine has 8 valves, then the consequences are not so critical - traction disappears, the belt quickly wears out and breaks.
After repairs, the following factors most often indicate an incorrectly set ignition:
- The car accelerates worse.
- Frequent overheating of the motor.
- The craving became much worse.
Checking the set ignition
To check the ignition on an 8-valve engine, an injector, you should prepare:
- Multimeter.
- Set of keys and screwdrivers.
- Pliers (necessarily with insulated handles).
Attention! Due to the lack of special equipment, the described method can only test the operation of the circuits. Diagnostics of the microprocessor part will not be available.
The process is:
- When the ignition is turned off, check how tightly the high voltage wires are seated and what contact is in the module.
- Remove the connector from the module, connect a multimeter (monitoring mode should be low AC) to pins C and B, make sure there is voltage. Check the coil (2nd and 4th contacts).
Checking the presence of power on the ignition module
- Check the functionality of high-voltage wires. Install a working spark plug in each cap in turn, attach one end to the block and crank the engine with the starter. The presence of a spark signals that everything is normal. Its absence on each wire means the module is faulty.
Checking high voltage wires
If you managed to set the ignition correctly on the VAZ model and this was confirmed by the test, but problems are still observed, you need to check the power system.
How to set the ignition on a VAZ using marks
Almost all modifications of the VAZ-2114 and 2115 are equipped with engines with BSZ (non-contact electronic ignition). To make the setup, you need to:
- Unscrew the timing case fasteners and remove it.
- Adjust the gap from the crankshaft sensor (located near the generator pulley) to the gear disk. The permissible value is up to 0.7 mm.
- If the distance is normal, check that the crankshaft pulley is not misaligned.
- To ensure that the marks on the flywheel align with those on the gearbox housing (can be seen on the hatch), the crankshaft must be rotated. It is convenient to do this by grasping the pulley mounting bolt.
Note! It is prohibited to turn the camshaft pulley itself.
- The mark on the cylinder block must align with that on the oil pump pulley. They should be adjusted.
- The last mark (on the camshaft pulley) should coincide with the other mark on the cylinder head.
Having placed the marks on the VAZ model, you can see that the pistons of cylinders 1 and 4 are located at the dead center at the top, if everything is done correctly. In this case, the power unit operates correctly because the crankshaft sensor sends correct data to the ECU.
Installation process
The timing belt itself is a rubber product closed with teeth inward, which synchronizes the torque between the camshaft and crankshaft. Ignoring its wear will not lead to anything good, because in the best case, your engine will stall while driving, and in the worst case, the entire wheelbase will jam, which can lead to the most unpredictable incidents on the road.
The replacement and debugging itself is carried out in two stages, in the first stage the main repair and debugging work is carried out, and the second stage carries the function of monitoring the work done.
First stage
- The assistant gets into the car and puts 5th gear in the gearbox, and at this time you remove the front belt protection.
- Insert the ratchet into the place allocated for it and begin to turn the crankshaft, you need to do this until you see that the mark located on the camshaft has not moved to remove several teeth from the control antenna of the rear cover. (this action is necessary to reduce the degree of belt tension).
- We dismantle the drive pulley on the crankshaft and return the mounting bolt to its place.
- The assistant switches the gearbox to “neutral”.
- Again, we begin to carefully turn the crankshaft until the mark on the VAZ 2114 flywheel is in the central position.
Second stage (control-final)
- Before checking the timing marks on the VAZ 2114, you need to fix the pulley on the generator and tension the belt with a roller to the maximum.
- Now we check all the matches, if nothing is wrong anywhere, then we install the protection back and clean the workplace.
Looking under the hood of your car, with knowledge of this information, you will understand that there is nothing difficult in this procedure, but its success is quite dependent on the skill of the performer. Therefore, if something doesn’t work out the first time, just repeat the operation, you may even need to do it twice. Don’t be discouraged, because after the difficult first time it will only take you a few minutes, like a seasoned professional.
conclusions
As practice shows, setting the ignition on a VAZ-2114 is quite simple, but not every motorist can do it. So, it is necessary to have knowledge of the operation of the engine and its design. Therefore, if a motorist is not able to do this type of repair on his own, he must contact a car service center.
For proper operation of the engine, the timing marks must be correctly set after performing various actions - complete replacement of the mechanism or repair. The service station charges a small amount for such services. But you can save money and set the timing marks yourself. How to complete the procedure on VAZ cars will be discussed further.