Modern AVTOVAZ SUVs use injection power units. If a malfunction is detected in the electrical equipment of the car, you should first check the serviceability of the fuses and relays. Next, we will show where the mounting block is located (fuse box or black box), as well as the location of the elements inside it.
Where is the Niva Chevrolet fuel pump relay located?
In a modern car, electrical circuits are protected by fuses and relays.
Chevrolet Niva is no exception - relays are installed on all important electrical devices of the car. One of the most important devices of the car is the fuel pump, which supplies fuel to the engine. It happens that the car does not start due to lack of gasoline supply. Before starting repairs, you should make sure that the electrical circuit is working properly, and for this you need to know where the Chevy Niva fuel pump relay is located.
Relay structure and its purpose in a car
The principle of operation of any standard relay in a car is the closure or switching of two contacts on a power electrical circuit using an electromagnetic field. Closing the contacts directly through the switch will require the use of thick wires and will lead to a voltage drop in the entire on-board network. A switch with an electromagnetic coil inside allows a low current to close the desired contact and apply voltage to a section of the circuit. Through it, headlights, heating and cooling fans, power windows, a starter and other components are powered in a Chevy Niva car.
A typical fuel pump relay 75.3777-10 has 4 contacts, a coil with an armature, and a spring for opening the contact. When voltage is applied to the control contacts, the rod is pulled into the winding and another pair of contacts is closed. It turns off automatically as soon as the low-current connectors are de-energized.
Advantages of using relays in Niva Chevrolet cars:
- spontaneous leakage current in the on-board system is eliminated;
- reliable control of all electric motors;
- quick and guaranteed start of electrical mechanisms;
- Network overload protection.
The fuel pump relay has appeared on cars of the Chevrolet Niva family since 2003 , when an injection engine was installed. The engines of the VAZ 21213 family are equipped with a carburetor and do not have a relay in the fuel supply system.
Important! The markings of the fuel pump relay may vary depending on the year of manufacture. For example, 2015 and 2006 have different numbers on the cap, but remain interchangeable.
System structure and principle of turning on fans
Everything works as follows.
- The radiator and engine block are looped into a single system using pipes. Between them there is a rheostat - a damper with a temperature-sensitive element inside.
- When a certain temperature is reached, the damper opens and the liquid begins to circulate in a large circle.
- If passive cooling fails, the engine temperature rises. The head cooling fans come into play. When the temperature limit is overcome, the DTOZh sends an impulse to the BC.
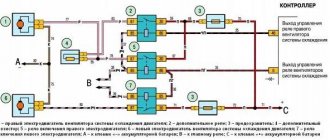
- The processed signal closes the relay and the fan turns on. To improve system performance, the devices are paired. Dubbing helps prevent overheating if one of the devices breaks down. At the same time, the connection diagram for active coolers implies their simultaneous and separate activation.
The Chevrolet Niva interior heater fan is also used to cool the engine. Part of the system has a slight effect on the temperature, but in an emergency it can affect the operation of the engine.
Power system in Chevrolet Niva
Niva's electrical network operates with a nominal voltage of 12 Volts . The design of the fuel system consists of an electric motor with a pump in the car tank, from which a fuel line is extended to the ramp.
The electrical circuit of the power system consists of:
- electric motor;
- power cables with connectors;
- fuel level sensor;
- relay;
- fuse.
The ends of the wires are powered to the central lock . When we insert the key into the ignition switch and turn it, the relay control connectors close, which causes the power contacts to close. A characteristic click is heard from under the instrument panel, indicating that the fuel pump is ready.
5.1.2 Relieving pressure in the fuel system
Relieving pressure in the fuel system
Before you begin, read the safety precautions in the General Information and Safety Precautions section.
After performing the procedure described below, you will only relieve excess pressure in the fuel system. Gasoline will remain in the pipelines
Take all necessary safety precautions before disconnecting any fuel hose.
The fuel system discussed in this Chapter consists of a fuel tank, a fuel pump located inside it with a fuel level sensor, a fuel filter, injectors or nozzles, a pressure regulator and various hoses and tubes. Inside all these components, while the engine is running (as well as when the ignition is on), the fuel is under pressure.
After turning off the ignition, the pressure in the system remains for quite a long time. Before disconnecting any of the above components, the pressure must be relieved.
To do this, briefly open the fuel tank cap and close it again. Place a thick rag over the joint. Wear safety glasses. In the direct injection system of the AWA engine, the pressure can be relieved in the described manner only in the part of the system that has low pressure (up to 6 atm.). To remove high pressure (up to 110 atm.) special devices are required. High pressure in the system is present in the area from the injection pump to the injectors. For a 1.9 liter diesel engine, the temperature of the fuel lines and fuel in an engine with pump injectors can, in extreme cases, be up to 100°C. Allow the fuel to cool before opening connections, as otherwise burns may occur.
The simplest way to relieve pressure is as follows. Remove the fuel pump fuse and start the engine. If the engine does not start, crank it with the starter for a few seconds, and if it does start, let the engine idle until it stalls. In order to completely relieve the pressure, turn the engine crankshaft with the starter a couple more turns. Turn off the ignition and replace the pump fuse.
Be aware that if pressure is released (or fuel is removed from the system), the engine will take longer than usual to start. You will have to crank the engine crankshaft with the starter for at least a few seconds, during which the pressure in the system will be restored and fuel will fill all the pipelines.
Source
Location of the fuel pump relay in the car
The Chevrolet Niva compares favorably with its predecessor primarily in its layout and convenient access to all parts . The designers have provided the most reliable place for the relay and fuse box in this SUV - in the cabin under the dashboard. In total, 2 mounting blocks are installed in Niva Chevrolet. The first is located to the left of the steering column under the hinged lid, the second under the glove compartment on the front passenger side.
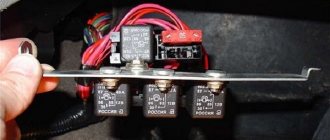
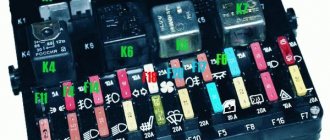
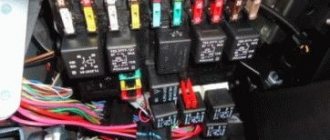
We are interested in the second block . It combines the engine control unit and 4 power relays on a metal strip. From the outside, this unit is covered with a decorative plastic cover. The device we are interested in is located third on the left. The Chevy Niva fuel pump fuse is located on the left edge of this block. The fuse rating is 15 A. For easy access to it, it is recommended to remove the glove box cover.
Procedure for disassembling the glove compartment of a Chevy Niva:
- remove the terminal from the battery;
- use a screwdriver to unscrew the screws securing the glove compartment (1 on the right, 2 on the left and a pair in the upper and lower parts);
- tilt the glove compartment body forward and carefully pull it out, disconnect the backlight;
- remove the protective cover of the mounting block.
The exact location is shown in the photo . You can clearly see the factory markings of each connector and what it is responsible for. Changes in the restyled car since 2009 from the pre-restyling car affected only the main mounting block with relays and fuses. Now several electrical circuits are connected to one relay. The location of the relays and fuses under the glove compartment has not changed.
Main and additional fuse blocks
These two blocks are connected to each other. There are 10 fuses in the upper block, and 6 in the lower one. Markings from left to right:
| F1 (16A) | Heater fan, rear window defroster, rear wiper and washer system, windshield washer pump |
| F2 (8A) | Steering column switch, windshield wipers, hazard warning lights, breaker relay (in turn signal mode), reverse light, instrument cluster (coolant temperature gauge, fuel level gauge, tachometer, warning lights: turn indicators, differential lock, parking brake, emergency condition of the working brake system, insufficient oil pressure, fuel reserve, battery charge) |
| F3 (8A) | Left headlight (high beam), high beam indicator lamp |
| F4 (8A) | Right headlight (high beam) |
| F5 (8A) | Left headlight (low beam) |
| F6 (8A) | Right headlight (low beam) |
| F7 (8A) | Side light lamps in the left front and left rear lights, license plate lights, side light indicator lamp |
| F8 (8A) | Side light lamps in the right front and right rear lamps, backlight lamps for the instrument cluster, cigarette lighter, switches, heating and ventilation control unit |
| F9 (8A) | Hazard switch, breaker relay (in hazard mode), heated tailgate glass relay contacts |
| F10 (8A) | Sound signal, interior lamps, brake lamps in the rear lights |
| F11, F12 (8A) | Reserve |
| F13 (8A) | Fog light relay contacts in rear lights |
| F14 (16A) | Cigarette lighter |
| F15 (16A), F16 (8A) | Reserve |
Additional block:
| F11 (8A) | Turn signal lamps and relay-breaker for turn signals and hazard warning lights (in hazard warning mode) |
| F12 (8A) | Daytime running light relay, daytime running light bulbs |
| F13 (8A) | Rear Fog Lamps and Relays |
| F14 (16A) | Cigarette lighter |
| F15 (16A) | Spare |
| F16 (8A) | Spare |
Additional fuse circuits in the Urban package:
| Fuse number and rating | Protected circuit |
| Main unit | |
| 1 (16A)* | Electric windows for front doors Electric side mirrors |
| 2 (16A)** | Air conditioning fan, air conditioning compressor |
| 9 (16A)* | Side mirror heaters |
| 10 (16A)* | Central interior lamp |
| Additional block | |
| 15 (16A)* | Air conditioning fan, air conditioning compressor |
Methods for diagnosing the fuel pump relay
Let's imagine a situation : the car does not start because the gas pump does not pump fuel. In this situation, the first thing they do is check the integrity of the electrical circuit, and only after that the fuel pump itself is replaced. Any relay of this type can be very easily diagnosed by ear. When triggered, a characteristic click is heard, which is clearly audible from the front passenger side. This indicates the serviceability of the control relay itself.
Even if you couldn’t hear the clicks, the next signal will be the sound of the fuel pump firing - the hum of a running electric motor, which creates operating pressure in the fuel line. If this does not happen, then most likely there is a break in the circuit.
There are two ways to check the relay for serviceability:
- Replace with a known working one. You can take it from the adjacent connector or pull it out from the fuse box with a similar marking, but not responsible for starting the engine. For example, a head light relay or a cooling system.
- Remove the suspicious part from the connector. Take a piece of wire with stripped ends. Close contacts 30 and 87 on the mounting block. Thus, the fuel pump circuit will be closed directly. If the engine does not start in this case, then the reason lies in something else, and the relay can be considered serviceable.
Important! The jumper between the contacts is temporary, and permanent operation with it is unacceptable.
Replacing the Fan Heater
So, your heater radiator is leaking, to make sure of this and not engage in “monkey work”, touch the radiator pipes on the front passenger side, if they are dry, then look for a puddle under the driver’s carpet. If the puddle is from antifreeze, it will taste greasy and sweet. So, if all the signs match, then most likely the radiator is leaking.
We go to the store and buy a radiator. I bought a regular aluminum one for 500 rubles and some clamps just in case. You will also need 10 liters of antifreeze. Also stock up on boxes for self-tapping screws, because there will really be a lot of them!
Drain the antifreeze. To get as much as possible, blow into the expansion tank.
I’ll say right away that you need to remove the dashboard if you don’t want to end up at a gas station, although judging by my guesses, even in that case you’ll have to remove the dashboard.
First of all, we remove the glove compartment, it is easy to remove, there should be no problems.
Unscrew the center console along with the radio. There is nothing complicated here either.
Next, we begin to disassemble the decorative cladding
dashboard, simultaneously throwing off the dashboard and the steering column housing with switches. We take out the air duct, which is located behind the dashboard. Here you will have to suffer with the cables. Why can't you remove the entire dashboard? - you ask. This bolt won't give you anything.
stove Niva Chevrolet
During operation of the car, the Chevrolet Niva fuse box may become damaged, to correct which it must be removed for repair. If the block cannot be restored, then it should be replaced with a new one. If a part has become unusable on a car, for example, 2004, you can only install an old-style unit on it. When installing a new device, you must ensure that the fuse markings correspond to the electrical diagram.
Possible malfunctions in the fuel pump power supply system
Chevrolet Niva is a full-fledged SUV that is used by its owners in extreme conditions. Due to shaking, vibrations, moisture entering the interior and not only failure of electrical circuits and components occurs more often than in an everyday car. In addition to the failure of the relay itself, power may not be supplied for other reasons.
The most common ones are:
- fuse blown;
- break in the wire going to the fuel pump;
- poor contact at the joints or their coating with rust;
- weakening of the “mass” on the car body;
- loosening of the positive injector power wire at the battery terminal;
- the voltage in the vehicle's on-board network is not enough to trigger the solenoid coil;
- short circuit in the electrical circuit;
- poor contact on the fuel pump motor brushes.
Identifying and eliminating these problems is carried out in a certain sequence . The check always begins with monitoring the charge on the battery and the reliability of all visible contacts. Then check the serviceability of the relay and the integrity of the fuse. After which the wires going to the fuel pump and to the ignition switch “ring.” If they turn out to be intact, then the only reason remains is the failure of the fuel pump in the fuel tank.
Advice! The multimeter can be replaced with a regular 12 V light bulb, to which 2 wires are connected. We connect them one by one to the sections of the circuit being tested and see whether the light bulb lights up or not. The ignition must be turned on.
Methods for troubleshooting the electrical circuit of the fuel pump
A faulty relay or fuse is replaced with a new one, but first the cause of its failure must be eliminated . If there is a break or short circuit in the circuit, then this part of the wiring is replaced entirely. Poor contact in the connectors can be corrected by crimping or soldering the wires. The cost of a new relay in a store averages 200-400 rubles. At the same time, expensive does not always mean high quality. First of all, pay attention to the appearance of the relay and workmanship, as well as reviews from sellers.
Advice! Temporarily, to continue driving, you can use the removed relay from any secondary circuit.
The fuse can only be replaced with the same one with a nominal value of 15A . Chevrolet Niva is equipped with modern blade fuses that never lose contact due to vibrations and last quite a long time.
Replacing fuses
Watch this video on YouTube
Before replacing an element, it is necessary to eliminate the cause of its failure. Do not use fuses of a different rating. The calculated current strength for each circuit can be found in the assignment table located above in the article.
The protective device may fail due to long periods of use, so if any consumer stops working, the first thing to check is its fuse.
They are held in their nests by sliding contacts. In order to remove the element, simply pull it out of the socket. To make this more convenient, modern mounting blocks are equipped with plastic tweezers.
A faulty fuse can be determined by visual inspection or using an ohmmeter. Since the housings are made of transparent plastic, the integrity of the conductor is easy to determine with the naked eye. In addition, conductor burnout is accompanied by an increase in temperature. Traces of heat exposure remain on the plastic case. Having selected an element suitable for its nominal value, it is inserted into the socket in place of the failed one.
If a fuse burns out on the road, you can replace it with an identical one that protects the circuit of the consumer that is not currently in use.
More information about Chevrolet Niva electronics can be found here.
Where is the fuel pump relay on a Niva Chevrolet: photo of where it is located
Failures that are somehow related to electronics on cars are quite common. And finding the cause of its occurrence is sometimes not easy. One of the most common problems is a faulty fuel pump. The main reason for the breakdown is the breakdown of the pump itself, clogged filters, breakage, fraying of the power wires or failure of the control relay.
Video with the location of the fuel pump on a Niva Chevrolet:
Relay - what is it?
And if all the reasons seem to be easy to diagnose, then a relay malfunction most often remains a mystery to car enthusiasts, because few people have any idea about its location and functions. Below we will tell you about why this device is needed and how to replace it.
A relay is a special electromagnetic switch that operates when there is a sudden change in current or voltage in the circuit. Simply put, the device closes the circuit when voltage is applied to it in the form of a special signal and breaks it when there is no voltage.
Relay design
Relays in a car come in different types, shapes and with different numbers of contacts, but their functions and design are generally identical. Inside it is a coil of copper wire, a return spring, contacts and an armature. All these elements are collected in a certain sequence. The relay for the fuel pump is clearly visible in the photo below:
The relay has a value of 30 Amps.
Operating principle
Since the fuel pump relay is designed only for an injection engine, it is powered from a 12 volt . And after the key has been turned in the ignition, the relay closes the circuit, activating the contacts on the fuel pump, and turning it on. The buzzing sound that occurs after turning the key is the correct operation of the pump.
Where to find the fuel pump relay on a Chevrolet Niva
The block with the fuel pump relay is located directly under the glove compartment.
To understand where the relay is located, you need to know a little about the design of the car. On the right side of the dash, just under the glove compartment, is the first part of the car's accessible electronics, and the second part is right on the driver's side. The device we need is located in the second part, right under the cover of which there are four relays. It is not difficult to find the one that is responsible for the operation of the gas pump; its number is “3” . In order to better identify it, next to it you can see a fuse with a rating of 15 Amperes , which is responsible for the safety of the fuel supply circuit.
The location of the relay is clearly visible in the photo.
Two types of fuel pressure regulators
On Chevrolet Niva cars until 2009, the RTD was installed on the fuel rail. A pressure fuel line from a fuel pump was connected to the RTD housing. Excess fuel was returned to the gas tank through the drain pipeline, in common parlance “return”. Also, a vacuum supply tube from the intake manifold was connected to a separate housing pipe.
Cars produced after 2009 are equipped with a fuel module, which contains a coarse fuel filter, a turbine electric fuel pump with a control relay, a fuel level sensor and a fuel pressure regulator. Thus, the modern RTD has turned into a conventional overflow valve, which has simplified its design and increased the reliability of the power system as a whole. The function of determining the required instant amount of fuel was taken over by the ECU unit, summing up the readings of the throttle position and mass air flow sensors and controlling the injectors. In the electronic part of the ECU there has been a transition from a processor (controller) of type “7.0” to “7.9.7”.
Important! Controllers "7.0" and "7.9.7" are not interchangeable. RTD malfunctions are usually caused by the fact that the spring acting on the valve “sags”; its force gradually decreases as a result of prolonged variable loads
The valve no longer fits so tightly to the seat, as a result, a significant portion of the fuel enters the “return”, the pressure in the ramp decreases even with a short stop of the engine. When you press the throttle pedal, the engine does not have enough fuel, which causes “dips” instead of increasing speed, especially during acceleration and transient conditions
RTD malfunctions are usually caused by the fact that the spring acting on the valve “sags”; its force gradually decreases as a result of prolonged variable loads. The valve no longer fits so tightly to the seat, as a result, a significant portion of the fuel enters the “return”, the pressure in the ramp decreases even with a short stop of the engine. When you press the throttle pedal, the engine does not have enough fuel, which causes “dips” instead of increasing speed, especially during acceleration and transient conditions.
About malfunctions
Characteristic signs of a faulty RTD:
- Unstable operation of the engine at idle, the engine starts with difficulty and the first minutes after starting it “troubles”;
- Due to the unevenly enriched fuel-air mixture entering the cylinders, the crankshaft speed “floats” at idle;
- The engine “does not pull” and “stalls”, that is, it does not develop its former power and loses throttle response;
- When driving, jerks and twitches are felt, slow reactions to pressing the throttle pedal;
- Fuel consumption increases, the content of CO and CH in the exhaust gases increases.
Please note that any of these problems may not be caused by the pressure regulator, but by problems with something else. https://www.youtube.com/embed/IwmEVn255NI
Self-diagnosis
It should be noted that most of the symptoms of a faulty RTD are the same or very similar to problems with the electric fuel pump or injectors.
When the regulator is located in the fuel rail, to check it you should:
Unscrew the control valve plug from the end of the ramp, in which a regular spool is located, like in the wheels of a car. There is a sealing ring located in the internal thread of the plug, the condition of which must also be checked and, if necessary, the ring or plug assembly must be replaced;
Using a metal cap from the wheel “pipe”, unscrew the spool from the control valve and screw the hose of a conventional compression gauge onto the valve, having first unscrewed the adapter with the spark plug thread; Start the engine at idle speed and use a compression gauge to determine the pressure in the fuel rail. If the fuel pump is working properly, the device will show 2.8…3.0 kg/cm2. If you use pliers (carefully!) to pinch the return hose, the pressure should increase to 5.0...6.0 kg/cm2. Turn off the engine. Observing the readings of the compression meter, make sure that the residual pressure in the ramp remains within 2.8 ... 3.0 for a sufficiently long time, at least 10-15 minutes. If so, your fuel pressure regulator and fuel pump are working properly. If, when the return line was clamped, the pressure in the rail did not rise or rose only slightly, the fuel pump is faulty
If the pressure in the ramp decreases quickly, the RTD is faulty. Remove the compression gauge, screw in the spool, screw in and carefully tighten the control valve plug.
Relay diagnostic methods
In order to understand whether the device is working properly, you can use two proven methods:
First way
It consists of replacing a faulty relay with a known good one. After this, check the above fuse for integrity. If after such a check, the fuel supply is restored and the engine starts, then the work can be considered completed.
Second way
If you don’t have a new relay at hand, you can carry out diagnostics using a small piece of wire. A wire with even a small cross-section is suitable for this, since the current in this circuit is small. So, in order to diagnose the relay, it is necessary to close contacts “30” and “87” on the relay with a wire. Their location can be easily determined by visual inspection of the device.
These contacts should be closed with wire.
After the contacts are closed, you need to turn on the ignition and check the operation of the pump. If after such work the pump starts working, then it is necessary to replace the relay, because its operation with a jumper is prohibited.
It would also be useful to check the power contacts from the injector directly to the battery, because this system is powered directly by the battery and there may be abrasions and breaks on it.
What to do if the options don't work?
It happens that after all the manipulations the pump still does not work and then it is necessary to pay attention to the wiring and the condition of the pump as a whole.
If the two methods described above did not in any way affect the performance of the fuel system, then most likely the fuel pump itself has failed. You can diagnose its condition using a voltmeter by checking the voltage on the contacts, and if it is present, then this will only indicate the replacement of the unit, but if it is absent, then there is a break or short circuit in the wire.
It is visible to the naked eye that the contacts are melted and need to be replaced.
Replacement
Before replacing, it is necessary to identify the cause of the burnout. It is not recommended to install any jumpers in its place, as this can lead to damage to electronic devices or a short circuit that can cause a fire.
And so, in order to change a burnt-out element, you need to do the following:
- Unscrew the screws that secure the block cover
- Remove the cover
- It contains special pliers with which we remove the required fuse.
- We replace it with a new one
If you need to dismantle the entire block, you need to unscrew the screws that hold it and use a screwdriver to separate the pads.
Quite often, the Chevrolet Shiva fuel pump fuse, which is located near the large fifty-amp relay, fails. The location can be seen in more detail in the picture below.
To summarize, we can conclude that before making a replacement, you first need to understand why it burned out. To do this, it is enough to ring the entire circuit, and if the fuel pump does not work, check what condition it is in, and only then replace it with a similar one
Where is the Niva Chevrolet fuel pump relay located?
One of the most common cases, most disliked by car owners, is the situation when the car does not start at the most inopportune moment.
The cause may be a breakdown of the fuel pump, however, in order to try to fully implement a set of diagnostic measures, quickly find and fix the malfunction, it is advisable for the car owner to know where the Niva Chevrolet fuel pump relay is located. The fuel pump relay is a very important part; some experts call it one of the key parts in the fuel system of a car. There is a great deal of truth in this statement, because this element, in essence, is a kind of key, a switching device, without which your engine simply will not start.
Like any relay, it works on the principle of closing-opening an electrical circuit under the influence of an electromagnetic field, and turns on when voltage is applied to the contacts. In addition, it serves to enhance the impulse supplied to the fuel supply system.
Finding a Niva Chevrolet fuel pump relay is not so difficult. It is located in the relay box located under the glove compartment on the right side. Opening the cover, you can see four switching devices. One of them, the third from the left, is the fuel pump relay, which is located near the 15-amp fuse, which is responsible for the safety of the entire electrical circuit of the system. This arrangement was made for the convenience of users so that they can have unhindered access to the device.
The design of the fuel pump relay is fundamentally no different from many similar devices. It consists of a coil of copper wire, contacts, a return spring and an armature. The relay is powered by a voltage of 12 volts, and switching occurs after the key is turned in the ignition switch. The pulse activates the contacts, they close, and power is supplied to the fuel pump. It is at this moment that we usually begin to hear a characteristic buzzing sound, indicating that the fuel supply system has started and is working normally, which means there will definitely be no problems with this.
If there is a suspicion of a relay malfunction, prompt diagnosis should be carried out. There are two main ways:
- replacing the “suspect” fuel pump relay with a working one;
- check with a piece of wire.
In the first case, provided that the fuse is intact, when starting the car after turning the key in the ignition switch, the diagnosis can be considered complete, because this means that all other devices are working normally.
If a working “replacement” relay is not available, a piece of conductor will do. With its bare ends you need to close the contacts numbered “30” and “87” (they are not difficult to find). After the contacts are closed, you need to turn the key in the ignition switch. If the engine starts, it means that the relay requires replacement, because operating a car with a jumper installed directly past the relay is strictly prohibited.
It is important to remember that if, with both options for checking the functionality of the relay, the engine still does not start, you should look for the cause of the malfunction further along the circuit. Perhaps the hose is clogged, or the fuel pump itself is faulty, but the problem here, as you can understand, is no longer in the relay.
To summarize, it is worth noting that the failure of the fuel pump relay is not such a common reason that the engine does not start, because the device is structurally simple and quite reliable in operation. At the same time, taking into account the diagnostic features discussed above, experienced car enthusiasts recommend constantly carrying a spare relay with them, so that at the most inopportune moment you do not have to walk to the nearest spare parts store or service station.
Signs of malfunction.
First of all, you need to try turning the ignition key and listen to whether the pump starts pumping fuel. If it is working properly, then when you turn the key you should hear a characteristic buzzing sound from the trunk. If there is a malfunction, the motor is silent and does not create the pressure in the system necessary for operation.
You can try to revive a faulty fuel pump. First of all, you need to remove the terminal from the battery. In some cases, the problem may be caused by a fault in the electronic control unit and a system reset will help get it working.
But such a development of events is quite rare. In most cases, resetting a terminal does not produce the desired results. And then you need to look for a fault. First you need to check the pump terminals. To do this, you will need a tester or test lamp. To check the fuel pump, you need to connect one probe of the tester to the car body - ground, and attach it to the terminals of the fuel pump. If the tester shows voltage, the pump is faulty and needs to be replaced. If there is no voltage, you need to look for a problem in the car's electrical wiring.
Relay for controlling the fuel supply system to the Chevrolet Niva engine
There are often breakdowns in cars related to electronics. And sometimes it is very difficult to detect the cause of a malfunction. A common cause of breakdowns on the Chevrolet Niva are breakdowns associated with the fuel pump. The main problems of failure of the engine fuel supply system are: breakdown of the fuel pump itself, clogged filter, breakage of supply wires, damage to tubes, failure of fuses or breakdown of the fuel pump control relay. The last reason, although not common, always remains a mystery to most drivers. This part performs electronic functions, and electronics in a car are a dark forest for the average driver. “It’s much easier to rebuild an engine than to delve into the brains of a car,” many drivers would say. In order to clarify the picture of the need for a relay in a Chevrolet Niva, let’s take a closer look at what it consists of and what functions it performs.
Video instructions for replacement:
Electronics-related breakdowns are common in cars. For an inexperienced driver, this is a dark forest, because for most it is much easier to deal with a mechanical breakdown than with the so-called brains of the car. One of the most common breakdowns in a Niva Chevrolet car is a problem with the fuel pump relay.
You should be aware that the following factors can cause fuel pump failure:
- clogging in the filter;
- broken wires;
- damage to tubes;
- failure of fuses;
- breakdown of the fuel pump itself.
Due to the above, before fixing a broken relay, you should be sure that it is the problem. How to determine this will be discussed below.
What is a relay
A relay is called an electromagnetic switch, which is designed for switching during abrupt changes in the input value (current, voltage) in electrical circuits. In simple terms, it is a device that turns on when a voltage signal is applied to it, and turns off when the voltage disappears. The current that switches the device is very low, and to start the fuel pump a large current is required. Therefore, it is also called a kind of amplifier.
What does it consist of?
There are different numbers of relays, but almost all of them perform similar functions. This device consists of a contact group, which we can see by removing it from the block. Inside it there is a coil with a certain number of turns of copper wire, a return spring and an armature. All this is assembled in a certain sequence and located on the board. A photo of the contact group and the shape of the relay can be seen below, or you can enter it in a search engine and see all the types and types. We are interested in the Chevrolet Niva fuel pump relay, which looks like this.
Relay operating principle. The fuel pump relay is used only in engines with injection type. Carburetor engines use a mechanical fuel pump. The Niva (injection) car uses a 12V electric fuel pump. The electrical circuit of its operation includes power wires, a fuse, a relay, as well as fuel reading sensors in the tank. Thus, when you turn the car key, power is automatically supplied to the relay. It, in turn, operates instantly and closes the contacts that power the pump. This is how the fuel pump turns on briefly, as a result of which, when we sit behind the wheel and turn the key, we hear its buzzing, indicating its operation.
Location in Niva
On the right side under the glove compartment there is a cover, and under it there is part of the electronics of the Niva car, the second part is under the dashboard on the driver’s side. Under this cover you can see the location of four relays. The device that is responsible for turning on the fuel pump and its operation is located under the third number. Next to it is a 15A fuse, which is designed to protect the circuit and electrical components of the fuel pump.
Front Wiring Diagram Harness
This highway is simpler - it is responsible for the operation of external devices and sensors. The harness comes out of the body and is divided into two cores:
- The left one connects to the “plus” of the battery, the generator and sends wires to the left headlights, sound signal, and outside temperature sensor.
- The right wire goes to the wiper motor, brake fluid level sensor, engine compartment button and lamp, windshield washer and right headlights.
The diagram of the front harness is indicated in the figure below, the core is marked in red.
Where is the Niva Chevrolet fuel pump relay located: photos and videos
We check it, if it’s working, let’s go.
Niva Chevrolet fuel pump relay where is the photo located
If it burns out, we replace it with a new copy. Checking the Niva Chevrolet fuel pump relay Sometimes the fuse is not firmly in its seat, although it is intact and in good working order, but in this case it will not work. Then we move on to the relay.
If you hear the relay clicking when you start the engine, it means it is more likely to be working properly. Otherwise, the mechanism must be checked and changed.
But, before changing the relay, check the wiring. Maybe there was a break somewhere or the contact was oxidized? It is at this moment that we usually begin to hear a characteristic buzzing sound, indicating that the fuel supply system has started working and is working normally, which means there are definitely no problems with this.
Where is the fuel pump relay on a Niva Chevrolet: photo of where it is located
If there is a suspicion of a relay malfunction, prompt diagnosis should be carried out. There are two main methods: In the first case, where the Chevrolet Niva fuel pump relay is installed, provided the fuse is intact, when you start the car after turning the key in the ignition, the diagnosis can be considered complete, because this means that all other devices are working normally.
The principle of operation of the fuel pump
The operation of the pump is controlled by a controller. At the same time, its control scheme is quite interesting. There is no pressure sensor in the car system, and therefore it is maintained by a pressure regulator. It is located near the pump in the tank.
New and old fuel pressure regulator
The regulator has a valve that can open only at a certain moment, namely when there is sufficient pressure in the system (4 Bar).
In this case, fuel will not flow into the return line either. When the ignition is turned on, the pump begins to pump fuel into the system, after which the regulator valve opens and remains in this position throughout the engine operation.

