How to remove the engine from a car in the garage without resorting to the help of a car service
In fact, this is not such a complicated procedure as it might seem at first glance. The main task is to select tools for removing the motor.
Important! The engine weighs several hundred kilograms. Falling it can not only cause property damage, but also lead to serious injuries. Before lifting the engine from the engine compartment, the following procedures must be carried out:
Before lifting the engine from the engine compartment, it is necessary to carry out the following procedures:
- Drain all technical fluids: oil, power steering fluid, brake fluid.
- Free the cooling system from antifreeze.
- Drain the gearbox (except when you remove the engine without removing the gearbox).
- Disconnect all hoses and pipes of the fuel, brake, lubrication and cooling systems.
- If possible, remove attachments: air conditioning compressor, generator, etc.
- Disconnect electrical cables, engine control unit, injector control cables, high-voltage ignition coil wires.
- Remove the connectors from all motor sensors. It is recommended to make a list (“based on” the maintenance and repair instructions), this will help you not to miss a hidden connector.
- In most cases, you will need to remove the hood cover.
If you plan to remove the engine without the transmission, you need to unscrew all the tightening bolts and make sure that after removal the gearbox will not fall under the car. That is, you need to take care of temporarily securing the unit.
The procedure for adjusting valves VAZ 2101-2107
First we prepare the car:
- wait until the engine cools down if it was running;
- park the car on level ground;
Valve adjustment procedure:
- Remove the air filter cover and the filter itself.
- Disconnect the filter mounting tubes and remove the mount.
- Remove the air damper control cable (choke).
- Remove the throttle linkage.
- Unscrew the nuts securing the valve cover and remove it.
- Before adjusting the valves, immediately check how the chain is tensioned. If the tension is not normal, you will have to do the work again.
- Remove the distributor cover.
- We install the piston in the 4th cylinder at top dead center (TDC). TDCs are set using marks on the engine crankshaft pulley and the camshaft drive cover, and marks are also placed on the camshaft gears and camshaft cover.
The mark is set with a special wrench for the engine crankshaft pulley bolt.
If you don’t have a key, you can set the 4th piston to TDC by rotating one of the rear wheels. Raise one side with a jack and place the gear shift lever in 4th gear to make it easier to turn and turn the wheel slowly. When setting marks without a key, you will need an assistant to look at the marks.
- When the marks on the camshaft and the camshaft cover are aligned, check that the marks on the crankshaft are also aligned. You can also check whether the marks on the distributor slider match. The contact terminal should be directed to the high voltage wire terminal of the fourth cylinder. We have already discussed how to determine whether ignition is early or late in another article.
- After the marks match, we proceed to adjusting the valve clearances.
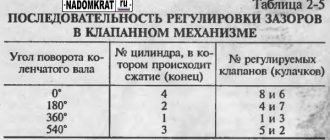
The correct procedure for adjusting the valve mechanism of the VAZ “Classic” 2101-2107. Crank angle Adjustable valves 8 and 6 180 4 and 7 360 1 and 3 540 5 and 2 From the table we see that if the 4th piston is set to top dead center, then we measure and adjust the 6th and 8th valves.
- We find the 8th valve. The countdown comes from the side of the bumper, the eighth will be the first from the interior.
- We insert a dipstick between the rocker and the camshaft cam. Normal clearance is the passage of the feeler gauge with little noticeable resistance.
If a special plate probe with a thickness of 0.15 passes easily or with great effort, then it needs to be adjusted.
- On the side of the rocker there is a nut screwed onto a bolt with a 13 mm head. This bolt sets the gap, and the nut protects against unscrewing. To increase or decrease the gap, loosen the wrench nut by 17 while holding the bolt. When the bolt is loosened, rotate it and change the gap.
When the required gap has been set, we begin tightening. After tightening, you need to check again, perhaps the bolt has turned a little and changed the gap.
- Next, we do the same with the 6th valve.
- When a pair of valves 8 and 6 were adjusted. We proceed, according to the table, to setting the gaps of the 4th and 7th valves. But, before you start adjusting valves 4 and 7, you need to rotate the crankshaft 180 degrees. After turning the crankshaft of the internal combustion engine 180 degrees, the piston of the 3rd cylinder will be set to TDC. The angle of rotation when setting the third piston to the top dead position is inconvenient to set. For convenience, we use a marker or felt-tip pen.
If the internal combustion engine crankshaft rotates 180 degrees, the distributor slider will rotate 90 degrees. This means that you can use a distributor and a slider to set the 3rd piston to TDC, making marks on the body with a marker: we mark where the contact is now, and mark where it should be strictly after 90 degrees.
- After adjusting the valves of the 3rd cylinder of classic VAZ cars, use a distributor to set the piston of the 1st cylinder by turning the crankshaft another 180 degrees, adjust valves 1 and 3 in the same way. Then, we also set the piston of the 2nd cylinder to TDC and adjust the last valves 5 and 2.
Removing an injection engine from a car without disassembling
To remove the injection engine from the car, you need a lifting device with a lifting capacity of at least 300 kg and slings (chain)
Installing an injection engine on a car
Installing the engine and all removed parts is performed in the reverse order
On these machines, VAZ 2101 to 2107, the principle of engine removal is the same. If you decide to remove the engine yourself at home, without any equipment, and don’t know how to do it correctly, then this article is for you.
The engine has to be removed to overhaul it, or to replace it with another engine.
You look at the engine and the first feeling is that it is difficult to remove the engine from the car, but in fact everything is very simple, two men can easily remove the engine themselves at home and also put it in place. I will give an example of removing an engine from a VAZ 2106, although this principle is suitable for VAZ2101 to 2107.
The engine can be removed entirely, but this is much more difficult, or you can remove it without the head, this is much easier. If you decide to repair the engine yourself, then the second option is preferable, since you have to disassemble the engine anyway and why drag out the extra weight. I will describe the removal of the engine with its partial disassembly, in the engine compartment of the car.
The reason for removing the engine was that the splines on the oil pump drive gears on this six were torn off, and the driver drove on without oil pressure, and the engine jammed.
What is needed for repair
First of all, worn out sliding bearings under the crankshaft supports and piston rings (compression and oil scraper) need to be replaced. You need gaskets (for the cylinder head and others) and seals - installing old ones with new working dimensions can lead to the formation of gaps through which oil and antifreeze will leak.
Consumables necessary for major repairs.
You also need to purchase rollers and a belt for the belt drive. If the drive is chain, you need to check the chain.
Temperature and pressure sensors in the lubrication system need to be replaced.
We need filters (air, oil filter and others), new oil and antifreeze.
The list of what is needed to repair an engine on a VAZ 2107 also includes all consumables and fastening elements. For example, sealant or retaining rings. The need for them arises during the repair process and cannot be determined in advance.
Removing the engine, VOLGA AVTOMOTIV-TOMIX
The engine is removed from the car upwards. To remove the engine, a lifting device with a lifting capacity of at least 300 kg is required. The car must be installed on a lift, inspection ditch or overpass. Before removing the engine, it is necessary to prepare a reliable stand on which the engine must stand steadily. It is easier to remove the engine if you remove the hood.
Before disconnecting hoses and electrical wires, we recommend that you mark them so as not to mix them up during assembly.
1. Disconnect the fuel supply and drain lines.
2. Remove the battery.
3. Remove the hood.
4. Remove the engine splash guard.
5. Drain the engine cooling system.
6. Drain the oil from the engine crankcase.
7. Remove the radiator of the cooling system with the electric fan and fan shroud.
8. Disconnect the wire terminals from the ignition coils. Remove the ignition coils.
9. Disconnect the phase sensor connector from the wiring harness.
10. Remove the screws and disconnect the wires from the oil pressure indicator 1 and emergency oil pressure 2 sensors. Loosen the clamp and remove hose 3 to the expansion tank from the thermostat fitting.
11. Disconnect the connectors from the engine temperature sensors 3, coolant temperature indicator 2, coolant overheat indicator 1.
12. Loosen the tightening of clamp 1 and remove hose 2 from the fitting to the check valve of the vacuum brake booster. Disconnect connector 3 from the throttle position sensor. Loosen the clamp and disconnect pipe 4 of the air supply from the throttle assembly. Move the pipe along with the mass air flow sensor to the side.
13. Unscrew the nut and remove the blue ground wire 2 from the stud at the front end of the receiver. Unscrew nut 1 and remove accelerator cable 3 from sector 4 of the air throttle valve drive.
Warning and indicators
The first thing you should pay attention to when there is a need for engine repair is the condition of the oil in the crankcase (color, turbidity and level). Motor oil in the engine lubrication system is the main indicator of the condition of the connections of engine parts.
Cloudy engine oil.
Cloudiness of the oil indicates the presence of running-in parts, blackening indicates possible overheating or a flame breakthrough from the combustion chamber into the crankcase. A decrease in level may indicate leaks or friction wear in overtightened joints.
Checking the oil level is carried out on a cold engine when the car is installed on a flat horizontal surface.
It is also necessary to check the level of antifreeze in the expansion tank. If the level drops, this may indicate overheating or a leak in the cooling system. If the level rises, then we can talk about problems with the thermostat - a device that, depending on the temperature of the coolant, regulates the speed of its movement in the cooling system.
Other malfunctions of the VAZ 2107 engine and their characteristic manifestations can be found in special literature and engine repair instructions.
Causes
There are several most common reasons why a car owner has to remove the engine from his car.
| Cause | Peculiarities |
| Major renovation | In the event of a serious accident or as a result of wear of key engine elements, it will not be possible to restore its functionality without a removal procedure. Therefore, they resort to dismantling the engine |
| Replacement | It’s not uncommon for VAZ 2109 owners to think about replacing the standard factory engine with a more efficient, powerful power unit. This is a serious step, where dismantling is one of the initial stages |
| Finalization | If there is no opportunity or desire to change the engine, some simply modify the existing one. Tuning can be quite complex, involving the need to completely remove the engine from the engine compartment |
Regardless of the reasons, you need to remove the engine carefully, following a clear sequence of your actions. Decide in advance whether you will dismantle the engine together with the gearbox or without removing it.
Characteristic
The VAZ 2107 “Classic” is equipped with a four-stroke in-line engine with four cylinders. The engine, depending on the modification, can be made with a central mixing injection system (carburetor) or with a distributed injection system (injector). Depending on the modification, it can also develop from 68 to 74 horsepower.
Car engine maintenance must be carried out in accordance with the manufacturer's instructions, adjusted for operating conditions.
Lada 2107 is a rear-wheel drive car. The connection between the engine and the variable gearbox is made longitudinally. This design can cause difficulties when completely dismantling the motor. Almost the entire internal engine compartment space is used to house the engine, air filter and auxiliary systems. This also causes difficulties during repairs.
Special tool car-tool.
The need for engine repair can be caused by a number of reasons:
- terms of Use;
- planned wear of parts;
- engine diagnostics;
- unscheduled breakdowns;
- accidents and others.
The car was produced for about forty years. Due to the outdated design, there may be incompatibility with a number of tools. In addition, complete engine overhauls are performed exclusively in private repair shops.
This increases the cost of work so much that it may be easier to buy a new motor. If the damage is minor and can be fixed without complex procedures, or if it is possible to perform a partial overhaul, it is better to do everything yourself
Removal from gearbox
Follow the instructions clearly, be sure to watch the video tutorials. Plus, don't forget to check the condition of all engine mounts, since you'll probably be reassembling it again. All damaged elements will have to be replaced without fail.
- First, disconnect the battery to completely cut off the power to the car.
- Drain the oil from the engine crankcase. Here it is better for the engine to be warm. This will allow the oil to drain out faster.
- Drain the coolant from the cooling system. A cold motor is already required here. Be careful.
- To disconnect the exhaust systems, you will have to completely remove the engine crankcase protection and dismantle the exhaust pipe.
- Remove the air filter housing, and then disconnect all hoses from the engine, power wiring, sensors, damper rods, and brake system vacuum hoses.
- Unscrew the fastening nut of the ground wire, put on the stud and located on the clutch housing.
- Disconnect the cooling system pipes and turn off the thermostat.
- Disconnect the central high voltage from the ignition distributor. After this, you can release the clamp of the block with the supply wiring and remove the entire block.
- Disconnect the fuel supply hoses from the fuel pump. To do this, just loosen the fastening clamp.
- Unscrew the adjusting nuts to remove the drive cable from the clutch lever.
- Disconnect the power supply wires from the starter - one wire from the battery going to the solenoid relay and the wiring block.
- Switch off the generator in the same way.
- Deprive power by disconnecting the corresponding wires from the coolant temperature sensor and oil pressure sensor.
- Disconnect a pair of pipes from the radiator for the car interior. Loosen the clamps, which will allow you to remove the elements.
- We go directly under the car. Here it is better to have a pit or overpass available, otherwise it is inconvenient and unsafe to remove the engine while lying down.
- Unscrew the fastening nuts of the drive rod from the tip of the gearbox shift joint. The speedometer drive rod and the reverse sensor are also disconnected here. You need to disconnect the power wires.
- Disconnect both guy wires, right and left. Before this, you need to loosen the clamp of the tensioner fastening nut to the suspension arm on both sides. Next, unscrew the three bolts of the bracket to the car body. It is not necessary to remove them completely, but just move them to the side. This way they will not interfere with further processes.
- The next step is to disconnect the tie rods. To achieve the desired result, remove the cotter pin and unscrew the nut. Next, armed with a special puller, press the pin out of the swing arm.
- We perform the same actions with the ball joint, which will need to be similarly disconnected from the lever.
- Using a pry bar, pull out the upper tail of the front wheel drive and move it slightly to the side. Don't forget to insert a technological plug in place of this tail. A plug from an old grenade will suit you just fine, if you have one available.
- Now comes the stage of directly dismantling the power unit itself.
- Securely secure the motor by tying it by the eyelets using a strong rope or metal wire. Rym translated from Dutch “ring” means ring. That is, instead of a head, the eye bolt and eye nut end in a ring. And the eye bolt and eye nut are intended for gripping and moving machines, parts, as well as during installation, disassembly, loading, etc.
Step-by-step instructions for disassembling the internal combustion engine of a car + Video
- Prepare all the necessary tools and drain the oil from the crankcase.
- Firstly, this will be necessary to lighten the weight of the motor, and secondly, it will help to avoid excess dirt on the workbench. Next, unscrew the oil filter. Also unscrew all the bolts that secure the oil pan. The old gasket can be thrown away as it is no longer suitable for further use.
- Now you need to remove the crankshaft pulley. This is not as easy to do as it seems at first glance, since in this case you will need good physical strength. However, no one has canceled the use of a pipe as a wrench extension. Secure the crankshaft from turning by blocking the flywheel. For this, a special device is used, which can be purchased in the store. Next, use a wrench to unscrew the ratchet and remove the pulley.
- Unscrew the nuts securing the valve covers and timing chain, remove it and pull out the gasket. Unscrew the bolts securing the camshaft gears, as well as the shaft that drives the engine oil pump. Next in line is the timing chain tensioner. First, loosen the special cap nut, and then unscrew the other two nuts that secure it to the cylinder head. Do not forget to unscrew the bolt securing the shoe, and then remove the tensioner itself, along with the shoe. Then the pin that restricts the chain is unscrewed, the camshaft and oil pump gears are removed, and the chain is removed.
- Now you need to remove the camshaft. To do this, unscrew two nuts located on its studs in the bearing housing. The housing must be removed and the camshaft carefully pulled out. Before pulling it out, do not forget to also remove the special thrust flange.
- Next, the bolts intended to secure the cylinder head to the block itself are unscrewed. The cylinder head is dismantled immediately along with the manifolds, which are not required to be removed (depending on the type of repair being carried out). After removing the head, it is also recommended to replace the gasket. This procedure will help you, in the future, get rid of repeated removal of this element.
- After this, you need to dismantle the oil pump. To pull it out you need to remove the special thrust flange. After this, remove the roller from the cylinder block, which is responsible for driving the oil pump.
- Using a special removable device, remove the gear that fits onto the engine crankshaft. Then remove the nuts located on the connecting rod bolts. Now remove the connecting rod caps and, using the cylindrical opening, pull out the connecting rods along with the pistons.
Attention! Before removing the connecting rods and pistons, as well as the main bearings and liners, you must first mark them all to prevent errors when assembling the element.
- We return to the flywheel retainer again and install it. Unscrew the bolts that are intended for fastening and remove the washer, then pull out the flywheel mounted on the crankshaft, and then remove the protective cover of the clutch housing.
- Using a puller, remove the gearbox input shaft bearing, which is located in a special socket at the rear of the power unit. Next you need to pull out the special crankshaft oil seal holder. Now unscrew the bolts that secure the caps covering the main bearings and pull them out along with the liners. After this, you need to remove the crankshaft and the uppermost shaft bearings. Also remove the special thrust half-rings that are located on the support.
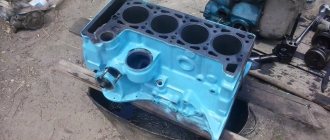
That's all you need to do to disassemble the engine. The next step is to bore various elements to repair sizes and replace damaged and worn elements. It is recommended to pay special attention to the liners, which are most often subject to rotation, which is why the motor simply jams. After repair, the engine is assembled and installed on the car.
How to remove an engine from a car
At home, there is usually no professional lifting equipment, so you will have to rent it or make it yourself.
Do-it-yourself goose for removing the engine
This is a simple mechanism that resembles a gooseneck. It makes it possible to move the engine away from the engine compartment. It may have a rotating design that allows you to remove the engine without moving the machine.
The heavy internal combustion engine is simply transferred to a workbench located next to the car. In fact, it is a universal garage crane. The rack rests on long “legs” located under the engine compartment to prevent it from tipping over. A cable and a winch are used for lifting.
The gander is used both in garage conditions and in small services.
DIY engine removal lift
As a rule, this is a rolling crane, the lower part of which is placed under the front bumper. A smooth platform is required; on uneven ground, removing the engine using such a device is problematic. The lift operates using hydraulics or a tensioning mechanism like a winch. The device is simple: a stand with rolling supports, and a movable boom on which the motor is suspended. You can make a lift with your own hands from a channel or a square professional. pipes.
If there are strong wheels on supporting legs, you can quickly roll out the lift with the motor and move it to the repair area.
What engines can be installed on the VAZ “classic”
The VAZ 2107 is certainly considered a classic of the domestic automotive industry. Therefore, the same rules apply for this model as for the entire “classic” AvtoVAZ line.
Two engines can be considered the best options for the “seven”:
- from Lada Priora;
- from VAZ 2112.
These 16-valve engines have virtually identical mountings and require very little modification for installation.
In addition (which is also important), the current gearbox from the VAZ 2107 is quite suitable for these engines, thereby saving the driver time on installing the gearbox
It is advisable to take the power unit from later VAZ models from 2112 or Priora
Without removing the gearbox
In short, it is quite possible to remove the engine from your “nine” without removing the gearbox. To do this you will have to follow these steps:
- Place bricks or other reliable supports under the gearbox;
- Unscrew the left crab, move the stretcher aside;
- Remove the generator, crankshaft pulley, and camshaft gear from the engine;
- The pump, tensioner pin, distributor, and exhaust pipe are also dismantled;
- If a major overhaul is planned, then you can also remove the head;
- Then the engine mount is removed;
- The motor is moved from the box and lowered to the floor. To remove the engine, the front part is raised higher using a jack and the volume is removed;
- Or you can pull it out through the top using a winch.
In practice, all experts recommend dismantling the engine along with the gearbox. Especially if you plan to replace the engine or increase the power of the standard engine. In this situation, the box itself is often changed so that it can clearly interact with the new motor.
Gearbox from nine
Major repairs yourself
Before proceeding with a major overhaul of the VAZ 2107 engine, it is strongly recommended that you familiarize yourself with special literature in order to better understand the procedures being performed.
Upon completion of the repair, the vehicle must be run in to break in all parts. Typically, break-in occurs within the first 5,000 kilometers.
Engine prepared for major overhaul.
Before disassembling, the engine oil must be drained. To do this, warm up the engine to approximately operating temperature and turn it off. If there is a ditch, then the car is driven into it.
If it is not possible to drive into a ditch, you must park the car on a flat surface.
Place a 10-liter container made of heat-resistant material under the oil drain hole. Unscrew the plug and drain the oil.
After this, drain the antifreeze from the cooling system through the drain hole at the bottom of the engine cooling radiator.
IMPORTANT!
The oil can reach temperatures of about 100 degrees. If you try to start the car with the oil and antifreeze drained, the engine will completely fail.
When all the working fluids have been drained, unscrew all the supports and disconnect the bolted connections of the flywheel to the gearbox. Using a winch, remove the engine from the hood space and install it on a stand for repair.
Disassembling the engine does not require a special approach: simply unscrewing the threaded connections.
Photo of the removed cylinder head.
Everything is removed: the cylinder head, electrical components, including the starter and generator, connecting rods, crankshaft, oil pump, and so on. The result should be a separately disassembled cylinder block and crankshaft. Removing the head and all elements is a simple procedure.
It will be difficult when assembling gas distribution and other engine mechanisms that require precise alignment of the position of the working parts. Installing the head will require compliance with the timing marks and other mechanisms.
The removed cylinder head and crankshaft, along with the purchased pistons, are taken to a grinding specialist. The specialist takes all measurements, including all crankshaft dimensions, for subsequent engine boring. Boring is necessary to compensate for wear of non-replaceable parts. The specialist bores the pistons already purchased to size.
Replacing the VAZ 2107 heater motor.
Hello. Over time, the grease in the bushings of the heater motor dries out, which causes creaking, whistling or howling. Or the stove stops blowing altogether due to the fact that the windings of the stove motor are burned out. In these cases, the VAZ 2107 heater motor is replaced and how to do this, read on. I do not recommend lubricating the bushings of the heater motor because... The effect will not last long, and the procedure for removing the motor is quite lengthy. It is better to replace it immediately, so as not to climb into the same place twice.
How to understand that it is the heater motor that is not working, and not a broken switch button or a blown fuse, read the article “The VAZ 2107 heater fan does not work”