Modern paintwork on a car body is very strong and durable. He is not afraid of temperature changes, rain and snow. The gloss does not fade or scratch for a long time. Unfortunately, operating conditions are very different. Harsh environmental conditions literally leave their mark on cars - branches and stones leave scratches on the varnish. And a lot of transported cargo contributes to the formation of abrasions.
Over time, moisture inevitably enters through scratches and abrasions and contributes to the development of rust with all the ensuing consequences. It is precisely for such cases that a special technology has been developed for coating the body with a special polyurethane composition, which is collectively called “Raptor”.
It received this common name thanks to the U-POL trademark, which produces elastic coatings with this name.
What is Raptor?
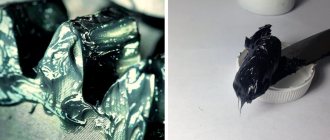
First you need to figure out what it is. Paint, or rather polyurea elastomer, is a specialized two-component organic polymer. Thanks to it, it is possible to obtain seamless, durable and at the same time elastic coatings on surfaces of any shape and curvature. Roughly speaking, paint coating is not, but rather, an elastic plastic that is sprayed and then hardens, having high adhesive and protective properties. Such properties have made polyurea ideal for industrial use in coatings that require high wear-resistant and protective properties. These coatings can be used in a wide range:
- construction;
- various engineering structures;
- energy and utilities.
Coating car body parts with this polymer is just one of the areas of its application.
Positive reviews of Raptor painting of trucks confirm these statements.
Why do they paint us with Raptor?
The key to achieving all the properties of the Raptor coating lies in the correct and thorough preparation of the surface. The surface to be painted must be cleaned of dirt and corrosion, thoroughly matted and etched with acid primer. That is why in our car service we approach the preparation process before painting with Raptor so carefully that for some car models we paint the body parts that have been removed. For example, we paint fenders and frames for UAZ separately from the body, and this also applies to the rear sides of a pickup truck.
It is necessary that the Raptor evenly covers the places where the wing and body meet. Also, for all cars, before preparation, external body elements are removed - door handles, headlights, decorative elements and windshields and rear windows.
Features of the Raptor coating
A special feature of polyurea elastomers is that they do not contain volatile solvents. This makes them non-toxic and non-flammable. They also do not contain carcinogenic resins and tar, which are harmful to the human body.
Another feature is the absence of plasticizers required for paint and varnish coatings in the polymer. Over time, they cause the coating to shrink as it dries. In other words, such a coating, in the absence of mechanical impact, will last forever, as reviews say. Also, one should not forget about exceptional strength and elasticity, moisture resistance and chemical inertness. All this suggests that we have a very promising and generally positive type of coating. It is no coincidence that the reviews about Raptor painting are the most positive. But our story does not end there.
Why paint cars with Raptor (Raptor U-Pol)
Regardless of what kind of car you have: used or just from the showroom, damage to the paintwork is perceived equally sadly. We offer to protect the body and paint the entire car with Raptor. According to the manufacturer U-Pol, the Raptor coating has additional anti-corrosion properties and the ability to reduce the impact of winter reagents and extreme temperatures. An important advantage is that this coating can significantly improve the appearance of a new car.
What is needed for painting with Raptor?
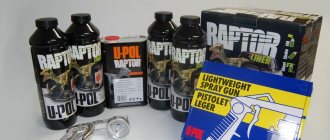
This polymer coating is sold in bottles with the base material, plus a container with a hardener. The kit also includes a special paint gun (sold separately). With its help you can adjust the degree of surface roughness. Naturally, there are packaging options in aerosol cans for local painting or for individual small elements. Specialized primers and cleaners are used to prepare the surface. They are also produced by U-POL and some other companies.
Packaging, colors, features
Raptor U-POL paint is sold in a variety of packaging - in spray cans, large cans, bulk cans, and barrels. They should be purchased based on the area to be painted. There are packages of 3 - 4 bottles, each of which includes 0.75 liters of paint, other packages contain 1 - 2 cans per 1 liter.
Complete set of Raptor U-POL: the actual coloring composition and hardener, which is required to fix the material. One bottle of hardener is enough for 10 - 12 square meters. m of cultivated area.
Some Raptor kits include a gun for applying paintwork (anti-gravel gun GUN/1), although it may not be used for work. A brush for processing the bottom and lower parts of the sides will have to be purchased additionally, as well as pigments for tinting.
Price
As for the cost, a painting kit (4 liters in volume), which includes 4 cans of starting material and a hardener, costs about 6 thousand rubles. To this you need to add a special spray gun (1,700 rubles).
It takes about three of these sets to repaint the entire car. To this amount (from 19,700 rubles) it will be necessary to add the cost of the work itself (the same amount). Of course, the figure turns out to be rather large. However, considering all the advantages of this technology, it is worth taking advantage of. Many people decide to undergo such a procedure as painting with “Raptor”. Reviews indicate that the coating perfectly protects the body from rust and scratches.
Paint price
The cost of a set of 4 750 ml jars of paint and hardener is about 6,000 rubles. The kit does not include a pistol, which is sold additionally (approximately 1,700 rubles). Sets with a pistol are sold for 7400 – 7700 rubles.
To paint a whole car (sedan) you need about 3 sets, you will have to pay for the work of a specialist (from 4000 for one part). If you paint it yourself, you can save costs at this point, but if you are not confident in the quality result, it is better to trust a professional.
Painting technology
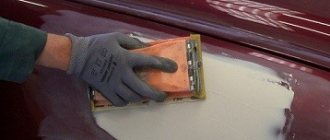
The technology itself is not too complicated, however, it requires preliminary preparation. If the entire body will be processed, then all attachments must be removed. These are bumpers, headlights, mirrors, door handles, etc. After this, the body is prepared - removing and cleaning rust. Exposed metal must be primed with a special primer. Dents, as usual, are straightened and puttied. After preparation, the entire surface is matted with sandpaper. The surface should be rough for better adhesion.
The paint material itself is mixed with a hardener in a ratio of 3 to 1 and applied using a paint gun, like regular paint. The first layer dries for an hour. Then a second one is applied, which requires polymerization for 5-7 days. You can start using the car within 12 hours. It is, of course, better to maintain a longer time interval to obtain optimal results.
Application methods
In fact, painting a car with Raptor is not much different from using traditional paints and varnishes. However, the newfangled material is less “capricious” than conventional car paints. You can even apply it outdoors, but it is advisable to avoid this approach so as not to get negative effects from dust, moisture, wind or other external factors.
We recommend following a specific application order:
- Before you begin processing, you should get rid of removable elements on the body, including mirrors, wheels, bumpers, etc.
- If there are problem areas with rust, mold or other types of external damage, you will have to clean these areas from damage. You also need to level, putty and straighten any possible dents or depressions.
- We get rid of the glossy layer using special abrasive discs, which will help the new anti-gravel coating to better adhere to the outside.
- It is important to pre-etch with the proprietary special primer ACID#8 U-POL. If there are plastic elements, then adhesive primers are used.
- The layers are applied evenly with pauses for drying.
Security measures
Treating a car with any material, whether regular paint or Raptor, must be carried out with mandatory observance of safety measures. There are certain types of danger:
- flammability;
- toxicity of the starting material to mucous membranes and skin (can cause cracking and irritation), and respiratory organs.
Therefore, when working with Raptor, you should follow all safety precautions as when painting.
Protective clothing, goggles and respirators must be available, and the room must be ventilated. The coating will lose its toxicity after polymerization, and care should be taken before it dries.
Procedure for removing paint from a car
Removing a coat of Raptor U-POL paint that has already dried is quite a task. Doing this manually using sandpaper is difficult, ineffective and time-consuming, because the paper immediately gets clogged.
Using an angle grinder is simply dangerous, since the abrasive wheel creates nicks, defects, and chips on the body that will need to be puttied. Only putting a metal brush on a grinder or drill will allow cleaning to be more effective, but large parts often overheat and become deformed.
It is best to use a construction hair dryer, which is used to heat the base, and then remove the material with a special narrow sharp spatula.
Features of the Raptor
The polyurethane coating forms a special protective film. It has the following advantages:
- Increased durability of the Raptor paint. Reviews say that deep scratches can be removed even with a regular hair dryer.
- Resistance to mechanical stress and abrasion.
- Does not fade in the open sun and does not fade.
- The painting process itself does not require high qualifications.
- Does not require careful preparation for painting compared to ideal removal with conventional processing.
- Apply using a spray gun and roller.
- Painting can be done even outdoors, at normal room temperature.
- Painting a car with Raptor does not require additional protective coating (varnish). Reviews repeatedly confirm this fact.
- Reliably protects against corrosion and chemical influences.
Advantages and disadvantages of Raptor
Painting a car with Raptor has a number of advantages and some disadvantages. Let's take a closer look at both.
So, what advantages can the Raptor boast?
- Friction resistance
This advantage is very relevant in relation to trucks and all vehicles that are used to transport goods. As you know, during cargo transportation, cargo can rub against various surfaces, thereby causing damage, and over time, rust may occur. Painting a car with Raptor helps protect its surfaces from friction.
- Chemical resistance
There are often cases when, during certain processes, the surface of the car may begin to interact with chemicals, many of which can be extremely harmful to the car. Raptor copes well with this negative factor and does not allow dangerous chemical elements and compounds to harm the surface of the car.
- Corrosion protection
As you know, corrosion is one of the main enemies of all kinds of metal products, and cars are no exception. Raptor copes with this problem very well and minimizes the likelihood of corrosion.
- Resistance to sunlight
Exposure to sunlight for long periods of time has negative consequences for almost every substance. For cars that spend most of their time in the sun, especially not in urban environments, exposure to ultraviolet rays is an extremely negative factor. Thanks to a very thoughtful and technological composition, Raptor allows you to almost completely remove this negative factor and protect the car from harmful ultraviolet radiation.
As you can see, painting with Raptor (the video can be found on our website) is a very reasonable and competent solution, which has a very large number of advantages.
However, Raptor not only has advantages, it also has some disadvantages, like any other product. Here are the most basic of them:
- Raptor cannot be varnished
Indeed, Raptor manufacturers strongly do not recommend varnishing the surface on which their product is applied, which is why the surface of the car will always remain matte. Should this be considered a big disadvantage? If you use Raptor for the corresponding vehicles (trucks, pickups, SUVs, etc.), then the inability to coat them with varnish can not even be considered a disadvantage.
- If you do not follow the painting technology, chips are possible.
Of course, Raptor chips are not the most pleasant thing, but this can always be avoided if you read the instructions correctly and follow all the rules and painting technology. Therefore, if you paint the Raptor yourself, you should be as careful as possible.
Disadvantages of coverage
With all the variety of advantages, this coating also has disadvantages. This coating cannot be varnished or polished. Therefore, it will always be matte. The applied coating will always be rough, like shagreen, which does not always look beautiful on all cars.
The application technology requires strict adherence, otherwise chips and surface defects are possible, which again spoils the aesthetics. Very long (especially in comparison with conventional paintwork) drying time and complete polymerization. It lasts up to three weeks.
The main stages of painting a car in a car service
Painting a car with raptor is an expensive service . By contacting qualified specialists, you can be sure that such camouflage for your car will last a long time. To save money, many people prefer to paint it themselves, but the raptor is very finicky to use and requires considerable skill. The result of painting depends 99% on the careful preparation of the car for processing.
The first most important stage includes mandatory thorough cleaning and disassembly of the machine . All attachments must be dismantled, and the varnish coating is removed from the surface of the body using a grinder. At the second stage, all damaged parts of the body panel are removed, sanded and treated with sealant. Next, all painted surfaces must be primed; for this, the surface is degreased with silicone or gasoline and completely dried.
The last stage is painting with strict adherence to application technology. Raptor has a grainy structure, which makes it difficult to apply an even layer of paint. To make work easier, the S2041 tinner is added to the composition and, for reliability, it is painted in two layers.
Do not replace the tinner with a simple solvent , as this may destroy the protective properties of the raptor.
Usually the paint is matched to the factory finish, but you can change the type and color of the paint depending on your personal preferences. The shelf life of the prepared mixture is only three hours; later it will be unusable. Painting always starts from the roof of the car at a distance of half a meter, the second layer is applied an hour later to the dry surface. Impatient motorists can use their vehicles within a week after treatment, but car service specialists advise waiting approximately 20 days , during which time the raptor is completely polymerized.
Painting "Raptor": reviews
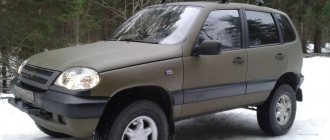
The pros and cons of this technology have already been described above. The opinions of many owners are encouraging. For example, painting a UAZ “Raptor”. Reviews indicate that with this coating, the car is no longer afraid of branches or stones. The car is now not afraid even of contact with other cars. Niva is also often painted with Raptor. The reviews practically repeat what was said about the UAZ.
No scratches or abrasions, on any off-road and in any weather conditions. In some places the Prado 120 (Raptor white) was painted. The reviews are also encouraging - the car retained its original color, but became rough and matte. In addition to external beauty (however, not for everyone), resistance to scratches has appeared, which are inevitable with a varnished coating.
What primer to use with Raptor!
I will try to briefly summarize the answers to numerous questions!
First of all, an introduction:
RAPTOR or any other protective coating, according to the manufacturer’s advertising, has good adhesion to any type of materials, preliminary preparation (
Soils, including old paintwork
) The main thing is to prepare this coating correctly!
Briefly about preparation:
Straight surfaces - mechanically, radial eccentric machine - wheels P80 grain. Curves and decorative elements, by hand P100-P120 (I use Mirka mesh) Edges and ribs, by hand, FINE sponges.
Now about the main thing, soils, theory:
There are three main types of primers: - acrylic filler or leveling - epoxy primer - acid primer
Acrylic primer:
performs only a leveling function or can be an insulator of one layer from another.
Hygroscopic - permeable to moisture, which, in case of damage to the protective layer ( Paint
), accumulates in the form of microdrops on the metal surface under the soil. Acrylic primers are used only for filling/leveling, on putties or old paintwork.
Epoxy primer
: Also used as an insulator. It does not allow evaporation and moisture to pass through. It is also used as a primary primer when painting aluminum and galvanized parts. I recommend using it on parts where different materials are found in spots, somewhere putty, somewhere sanded down to primer or metal, somewhere old paintwork remains.
Acidic soil:
Phosphating or reactive primer. Provides chemical adhesion and also contributes to the formation of a protective layer on the metal. On parts with severe corrosion, where rust can remain in pores and microcracks, acid primer is used. It converts the remaining corrosion, turning it into a phosphate film that will protect the metal from subsequent oxidation. By the term acid soil, I mean acidic soil, not acid-containing soil.
When working with old parts, you can use either acid or epoxy primer, whichever is more convenient for you. Read on carefully, RESULT!
In case of severe corrosion or after sandblasting - acid, which is then covered with acrylic! In other cases, epoxy! I’ll try to chew it up, if there is corrosion on the parts, there’s not a lot of it, I don’t want to bother, epoxy wet-on-wet and paint. If you want to do it well, then treat the corrosion areas locally with acid, then with acrylic, dry, sand, epoxy wet-on-wet, paint...
What not to do!
You cannot use acid and epoxy at the same time. Epoxy dissolves the acid agent and erodes the phosphating layer, in fact, in this case it neutralizes the acid agent, and such use is pointless. You can't apply putty to acid-based putty, but acid-based putty to putty!
Wet-on-wet:
This is a method of applying material (
paint
) to the ground without sanding the ground.
That is, we apply the primer, wait 10-30 minutes between layers ( read the instructions for the primer
) and immediately paint.
Now in relation, for example, to the REOFLEX
!
What primers from this line do I personally use: Reoflex RX CF 1+1 ACID,
you cannot apply RX F-02 primer on it, it peels off!
Reoflex RX F-01
acrylic primer with anti-corrosion properties, acid-filled, applied directly to metal wet-on-wet, can be applied on RX CF 1+1
Reoflex RX F-06
wet-on-wet on RX CF 1+1
Reoflex RX P -03
Epoxy wet-on-wet do not apply to CF1+1
Source