Tuning does not always mean installing a new body kit or shortening the Priora springs. Sometimes modernization helps improve driving comfort. An excellent example would be a short-throw rocker. VAZ owners know the “features” of the gear shift lever (GSL), which is not so easy to direct to the desired gear. The short-throw rocker on the Priora solves this problem, but we will tell you how to install it on the Priora and adjust it correctly.
The instructions in our material are also relevant for motorists who want to know how to repair and replace a conventional rocker. The instructions describe in detail the process of dismantling and adjustment, which is carried out for a factory part according to exactly the same principle.
Repair
How to adjust the rocker on a VAZ 2114, varieties, repair
Regardless of what exactly you do with the rocker - repair, adjust or change, you will still need to disassemble this unit.
Disassembly is performed as follows.
- Remove the cover from your gear shift knob.
- Place the car on a pit, or raise the front end with a jack.
- Remove the front console. It is held in place by mounting bolts.
- Now remove the curtain itself. To fix it, AvtoVAZ used 6 bolts in the case of the VAZ 2110 model.
- When carrying out dismantling work, be sure to examine the condition of all elements.
- By bending the boot, you will gain access to the support, oil seal and cardan shaft.
Changing the boot
Now as for the repairs. There may be several recommendations in this regard, depending on the current state of the node and its components.
- At best, repairs will require the use of a repair kit for the backstage. It doesn't cost much.
- If the bushing is deformed, it will need to be replaced with a new one.
- Check the lever shaft bore for wear.
- Make sure there is no play in the driveshaft. Otherwise, a regular repair kit will no longer be enough, that is, a complete replacement of the entire backstage will be required.
- Often the culprit of extraneous noise and rattling when shifting gears in gearboxes is the rocker pad. Changing it is quite simple, and even a beginner can perform the operation.
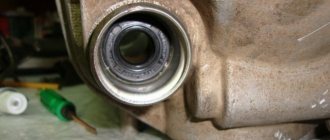
How to replace the oil seal
If you detect an oil leak from the gearbox, carefully inspect the crankcase.
The leak will reveal itself. Lubricant usually leaks out through the CV joint seals and rocker panels. In the latter case, to replace you will need to perform a number of actions:
- Purchase a new VAZ-2109 gearbox seal. Its price is about 100 rubles.
- Drain the oil completely from the gearbox by unscrewing the plug from the bottom using the key “17”. If necessary, you can replace the lubricant later. It is recommended to pull out the upper dipstick to facilitate oil drainage.
- Disconnect the cardan from the rocker arm.
- Remove the boot, use a 10mm wrench to unscrew the bolt securing it to the gearbox rod.
- Using an awl or a thin screwdriver, remove the old oil seal. Inspect it for damage.
- Install the new oil seal using a pipe or large washer to press in.
After replacement, install the boot. Assess the condition of the cardan: if it has too much play, it will need replacement. After carrying out all the work, be sure to check that the speeds are turned on correctly.
Repair
Replacing the cabin filter on a Priora
Regardless of what exactly you do with the rocker - repair, adjust or change, you will still need to disassemble this unit.
Disassembly is performed as follows.
- Remove the cover from your gear shift knob.
- Place the car on a pit, or raise the front end with a jack.
- Remove the front console. It is held in place by mounting bolts.
- Now remove the curtain itself. To fix it, AvtoVAZ used 6 bolts in the case of the VAZ 2110 model.
- When carrying out dismantling work, be sure to examine the condition of all elements.
- By bending the boot, you will gain access to the support, oil seal and cardan shaft.
Changing the boot
Now regarding the repairs. There may be several recommendations in this regard, depending on the current state of the node and its components.
- At best, repairs will require the use of a repair kit for the backstage. It doesn't cost much.
- If the bushing is deformed, it will need to be replaced with a new one.
- Check the lever shaft bore for wear.
- Make sure there is no play in the driveshaft. Otherwise, a regular repair kit will no longer be enough, that is, a complete replacement of the entire backstage will be required.
- Often the culprit of extraneous noise and rattling when shifting gears in gearboxes is the rocker pad. Changing it is quite simple, and even a beginner can perform the operation.
Replacing the oil seal
Quite often, VAZ 2110 owners are faced with a situation where, after parking under the car, they find traces of oil. There are two options here - the oil filter has worn out or there are problems with the oil seal.
As you replace the oil seal, you will be able to simultaneously inspect and change such elements as the cushion, cardan shaft, and boot.
Dismantling works
But let's talk about everything in order. First of all, check whether it is really an oil seal and not a filter. If everything is fine with the filter, then we drive the car into a pit or find another way to end up under the bottom of your VAZ 2110. Beforehand, it would be a good idea to watch video materials regarding your current situation.
- Carefully inspect the boot. If oil leaks from the gearbox through the oil seal on your car, traces of it will definitely remain on the boot.
- Bend back the boot. This way you can get to the cardan, disconnect it and gain access to the cuff.
- You first need to dismantle the cardan from the lever, and only then from the rocker itself. Not the other way around.
- The cardan has been removed, so we move to the oil seal.
- The cuff is removed from the gearbox using a hook and an awl. Therefore, make sure you have these tools at hand in advance.
- Now a new one is installed in place of the old oil seal. Craftsmen have adapted to using ordinary plastic bottle caps. If you get used to it, it turns out to be very easy to change the oil seal.
- After replacing the element, return all dismantled components to their places. If some of them need replacing or signs of wear are already visible, it is better to replace them immediately. It is unlikely that you will want to repeat the same operation in a couple of weeks and lie under your own car.
Repair will not give the desired result if the adjustment was carried out with errors. To do everything carefully and competently, use the help of a partner. One will work under the car, the second will help from inside.
The gearbox is one of the most complex components of a vehicle. However, this does not mean that its repair cannot be done at home on your own. Now we will tell you what the VAZ 2110 rocker is, what may be the reasons for its malfunction and how to repair the mechanism.
Repairing the box
Tuning door cards on Prior
In the event that this kind of adjustment work did not bring much results, you will have to remove and disassemble the gearbox of your VAZ 2110
The main attention should be paid to the gears, as they are most often knocked out. This is especially true for first and second speeds.
It will also be important to check the latch. There are three latches in total in the gearbox.
The very first of them is very long and is responsible for 1st and 2nd gears. Next comes the clamp for third and fourth gears, and the shortest of the clamps is intended for 5th gear
There are three latches in total in the gearbox. The very first of them is very long and is responsible for 1st and 2nd gears. Next comes the clamp for third and fourth gears, and the shortest of the clamps is intended for 5th gear.
complete gearbox assembly
Often, VAZ 2110 owners voice a problem regarding the switching or departure of first gear. Most likely, the reasons lie in the following:
- synchronizer problems;
- damage to the retainer spring when the lever dangles and the gears are switched on randomly;
- damaged rod and fork.
A common problem is when the second gear is reluctantly engaged, or it is simply knocked out. The most likely causes of the problem:
- poor engagement of the gear and clutch that engages the gears;
- wear of gear teeth and coupling;
- problems with the clutch.
Attention!
If you first assemble the reverse gear locking mechanism, the long rod will not allow you to put the rod on the cardan shaft. The problem can be solved by shortening it. It is important not to forget to put the boot on the driveshaft.
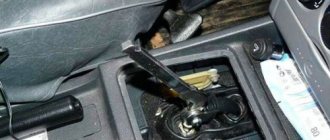
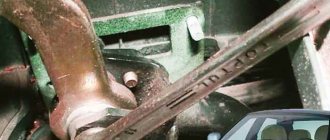
Adjust the reverse gear locking mechanism, since the consequence of adjusting the scenes is that the mechanism does not match the plate to which it clings. The problem can be solved by removing the plate and adjusting the hook (it is a cutout on the mounting bracket). You can sharpen it with sandpaper or a file.
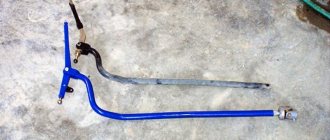
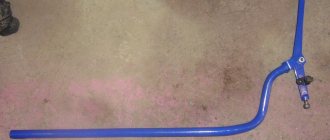
The photo shows the adjusted toe.
Gearbox control drive Lada Priora Lada Priora
Adjustment may be required after removing and reinstalling the VAZ 2170 gearbox, as well as in case of unclear gear shifting during operation of the Lada Priora. You will need two “13” keys.
1. From below the car, loosen and unscrew the nut of the clamp bolt on the transmission control rod by 3–5 turns.
2. Use a screwdriver to slightly widen the groove of the clamp and the groove at the end of the rod to ensure free movement of the rod relative to the gear selection rod, and set the rod to the neutral position.
Scheme for adjusting the position of the Lada Priora gear shift lever: 1 – reverse lock bracket; 2 – axis stop; 3 – gear shift lever axis; 4 – axle bushings; 5 – gear shift lever; 6 – spacer sleeve; 7 – spherical washer of the ball joint; 8 – spherical pin of the gear shift lever; 9 – body floor; 10 – ball joint; 11 – buffer; 12 – spring; 13 – template 67.7834.9527; 14 – bracket cover
3. Inside the car, remove the gear shift lever cover from the handle, lower the cover down along the lever and install the lever so that its lower (non-bent) end is approximately vertical. If you have template 67.7834.9527, position the gear shift lever as follows: with the lever cover removed, install the template in the window of the lining 14 of the reverse locking bracket. Insert the stop 2 of the axis of the lever 5 into the groove of the template 13 and press it against the template in the transverse direction without causing elastic deformation of the bracket 1. Fix the lever 5 in this position.
4. From the bottom of the VAZ 2171 car, with light hand movements (so as not to move the levers of the VAZ 2172 gear selection mechanism), select the axial play of the rod in the rearward direction and its angular play in the counterclockwise direction.
5. Tighten the nut of the clamp bolt, placing the clamp at a distance of 1–3 mm from the end of the rod.
Gearbox and gearbox Lada Priora
Gearbox Lada Priora |
Lada Priora gearbox malfunctions, their causes and solutions |
| Removal and installation of the Lada Priora gearbox |
Disassembly and assembly of the Lada Priora gearbox |
| Disassembly and assembly of the secondary shaft Lada Priora (Lada Priora) |
Disassembly and assembly of the input shaft Lada Priora (Lada Priora) |
Dismantling and assembling the Lada Priora gearbox synchronizer (Lada Priora) |
Assembly and disassembly of differential Lada Priora (Lada Priora) |
Selection of differential bearing adjusting ring for Lada Priora |
Assembly and disassembly of the gear selection mechanism Lada Priora (Lada Priora) |
Removal and installation of gearbox seals Lada Priora (Lada Priora) |
Replacing gear shift lever axle bushings for Lada Priora |
Assembling and disassembling the gear shift lever Lada Priora (Lada Priora) |
| Gearbox control drive Lada Priora |
Causes
The reasons why reverse gear engagement is poor or difficult may be as follows:
- loosening of the fastening clamp of the rocker, due to which the length of the rod is not enough to fully engage the gear;
- jamming of the reverse speed lock;
- spring breakage and debris getting into the guide grooves of the gear selection mechanism;
- spontaneous loosening of the selection mechanism mounting bolts;
- the clamp bolt is cut off;
- wear of the clutch disc and release bearing;
- incorrect adjustment of the clutch and clutch pedal;
- low oil level in the box or the need to replace it.
Features and purpose of the scenes on the VAZ-2110
The easiest way to get acquainted with the principle of operation of the backstage is to study the photo drawing of the product. This functional unit is directly connected to the operation of the gearbox and, through a lever transmission, allows you to switch the gears of the driven shaft. Thus, the driver can change the gear ratio of the drive and driven shafts of the gearbox. It's no secret that thanks to this you can change the speed of the car and accordingly adjust the torque that creates traction force on the drive shaft of the wheels. Thanks to the rocker, reverse gear is also engaged and the movement of the vehicle can be completely blocked.
VAZ 2110 backdrop
Naturally, the rocker plays one of the key roles in the car control system. If the gearshift lever is faulty, full-fledged driving in real road conditions becomes difficult, and sometimes even becomes impossible. Unfortunately, this functional unit can break down quite often. Surely, you will be interested to know why this happens and how to prevent the malfunction of the link in time. The next section of our article is devoted to these issues.
Recommendations
Drivers have accumulated extensive experience in servicing and repairing gearboxes. A gearbox is a complex and important mechanism, especially for a unit with automatic shifting. The main advice is to be careful and attentive.
Recommendations:
- Keep an eye on the oil level.
- Avoid sudden starts and accelerations.
- Engage reverse gear after the vehicle has come to a complete stop.
- Do not carry trailers on a car with a robotic gearbox, do not push start the car.
- Follow the rules for towing your vehicle.
- Don't skip maintenance.
- Carry out a daily inspection of the unit, listen to the operation of the motor.
Priora gearbox
For self-diagnosis and repair you need special precision equipment. Knowledge and skills of dismantling and assembly are important. For example, how to correctly measure the gap between a pair of meshed gears. If you are not a professional car mechanic, it is better to entrust the box to service companies.
Main malfunctions of the scenes
All malfunctions of the Lada Priora gearbox and how to eliminate them:
| Symptom | Malfunction | Gearbox model | Way to solve the problem |
| Unclear gear shifting | Worn bushings | 2170–2181 | Replace all bushings |
| Damaged pillow | 2170–2180 | Replace pillow | |
| Cables stretched | 2181 | Replace cables | |
| The tension of the traction clamps is loose | 2170–2180 | Adjust then tighten | |
| The lever has failed | The pillow tore | 2170–2180 | Replace pillow |
| Lever travel too long | Worn bushings | 2170–2181 | Replace all bushings |
| Cables stretched | 2181 | Replace cables | |
| The tension of the traction clamps is loose | 2170–2180 | Adjust then tighten | |
| One or more speeds do not turn on the first time | Forks are deformed | 2170–2181 | Replace plugs |
| The tension of the traction clamps is loose | 2170–2180 | Adjust then tighten | |
| Cables stretched | 2181 | Replace cables |
The main malfunctions of the Priora gearbox are the same for any transmission and are determined by their design. The lever and rigid drive are made of steel, so they do not break. The remaining parts, all kinds of plastic bushings and cables, clamps that secure the rods, often fail (their nuts have a bad habit of becoming loose). In addition, on the so-called rocker boxes, that is, gearboxes 2170–2180, the rubber band (the rubber support of the lever) often fails, which also leads to problems with switching on the required speeds.
One of the rare defects is the rattling of the 2014 Priora gearbox, although it also occurs on cars of other years, but always with a rocker transmission. It is caused by contact between the torque rod and the gear shift rod. Due to the running engine, the contact becomes vibrating, and the collision of parts generates ringing. To eliminate it, just slightly move both rods away from each other.
How to adjust the rocker on a VAZ 2110 with your own hands
Before adjusting the gearbox linkage, it is necessary to perform a number of preparatory work:
- Drive the car into the pit.
- Tighten the handbrake and install the wheel chocks.
Method No. 1 - adjusting the rocker according to the rear speed.
- Loosen the clamp.
- Engage reverse gear and position the lever as you would like it to be in this position.
- Then tighten the clamp and check how the rocker works, whether you are satisfied with the current position of the lever and the operation of the rocker.
Method No. 2 - adjusting the rocker at first speed.
This method is used, as a rule, when the first method did not produce results.
- Turn on first speed.
- Loosen the rocker clamp.
- Turn the rocker drive counterclockwise until the gearshift lever begins to rest against the plastic reverse speed stop.
- Tighten the clamp and check how everything works.
Method No. 3 - adjusting the scenes in neutral.
If you do not have a plastic stopper, the adjustment is made in neutral gear.
To adjust the neutral position of the gearshift lever, you need to accurately calculate the depth of the shift of your gearbox to the driveshaft of the VAZ 2110. Sometimes such manipulations result in the appearance of annoying rattling of the lever.
If adjusting the rocker does not lead to anything and there is still a problem with switching, replace the rocker completely or ask for help from specialists.
It would seem that such an element as the backstage cannot be modified or modernized, because everything here is extremely simple. However, tuning is also possible here, we’ll talk about this in this article, and as an example we will have a VAZ-2110 car. Many car owners prefer to change the standard rocker because it has too long a stroke; instead, they install a short-stroke one. This is good because the clarity of switching improves and less time is spent on it, but at the same time, car enthusiasts for some reason forget that the rocker needs adjustment.
If there is no adjustment, the driver will soon feel difficulty changing gears. It is recommended to do the work together with an assistant, although, if desired, you can do everything alone.
In this case, the owner of the “ten” replaced the rocker, did not adjust it, and had problems when shifting from reverse to fifth gear. The adjustment can be done in different ways; we will consider several options with you.
1. In the first case, the adjustment is made in reverse gear. We switch the box to reverse mode, then climb under the car and tighten the clamp. That's it, the work is finished, the problem is solved. But what to do if it is impossible to switch to reverse gear? For this we have the following method.
2. Here the “ten” link is adjusted when first gear is engaged. We switch the gearshift knob to first speed, unscrew the bolts securing the rocker clamp, to do this you will have to crawl under the car. Next, the drive must be rotated counterclockwise. We twist until the gearshift lever collides with the plastic rear speed lock. Now you just need to tighten the clamp bolts and the setup is complete.
Do you want to adjust the transmission neutral position? Then you will have to calculate the fit of the rocker on the “tens” cardan. So, we learned that when replacing the rocker, it is imperative to adjust it so that in the future there will be no problems with switching gears. Moreover, we learned to do it ourselves, and this saves us money. However, if you are a specialist and have done such work for the first time in your life, then it will not be easy to assemble the mechanism perfectly.
Very often, after self-upgrading, extraneous sounds appear in the gearbox. Some people don't pay any attention to the rattling noise and drown it out with music, but we're not one of those people, so we need to eliminate the cause of the sound. The problem can be solved quite simply; all you need to do is buy a spring and put it on the slide. This spring will hold the gearbox and the formation of unpleasant noise will stop. Let's go back to the adjustment once again and repeat how to do it:
1. Set the gearbox to neutral position.
2. Turn the gear selector rod counterclockwise. We do this until the adjusting pin fits into the hole in the rod.
3. Remove the gear lever trim.
4. After fixing the gearshift knob and the gear selection rod, fix the adjusting bolt.
The travel of the gearbox handle is adjusted individually, this is done by adjusting the length of the link arm.
Principle of operation
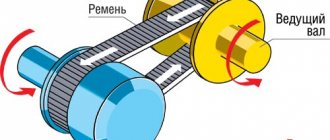
Study the diagram below to understand how the short throw rocker works. The lever is installed in the neutral position, here it is indicated by the points “O” and “F”. To start the transmission, you need to move the rod - it will connect to the control gear at point “B” - at point “A”. After this, the handle will move to point “E”. Repairs and subsequent replacements are carried out in order to reduce the distance.
This can be done if the lever extends to point “H”. This move will increase the distance. On the diagram, "A" and "B" will become points "C" and "D". Replacing the standard rocker with a short-stroke one allows you to reduce the movement of the handle. We've sorted out the theory, now we can start the repairs.
Short-stroke link for Priora PrioraPRO
Before we consider how to properly install a short-throw rocker on a Priora with our own hands, let’s remember why this is being done.
The essence of a short-stroke rocker is that it reduces the travel of the gearbox lever when switching gears off or on. Moreover, gear shifting in the car becomes clearer.
Unlike the factory standard lever, the short-stroke rocker has slightly different bending angles. Thanks to improved geometry, the gear shifting process brings pleasure to sports driving enthusiasts.
As already mentioned, installing a Priora short-stroke rocker results in the gearshift lever reacting to your movement faster and more responsively, while the actual rocker travel will be less.
If you are a fan of sporty style and want to accelerate the car as quickly as possible, then you will need to change gears quickly. Again, here too a short-throw slide will come in handy.
Installation process
Let's analyze the installation of the Priora short-stroke rocker with our own hands step by step.
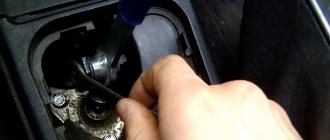
First you need to pull the knob and cover off the box lever. The knob on the lever is not fixed, so it is enough to apply a certain force to remove it.
Using a key set to “13”, loosen the clamp and separate the gearbox lever rod from the cardan.
To release the lever, we release the ball from the spring mechanism, which is necessary to activate the reverse gear with locking. To do this, remove the locking ring.
It is strictly forbidden to sharply pull the lever upward when trying to release it.
Slowly, carefully remove the retaining ring.
We take out the spring and then the lever with the ball inserted into the plastic frame, as well as the locking ring.
The plastic mandrel includes two parts: the lower one, located on the right and the upper one, located on the left, cylindrical in shape. There is a slit at the top. This component fits onto the gearshift lever. At the bottom there is a lever ball. The upper part wraps around the lower part so that the grooves match.
We take out the lever and rod from the interior. For convenience, you can separate the lever from the rod, although this is not at all necessary.
Using a “10” wrench, unscrew the left bolt on the cardan and pull off the rubber boot.
The driveshaft from the Priora differs in length from the driveshaft of the Viburnum. It is necessary to shorten the stem of the viburnum, depending on its type.
We insert the cardan from the viburnum. Lightly lubricate it with lithol from the inside. When screwing in the bolt, you do not need to tighten it.
We insert the rod through the interior. It is advisable to do this not alone, but to take someone as an assistant. Let one hold the elastic band in the cabin, through which the thrust passes, while the second gradually stretches the thrust.
Next we assemble the lever:
— We put the rod back on the cardan shaft. — We equip the spring mechanism again (we also lubricate the ball with lithol). — We center the lever (we fix it in a comfortable position). — We tighten the clamp on the rod.
It is quite possible that the lever will not immediately center itself as it should. In this case, perform steps 3-4 again.
Please note that if you first assemble the spring mechanism, then due to the greater length of the rod it will be impossible to put the rod on the cardan (the problem can be solved if the cardan is shortened)
Don't forget to put the boot on the driveshaft
After completing the above steps, we will be able to correctly install the short-throw rocker on the Priora.
It will also be necessary to adjust the mechanism that blocks reverse gear engagement. Due to the fact that we customize the Priora short-stroke rocker to suit ourselves, the following problem may arise. The locking mechanism does not align with the plate it engages. We solve the problem by removing the plate and carefully adjusting the engagement.
In the end, all that remains is to put the knob and cover on the gearshift lever. Keep in mind that after assembly the gearshift lever will be tilted to the right.
Advantages of a short-stroke rocker
After we bought a short-throw rocker for a Priora and installed it manually, we can see the following improvements:
— the lever stroke becomes 3 times shorter, resulting in a much faster transition from gear to gear. You can feel as if you are driving a sports car;
— you need to get used to switching, because the lever itself is not in its original position. To stick gears you now need to put in more effort;
The irritating rattling noise, which is inherent in driveshafts of Ladder models from Nines to Prior at high speeds, disappears.
Also check out
- Install the Kalinovsky cardan by applying lithol to its inner surface. Since the bolt is cone-shaped, screwing in is not difficult.
- The thrust should be installed through the interior. It's good if you have an assistant nearby. He will hold it by the elastic band in the cabin, at this time you need to stretch the traction.
Assembly is performed in reverse order
- First, we put the rod on the cardan shaft.
- Then you can begin assembling the reverse gear locking mechanism. Lubricate the spring ball.
- Adjust the gearshift lever.
- Tighten the clamp on the rod.
Replacing the gearbox slide
First, you should decide whether you will buy a ready-made short-stroke part or make it yourself. For Lada Priora drivers who have not upgraded components, we recommend choosing the first option. The instruction will be carried out taking into account modifications.
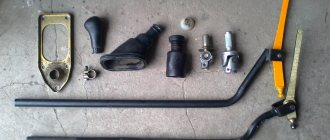
For work we will need:
- Two metal plates.
- Kardanchik from Kalina.
- Welding machine.
- A set of keys, including spanners.
- A grinder with a cutting wheel; alternatively, you can use a hacksaw.
Step-by-step instruction
- Repair and replacement begins with removing the decorative cover from the gearshift lever. The knob may not give in, but it is not secured by anything, so just pull firmly towards you;
Principle of operation
Study the diagram below to understand how the short throw rocker works. The lever is installed in the neutral position, here it is indicated by the points “O” and “F”. To start the transmission, you need to move the rod - it will connect to the control gear at point “B” - at point “A”. After this, the handle will move to point “E”. Repairs and subsequent replacements are carried out in order to reduce the distance.
This can be done if the lever extends to point “H”. This move will increase the distance. On the diagram, "A" and "B" will become points "C" and "D". Replacing the standard rocker with a short-stroke one allows you to reduce the movement of the handle. We've sorted out the theory, now we can start the repairs.
Repairing the backstage of the Lada Priora
First of all, you need to remove the gearshift lever cover. Since it is made of very expensive skin of a rare animal, we handle it carefully, although most likely there will be no issues with its dismantling.
Next we do this:
- Unscrew the two nuts and one bolt of the reverse lock bracket. Let's take it off.
- Unscrew the gear shift lever shaft nut.
- Carefully remove the axle from the lever and also carefully remove the old bushings of the gear shift lever axle washer.
- Remove the locking ring of the gear lever hinge and remove the lever assembly.
- Lubricate the new gearshift lever ball joint with silicone grease and install it on the lever.
- Before installing the bushings of the gear lever hinge, you should carefully remove all burrs from it. This will allow the bushings to work as long as possible.
- We also mercilessly throw away the ball joint spring and replace it with a new one, since its stiffness and size are already different from the nominal ones.
- Now we place both washers on the lever, having previously generously lubricated them with silicone grease, not forgetting about the remote bushing of the lever.
- We put the gearshift lever in place and secure it with a retaining ring.
- Now comes the fun part. We need to replace the gearshift lever shaft. This is not so easy to do, because we are very limited in space. We keep our composure and painstakingly get into the special cutout on the reverse locking bracket.
- If we succeeded, we combine the holes of the gearbox rod and the lever itself, installing a second thrust washer and fix the success with the nut securing the gearbox lever axis.
- Well, finally the cunning mechanism has been installed. Now you can put the reverse lock bracket trim back in place.
- All? No, not all. Now we put the decorative trim on the gearshift lever and go under the car. We find there a thrust joint for the backstage, the existence of which many do not even know.
- We are convinced that the hinge refuses to perform its functions (to ensure the accuracy of gear engagement), as evidenced by obsessive play and knocking.
- We will replace it with a homemade part made from the stabilizer strut of any front-wheel drive VAZ. To do this, you need to have a welding machine, an angle grinder and some skills in using them.
- But if we don’t have any of this, as happens in most cases, we simply install a new hinge. It won’t last long, but we will know that after a couple of thousand kilometers it’s worth coming back here.
- To do this, loosen the clamp and move it away from the hinge.
- After this, unscrew the nut securing the hinge torque rod, but not completely. Otherwise, the hinge will crash under your feet, crumbling into several parts.
- We unscrew the hinge mounting bolts and only after that remove the hinge from the car along with the bracket. This is the most optimal replacement option, since it is much easier to install a new hinge on the bracket on a table than under the car, standing upright.
- We do not tighten the nuts, but install the bracket assembly with the hinge on the car.
- Tighten the hinge fastening. We actively shake the jet thrust so that the hinge takes its place in this entire structure. Only now can you tighten the hinge clamp and the hinge nut itself. Tighten the hinge nut last.
You shouldn’t hope for a miracle, but the gear shift lever on the Priora will now make the driver much less nervous and the backlash, accordingly, will become much less noticeable. So, with minimal costs in terms of money and time, we can bring the Lada Priora gearbox into a more or less digestible state.
Rigid traction mechanisms
For both “screw” mechanisms, the procedure is completely identical. So do this:
- Raise or hang the machine.
- Remove the cover and gearshift lever knob.
- Unscrew the nuts and bolts securing the reverse lock plate (bracket), then remove the bracket.
- Unscrew the lever axle nut. Be careful not to lose the nut and lock washer.
- Unscrew the bolt securing the lever axle, then pull out the axle.
- Go down under the car and unscrew the nuts of the rocker pad bracket (this is convenient to do with a ratchet and an extension).
- Unscrew the bolts securing the torque rod to the car body.
- Pull down the pillow with the lever.
- Remove the retaining ring from the cushion.
- Lubricate the ball joint of the new cushion with any grease.
- Insert the lever into the pillow and make sure that it rotates freely and does not fall out of it.
- Place the pillow with the lever in place and secure it.
- Lubricate the new bushings and insert them into the lever.
- Replace the lever shaft.
- Have an assistant sit behind the wheel and go under the car yourself.
- Ask an assistant to engage first gear. If the lever is where it should be, then the repair and adjustment is complete. If not, then loosen the nut and bolt that tighten the clamp on the rod next to the driveshaft. While holding the rod, have an assistant place the lever in place corresponding to first gear and tighten the clamp.
Ask an assistant to engage all gears in order. If they turn on clearly and there is no strong play in the lever (on the rocker boxes), then you have done everything correctly and the repair and adjustment are completed.
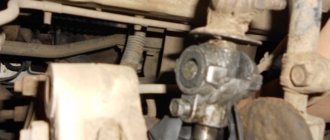
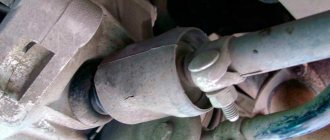
It's no secret that the Priora has a congenital problem - the rattling of the gearbox driveshaft.
In almost all Priors, the rubber boot of the gearbox driveshaft is destroyed after some time. One glance is enough to give a verdict: the boot is made of burnt rubber, so it doesn’t last long! The markings on the cardan shaft boot were not Balakovsky.
It was decided to replace the Priora boot with a Viburnum boot, and also replace the Priora gearbox driveshaft itself with a Kalina driveshaft - it is too praised on various forums.
| The original boot of the gearbox driveshaft was cracked, and there was even a hole in its “accordion” |
| I purchased a Balakovo-made boot and a Tolyatti gearbox driveshaft, all from Kalina |
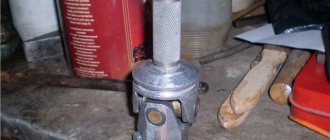
| I had to tinker a little with the Kalina gearbox driveshaft: the Kalina driveshaft rod is longer than the Priora rod by about 2 cm. Since I didn’t have the opportunity to compare the Kalina driveshaft with my own driveshaft (it was still on the car at that time), I had to cut it “blindly”. I measured 1.8 cm from the edge and started sawing |
| I don’t have a grinder, I sawed with a hacksaw for metal - it took about 40 minutes of time, 2 hacksaw blades and a slightly ground corner on the emery))) It’s very difficult to saw, because the metal is strong! After sawing off part of the rod, I made a conical chamfer using sandpaper and a file. |
| Let's start removing the original gearbox driveshaft. We loosen the clamp and tighten the torn boot. Next, we unscrew the fixing bolt, but unfortunately this is not so easy to do: the bolt is coated with red thread locker and there is no way to unscrew it. The open-end wrench turned, “licking” the edges, but the powerful socket head did not fit; the gearbox housing interfered with it. In general, in order to remove the fixing one, stock up on spanners. Replacing the boot and drive shaft itself takes about 10 minutes |
| I sawed at random, but the size was amazingly accurate - the length of the rod of the original Priora gearbox driveshaft and the Kalina gearbox driveshaft are the same! |
| The original driveshaft of the Priora gearbox is essentially not a driveshaft at all: it bends only in one plane, while the Kalinov gearbox driveshaft bends in 2 planes. In addition, the photo clearly shows a huge gap of 2-3 mm on the original Priora driveshaft |
| The anthers differ slightly, but the Kalinovsky anther has better workmanship than the original Priora anther |
| A little about adjustment. While unscrewing the fixing bolt, the reverse gear jumped out. We had to manually select the desired gear using pliers, but we couldn’t do it the first time. Having assembled the mechanism, it turned out that in place of the reverse gear it turned out to be the first, and the second could not be engaged due to the reverse speed limiter. I had to redo everything. The repeated adjustment turned out even worse, only 3, 4, 5 gears remained. It was possible to adjust it normally only the 4th time, using pliers to find the reverse gear. And we found it this way: having removed the link and clamped the cardan shaft with pliers, turned it counterclockwise until it stops and pushed the hinge forward. In order to make sure that we had engaged reverse gear, I started the engine and carefully moved off - the car went backwards! Let me make a reservation right away: absolutely nothing will happen to the box, nothing will fly out or break. |
| We install the gearbox driveshaft in place. Having straightened the clamp clamp a little, we connected the gearbox driveshaft to the rocker, set the lever to the reverse gear position and tightened the clamp clamp! The check showed that all the gears are there and they work perfectly. The feeling is very pleasant, the gears are engaged very softly and smoothly, no snagging. The lateral play of the lever has not changed, the longitudinal play has become smaller, but this difference is not noticeable either while moving or standing still. The position of the lever has changed a little, it has become a little closer to the driver’s seat, but it doesn’t touch anything, and it’s not noticeable from the outside, just by feeling it! But now you don’t have to reach so far for fifth gear |