Continuation of the story about the installation of EUR from Priora...
In the previous post I tried to describe in detail how to install the EUR
, and now I’ll tell you how to connect it, and also tell you how to do independent diagnostics.
( more on this at the end
)
And so, to connect the EUR you will need:
1.
wire with a cross-section of about two squares (well, this is just my eye), in short, no thinner than what goes to the ignition switch, three meters (this is with a margin) 2. wire with a cross-section of 0.75, 8 meters 3. females are large, for connecting the steering column switches, 30 pcs (with a spare) 4. small mothers and fathers, for connecting wires from the EUR and a couple of other little things, 20 pcs (with a reserve) 5. fuse holder + fuse, 1 pc (they say at least 50 amps, I’ve already been driving for a week with 30 ampere) 6. corrugation, so that everything is neat 7. electrical tape, heat shrink 8. pliers, wire cutters 9. screwdrivers + and – 10. drill, drill bit 11. file
I think I mentioned everything.
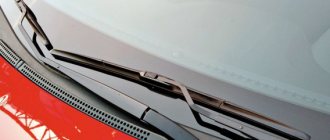
And so, first of all, we pull the power wire to the EUR from the battery
.
I pulled it through the rubber band under the windshield
.
We place the fuse holder as close to the battery as possible.
We don’t install the fuse yet
. I threw the negative wire onto the adapter plate.
Next we run three wires to the speed sensor
, +, - and signal.
The main thing when connecting is to look at the pinout on your sensor
, it says there what goes where. I hooked up the positive wire from the sensor to the top fuse block, to the far left.
I took the minus from the pin that holds the panel. I attached a small terminal to the signal terminal and led it to the instrument panel.
Next, we connect the remaining wires of the EUR according to the diagram
.
I soldered the terminals to the standard wires for further ease of dismantling. ( Well, you never know...
)
Indicator lamp
I displayed “
not fastened seat belt
” on the lamp, soldered the wire, and for it to work you need to install an LED.
This lamp is useful for self-diagnosis of an ESD
.
( diagnostics will be described below
)
Then we connect the wires to the ignition switch.
,
steering column switches
on the left under the panel.
We connect them according to the diagram
.
Oh, I almost forgot, now you can use the wiper switch
, stick and
back
. We drag the wires from the key there.
Adjusting the steering column cover
, we file down
the emergency light button
. (
I placed it to the right of the steering wheel
) We assemble everything, plug in the fuse that was placed under the hood.
We start the engine and enjoy the light steering. ( the indicator lamp should go out after starting
)
PS
I installed a speed sensor, but the cable does not screw onto it, the airbag is in the way.
Therefore, I had to buy a tidy device from a chepyrka, but that’s a completely different story... Well, now there aren’t many words about self-diagnosis of the EUR.
For this you need a paper clip.
I write as I personally did, and not as it was written on various sites.
We insert a paperclip into the sixth pin of the EUR ( it is empty, see diagram
), so that it can be shorted to ground.
We start the engine, connect to ground and release, the warning lamp will blink slowly at first ( means that the EUR has entered the diagnostic system
).
Next, the lamp will begin to blink quickly ( we count how many times it blinks and see the explanation below
), after which the lamp will blink slowly again (
exited the diagnostics
).
— 1
The system is working — 2 No engine speed signal — 3 Malfunction of the torque sensor — 4 Malfunction of the EMUR engine — 5 Malfunction of the steering shaft position sensor — 6 Malfunction of the EMUR engine rotor position sensor — 7 Malfunction of the vehicle’s on-board network (below 10V or more than 18V) — 8 Malfunction EMUR control unit - 9 Malfunction of the vehicle speed sensor
( the sources say that the lamp blinks 10 times more, i.e. * 11 The system is working and so on, but I had it as I wrote
)
And I started looking for diagnostics, because... The EUR switched off while driving, but why? Yes, because I didn’t look at the inscriptions on the speed sensor, but connected it according to logic, according to the color of the wires on the chip from it, and it turned out that I mixed up the polarity))) That’s why I wrote that look carefully at your sensor
.
Good luck to everyone and see you in the new entry)))
PS
If you have any questions or see errors, please tell me))
In VAZ Priora cars, the electric power steering performs the function of making the vehicle easier to control. With the help of the ESD, the driver can easily turn the steering wheel with one hand. What malfunctions are typical for the amplifier and how to replace the EUR in a garage - we will talk about this below.
Possible malfunctions: signs and causes
Methods for determining mechanical damage to electric power steering and steering mechanisms
Self-removal and installation of the amplifier
Photo gallery “Removing the EUR”
Video “Do-It-Yourself Amplifier Repair Guide”
Comments and Reviews
Methods for determining mechanical damage to electric power steering and steering mechanisms
Mechanical damage is checked only when the EUR as a whole is not functioning correctly, but there are no errors on the on-board computer display. To diagnose mechanical breakdowns, turn the steering wheel in different directions until it stops while the engine is running. Of course, the car must be in one place. If you have to exert significantly more force than usual when turning the steering wheel, this indicates a malfunction in the system and a breakdown of one of the components. The same problem may indicate a failure of other components of the steering system.
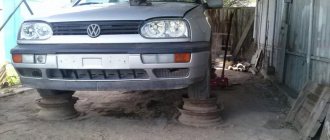
To more accurately identify problems, a thorough performance check should be carried out. You will need to drive your Lada Priora onto an overpass, pit or lift, and then carefully diagnose all components of the chassis. It is necessary to check the racks, steering rods and other components, since there is a possibility that the amplifier itself is working, and the signs of malfunction are associated with other problems. To service an electric amplifier at home, you will have to completely disassemble the system, clean its components and put it back together.
Pinout diagram and designations of EUR contacts
How to remove the EUR on a Priora with your own hands
In fact, the electric power steering can be removed without any problems, you just have to remove quite a lot of parts first. Namely, you will need to do the following:
After that, using an 8 mm socket and a ratchet, unscrew and remove the contact group.
We remove it from the shaft completely so that it does not interfere.
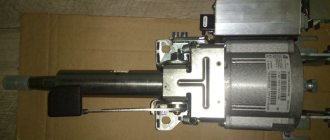
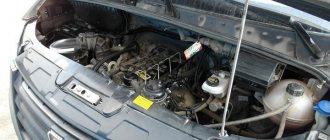
Now you need to disconnect all the power wires from the power steering control unit, which are clearly shown in the photo below.
Each of the plugs has its own lock, so be sure to first look at the design of the lock so as not to damage it when removing it. When you have dealt with the wires, you need to unscrew the coupling bolt at the fastening of the driveshaft with the steering rack.
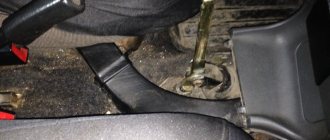
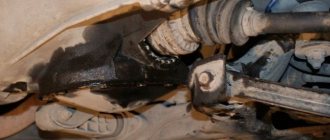
Using a chisel and a hammer, we slightly expand the coupling “collar” of the cardan shaft. Then you can begin to unscrew the nuts securing the EUR to the body. Two nuts are located at the front.
And two from the bottom.
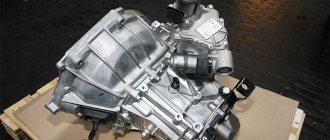
Of course, when unscrewing the last fastening nuts, it is necessary to hold the EUR so that it does not fall. Next, we pull it off the steering rack shaft and remove it completely. If necessary, we replace it with a new one. This mechanism is installed in the reverse order and we connect all the necessary wires to their places.
Self-removal and installation of the amplifier
You can do the procedure for dismantling and installing a new electric amplifier yourself, but for this you will need to prepare all the tools. To complete the job, you will need two screwdrivers - one with a flat head and the other with a Phillips head. You will also need a set of socket wrenches.
How to complete the DIY removal and installation task:
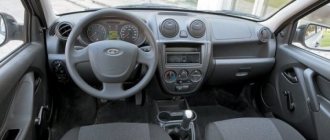
- Before performing work, you will need to turn off the power to the on-board network of your Priora. To do this, turn off the ignition, then open the hood and disconnect the battery from power. After this, you will need to remove the steering wheel, but first remove the plastic trim located under the steering wheel and under the dashboard. The casing is attached to several bolts; they must be unscrewed and set aside. Removing the steering wheel is carried out taking into account the recommendations described in the service manual.
- When the trim is removed along with the steering wheel, you will see the connectors of the steering column switches to which the wires are connected. These plugs will need to be disconnected. The contact ring must also be dismantled.
- Using a 8-mm wrench, you will need to unscrew the bolt that secures the connector with the wires from the ignition switch. Set the bolt aside so you don't lose it.
- Once these steps are completed, press down on the plastic fasteners and disconnect the wiring connectors at the top and bottom of the steering column.
- Having done this, you will see a plastic curtain in the place where the electric amplifier is fixed directly to the speaker. You will need to remove it, which will also require you to remove the fasteners.
- Using a socket wrench, you will need to slightly loosen the nuts that secure the amplifier to the bottom of the speaker. Just loosen it, not twist it. When the nuts are loosened, you need to remove the electric amplifier from its seat; its removal is carried out with the intermediate shaft. But we recommend that you still disconnect the amplifier from the shaft; this will allow you to quickly clean the EUR and simplify the installation procedure. To disconnect the shaft, you will need to unscrew the screw that secures the universal joint to the shaft using a 13mm wrench. Having done this, you will also need to unscrew the two nuts located on the end parts, after which the entire steering column must be removed.
- Then you will need to remove the bolt and cardan from the splined pulley of the mechanism. In this case, pay attention to the labels - during further installation they must match in any case. The marks are located on the protective cover, pulley and starter mechanism cover. Now you can clean the electric booster and other system components or replace the failed EUR with a new one. The assembly procedure is carried out in reverse order.
Priora steering rack malfunctions
Problems with the functioning of the steering rack can be different. To identify them, it is not necessary to have a wealth of special knowledge; it is enough to periodically inspect the mechanism.
Large steering play
If you turn off the engine and actively turn the steering wheel, there should be no extraneous sounds. When not only suspicious noises appear, but also play is observed, the cause of the problem may be a weakened spool stop or insufficient elasticity of the torsion bar. The steering wheel may play due to severe wear of the silent blocks on which the steering rack is fixed. The same problem occurs when the angle of contact between the teeth and the screw is incorrect, or the curvature of the crankcase or shaft is caused by damage or the stroke of a screw-type bearing. To determine the malfunction, you will need to diagnose the rack bushing, steering rod joints and teeth.
The appearance of knocking and heaviness when turning the steering wheel
The steering wheel becomes heavy due to a soured cardan, but most often it is the knocking that occurs. There are a number of characteristic reasons for this phenomenon:
- noise occurs during the movement of the vertical bearing shaft;
- excessive wear of joints and crankcase;
- exhaustion of the life of a screw bearing, bushing or teeth;
- crooked shaft or crankcase, as a result the screw contacts the teeth with an offset angle;
- wear of silent blocks;
- loose rack fastening;
- steering wheel play.
In any case, you will need to carry out diagnostics, and if malfunctions are identified, you will need to dismantle and repair the Priora steering rack with replacement of worn elements.
Worn steering shaft center tooth
Wear of the mechanism with teeth occurs quite often. The main purpose of the steering shaft is to convert rotational motion into translational motion. Most cars are characterized by the exhaustion of the resource of the central teeth. The reason is simple: movement in city traffic is determined by driving in a straight line with slight deviations of the trajectory to the left or right.
To determine the malfunction, you need to swing the steering wheel to the sides from the middle position. If knocking noises are heard, it is better to carry out further diagnostics at a service station. If the central tooth is worn excessively, the entire shaft must be replaced.
Comments and reviews
Periodically, after replacing the ignition switch, the power steering began to turn off at low speeds. Especially when you turn around. Car Lada Priora 16 cl. 2011 mileage 80000.
Good evening) I need advice) EUR Kalina is not working) the power supply has checked everything is normal) the speed sensor is working) the tachometer is working) the rotor sensor is missing) I connected the scanner) two errors) 1011 incorrect DPR sequence and 1044 engine speed signal circuit no signal) I turn the steering wheel) on the scanner, phases A and B change values) but phase C does not) I WOULD BE GRATEFUL FOR CONSULTATION
The light on the dashboard came on, there was a squeak somewhere and the steering wheel turned hard, I have a Priora with electric power steering, pr. 100,000t.
The electric power steering light on the dashboard is on, so it doesn't work, maybe there are some fuses.
Electric power steering intermittently fails
Hello Sergey, I bought an EUR from Priora, installed it on a VAZ2114, connected it through the instrument panel, the steering wheel turns jerkily! Maybe you need to connect through the brain. I have an injector with brains.
EUR Priora does not work, the error suddenly came on
When you turn the steering wheel left to right, the power steering is turned off.
Good afternoon) It all started trivially with reviews and reviews, according to which the finalization of such a plan is simply a “fairy tale!”) Afterwards we experienced this miracle of technology from personal experience! Details.
The unit was purchased from a 2012 Priora
(mileage 12,000 km).
It came with an adjustable shaft
, excellent condition. Will go for further improvements!
The hardest part was finding the wiring. In the end, they cut it out of the under-panel “braid” from the viburnum fret =) Ready-made versions are also sold (in the photo on the right).
In my case, the option from the store is not suitable, all the harnesses were redone, the power part of the wiring was moved to the engine compartment and located next to the battery. You only need connectors to the amplifier control unit and power wires (“+” and “-“).
About the plate and preparation of the intermediate shaft.
1)Adapter plate.
There are two options: - finished steel with a coating (buy in a store) - a drawing is available online which you can make yourself, or have it made to order.
Initially, I was confused by the comment on the drawing: “...for a VAZ 2110-2112 with an old instrument panel.” What about the Euro panel? Most likely, this plate is completely universal and in order to eliminate unnecessary gaps (between the panel and the steering column casing), you will have to adjust the outer mounting studs individually to the location... In fact, this is so! I didn’t make it to order because it’s cheaper to buy ready-made (Even taking into account delivery). Material: steel 5 mm, galvanic coating. There are no spacer rings included in the kit (needed to maintain the up-down adjustment of the steering column).
2) Intermediate shaft.
Made on the basis of a priority one with two cardan shafts. Subjects:
The original one is hollow at the base; a piece was cut off from it to lengthen it. The inside of the tube was machined at both ends. It was not possible to insert the part from the prior shaft any other way; the diameter is larger than the internal hole in the tube.
You need to act carefully near the crosspiece; you must not overheat the part! Otherwise, the rubber sealing the hinge joint will “float”. Finished product)
If desired, you can make any length. In the installed version with the adjusting bolt tightened, the result is slightly more than 26 cm, i.e. the middle of the possible tolerance. 3) Shred the plastic.
I don’t remember exactly how it worked out for others, but for me the EUR specifically hit the plastic. It seems that I didn’t see this in the reports, so I didn’t initially think about sawing the panel... Let’s act)
As I wrote at the beginning, there were no spacers included in the kit, and after trying it on, it turned out that they were not needed. I put three washers on the front studs (wide, about 1-1.5mm thick). Two were enough, but this resulted in a small gap between the body and the engine (when adjusted as high as possible)
5) EUR, rejoice at the finish!
6) The connection was made according to the factory diagram.
Purpose of terminals of EMUR blocks:
Chip errors
When a situation is observed that the wheels turn on their own, the reason is the electronic filling of the Priora electric power steering control unit. As mentioned above, quality was sacrificed for the sake of economy. Now the situation with this seems to have improved and everything has been finalized, but if suddenly you feel that the steering wheel is starting to move by itself, go for repairs.
If, along with the electric power steering, the speedometer also fails, then you need to look at the speed sensor. It was either simply dirty or broken. The same applies to the torque sensor installed on the amplifier. Clean them well and check their functionality.
Don’t forget to reset errors on the on-board computer; this can be done in several ways.
- Remove the terminal from the battery, wait a few seconds and put it back, the error should go away.
- Using a computer, the corresponding software can be found on the Internet.
FakeHeader
Comments 108
I have this problem on my Priora. In short, I go to work, get into the car, start it, warm it up, start to move away and the EUR turns off, and only by the end of the evening it doesn’t seem to work for me. I decided to check the charging and this is what happened: with the engine running 13.9, with a stove 13.7, with dimensions and a stove 13.5, with low beam and with a stove and dimensions 13.3 and all together and the high beam in general 13, I think that’s why the EUR turns off because it doesn’t have enough power, I think There's something wrong with my generator, who knows?
Technical characteristics of the electric power steering: - rated supply voltage 13.5V; — maximum current consumption no more than 55A; — current consumption in the absence of torque on the input shaft is no more than 0.5A; — maximum compensating torque (at a shaft rotation speed of up to 360 degrees/sec., vehicle speed 0 km/h, load torque on the output shaft 35 Nm) — 24 Nm (12.9 kgf at R steering wheel = 190 mm), which corresponds to the control force on the steering wheel driver 6Nm (3.2kgf at Rsteering wheel = 190mm); — the moment of resistance to shaft rotation when the EMUR is not working is no more than 0.8 Nm; — total weight no more than 9.3 kg; — operating temperature range -40…+65С; — operating supply voltage range 10.8…15V.
Didn't you read the errors with a scanner? There are a lot of codes for eur.
Temporal parameters of the light code: duration of the initial pause – 2 seconds; long signal duration – 2 seconds; short signal duration – 0.5 seconds; the duration of the pause between signals is 0.5 seconds; Pause duration between codes – 2 seconds
Code decoding 1 long 1 short System OK 1 long 2 short No engine speed signal 1 long 3 short Malfunction of torque sensor 1 long 4 short Malfunction of engine EMUR 1 long 5 short Malfunction of steering shaft position sensor 1 long 6 short Malfunction of engine rotor position sensor EMUR 1 long 7 short Malfunction of the vehicle's electrical system (below 10V or greater than 18V) 1 long 8 short Malfunction of the EMUR control unit 1 long 9 short Malfunction of the vehicle speed sensor
Description of EMUR fault codes read from internal memory using a special scanner.
C1011 Vehicle engine speed signal circuit, no signal C1012 Vehicle speed sensor signal circuit, no signal C1013 Vehicle on-board voltage below the minimum threshold C1014 Voltage at the ignition switch below the minimum threshold C1021 Voltage of the main terminal of the torque sensor C1022 Voltage of the control terminal of the torque sensor C1023 Incorrect signal of the main and /or torque sensor control terminal C1024 Torque sensor, no signal C1031 Steering shaft position sensor, main signal circuit fault, or out of range C1032 Steering shaft position sensor, control signal circuit fault, or out of range C1033 Steering shaft position sensor, no power C1041 Engine Rotor Position Sensor, Phase A Circuit Malfunction or Out of Range C1042 Engine Rotor Position Sensor, Phase B Circuit Malfunction or Out of Range C1043 Engine Rotor Position Sensor, Phase C Circuit Malfunction or Out of Range C1044 Engine Rotor Position Sensor Sequence Incorrect C1045 Motor rotor position sensor, lack of power C1050 Short to ground in power circuits C1051 Motor, excess current through phase winding A C1052 Motor, excess current through phase winding B C1053 Motor, excess current through phase winding C C1054 Motor, open phase windings C1055 Motor, open circuit of phase winding A C1056 Motor, open circuit of phase winding B C1057 Motor, open circuit of phase winding C C1058 Motor, short circuit of phase windings C1059 Short circuit of motor phase A winding C1060 Short circuit of motor phase B winding C1061 Short circuit of motor phase C winding C1070 Fault not recognized C1 071 Control unit, RAM error of the electronic unit C1072 Control unit, ROM error of the electronic unit C1073 Control unit, error EEPROM of the electronic unit C1074 Relay of the electronic unit C1075 Control unit, excess temperature of the radiator C1076 Supply voltage of the ECU elements is below the minimum threshold C1077 Voltage on the power capacitors is below the minimum threshold C1078 Charging time power capacitors C1079 The current of one of the phase windings is above the maximum threshold C1080 Breakdown of at least one of the upper power transistors
Battery problems
Based on this, we can draw the first conclusions about the cause of the breakdown. A common cause of malfunction is low voltage in the on-board network. The fact is that for the amplifier to function, a supply voltage of 13.5V is required.
First of all, we test the battery, if everything is fine with it, then we’ll look into it further. The problem may have occurred when you removed the battery for charging. To make the electric booster work again, turn the wheels to the extreme position and back 5-6 times, very often this is enough to resume operation.
Electric power steering
This device increases the force that is transmitted in the steering system. Simply put, you can turn the steering wheel with two fingers. Previously, VAZ models were equipped with hydraulic boosters (power steering), but starting with the Lada Kalina they were abandoned.
The EUR was developed. In terms of force transmission power, power steering is preferable, however, it has many disadvantages:
- Engine power take-off.
- Constant monitoring of the level in the tank is necessary.
- Checking oil lines.
The electric amplifier is devoid of all these disadvantages. And it is even easier to repair than power steering. But it also has its own faults.
EUR device
Main components of an electric amplifier:
- Mechanical part.
- Electrical component.
- Electronic control unit (ECU) with peripherals.
The mechanical part includes the actual steering parts, connecting parts and mounting hardware. That is, the input and output shafts, bracket, nuts, bolts, studs and springs. Well, there’s also an adjustment lever for changing the angle of the steering wheel.
Electric, actually the amplifier motor itself. The most vulnerable is the electronic component. ECU and connectors with sensors.
Diagnostics
First of all, it should be noted that a breakdown that occurs with the EUR is determined by the indication on the instrument panel. It has a light bulb with a schematic representation of a steering wheel and an exclamation mark.
Normally, after starting the engine, it lights up for a couple of seconds and then, after self-diagnosis performed by the ECU, goes out when no faults are detected. But when a problem is detected, the indication does not turn off.
Do not forget that the electric amplifier controller communicates peripherally with the vehicle's ECU. Therefore, it is better to identify this kind of breakdown at a service station using a computer.
However, individual devices are currently available for sale to test the functionality of certain electronic components. They are easy to use and are quite inexpensive - up to 1.3 thousand rubles.
Thus, an individual scanner allows you to find out what happened to the car. It should be connected to the ECU - the latter will generate error codes. All related to ESD malfunctions begin with “C”. In particular, C1013 signals that the voltage in the on-board system is too low - this means that it is not enough for the amplifier to operate normally.
According to experts, the most common problems are the following:
- breakage, burning or short circuit of the wires supplying the EUR (they are red and black, have a larger cross-section than the others, and are also included in a separate connector);
- fuse blown;
- low voltage.
In the latter case, you need to check both the battery and the generator.
Purpose of the unit
Due to the operation of the ESD, the load and force on the steering wheel are reduced when making a turn. The unit greatly facilitates driving, and at high speed it does not allow dangerous maneuvers.
The unit includes the following components:
- Steering wheel;
- Column;
- Shaft;
- Electric motor;
- Steering mechanism;
- Electronic control unit (ECU);
- Torque sensor.
When turning, the electric power steering is activated. The torque is provided by an electric motor, which is present in the EUR design. The torque sensor measures the indicator and sends it to the ECU. Depending on the angle of rotation, the block calculates how much power needs to be given to the motor. The switch located under the steering wheel contains a device that determines the angle of rotation. The torque and rotation sensors transmit data to the ECU, which “determines” whether the electric motor is running at the desired speed.
On previous generations of VAZ cars, a hydraulic booster was installed; it gave almost the same force in all rotation ranges. As for the electric power steering, the degree of force depends on many factors - the speed of rotation of the steering wheel and its angle, the speed of the power plant, the speed of movement.
Differences between EUR and power steering
The electric amplifier differs from the hydraulic one in the absence of fluid and the pump necessary to pump this fluid. Also, the hydraulic power steering operates entirely on mechanics, unlike the electric power steering, in which mechanics are involved only in the rack and steering wheel. EUR is much simpler and easier to maintain, but in terms of repairs it is much more expensive.
Advantages and disadvantages of EUR over power steering
Although the EUR is more modern and technologically advanced, it has both advantages and disadvantages over the power steering.
Advantages:
- The simplest design that does not require constant monitoring of the liquid level (dixtron);
- There is no need to service the power steering pump, since it simply does not exist;
- Reduction of force with increasing vehicle speed;
- Ability to programmatically adjust steering wheel force;
- Reliability of the design;
- Compact, no bulky pump in the engine compartment and no extra hoses;
- The simplicity of the steering rack and its reliability, since it is dry and there is simply nothing to leak in it (everyone knows very well about the disease of “wet” racks);
- High power consumption, at some points the electric power steering can take up to 40% of the electrical power of the car’s generator and cause voltage drops in the on-board network;
- Possibility of overheating of the electric motor when driving on a dirt road (track) up to the complete shutdown of the power steering;
As you can see, the more modern power steering has many more advantages, which is why it is gaining great popularity among cars at the present time.
Bottom line
You can carry out diagnostics and minor repairs to the Priora's electric power steering with your own hands. To do this, it is enough to determine what caused the failure and fix the problem, following our advice. It is better to entrust a complete replacement of the electric amplifier to professionals.
In VAZ Priora cars, the electric power steering performs the function of making the vehicle easier to control. With the help of the ESD, the driver can easily turn the steering wheel with one hand. What malfunctions are typical for the amplifier and how to replace the EUR in a garage - we will talk about this below.
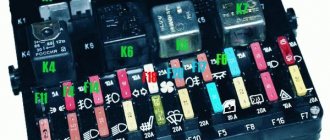
Fuse box location
If you suspect that a fuse has blown and you want to check it, then the question arises: where is the Priora electric power steering fuse located? The control mounting block is located to the left of the steering wheel. Its opening scheme is simple. All you need to do is turn the three latches 90˚ and remove the cover, as shown in the photo, and you get to the brain stuffing of the car.
Here you can check and replace the failed fuse, then close the lid by pressing it tightly and snapping the three latches back 90˚ in the opposite direction.