There are a number of signs that indicate that the Ford Focus II clutch should be bled as soon as possible. So, if when the pedal is fully depressed the clutch does not disengage 100%, but a grinding noise occurs when reverse gear is engaged, this situation may indicate the presence of air in the assembly. In addition, if the lubricant was changed or repairs were made due to the loss of tightness of the unit, this also becomes an indication for working with the clutch.
The main factor on the basis of which a car’s clutch is pumped is the removal of air from the lubricants. The clutch cannot operate correctly when there is air in the mechanism. So, if any problems were discovered in the functioning of this unit, you should begin to eliminate them, because further operation of the vehicle can be dangerous.
The greatest efficiency when pumping is possible only if you check and adjust the pedal, since it will be necessary to absolutely exclude the movement of the piston pusher, which acts as a shut-off valve.
Summarizing
High-quality and professional repairs are the key to long-term operation of your car. However, service specialists do not always take their work seriously, and therefore the effectiveness of their actions is low. If you think that you are capable of pumping the clutch yourself, do it, taking into account the recommendations of our article. Armed with the tools and help, you can fix your second-generation FordFocus and save yourself from more serious problems down the road.
Sources:
https://v-mireauto.ru/kak-prokachat-sceplenie/ https://avtodoc24.ru/kak-prokachat-stseplenie/ https://avtosfera76.ru/remont-i-zamena/kak-prokachat-stseplenie- na-FORD-fokus-2.html https://FORDprof.ru/FOCUS-2/prokachka-stsepleniya-FORD-FOCUS-2.html
How to change the clutch
Replacing the clutch yourself is not a complicated procedure and requires certain actions. To do this you need:
- Remove the gearbox.
- Mark the location of the disc housing and flywheel (this is only necessary if installing an old pressure plate).
- Remove the bolts securing the disc to the flywheel.
- Remove the pressure and driven discs. It is important to inspect the driven discs for chips, cracks and other damage.
- Next, inspect the friction linings. The driven disk must be replaced if the linings are covered with oil, the rivets are recessed by 0.2 centimeters or less, and also if the connections are loose.
- Inspect the places where the driven disk is fixed in the hub, carefully moving them with your hand. When they are damaged or move too freely, the disc must be replaced.
- Check the driven disk for runout. If it exceeds 0.5 mm, then it also needs to be replaced.
- Inspect the contact surface of the flywheel and pressure plate. If scuffs, scratches, or signs of wear are noticeable, replacement of components is inevitable.
- Next, replace the pressure plate and inspect the diaphragm spring (there should be no damage to it).
- Check the joints between the casing and disk links. If there is damage, the pressure plate needs to be replaced.
- Inspect the compression spring rings from all sides. There should be no cracks, chips, etc. on their surface, otherwise they will need to be replaced.
- Check the movement of the driven disk for ease of movement along the channels of the gearbox shaft. If it jams, a solution to this problem is required.
- Apply special lubricant (grease) to the hub splines.
- Install a new clutch.
After the clutch has been replaced, you need to check the functionality of the unit. First, just depress the pedal, then alternately shift all gears and test the car on the move. If problems occur, the clutch needs to be adjusted.
Useful tips for long-term use of the Ford Focus 2 clutch
In order for the entire assembly to work smoothly and for a long time, you should not keep the clutch clamped for a long time. Beginning car owners often suffer from this after studying at a driving school. There are two dangers in this situation:
- Your leg will get tired quickly.
- The pedal remains in the depressed position, that is, the driven disk slips and wears out. Although the release bearing assumes a long service life, constant pressing and holding will reduce the life of the part.
If you had to stand in a traffic jam or at a traffic light, it is better to put the car in neutral and use the clutch only while driving. When the clutch slips, it is noticeable on the tachometer readings. If pressing the gas pedal sharply increases the speed, but soon it drops, and only then the car begins to accelerate, it’s time to adjust the clutch pedal. The assembly may need to be completely replaced.
Bleeding the hydraulic clutch
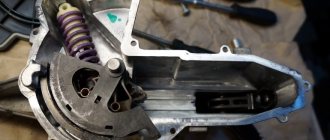
In short, carefully pull the entire shaft and pull it out of the gearbox. Now we also move the stand and the fist to the left to the side, while removing the shaft from the hub or knocking it out if it is firmly seated, or using a special puller we squeeze out its drive shaft.
Then he takes a slotted screwdriver and carefully presses it, inserting it into the hole from the right shaft into the gearbox, but in no case should you hit anything in the gearbox around it and rest the screwdriver firmly against the shaft that was spinning. Now the assistant, to make sure that the screwdriver is in the right place, staggers the shaft towards the gearbox and away from the gearbox as much as possible, if the screwdriver walks with the shaft, then we carefully begin to hit it with a hammer through the board.
At the same time, visually checking and monitoring that we are knocking in the right place and not damaging anything around the checkpoint. The left shaft comes out of the gearbox and the remaining oil drains from the gearbox. Now you can take it out and set it aside, being careful with it. There is a retaining ring on it - if it is ok, then leave it, if it is bad, then replace it.
All holes in the gearbox need to be plugged so that nothing falls or gets in there. At the same time, the support must also support them; it cannot be removed completely.
How to change the clutch master cylinder
We remove the hose, wipe the bleeder fitting dry and put a protective cap on it. We install the mudguard in place. Add fluid to the reservoir, bringing its level to normal.
If necessary, you can bleed the clutch hydraulic drive by freeing access to the fitting from above through the engine compartment. Do this until the liquid flowing from the tube has no bubbles. When pumping, constantly monitor the level.
Under no circumstances should it be allowed to fall below the minimum level. Do not be late in adding fluid - otherwise, if the level drops very low, there may be air in the system and all operations will need to be repeated again.
Reasons why the clutch slips
The answer to the question “why does the clutch slip on a car?” lies in the design features of this mechanism. It consists of several disks adjacent to each other that transmit torque from the engine to the gearbox. Normally, there is a large friction force between them, which is removed when the pedal is pressed. When these discs are worn out, dirty, or the pressure adjustment is off, friction becomes insufficient even with the pedal released, and the clutch discs slip relative to each other.
Overheating is a common cause of clutch slipping.
The reasons why the clutch slips are not always due to its wear. Sometimes slippage occurs due to contamination of the surface of the disks, which reduce the friction force, as well as when the clutch drive is misconfigured. The answer to the question “why does the clutch stink when you slip?” often involves overheating. If you try to get out of the mud or snow in a stuck car, repeatedly starting and changing gears, the discs are subjected to increased load, overheat, and the friction force decreases. Therefore, if the clutch begins to slip, the reason is either its malfunction or extreme operating conditions.
Why does the new clutch slip? The most likely cause is incorrect assembly or adjustment of the unit (for example, the driven disk is installed on the wrong side)
What could be the consequences of a slipping clutch disc?
Regardless of the reasons for the malfunction, the consequences of a slipping clutch do not bode well and are fraught with the following problems:
- increased fuel consumption;
- overheating of the gearbox (especially in the case of a “robot”);
- accelerated wear of gearbox oil;
- wear of the gearbox input shaft and its bearings;
- uneven surface wear and deformation of the flywheel;
- complete clutch failure.
Removing the gearbox
Before removing the gearbox, you must turn off the power to the battery. To do this, simply remove the negative terminal from the battery. The need is that before removing the box you will need to remove the starter and also work on some electrical connectors.
When removing the gearbox, the help of at least one mechanic/neighbor/comrade is required, since the weight and geometric proportions of the gearbox are quite inconvenient for independent dismantling. Box removal process:
- Place the car on a viewing hole or on a lift.
- Remove the air filter from the car.
- Remove the engine crankcase protection.
- Drain the oil from the gearbox. It is necessary to drain on a heated engine, since in this case the engine has good fluidity, and reduce the time for draining.
- Remove the front wheel drives.
- Remove the rocker from the car. It is secured with bolts with self-cutting heads. When reinstalling the rocker, these bolts must be replaced.
- Remove the gear shift housing cover by unfastening the seven clips.
- Remove the cable from the gear shift lever.
- Remove the front thermal shield.
- Remove the air filter mounting bracket.
- Remove the wiring harness from the speed sensor.
- Remove the hose from the hydraulic drive tube.
- Remove the starter.
- Support the engine so that it does not interfere with further work. Place the supports on the car body.
- Install a similar support under the gearbox.
- Disconnect the ground wire from the bracket stud.
- Remove the left power unit support along with the bracket.
- Unscrew the bolts on the top, left, bottom and right of the gearbox to the engine in order.
- Remove the rear power unit support.
- Move the box as much as possible until the input shaft can be removed from the driven disk hub.
- Move the box back as much as possible, remove the support and tilt the back of the box as much as possible, and dismantle it. It is not recommended to rest the input shaft against the petals of the diaphragm spring. There is a possibility of their deformation.
- The box has been removed. Now we need to work on the clutch.
Replacement algorithm
Of course, it is most rational to trust the professionals to replace units on modern cars. The presence of appropriate equipment and tools allows specialists from car service centers and service stations to perform the entire required range of work as quickly and with guaranteed quality. Some car owners who have the necessary knowledge and tools can replace the clutch themselves.
Regardless of the chosen option, this algorithm includes the following steps:
- Dismantling the battery shelf (you need to unscrew 4 nuts).
- Unscrewing the bolt securing the electrical wiring to the gearbox.
- Removing the gearbox fastenings to the power unit (unscrew 3 bolts).
- Removing the clutch hydraulic drive tube.
- Raising the car on a lift or jack (in case of replacing the clutch yourself).
- Disconnecting the cables and completely draining the transmission oil from the gearbox.
- Removing the lower support of the vehicle's power plant.
- Unscrewing the ball joint nuts and removing the drives.
- Hanging the engine and gearbox.
- Removing the gearbox.
- Removing the clutch basket (unscrew 6 bolts).
- Dismantling the basket and driven disk (in this case, it is necessary to hold the flywheel with a screwdriver, preventing it from spinning).
The next stage will be the direct replacement of failed and worn-out Ford Focus 2 clutch elements. Then you need to install the basket in place, having previously centered it on the flywheel pins. The final stage involves performing all of the above operations in reverse order. Properly performed manipulations will ensure maximum clutch life, so it is best to trust such work to trusted specialists.
Why does the clutch slip only under certain conditions?
The reasons why the clutch slips at high speeds, when accelerating or after the car has been idle, are different. The most common of them:
Characteristic signs of clutch wear
- incorrect installation or configuration;
- ambient temperature;
- aggressive driving style;
- heavy load (for example, trailer);
- natural wear and tear of parts.
If disc slipping occurs only in certain conditions, for example, when it’s cold, the clutch slips in 3rd and 4th gear, or if you change the clutch and it slips, then identifying a specific malfunction should consider the options that will be discussed below. All the main symptoms and causes of transmission slipping are presented in the table.
| Problem | Cause | What to do |
| Clutch slips when cold or in winter | A cold clutch disc is already hot. When heated, bodies tend to expand, so the heated disk begins to press harder against the also heated basket and flywheel. | If the clutch slips when cold, you can drive it, but you shouldn’t put off repairs too much, as this is usually a sign of large deterioration of the friction surfaces. |
| Water (snow) got into the checkpoint bell. | if the clutch slips in the cold due to water getting in, you just need to let it warm up and dry | |
| Clutch slips when hot | When heated, the friction force decreases, so the hot clutch slips and cannot transmit high torque from the engine to the gearbox. | If the clutch slips at speed after warming up, it must be changed, since due to constant heating the defect will quickly progress. in the case of a “wet” clutch with an oil bath (usually used on DSG “robots” and the like), you first need to check the amount of lubricant; perhaps it’s just a lack of oil. |
| clutch slips after crossing a ford or large puddles | if after fording, driving through mud and puddles or in heavy rain the clutch slips, the friction discs have become wet/contaminated | you need to disassemble and clean the clutch parts. To prevent contamination, do not depress the clutch while in water or mud. |
| Clutch slips after repair | the details didn't fit in | check the adjustment, break in the clutch |
| incorrect drive adjustment | adjust the clutch release mechanism | |
| incorrect assembly | inspect the clutch for correct assembly, check with the instructions, assemble correctly | |
| incompatibility of components or wear of old parts | if the clutch slips after replacing its individual parts (for example, the disc is new, but the basket is old), check whether the parts fit together and whether the old parts are overused | |
| New clutch slips | incorrect adjustment (basket pinched) | check the adjustment, loosen the basket pressure |
| incorrect assembly | check the correctness of assembly, assemble correctly | |
| incompatible parts selected | check new and old parts, their articles, if identified |
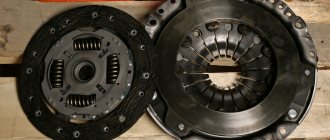
What kind of clutch fits Ford Focus 1
All Focus models with manual transmission use a single-plate dry clutch. Its advantage is that it is equally a fairly practical and simple design. There is one significant drawback in this clutch; it is due to the fact that wearing parts, for example, the driven disc and release bearing, are not very accessible. To access it, you need to disconnect the gearbox from the engine and dismantle it, and this is a job that requires special tools and certain knowledge. Therefore, it is more appropriate to leave the replacement of clutch units to specialists.
The most popular Ford Focus 1 clutch brands:
- “Sachs” (Germany) – from 5800 rubles.
- “Valeo” (France) – from 5800 rubles.
- “Kraftech” (Türkiye) – from 4,500 rubles.
- “Luk” (Germany) – 5500 rub.
The price of a Focus 1 clutch directly depends on the type of engine and year of manufacture. In order for the clutch to fit 100%, the best solution is to select it according to the individual VIN number of the car.
Procedure for bleeding the clutch on a Ford Focus 2
Clutch failure is an unpleasant situation for many motorists; signs of such a malfunction are the inability to shift gears normally, and in many cases the gearbox must be removed to replace parts. But if parts of the hydraulic drive fail, or air gets into the system, repairs are much simpler; sometimes it is enough to just bleed the clutch.
Bleeding the hydraulic clutch drive (HC) on a Ford Focus 2 is not difficult to do, the work takes very little time. This standard operation on the Focus is performed in the same way as on other passenger cars with a manual transmission, only it is necessary that all parts of the hydraulic system are in full working order.
Replacing and adjusting the Ford Focus 1 clutch
The Ford Focus 1 has a design whose reliability is beyond doubt among consumers and has been proven over years of successful operation. However, after a certain time, it may be necessary to replace or repair various components and systems, including clutches.
The main function of the clutch is to reduce gearbox jerks, interrupt engine torque when changing gears, etc. In addition, it plays the role of a safety clutch and is a means of ensuring safety. As a result, damage and destruction of more expensive components, including the gearbox, drive axle and engine, does not occur.
Clutch bleeding procedure
On a Ford Focus 2 restyling 1.8, bleeding is carried out by bleeding air through the fitting of the clutch slave cylinder (CLC), this procedure is usually performed by two participants. An assistant is needed here in order to periodically press the PS, and a very important condition when pumping is not to forget about adding brake fluid (F) to the filler tank. In order to bleed the clutch on a Focus, you should prepare the following tools and materials:
- keys for eleven (especially for bleeding the brakes) and seventeen;
- a piece of transparent polyethylene tube;
- a container for draining the liquid (you can take a plastic bottle and make a hole in the lid for the tube);
- bottle of brake fluid (DOT-4 recommended).
We pump the GPS as follows:
- pull off the cap from the RCS fitting, it protects against dirt;
- We attach a polyethylene tube to the tip of the fitting, and take its other end into a container prepared for draining;
- the second of the participants presses the pedal several times (“pumps up the clutch”), holds the pedal pressed with his foot;
- We unscrew the fitting using a bleeder wrench, holding the RCS (its plastic adapter) with a 17 wrench, loosen it by about three-quarters of a turn, air should come out of the working cylinder along with the brake fluid;
- PS remains pressed, then tighten the fitting;
- Now in the cabin you need to release the pedal and repeat the inflation;
- again we carry out the operation of bleeding the air, performing all these actions until liquid without air begins to flow out of the control center.
All this time you need to monitor the level in the tank, and when it drops closer to the minimum, periodically add fuel fluid to the top. At the end of pumping, we check the fluid level again (it should be between the min and max marks), screw on the reservoir cap, and check the operation of the car while driving. In this case, the pedal should be sufficiently elastic; if necessary, we pump it again. For the Ford Focus 2 restyling 1.6 version, the clutch is pumped in exactly the same way, the procedure does not change here.