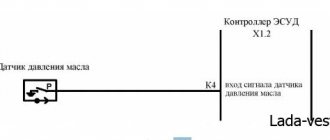
Causes of error P0140
- The vehicle's ECM has detected a lack of response from oxygen sensor 2 (bank 1), which in turn indicates a sensor failure.
- Oxygen sensor 2 (bank 1) does not respond (sensor voltage does not change between 410-490 mV) to the engine control module (ECM) fuel cut or enrichment signal for more than 74 seconds.
- The mass air flow sensor has failed.
- Damaged electrical wires or connector of oxygen sensor 2 (bank 1).
On which cars is this problem most common?
The problem with code P0140 can occur on different machines, but there are always statistics on which brands this error occurs more often. Here is a list of some of them:
- Audi (Audi a4)
- BMW
- BYD F3
- Chery
- Chevrolet (Chevrolet Aveo, Captiva, Cruz, Lacetti)
- Chrysler (Chrysler Sebring)
- Citroen (Citroen C3, C4, ds4)
- Daewoo (Daewoo Nexia)
- Dodge (Dodge Stratus)
- Ford (Ford Focus)
- Great Wall (Hover H3, Hover H5)
- Hyundai (Hyundai Santa Fe, Tucson, ix35)
- Kia (Kia Sportage)
- Lifan (Lifan Solano, x60)
- Mazda (Mazda 3, Mazda 5, Mazda 6)
- Mercedes
- Mitsubishi
- Nissan (Nissan Almera, Maxima)
- Opel (Opel Antara, Astra, Zafira, Corsa)
- Peugeot (Peugeot 206, 307, 308, 406)
- Saab
- Skoda (Skoda Octavia)
- Ssangyong
- Subaru (Subaru Forester)
- Suzuki (Suzuki Grand Vitara, sx4)
- Volkswagen (Volkswagen Golf, Passat)
- Volvo
- VAZ 2105, 2107, 2114
- Lada Vesta, Granta, Kalina, Largus, Niva, Priora
- UAZ
Other errors can sometimes be encountered with fault code P0140. The most common ones are: P0036, P0037, P0038, P0133, P0136, P0138, P0141, P0161, P0327, P0420, P0455, P1135, P1138, P2096.
How does a mechanic diagnose a P0140 code?
When diagnosing this error, the mechanic will do the following:
- Reads all stored data and error codes using an OBD-II scanner, clears error codes from computer memory, and test drives the vehicle to see if P0140 appears again
- Observe real-time oxygen sensor data using a scanner to determine if the sensor voltage is outside the 410-490 mV range
- Checks whether the mass air flow sensor responds to changes in throttle position
- If no problem is found, continue diagnosis following the procedure established by the vehicle manufacturer
Symptoms of malfunction
The main driver symptom of P0140 is the MIL (Malfunction Indicator Light) illumination. It is also called Check engine or simply “check light”. They can also appear as:
- The Check Engine Light (CEL) or Malfunction Indicator Light (MIL) will illuminate.
- Possible high fuel consumption.
- There is too much smoke coming out of the exhaust pipe.
- There likely won't be any other noticeable problems other than the "Check Engine" on the dashboard.
The reason is this: the oxygen sensor at the rear or after the catalytic converter does not affect the fuel supply. It only measures the efficiency of the catalytic converter. For this reason, you most likely will not notice any problems with the engine.
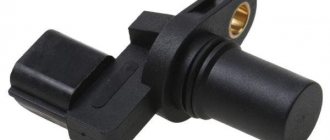
Types of sensors and operating principle
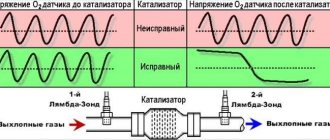
The lambda probe is installed in the exhaust system. Sensors are divided into two types: two-point and broadband.
The two-point sensor consists of ceramics, the elements of which are coated with zirconium dioxide on both sides. Installed in front of or behind the catalytic converter.
The principle of operation is to measure the level of oxygen concentration in the environment and exhaust gases. If the level changes and becomes different, a voltage is created at the ends of the sensor elements, from low to high. Low voltage is created if there is excess oxygen in the system.
Otherwise, if the system does not have the required level of oxygen, high voltage will be created. These signals are sent to the engine control unit, which distinguishes them by current strength.
The wideband sensor is a more modern design. It also has two ceramic elements. One of them can be called “pumping”. It is responsible for activating the process of pumping or removing air from the system.
The second element can be conventionally called “two-point”. The principle of operation is based on the fact that as long as there is the required amount of oxygen in the mixture, the current strength on the “pumping” element does not change and is transferred to the “two-point” element.
It, in turn, receiving a constant current from the “pumping” element, maintains a constant voltage between its elements and is inactive.
As soon as the oxygen level changes, the "pumping" element supplies the changed voltage to the "two-point". This, in turn, ensures either pumping air into the system or pumping it back.
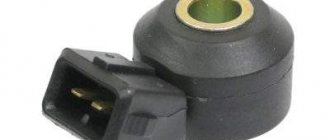
Replacing the oxygen sensor
If any damage occurs, the sensor must be replaced. You can try to do this yourself. Let's consider the situation of replacing a lambda probe on a VAZ 2114:
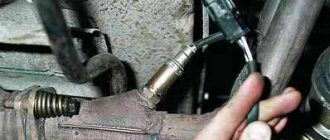
- We put the car on an overpass or drive it into a pit and remove the motor protection (to replace the sensor with the neutralizer).
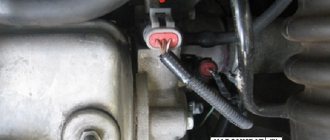
- We are looking for the wires from the oxygen sensor, and follow them to the sensors themselves, they are located on the catalyst (the first before the converter, the second after).
- We cut the clamps and disconnect the connectors.
- Let the system cool down.
- We take a wrench for “22” or special. head and unscrew the sensor.
- We take a new sensor and install it in place of the old one. We tighten the nuts.
- We connect the wires to the connectors.
- Use new clamps to secure the wires to the cooling system (do not allow contact with the exhaust pipe).
- Install the protection in reverse order.
On other car models, replacing the sensor will be identical.
Replacement problems
When replacing, the old sensor may stick to the pipe. In this case, proceed like this:
- Apply wd-40 generously and try to unscrew
- Turn on the engine, heat the exhaust system and unscrew the sensor
- We try to heat (being careful) the sensor itself and unscrew it
- Tap lightly with a hammer and try to unscrew it again
- If that doesn't help, try thermal shock. Pour cold water onto the well-heated sensor. Try unscrewing it again.
Oxygen sensor price
The price of an oxygen sensor will vary by region and model. It ranges from 1000 to 3000 rubles . Buy a lambda probe in specialized stores and only with a guarantee.
Causes of oxygen sensor failure
- Coolant or brake fluid has come into contact with the sensor housing.
- The fuel used has a high lead content
- Severe overheating of the sensor caused by unclean fuel (clogged cleaning filters)
- The sensor has simply expired
- Mechanical damage to the sensor while the vehicle is moving.
A failed sensor will affect the operation of the vehicle as a whole and lead to additional problems. But using them you can immediately determine a possible breakdown of the sensor and replace it in a timely manner.
Related problems when the oxygen sensor fails
- The car began to consume more fuel than usual
- The car began to move jerkily
- The engine became unstable
- The normal operation of the catalyst is disrupted
- When testing for exhaust gas toxicity, the result gives inflated values.
In conclusion, I would like to give advice: in order to avoid the problems outlined above in the future, monitor the performance of the lambda probe. Check its condition every five to ten thousand kilometers.
Causes of P0132
Depending on the year, make, and model, the P0132 code can have several causes. Here are some of the most common ones.
- Oxygen sensor malfunction. The most common cause is a malfunction of the sensor itself. Constantly exposed to exhaust fumes and temperature, the O2 sensor has a typical service life of less than 5 years.
- Electrical circuit malfunction. As wires are exposed to the environment, harnesses, connectors, and the sensor itself can be physically damaged by external influences. Water and corrosion are also common causes.
Common causes of violation
Error P0134 does not occur very often. There are few probable reasons for the occurrence of such a violation, and they all indicate an incorrect signal from a specific sensor. Based on this, you can determine the most popular options for the occurrence of error P0134:
- Presence of a short circuit;
- Oxygen sensor malfunction;
- Broken wires and oxidation of contacts.
During diagnostics using special equipment, the causes of the malfunction are identified quite quickly and accurately. In most cases, this violation is provoked by a breakdown of the oxygen sensor and in 5% of them the malfunction is directly related to a short circuit, an open circuit and the presence of oxidation processes in the contacts.
In situations where, along with the error in question, the presence of errors with code P0171 is also displayed, we can conclude that there is a possibility of a break or short circuit. The second error in most cases appears when the air-fuel mixture entering the engine is too lean. It is often accompanied by error code P0134, since in the exhaust circuit the first oxygen sensor is directly responsible for the supply. When the information supply stops, the ECU spontaneously reduces the fuel consumption. Thus, the air-fuel mixture becomes lean.
What to do if error P0134 occurs
To resolve error P0134, which reports a loss of signal from the oxygen sensor, you will need to diagnose the sensor's power circuit and test it directly. To do this, the car must be placed on a “pit” or overpass. It is recommended to start the test by diagnosing the wiring. If there are no problems with it, and the contacts are not oxidized, you can proceed directly to checking the serviceability of the sensor.
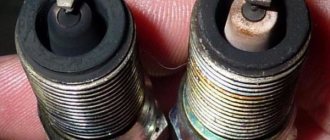
Before you start diagnosing the sensor with a voltmeter, you need to visually inspect it. If there is a problem with the sensor heater or the mixture is too rich, there will be traces of soot on the sensor, which often clogs the element, causing it to fail. Another common cause of lambda probe failure is damage to it by lead, which is excessively contained in the gasoline used. If there are white deposits on the oxygen sensor, this indicates poor additives in the fuel used.
If an external inspection of the oxygen sensor does not help identify the problem, you can proceed to checking it with a voltmeter. Diagnostics of the oxygen sensor occurs as follows:
- The car engine must be warmed up to operating temperature;
- Next, the probes of the multimeter, switched to voltmeter mode, are connected between the signal wire and the ground wire;
- The car engine speed increases to 2500-3000 per minute.
Install the lambda probe decoy
A broken or incorrectly functioning oxygen sensor cannot be repaired, but it can be replaced with an expensive new one or a fake one can be installed. Many car owners choose this simple method of deceiving the electronic control unit. In this case, the snag sends an average (similar to the working) signal to the ECU and the computer thinks that everything is fine. In this case, the whole point of engine adaptability is lost. The computer does not understand how well the mixture is prepared and how environmentally friendly the exhaust is. Without a normal sensor, the ECU goes crazy, which leads to increased fuel consumption and other troubles.