The electrical network of any car is powered by a generator, which is driven by the engine using a belt drive. Its revolutions are constantly changing, ranging from 900 to several thousand, causing the rotor to rotate accordingly. For the normal operation of all electrical appliances and charging the battery, the voltage in the on-board network must be stable, which is ensured by the relay regulator. Being the weakest link in the power supply system, the device first of all needs to be checked when problems with battery charging and other breakdowns in the vehicle's electrical network are detected.
Possible causes of failure of the regulator relay
Modern relay models have a relatively long service life. But some factors can lead to premature failure of the element, namely:
- Low quality of the part itself.
- The occurrence of a short circuit.
- Mechanical damage to the part.
Popular brands:
Acura ZDX, Audi A7, Citroen C4, Infiniti Q60
The problem may also be caused by water ingress.
On some generator models, replacement of the electronic regulator relay will be necessary if the brushes are worn out. Under normal conditions, the life of the voltage regulator exceeds 60,000 km.
Principle of operation
The autogenerator voltage regulator is designed to maintain the voltage of the on-board network within the required limits under any operating mode and at different generator speeds, load changes and changes in external temperature. It is also capable of performing additional functions - protecting the generator from overloads and emergency operation, automatically connecting the excitation windings or the generator failure alarm system to the on-board circuit.
The operation of any voltage regulator is based on the same principle and is determined by the following factors:
- Rotor speed.
- The current strength that the generator delivers to the load.
- An indicator of the magnetic flux created by the field winding current.
Higher rotor speeds determine an increase in generator voltage. An increase in current strength on the excitation winding makes the magnetic flux stronger, and at the same time the voltage. Any voltage regulator stabilizes it by changing the excitation current. When the voltage increases or decreases, the regulator decreases or increases the excitation current, regulating the voltage within the required limits.
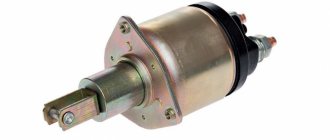
The relay regulator itself is an electronic circuit with outputs to graphite brushes. It is installed both in the generator body itself next to the brushes, and outside it, and then the brushes are attached to the brush holder.
Main symptoms of a malfunction
There are two main “symptoms” of a relay failure. This is an undercharge or overcharge of the battery. Also, a malfunction of a part can be determined by the dim glow of the headlights or by a change in their brightness when the engine speed increases.
If undercharged, the car will start with great difficulty. However, the manifestation of this “symptom” may not be related to the generator. Therefore, first of all, you should make sure that the battery is in good condition.
If the battery is overcharged, there is no doubt that the problem lies precisely in the damaged relay. There are other possible causes of overcharging, but they are extremely rare. Overcharging may cause the battery to boil over. This can be determined by the decrease in the amount of electrolyte in the jars and the appearance of a white coating on the battery.
If you suspect that the battery is overcharged or undercharged, you should diagnose the generator.
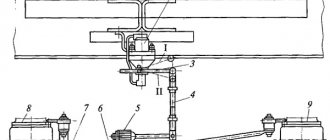
Charge circuit design and diagram
The technical condition of the main components of the car is displayed on the instrument panel. Thus, the performance of the vehicle depends on the reliable operation in any weather of the electrical equipment power system. It consists of a generator, battery, fuse F16, terminals, connecting wires and a control light. A defect in one of these elements is the reason why the VAZ 2114 injector lost charging.
At the initial moment after turning on the ignition key, sufficient voltage is supplied through the light bulb and the isolation diode (terminal D) to excite the generator. Further, during rotation, mechanical energy is converted into electrical energy.
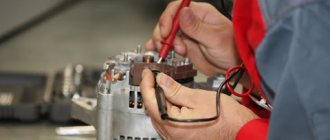
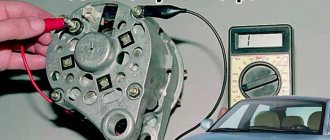
Checking with a multimeter without dismantling
You can check the condition of the relay using a multimeter. In this case, the generator is not dismantled. Before starting diagnostics, it is enough to clean the battery terminals (their oxidation can affect the operation of the car and the readings of the measuring device).
The diagnostic procedure is as follows:
- First you need to start the engine and let it warm up for a few minutes.
- Next, you need to connect the multimeter probes to the battery terminals. The device displays a value of 20V.
- After this, the voltage is measured. It should be between 13.2–14V. Such readings are considered normal for most cars.
- Now you need to increase the engine speed (up to 2-2.5 thousand). The voltage should increase by about 0.2V.
- If it exceeds 3,500 rpm, the multimeter should show 14–14.5V, but no more.
Serious deviations in the readings of the device indicate the presence of breakdowns of the relay regulator.
Factors influencing the price of the service - replacement of the generator relay in Moscow
It is common knowledge that the cost of car repairs depends on several aspects. Among them are the following:
- cost of spare parts (original, China, alternative manufacturers);
- personnel qualifications;
- level of equipment of the service station (availability of painting booths, lifts, special tools and equipment, etc.).
For example, the price of the service - replacing a generator relay in Moscow will also depend on factors such as the age, make and model of the car. We are confident that car services will compete for your order and offer the best conditions. The centers have a system of discounts for regular customers.
How to test a relay with a lamp
On many modern cars, the relay is combined with brushes. In this case, you can check the regulator using an incandescent lamp. The procedure will be as follows:
- To get to the part, you need to unscrew the mounting bolts and remove the terminals. The relay is located at the rear of the generator.
- To check, you need to prepare a 12V light bulb with a socket, wires, a voltmeter, and a power supply (no more than 20V).
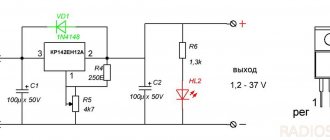
- Next you will need to assemble the following circuit.
- After connecting the light bulb, it should light up. At the same time, the voltage gradually increases. When it reaches 14.5V, the light should go out. If this happens later, it means the relay regulator is faulty.
When the voltage decreases, the lamp should light up again.
This test method can also be used for some models of regulators that are not combined with brushes.
How to replace the voltage regulator on a VAZ 2113-VAZ 2115?
Note! The work of replacing this unit can be performed both on a removed generator (It’s even more convenient) and on an installed one (If you decide to remove it, then in this case, study the detailed article on this subject, and it’s called: “Replacing a generator on a car "), but if you do not want to remove anything from the car, then be sure to disconnect the minus terminals from the battery before starting work; how to do this, read the article: “Replacing the battery on a car", in paragraph 1 everything is described in detail!
Removal: To remove the regulator, first you need to disconnect the terminals from the generator and the wire that is still attached to it (The terminals are disconnected by unscrewing the nut that secures them, and the wire is generally disconnected easily, pull it with your hand and it will be disconnected, more details on how to do all this, we indicated in the article to which a link is given just above, this article is called: “Replacing a generator on a VAZ”), as soon as everything unnecessary is disconnected, proceed to removing the cover, to do this, use a screwdriver to remove the seal as shown in the photo 1 and then, using a socket head with a knob, unscrew the three nuts that secure the cover (The nuts are also indicated in photo 1 with arrows) and remove the cover after that, as soon as the cover has been removed, remove the three spring washers from the studs so as not to lose them (see photo 2) and proceed to removing the voltage regulator, it is attached with bolts and the terminal is also connected to it with a screw, so unscrew the screw securing the terminal (see photo 3) and put it aside, then unscrew the two nuts on the sides that secure the regulator (see . photo 4) and completely remove it from the generator and check for serviceability (we already wrote how to check at the beginning of the article).
Types and differences of VAZ ignition coils
A car's gasoline engine operates by burning fuel. To ensure ignition, an electric spark is required, which is formed between the electrodes of the glow plug. They have a small gap that the spark must overcome. This is feasible when high voltage (tens of thousands of volts) is applied to the spark plug.
The vehicle's on-board system is not designed for such loads, and the equipment that supplies electricity is not capable of producing such values.
To solve this problem, a coil is introduced into the car's ignition system, creating a high voltage. A component of the vehicle's ignition system converts low voltage to high voltage (depending on the characteristics of the part from 6-12 V to 35,000 V). The tasks performed by the coil are determined by the structural features of the element. It consists of primary and secondary windings, which are housed in an insulated housing.
Attention! If malfunctions occur, it is recommended to check all engine components: from the valves and cylinder block to the ignition coil or module.
Where is the fog light relay located?
Located on the fender near the battery. Or trace its position through the wires from the fogs themselves.
VAZ 2115: fuse F10 is on
The fusible element is responsible for the left dimensions; it burns out for one reason - the metal frame of the dashboard frays the wiring and a short circuit occurs. To solve the problem, it is necessary to insulate and secure the cable.
VAZ 2115 heater fuse: where is it located?
F7 and rated at 30 Amps is placed in the cabin.
Charger
The battery fuse is installed on the battery.
Fuel pump fuse and relay
Placed in an additional interior mounting block under the glove compartment. The first is marked as F3 and its power is 15 A, and the number of the second is K4.
Low and high beam
4 elements rated 7.5 Amps. Designated - F12, F13, F14, F15 - right and left low beam, and for high beam.
Sources:
https://arskama.ru/remont-i-zamena/gde-nahoditsya-rele-zazhiganiya-vaz-2115.html https://rus-avtomir.ru/predohraniteli/rele-vaz-2115
Replacement process
This winter, I often had to leave the car near the entrance and not in the garage as before, so the low temperature and rare trips played a cruel joke on the battery. After the first recharge later, the battery was discharged again. I began to urgently look for the reasons for such discharges of my battery. Since I don’t drive often, I decided to install a three-level voltage regulator in the generator of my car.
External view of the Generator before repair.
Generator type and number.
INSTALLATION
My car is VAZ 2114 2010. 8th grade engineer, and he has a 90 A ten-volt generator. I bought this device on the auto market from a familiar dealer for 180 UAH. The number for my generator is 67.3702-02.
Appearance of the device.
Box. Type 1.
Box. View 2.
Box. View 3.
Box. View 4.
Instructions.
First of all, you need to remove the negative terminal from the battery, then you need to use a 10mm key to unscrew the power contacts and remove them from the bolt, and disconnect the battery charge lamp terminal. To remove the black plastic case, you need to pull the latches on three sides and at the same time detach it to the side. Next we will see where the original voltage regulator fits. We unscrew the two screws with a flat screwdriver and disconnect the terminal that is hidden at first glance.
In the reverse order, we install the brush assembly of the new three-level regulator in place, tighten the two screws, pull the braided wires through the protective cover, (if necessary, we make a hole in it, I didn’t have to), after unscrewing it from the regulator block itself, we install the protective plastic cover in its place until you hear a click and attach the power terminals into place. I screw the previously unscrewed wires to the control unit.
ATTENTION! Don't confuse them! I screwed the control unit itself to the car body (with an M3x12 screw and an M3 nut) directly above the generator, stripping the paint from the inside of the body. Next, connect the negative terminal to the battery and you're done. After taking measurements with a multimeter, everything is clear, as written in the instructions on the “Genes” terminals - 13.6 V, 14.2 V and 14.7 V.
REPAIR
After 3 weeks, one fine day the battery light came on on the fault panel. What's the problem? It stopped working completely. I installed the original voltage regulator back and, lo and behold, the car works, the battery signal is on halfway, when you press the gas pedal, it goes out, and at idle, although it’s bad, its light is visible.
I pick up a multimeter and start taking measurements - and I get 12.7 V at idle when I turn on the low beam, the fan in position "1" and the radio - the voltage drops by 11.6 V. These measurements are also terrible because on a working car, the voltage at idle speed of the car with the low beams on should be at least 13.7-13.8V.
I start sinning with the new voltage regulator I bought and go to the car market, buy another exactly the same three-level voltage regulator with an agreement to return it within two or three days if it does not work. The seller is not against it, but says that these regulators work flawlessly, but there is a worse manufacturer with a similar line of regulators that is 50 UAH cheaper. I’m driving home, installing it in 5 minutes and it doesn’t work - the answer for me is obvious and I photograph the diode (rectifier) bridge in detail and go to the auto market again. At the car market, I buy a new diode bridge in a car shop, comparing it with the photos on my phone. A new diode bridge for my generator cost 170 UAH.
A diode bridge is possible, but I categorically do not recommend installing it on the generator without removing it from the car. I shot the Gena on the street without a pit or lift and with engine protection installed.
Next, I drill keys 10, 13 and 17, tighten the alternator belt tensioner, unscrew two bolts, remove the upper alternator mount and remove the belt. To get the lower long bolt of the generator without removing the engine protection, you need to push the generator as close to the radiator as possible, unscrew the nut with a 13 socket with a ratchet from the right wheel side, and on the other hand hold the bolt itself with a 17 wrench. Afterwards, we remove the generator with effort and carry it to the workplace.
To remove a diode bridge that is not working, you need to unscrew 3 screws with a flat screwdriver and then remove the diode bridge itself from the guides. Under no circumstances should you lose the textolite insulator washers, you can’t do without them! This is very important!1.
View of the generator without a diode bridge.
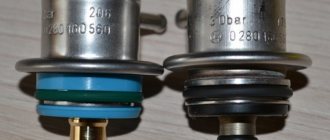
Old and new diode bridge.
From the dismantled old bridge, you need to unscrew the nut and bolts; on the reverse side, you need to remove the insulator. This is very important!2. install the insulator into the new diode bridge and install the bolt in its place. If the bolt is in a rusty, worn state, I advise you to replace it with a new one, otherwise there will be a loss of voltage.
We install the diode bridge in place and do not forget to connect the wire from the capacitor. Next, I recommend taking and cleaning the 3 contacts of the coil from dirt and dust with whisperite or acetone, and if you want to lightly clean the surface of the rings with sandpaper or a needle file for better contact. (In my case they were in terrible condition). Next, we insert three wires into their places and tighten them to the diode bridge with three screws and textolite washers.
Installed new diode bridge.
The next step is to pick up a multimeter and test all connections. To do this, I recommend watching the video on YouTube - “How to replace a diode bridge, without errors.” I recommend watching other useful videos by Valery Chkalov. Link -
After you have checked everything, install the generator in the car. It took me some time to get the bottom long screw through the ear and the generator mount, tighten the nut, tighten and tension the belt to a deflection force of 5 to 10 mm. Next, I conducted an experiment on my own regulator, everything worked like a clock, the voltage was 13.9 V with low beam 13.8, - 13.7. And with the installation of a three-level relay, as expected, but 0.1 V more, namely 13.7, 14.4, 14.9 V, but this corresponds to the errors of my multimeter, the device itself (indicated in the instructions) and the quality of measurements.
I am also attaching a photo. I specifically bought a multimeter at Epicenter to carry out all the measurements, I kept the receipt and then returned it after 5 days of using it, and I also returned the second three-level regulator I bought.
Installed generator. In testing mode. The black plastic cover is not installed.
Everything works like a charm, I’m happy as an elephant and now problems with the battery don’t bother me.
As a rule, I talked with the Auto Electrician and the sellers, they claim that these particular three-level regulators do not break down at all, what can burn out and deteriorate are the rectifier diode bridges in the generators. I recommend that anyone for whom this type of regulator has stopped working check and ring the diode bridge on their gene.