Code P0325 refers to the knock sensor on block 1 engine. This basically tells you that the sensor is not sending the correct signals to the controller. This can happen for a variety of reasons, from bad wiring to a faulty sensor.
This diagnostic trouble code (DTC) is a generic transmission code, which means it applies to OBD-II equipped vehicles. Although the specific repair steps may vary depending on the make/model. Oddly enough, this code is more common on Honda, Acura, Nissan, Toyota and Infiniti vehicles.
You probably won't have any drivability problems when the P0325 code is active, but that doesn't mean you can ignore it. Read below to learn how to diagnose and fix this knock sensor trouble code before it causes further problems.
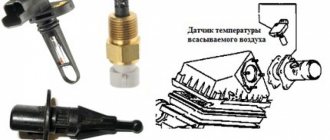
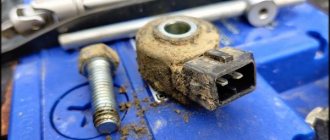
Knock sensor
What does P0325 mean?
The knock sensor in your engine tells you when the air/fuel mixture is not burning properly. It detects explosions, which are called knocks because of the noise. When detonation occurs, the engine does not receive full power. If this happens for too long, it can damage the engine.
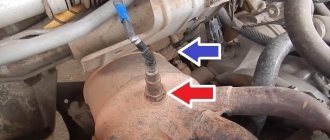
Information sent to the engine control unit (ECU) from the knock sensor allows it to make adjustments. The ECU may change the timing or otherwise adjust the engine to prevent detonation. Typically the knock sensor is bolted to the engine block.
When the engine controller does not receive the correct information from the knock sensor, it causes trouble code P0325. This code specifically refers to the knock sensor on block 1 of the engine.
Read the article: what is bank 1 and bank 2.
The P0325 code may appear intermittently or the Check Engine light may remain on constantly.
Diagnosis and problem solving
Begin your diagnosis by visually inspecting all system-related wiring harnesses and connectors. Inspect electrical circuits, sensors, and connectors that are contaminated with engine oil, coolant, or power steering fluid.
Petroleum-based liquids are known to corrode the protective insulation of wires and cause short circuits or open circuits. This may cause the P0325 code to appear.
Sensor test
To test an older style knock sensor, connect a multimeter set to AC voltage between the sensor output wire and ground. Tap the engine near the sensor. You should see the AC voltage reading on your DMM. Otherwise, the sensor is faulty and must be replaced.
To check the resonant type sensor, we connect a digital multimeter in the same way. But instead of knocking on the engine block. The fuel pump relay must be removed to prevent the engine from starting.
Crank the engine, shift into gear, and keep your foot on the brake. As soon as the car starts to run out of fuel, it will start knocking and stalling. You should then see the AC voltage output. Otherwise, the knock sensor is faulty and must be replaced.
Checking electrical circuits
If the knock sensor is working fine but the P0325 code is still on, you need to check the sensor circuit. Using a digital multimeter set to resistance, connect one side of the meter to the harness side of the sensor connector. And the other to the knock sensor input terminal on the PCM. This will check the continuity between the sensor and the PCM.
Now you need to check the grounding. Old style knock sensors are grounded through the sensor itself, while newer style knock sensors usually have a separate ground circuit. Connect the red lead of the multimeter to the positive terminal of the battery and the black lead to ground. You should see a reading of around 12 volts, indicating a good ground. Otherwise, you need to look for a circuit fault.
How to Diagnose P0325
You will need a diagnostic scanner or adapter.
- Check your vehicle's owner's manual for any specific tips on troubleshooting knock sensor problems. You can also check if there are any technical service bulletins related to this DTC. The repair for P0325 often depends on the specific vehicle model. Follow the manufacturer's instructions that you find before proceeding with the general diagnostics below.
- Use an OBD2 scanner to check for any other errors. You may see other codes related to the knock sensor, such as P0330. If you see codes related to other sensors, such as the mass air flow sensor (MAF) or oxygen sensors, this likely indicates a wiring problem.
- Read the freeze frame data related to the knock sensor. Check the conditions that were present when the code was installed. This can help you make an accurate diagnosis.
- Clear the codes and test drive your vehicle in an attempt to reproduce the trouble conditions. Make sure the knock sensor is sending a signal to the control unit. If not, use an OBD2 scanner to check the coolant temperature sensor readings.
- Visually inspect the wires around the knock sensor and wiring harness. Replace any wires that are damaged or corroded and make sure all connections are secure.
Error p0328
Error code p0328 by definition means that “ the output voltage of the knock sensor is above the threshold value ” (usually the threshold value is 4.5 V). In English it is called Knock Sensor 1 Circuit High. This error is similar to the previous one, but the difference is that in this case it may be caused by a break in the signal/power wires between the knock sensor and the electronic control unit or a short circuit of the wiring section to the ECU to “+”. Determining the cause is made difficult by the fact that such an error occurs much more often not because of problems with the chain, but because of poor fuel flow into the combustion chamber (lean mixture), which occurs due to clogged injectors, poor operation of the fuel pump, low-quality gasoline or phase shift and installation early ignition.
External signs
Indirect signs by which it can be judged that error p0328 is occurring are similar to those described above. In particular, the Check Engine light on the dashboard is activated, the car loses its dynamics and accelerates poorly. In some cases, increased fuel consumption is observed. However, the listed signs may indicate other malfunctions, so mandatory computer diagnostics are needed.
The cause must be looked for by studying the symptoms, and the search itself must be done by removing the connector for connecting the knock sensor with the engine running. It is necessary to measure the reading parameters and observe the behavior of the motor.
Causes of error p0328
The causes of error p0328 may be the following malfunctions:
- Damage to the knock sensor connector or significant contamination (ingress of debris, engine oil);
- the circuit of the mentioned sensor has a short circuit or open circuit;
- the knock sensor itself is faulty;
- there is electrical noise in the sensor circuit (interference);
- low pressure in the vehicle fuel line (below the threshold value);
- use of fuel that is unsuitable for the vehicle (low octane number) or its low quality;
- error in the operation of the electronic engine control system (failure).
Another interesting reason noted by car enthusiasts is that a similar error can appear if the valves are incorrectly adjusted, in particular, they have too much clearance.
Possible troubleshooting options
Depending on what caused the p0328 error, the ways to eliminate it will be different. However, the repair procedures are completely similar to those described above, so we’ll simply list them:
- check the knock sensor, its internal resistance, as well as the voltage it outputs to the computer;
- make an audit of the wires connecting the electronic unit and the DD;
- perform an audit of the chip where the sensor is connected, the quality and reliability of the contacts;
- Check the torque value at the knock sensor seat and, if necessary, set the desired value using a torque wrench.
As you can see, the verification procedures and reasons why errors p0325, p0326, p0327 and p0328 appear are largely similar. Accordingly, the methods for solving them are identical.
Remember that after eliminating all faults, you must erase error codes from the memory of the electronic control unit. This can be done either using software (preferably), or simply by disconnecting the negative terminal from the battery for 10 seconds.
How to fix P0325?
After each repair step, clear all fault codes and test drive the vehicle to ensure the code returns. Since drivability issues are rarely associated with this code, an OBD2 scanner will be critical to detecting the problem.
- Replace any damaged wires that you find during diagnosis.
- If you find any problems with the coolant temperature readings, replace the temperature sensor. Incorrect temperature readings can lead to overheating and other serious engine problems.
- If you are sure there are no damaged wires or connections in your engine, replace the knock sensor.
- If the P0325 code still appears, take it to a mechanic for further diagnosis. In rare cases, this code may indicate a problem with the electrical connections or the engine ECU.
Symptoms of malfunction
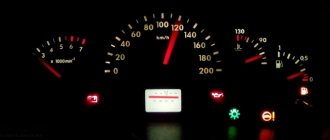
The main driver symptom of P0325 is the MIL (Malfunction Indicator Light). It is also called Check engine or simply “check light”.
They can also appear as:
- The “Check engine” warning light on the control panel will light up (the code will be stored in memory as a malfunction).
- The motor can operate, but with reduced performance (drop in power).
- Jerking and detonation in the engine.
- Increased fuel consumption.
- There may be no symptoms other than a stored DTC.
Error P0325 is not considered very serious. When it appears, serious problems with the car's handling are unlikely to arise, but a slight drop in engine power is possible.
Tips to Avoid P0325 in the Future
An improperly installed knock sensor is the most common cause of the P0325 code. Loosely connected wires can become loose over time due to engine vibration. Damaged or broken wires also often cause diagnostic trouble codes, not just P0325, but many other errors related to sensors on the engine.
Take extra time to check all wires any time you install or repair anything on your engine. Make sure the connections are secure and there are no objects on the wires that could cause damage or short circuits.
Previous Post Trouble P0108 - Manifold Absolute Pressure Sensor High Signal
Next Post Trouble P0101 - Mass Air Flow Sensor Range/Performance
On which cars is this problem most common?
The problem with code P0325 can occur on different machines, but there are always statistics on which brands this error occurs more often. Here is a list of some of them:
- Acura
- Chery (Chery Amulet)
- Chevrolet (Chevrolet Aveo, S10)
- Chrysler
- Citroen (Citroen C3, C4)
- Daihatsu
- Dodge (Dodge Magnum)
- Ford (Ford Mondeo, Focus)
- Honda (Honda Accord, Odyssey, Pilot, SRV, Fit, Civic, Element)
- Hyundai (Hyundai Accent, Santa Fe, Sonata, Elantra)
- Infiniti (Infiniti i30)
- Jeep
- Kia (Kia Karens, Magentis, Sorento, Spectra, Sportage)
- Lexus (Lexus gs300, rx300)
- Mazda
- Mitsubishi (Mitsubishi Galant, Lancer)
- Nissan (Nissan Bluebird Silphy, Quest, Pathfinder, Sunny, Serena, Cefiro)
- Opel (Opel Astra, Vectra, Zafira)
- Peugeot (Peugeot 207, 308)
- Renault (Renault Logan, Sandero)
- Saab
- Subaru (Subaru Impreza, Legacy)
- Toyota (Toyota Avensis, Camry, Corolla)
- VAZ 2109, 2110, 2112, 2114, 2115
- Lada Kalina, Largus
With fault code P0325, you can sometimes encounter other errors. The most common ones are: P0105, P0130, P0136, P0171, P0302, P0305, P0327, P0330, P0440, P0446, P0500, P0600, P0688, P1400, P1443, P1605, P1705, B1001, C0265, C210 0, U1000, U140E.
Prevention of breakdowns of electrical appliances
To prevent breakdowns of electrical circuits, you must follow a number of simple rules.
- Error 8 on VAZ 2114 (8 valves) - what it means, symptoms, solutions
- Periodically check the contact connectors for oxidation or overheating. Rust disrupts the passage of impulses, which can be read by instruments as damage to the unit.
- Once a year, treat contacts with special oils. Lubricants prevent moisture from entering metals, which prolongs their service life.
- Replace dry wires in a timely manner. Cracked insulation can cause a short circuit.
Popular knock sensor error codes
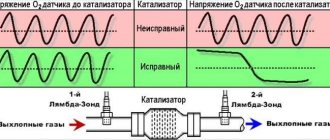
The knock sensor (DS) transmits a signal to the ECU (electronic control system) about the moment the fuel ignites in the engine (naturally, at the injector). The DD is needed by the electronic unit in order to calculate the optimal ignition timing: if the ignition timing is late, gasoline consumption increases to unreasonable limits, and the engine may overheat; if the ignition timing is early, the power will drop and the valves may burn out. Thanks to the knock sensor, fuel will be burned in the right quantities, and the engine itself will adapt well to the quality of gasoline (octane number).
How to view errors on a VAZ 2110 on the on-board computer
There are two main ways to find out the breakdown number on a car. One of them allows you to find out the code yourself, while the second will require the use of special diagnostic equipment to check it.
In the first case, reading occurs like this:
- turn off the ignition;
- hold down the reset key for daily mileage;
- without releasing the button, turn on the ignition and wait until the cells for numbers light up on the dashboard display;
- press any module control button twice.
As a result, the BC display shows the error number. If it is not possible to read the code, use the diagnostic option through a special scanner connected to the connector. The equipment checks more variants of codes and reads several of them at a time.
Checking DD yourself
The knock sensor is located between cylinders 2 and 3 on the radiator side directly on the engine block. Checking the knock sensor is a simple matter, especially if you have ever looked under the hood of the fourteenth.
Replacing the knock sensor VAZ 2114
- The key end is 13 for a single-pin DD (resonant) and 22 for a two-pin DD (broadband)
- Simple screwdriver
- Multimeter
How to check the knock sensor
The first thing to do is remove the DD. It’s easier to remove the single-pin one: don’t touch the ignition, turn it off and unscrew the sensor from the engine. The two-pin one is more complicated: we also don’t touch the ignition, but we also need to remove the negative from the battery. Then, remove the wires of the block, unscrew the DD fastening and remove it.
Second, we switched the multimeter to a voltmeter and set the limit to 200 MV. We connected it to the DD and carefully hit it with some piece of iron (the same screwdriver). When impacted, the voltage should jump; if there is no jump, the sensor is dead, go to the store for shopping.
When a two-pin DD is connected, its terminals cling to the multimeter, when a single-contact DD is connected, one contact and its body are clinging.
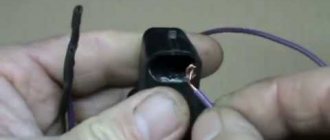
Third, we look at the wiring, as already mentioned, most often it’s a matter of frost, or broken contacts.
A simple plan on how to check the knock sensor in your garage with properly trained hands.
Opinions agree that a non-working DD should not be replaced with an analogue from the factory. You will buy a pig in a poke with a 1 in 10 chance that you will get a working one. For the fourteenth, DD from 406 engines for the Volga or a universal imported Bosch are perfect.
List of errors DD VAZ 2114
- Error code 0325 – the wiring supplying power to the knock sensor has broken. This error can be caused by oxidized DD contacts. Contacts need cleaning. In addition, problems with the timing belt can lead to it, so it also needs to be checked (perhaps it has jumped a couple of teeth, then you need to set everything to the marks).
- Error code 0328 - high-voltage wires are faulty. However, in this case, again, there is a possibility of the timing belt jumping.
- Error code 0326, 0327 – weak signal from the knock sensor. To eliminate this problem, you need to clean the connection contacts of the VAZ 2114 DD. Also, errors can be caused by weak tightening of the sensor.
Causes of knock sensor malfunction
DD can be resonant and wide-band. The resonant one resembles a barrel in shape, and the wide-band one resembles a tablet. But they differ not only in design, but also in operating principle: resonant DD (or piezoelectric) is associated only with the engine detonation noise signal and indicates a malfunction, accordingly; and a wideband (or piezoceramic) will create a voltage signal for the part of the engine on which it is installed. The resonant type of DD is considered more outdated.
Like any spare part in a car. The knock sensor tends to fail.
- engine problems
- inadequate fuel consumption
- the dynamics have dropped
- check engine lights up when just starting to move
- check engine lights up when accelerating or when accelerating
If any of the above happened to your fourteenth, then there is a possibility of a breakdown of the knock sensor. The best option would be to take the car to a service center for diagnostics. She will show you things you would never do at home. Since DD failure is not a new thing, specialists have long figured out the most common error codes for the fourteenth and learned to deal with them. Although, you can also check the DD in your garage, we will talk about this later.
For the VAZ 2114 model there are 4 popular DD error codes:
- Code 0325 indicates a wiring fault in the DD circuit. A simple break in the wiring can cause oxidized contacts. Try cleaning it and check after. If it doesn’t help, then the specialists are sinning on the timing belt; it may slip by one tooth or two. Put the belt back in place and check the operation of the DD again.
- Code 0328 indicates a malfunction of the high-voltage wires. And if everything is in order with them, then we check the timing belt again.
- Code 0326 and code 0327 indicate a problem with the sensor signal itself. Again we look at the contacts to see if they have oxidized. By the way, these errors can come out as a result of a poorly tightened DD. Tighten the sensor, just don't overdo it. The tightening torque of the knock sensor is a delicate matter - if you overtighten the bolt, the readings will be inaccurate. The optimal moment is considered to be in the range from 10 to 24 Nm.
Practice shows: most often the timing belt flies off and the contacts of the block break. Therefore, paying attention to these areas first may save time.
Check and replacement
Even if the scanner showed a malfunction of the DD, it’s a good idea to make sure that the part is not working.
The knock sensor is checked using an ohmmeter by measuring the resistance or a digital voltmeter by measuring the voltage between the contacts. The resistance of a working sensor on VAZ car models is almost infinite, but if it is small or absent altogether, the sensor must be replaced.
The voltage is measured as follows:
- Set the measurement limit on the voltmeter to 200 millivolts;
- The probes of the device are connected to the sensor contacts;
- Gently tap the DD body with any medium-heavy object (screwdriver, pliers);
- At this moment they look at the voltmeter readings.
At the moment of impact, the voltage on the device increases by 20-40 mV, depending on the force of the impact. The stronger the blow, the greater the tension.
Replacing the knock sensor on a VAZ 2114 is very simple. If the DD is broadband, then you will need a combination key of 13; for a single-contact sensor you will need a key of 22. Do it as follows:
- We turn off the engine;
- Open the hood;
- We disconnect the connector plug on the wires going to the DD;
- We unscrew the 13 nut from the stud (in the 2-pin version) or the piezoelectric sensor itself with a 22 wrench (resonant DD);
- We put the new part in place and connect the plug.
That's it, very simple. You also need to take into account the tightening torque - the force is small, about 2 kgf/m². With greater force there is a risk of breaking the thread.
What to do if the problem recurs
If you replaced the knock sensor and deregistered p0327 in the ECU, and the “Check engine” icon appears again, then the problem may be in the engine sensor itself. It needs to be checked. You will need a multimeter, which should be set to resistance measurement mode (ohmmeter). The minimum threshold value is 5 MΩ (operating alternating voltage: U= 0.5–3 V). If it shows below, then the sensor is defective. It is unprofitable to repair it, since a new one costs about 250 rubles.
Another reason: the DD is attached to the cylinder block with a bolt. But its crimping force is small, so the detonation signal is weak. Experts recommend using a pin instead of a bolt, and tightening the sensor with a nut. Then the risk of error p0327 is sharply reduced. In addition, you should make sure that the formation of a malfunction is not caused by: extraneous knocks, such as vibration of the pan protection or the clatter of hydraulic compensators, as well as poor-quality fuel or poor fastening of the engine to the cylinder block.
On a note. Experts recommend buying one of two brands of knock sensors. First original: AvtoVAZ number 21120–3855020–03–0. Second analogue: Bosch - 0 261 231 046.
What you need to know about the phase sensor
So, what is a VAZ 2114 phase sensor, how to find it and what are its signs of malfunction?
Device and purpose
DF installation location
DF is a regulator necessary to obtain data on the functioning of the vehicle engine and transmit this information to the ECU. As for the design, the DF consists of a sensitive component as well as a pulse converter. The design of the latter, in turn, includes an operational amplifier, an output stage, and a bridge circuit.
The sensing component located inside the structure operates on the principle of a Hall regulator. Its purpose is to transmit an impulse at the moment when a magnetically conductive component is located next to the microcircuit. As for the location of the VAZ phase sensor, it is located on the side of the cylinder block, next to the air filter element.
Malfunctions
A device failure can be identified by certain signs:
- increased gasoline consumption;
- malfunctions in the machine’s self-diagnosis;
- decreased dynamics when accelerating a car;
- Errors 0343, 0340 or a Check lamp may appear on the control panel.
The light bulb Check usually appears if the DF is inoperative.
How to connect DF correctly
Check and replacement
To check on an eight-valve engine, you must perform the following steps:
- At the multimeter terminal V1, you need to set the voltage to 13.5 volts; this probe is connected to pin E. At the second pin, which is connected to pin B, you need to set the voltage to 0.9 volts.
- After closing the contacts, a screwdriver or plastic steel should be brought to the end of the regulator. And if the DF is functioning properly, the voltage at output B should drop to 0.4 volts. If the readings differ, then the DF should be replaced (the author of the video is In Sandro’s garage).
As for the sixteen-valve engine, the principle is slightly different:
- The multimeter is set to operating mode V2, the voltage at output E should be set to 13.5 volts, and at output B to 0.4 volts.
- We again bring a screwdriver or plate to the DF body. If the DF is working normally, the voltage level will increase to 0.9 volts
To perform a replacement, you need to do the following:
- First you need to turn off the battery by removing the terminal from it.
- Using a 10mm ratchet wrench, unscrew the screw securing the device to the cylinder block. Disconnect the wires that are connected to the DF.
- Remove the DF and replace it with a new one. It is a good idea to clean the pad contacts from dirt or oxidation.
How does the sensor work and why is it needed?
The operation of the mechanism is based on the principle of a piezoelectric element.
This means that if vibration of a different nature occurs in the engine cylinder, a signal will be transmitted to the ECU using electronic pulses. In turn, the final element in this chain will make changes to the operation of the ignition angle. This algorithm of actions allows you to protect components and parts from mechanical damage. On the “fourteenth” in most cases there are broadband mechanisms, but often the manufacturer also installed a resonant type of device, most often on the very first copies of the VAZ-2114
The broadband mechanism is superior to its counterpart in that it has a wider range of capabilities. Such a sensor is capable of capturing noise of various frequencies, which undoubtedly gives the vehicle system additional stability.
The devices operate on different principles, therefore, if the resonant sensor breaks down, it cannot be replaced with a broadband one. The situation is similar in the opposite case. If there is an urgent need to replace or change the operating principle of the mechanism, you will have to purchase a new control unit.