For stable operation of the engine, many different parameters are necessary: from fuel quality to valve permeability. However, the error-free operation of the exhaust system can be called one of the main guarantees of normal engine operation.
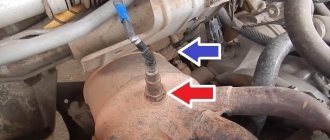
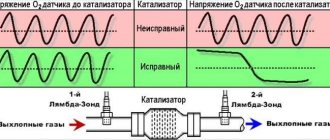
In the exhaust gas system, a catalyst plays an important role, which is designed to purify exhaust substances before they are released into the atmosphere. At the junction between the catalyst and the exhaust manifold there is a special device - an oxygen sensor (otherwise called a lambda probe). And after the catalyst (already at the outlet), a second oxygen sensor is installed, which checks the quality of gas purification and compares the toxicity level with the readings of the first device.
The occurrence of error p0134 on the dashboard can be regarded as a failure of the lambda probe or as a breakdown in the car’s exhaust cleaning system. Accordingly, the uninterrupted operation of the power unit may be disrupted, which can lead to serious financial investments for the owner.
What is this error
Car owners need to know that error p0134 is quite common. Its appearance on the instrument panel in the cabin indicates that the connection with the first oxygen sensor has been lost or the transmitted information is incorrect.
Error p0134 is recorded as follows:
- Data that the signal from the lambda probe is weak or completely absent is transmitted to the memory of the car’s on-board computer and recorded.
- If this data does not change within 60 seconds (that is, the signal remains extremely weak or absent), then the information is sent to the ECU.
- 5-10 seconds after information is supplied to the control unit, the Check Engine light turns on on the instrument panel in the cabin.
This is the error indicator
When checking with a scanner, the message “P0134 Oxygen O2 Sensor Circuit No Activity Detected (Bank 1 Sensor 1)” is displayed.
Functionality check
Many VAZ-2112 owners ask how to check the lambda probe (oxygen sensor) themselves. To do this you will need to do the following:
- It is necessary to turn off the engine and allow it to cool.
- After this, open the hood of the car and disconnect all contacts leading to the oxygen sensor.
- Take a multimeter and connect the end probes to the lambda probe.
- Then use the “Resistance” mode on the multimeter. If the arrow goes to infinity, then the device is working correctly and the readings are being transmitted correctly.
- In a situation where the arrow shows a value near zero, the measuring device is faulty and needs to be replaced.
Reasons for error p0134
Unlike other errors in the ECU, code p0134 clearly indicates the original source of the problem - this is the first oxygen sensor of the catalyst. Therefore, the appearance of this error can only mean one thing: some problems have arisen in the lambda probe.
However, there may be several specific reasons for the error:
- breakdown of the oxygen sensor itself (natural wear);
- breaks and damage to the lambda probe wiring;
- presence of rust on the connectors;
- Short circuit in the network.
Using professional equipment to diagnose errors helps you quickly and accurately find out the cause of the problem. For example, if the auto scanner produces two errors at once - p0134 and p0171, then this indicates the presence of a short circuit in the network or a wiring break. Accordingly, it is possible to exclude a breakdown of the sensor itself as the cause of the malfunction.
According to existing statistics, in 95% of cases error p0134 appears due to a breakdown of the oxygen sensor itself. And only the remaining 5% of cases occur due to short circuit or insulation damage.
How to extend the service life of a recreation center
To extend the service life of the sensor, you will need to follow the following recommendations:
- Conduct a technical inspection of the vehicle on time;
- use only original spare parts for the car;
- do not allow the use of low-quality fuel mixture;
- Contact a car service if you find problems with engine operation.
You can change the oxygen sensor on a VAZ-2112 yourself without going to a car service center. Only original components must be used. If there are problems starting the engine, you should check the correct operation of the lambda probe.
How to understand that the oxygen sensor has failed
The car driver can know that the lambda probe has stopped producing a stable signal by several signs:
- the yellow Check Engine light on the dashboard will light up;
- the engine will begin to operate unstably, especially at idle and low speeds;
- Black smoke comes out of the exhaust pipe;
- An unpleasant odor appears in the cabin.
However, in most cases, the very first sign of a bad lambda probe is the Check Engine light coming on. Only in the future, if the car owner has not bothered to eliminate error p0134, may other above-mentioned signs of sensor failure appear.
Crankshaft position sensor VAZ 2110
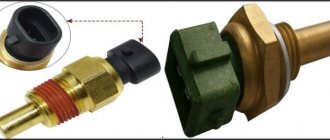
The crankshaft position sensor of the VAZ 2110 injector is quite important, since without it the engine cannot be started. Any malfunction of it brings the “tens” ECU or “brains” of the engine into a stupor. The sensor monitors the position of the camshaft (and therefore the pistons in the cylinders) in real time and allows the spark plugs to work in time. The spark plugs receive a signal from the ignition module that the upper compression point in the cylinder has reached and it’s time to “light” the spark. The sensor itself looks schematically as in this figure -
This is a small electromagnet that picks up the position of a toothed pulley that rotates nearby. The pulley has 58 teeth, which create electromagnetic disturbances. Actually for an injection engine, this is the main and most important sensor.
How does it work
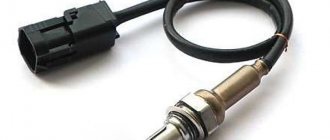
The principle of operation of a lambda probe is to compare the indicators of two electrodes, one of which is located in clean air, and the second in the exhaust manifold.
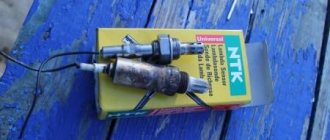
The VAZ 2110 lambda probe is made of heat-resistant materials, since the exhaust valve system and exhaust system have extremely high temperatures during prolonged engine operation.
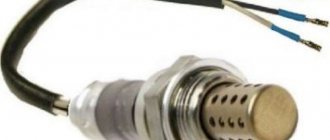
The main structural elements of the lambda probe are:
- steel body;
- external platinum electrode;
- internal zirconium electrode;
- ceramic insulator between the inner and outer electrodes;
- electric heater;
- protective casing for the outer electrode.
Also, lambda probes, with some technical differences, have a 4-pin connector:
- 1 contact - signal transmission to the electronic control unit;
- 2 - electrical power;
- 3 and 4 - electrical power supply to the electric heater.
The main task of the lambda probe is to determine the amount of unburned oxygen in the exhaust pipe.
The electronic control unit supplies the electrodes of the lambda probe with a voltage of 0.45 V.
The outer electrode determines the amount of ambient oxygen, the inner electrode determines the amount of oxygen in the exhaust gases. Having received the data, the sensor transmits the corresponding signal to the electronic control unit of the internal combustion engine. The transmitted signal is the difference between two indicators.
The control unit, having processed the received signal, makes adjustments to the operation of all components of the fuel system, and also ignites the combustible mixture earlier or later. This contributes to more stable and smooth engine operation.
On VAZ-2110 cars with 8-valve and 16-valve engines, on which an injector is installed, the sensor is located on the exhaust manifold of the car in front of the resonator.
A special feature of oxygen sensors on VAZ cars is their operating temperature. They begin to function when the temperature reaches 300–400 °C.
In the first minutes after starting the engine, its operation is monitored based on the readings of other sensors: mass air flow and internal combustion engine temperature, as well as the throttle opening sensor.
When the electric heater warms the device to the required temperature, the control unit begins to take into account its readings.
On previously produced VAZ-2110 cars, the manufacturer installed simpler lambda probes, the design of which did not include an electric heater. Consequently, the control unit read its readings only after the engine had sufficiently warmed up. At the same time, before warming up and subsequent monitoring of the operation of the internal combustion engine, the exhaust gases contained a significant amount of harmful elements.
After the approval of new legislation concerning a clean environment and a reduction in air pollution, car manufacturers began to install lambda probes that are able to independently warm up to the required temperature and, after a short period of time, provide less toxic emissions into the atmosphere.
Also, on a certain type of VAZ-2110 engine, the manufacturer installed a system of two lambda probes, which is also located on the exhaust system.
The first is located in front of the catalyst. It determines the quality of the exhaust gases before they enter the catalyst.
The second is after the catalyst, thereby checking the quality of its work, which consists of purifying exhaust gases to the level required by law.
On which cars is this problem most common?
The problem with code P2251 can occur on different machines, but there are always statistics on which brands this error occurs more often. Here is a list of some of them:
- Acura (Acura TL)
- Audi
- BMW
- Ford (Ford Mustang)
- Honda
- Hyundai
- Kia (Kia Spectra)
- Land Rover
- Lexus
- Mazda (Mazda 3, Mazda 6, Mazda cx7)
- Mercedes
- Mini
- Peugeot (Peugeot 308)
- Skoda (Skoda Octavia, Fabia)
- Toyota
- Volkswagen (Volkswagen Golf, Jetta, Passat)
With fault code P2251, you can sometimes encounter other errors. The most common are the following: P0030, P0130, P0134, P0135, P2138.
Restoring the performance of the lambda probe by cleaning
In some cases, the oxygen sensor stops working only because the holes in the protective screen and the ceramic tip itself are covered with soot. To restore the functionality of the part, it is necessary to clean the soot from the lubricating zone, but when performing such work, you must follow certain rules
It is important not to use for cleaning:
- metal brushes;
- sandpaper;
- files;
- other objects that can damage the ceramic element.
The best method to get rid of contaminants is to soak the ceramics of the lambda probe in a solution of orthophosphoric acid, but to do this, you must first carefully saw off the protective cap. If acid cannot be found, you can use a rust converter, which is sold in stores selling auto chemicals. Of course, to clean the part from soot deposits, the sensor must be removed.
To soak a ceramic tip, it must be placed in liquid for 15-20 minutes; the soot should disappear from the surface on its own. If the deposits are not completely removed, they can be cleaned with a soft toothbrush. After the procedure, you need to secure the protective screen using camp welding. When it is not possible to restore the lambda's functionality, there is only one option left - to buy a new oxygen sensor.
How to troubleshoot P0134?
Before attempting to electrically diagnose the P0134 code, ensure that the engine is running and that there are no air leaks or serious exhaust leaks that could affect the operation of the oxygen sensors.
Also, make sure there are no rich or lean conditions and that the engine oil is not contaminated with antifreeze. If any other codes are present along with P0134, troubleshoot those issues first before attempting to diagnose P0134.
In a properly functioning oxygen sensor, any change in throttle will result in an almost immediate change in signal voltage. However, the speed at which changes occur (depending on the efficiency of the sensor) is best assessed using an oscilloscope.
Keep in mind that while an oscilloscope can identify emerging problems, interpreting the resulting waveforms requires expert knowledge and verified reference data for each vehicle being tested.
Therefore, in order to identify a faulty DC (if there is no oscilloscope), it should be enough that there are no changes in the signal voltage during a discernible period.
Step 1
Take a diagnostic scanner or adapter and read the information from the car. Record all stored trouble codes and available freeze frame data. This data can be useful if an intermittent error is later diagnosed.
Step 2
Visually inspect all wiring associated with the damaged sensor. Look for burnt, shorted, or otherwise damaged wires and connectors. Restore them if required.
Step 3
If there is no visible damage to the wires, check resistance, input (reference) voltage, ground, and continuity in all circuits associated with the damaged sensor.
Before checking the wiring integrity, be sure to disconnect the sensor from the ECU to prevent damage to the controller.
Since the P0134 code indicates a problem in the signal voltage circuit, as opposed to the heater control circuit, pay special attention to the resistance and continuity values in the signal circuit between the ECU connector and the sensor. These values must correspond exactly to those specified in the repair manual.
Try to avoid signal circuit repairs - it is best to always replace the associated harness to avoid problems with poor connections and high resistance that can arise from poorly executed repairs.
Make sure that the sensor is receiving full voltage from the battery. Keep in mind that in some cases the heater circuit voltage comes from the ECU, in which case the circuit is not protected by a fuse. Look in the repair manual to see how voltage is supplied to the DC heater.
Since the sensor has a heated element, it is possible that low battery voltage, poor grounding, or other resistance issues could affect the time it takes for the element to heat up, which is one reason why the code may set. P0134.
It goes without saying that the voltage/condition of the battery should also be checked. However, in cases of low battery voltage, codes related to low input voltages to the heater control circuit may be present along with P0134.
Step 4
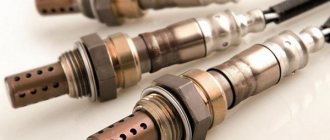
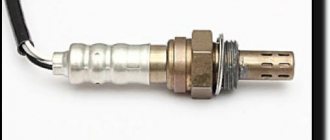
If all data obtained is within the manufacturer's specifications, unscrew the oxygen sensor from the exhaust pipe and inspect it for discoloration or the presence of any type of deposits that may reduce the effectiveness of the sensor. In general, the correct color of the oxygen sensor should be the same color as a healthy, properly functioning spark plug.
Compare the sensor to the pictures at the top of this article, but keep in mind that the DC cannot be cleaned of deposits. The only reliable remedy is to replace the sensor rather than use any additives.
If the DC does not show discoloration or deposits, measure the sensor resistance and replace it if its resistance is outside the manufacturer's specifications.
Replacing the sensor does not make sense if it shows signs of “poisoning” with oil or antifreeze. In these cases, the underlying problem must be resolved to prevent the P0134 code and its associated symptoms from recurring.
Step 5
If you have checked all associated wiring, all electrical parameters specified in the manufacturer's specifications, and replaced the appropriate DC, test the vehicle to ensure the repair was successful. Sometimes a fault code returns. There may be an intermittent (intermittent) error present.
Detecting and correcting intermittent faults can sometimes be very difficult and in extreme cases may require the problem to worsen before an accurate diagnosis and permanent repair of the fault.
Source
Symptoms of malfunction
The main driver symptom of P2251 is the MIL (Malfunction Indicator Light) illumination. It is also called Check engine or simply “check light”.
They can also appear as:
- The “Check engine” warning light on the control panel will light up (the code will be stored in the ECM memory as a malfunction).
- Additionally, misfire and lean/rich exhaust codes may be present.
- Decrease in engine power.
- The engine accelerates poorly, and vibration is also possible during acceleration.
- Increased fuel consumption.
Trouble code P2251 is considered severe. Because a shorted O₂ sensor can cause very poor engine performance and various drivability problems.