The starter on a VAZ 2110 does not turn - reasons and methods for eliminating them
Quite often, car owners ask the question: why doesn’t the VAZ 2110 starter turn?
Everyone faces this common problem every day. As they say, you won't go until you start it. It is necessary to find out the reason why the starter does not turn, and also to correct the malfunctions in the VAZ 2110. Without a starter, the vehicle simply cannot be started, so it is recommended to treat this task with special attention. If you cannot save the component, you can always carry out the repair yourself. Moreover, in domestic transport this problem is solved much faster and easier.
What to do next?
After all stages of checking the starter, it is necessary to decide on the course of further action.
In any case, if the reason for the breakdown of the latter lies in the traction relay or the starter itself, then everything will have to be disassembled. As a rule, this is what happens in 80% of cases.
Having disassembled the traction relay, pay attention to the nickels of contacts that are closed by the plate.
They should be free of rust and scale; clean them if necessary.
You can check whether the contact pins are closed by the plate using an ohmmeter.
Pay attention to the stem.
It should always be lubricated and move freely. Dirt on the rod is not allowed.
For new traction relays produced in China, the presence of lubricant is a problem; the Chinese clearly save it. Because of this, the rod may become stuck and the fork will not extend.
If the problem with the traction relay has not been resolved, you can try ringing the pull-in and retaining windings. But this is already a serious repair, it’s easier to buy a new relay and not suffer.
The breakdown problem may also be in the starter itself.
After disassembling it, first of all pay attention to the brushes.
Worn brushes need to be replaced. Their height should not be less than 1.2 cm.
And if they are stuck, then find out the reason for their laying; maybe you need to lubricate them with graphite lubricant.
It would also be useful to use an ohmmeter to check for short circuits between the brushes and the brush holder body.
The resistance should approach infinity.
Pay attention to the armature commutator. There should be no scale, no traces of burning, all contacts must be intact.
Minor burns can be easily removed with gasoline or just a dry rag.
If you open the starter and smell the characteristic smell of a burnt winding, it means the case is serious.
To be sure, check the armature winding for short circuit. You can use an ohmmeter for this.
The winding resistance should be close to infinity.
If the circuit is closed, then have the starter repaired or buy a new one. Although rewinding the winding will cost much less.
Some parts of the device can be replaced, just buy a used analogue on the secondary market, remember this.
Read on the topic: Do-it-yourself starter repair.
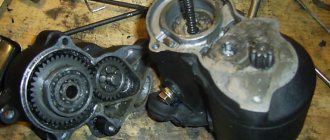
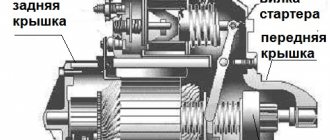
VAZ 2110 starter device
Such an important element in a car’s design as a starter consists of a housing with four magnets attached. The lid and body are secured with a pair of studs. The device is located on the shaft and is called an anchor. The shaft rests on two metal-ceramic bushings, which are mounted on a support with a cover.
The rotational force is transferred from the armature to the drive using a special gearbox. The gearbox is created from the main and three additional gears. The shaft is equipped with an overrunning clutch, a bendix, which supplies power from the starter to the engine, separating them.
There is a special retractor on the body that feeds the drive gears to engage the crankshaft. It starts the starter motor. During the ignition startup process, voltage is supplied to the engine.
Starter Specifications
Stator faults
The stator is a stationary part whose winding consists of four parts. The wire used is thick to ensure maximum torque. Before checking the removed starter for functionality, be sure to make sure that its windings are not shorted to the housing. This can be done with a simple multimeter. Switch it to the “continuity” mode and check if there is contact between the ends of the stator windings and the housing.
If there is no contact, then make sure that there is no break in the windings. Failures are generally the same as those of the rotor; there is no point in rewinding; it is easier to replace the stator with a known good one. But if 90% of the elements in the starter require replacement, then it’s better to buy a new one assembled - it will be a little more expensive, but you won’t have to go through everything bit by bit.
Causes of starter malfunction
The fundamental factors why the VAZ 2110 starter does not turn are:
- Inoperative solenoid relay.
- Sticking of closing elements.
- Worn motor brushes.
- Failure of the overrunning clutch.
- The immobilizer is interfering.
- The reason is in the injector.
These factors are the most complex and can be solved exclusively by removing and overhauling the unit.
Solenoid relay
If, after turning the ignition key, the dashboard turns on and the fuel pump operates, but later the panel turns off and the starter goes silent, then the solenoid relay may be the cause.
See if there is voltage to the unit and try to close the starter. Does it still refuse to rev? Disconnect the alarm, it often interferes with work. Each individual unit is operational, but together it fails: this means that the entire fault is in the solenoid relay, which needs to be replaced.
Sticking contacts
In the case under consideration, the VAZ 2110 injector does not turn the starter, it starts hard and makes clicking noises.
That is, first it clicks inside, and then it starts to turn the engine. The first thing you should do is look at your contacts. It’s better to start with the battery, where the cause is oxidation of the terminals. If the VAZ 2110 does not start and the starter does not click, then inspect the mass and the device itself, because they also tend to oxidize. There is also a proven method: simultaneously turn the ignition key and knock on the relay with something hard. If the car starts, then the problem is that the contacts or coins are stuck. Then it is better to purchase a new relay.
Instructions for replacing the VAZ 2110 starter
To independently remove or replace a failed starter on a domestic car, you need to follow these simple steps:
- Remove the negative terminal from the battery.
- Disconnect the central wiring of the traction relay.
- Remove the positive terminal with a key set to “13”.
- Remove the nuts connecting the starter to the clutch.
- We remove the starter.
- Use a 10mm socket to unscrew the traction relay nut.
- The tip of the wire is removed.
- Using a 8 key, unscrew the bolts of the traction relay for removal.
- The gasket serving as a sealing connection between the cover, starter, and relay is removed.
- The anchor with the spring is removed from the central cover.
Such simple manipulations will make it possible to quickly and effectively dismantle the starter for further replacement or determine the breakdown, why the starter on the VAZ 2110 injector does not work. The removal procedure is not very complicated and does not require the intervention of a professional specialist.
First stage
- We connect one end of the power wire to the negative terminal of the battery, the other to the starter housing.
- We “throw” the end of the second cable to the plus of the battery and the control contact for turning on the solenoid relay
- At the same time, we press the screwdriver against the Bendix gear to feel with what force it “flies out”.
In this way we can determine with what force it “pops out”. In other words, determine the performance of all windings of the solenoid relay.
Malfunctions
- If you were able to use a screwdriver to keep the gear from falling out or while applying voltage you can move this gear to its initial position, it means that the holding winding of the relay is faulty.
- Defective bendix control mechanism.
Where is
The VAZ 2110 starter is located on the gearbox housing and is mounted on two studs. It is easier to see the starter in detail on 8-valve engines, since there is more free space in the engine compartment with such an engine. In a 16-valve engine, to see the starter, you need to remove the air filter housing.
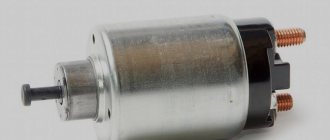
Starter relay (retractor)
The starter retractor relay is located on the starter itself and serves to move the bendix to the flywheel, and then engage with it. This relay often fails due to poor workmanship. It is quite easy to understand that the solenoid relay has failed; with such a breakdown, the starter will spin at idle, but the engine will not rotate, since the moving part of the drive (bendix) will not engage with the flywheel.
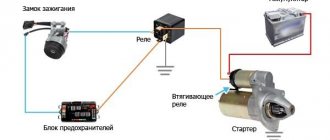
Engine starting system
Any car has two energy sources - a generator and a battery. The first is used to recharge the battery and power all the car’s electrics when the engine is running. The battery is used to power the vehicle systems when the engine is stopped. But most importantly, it supplies the current necessary to crank the crankshaft to the starter. At the same time, the fuel supply and ignition systems operate. All these mechanisms and devices function as synchronously as possible, due to which the engine starts very quickly.
For injection engines, the normal starting time is 0.8 seconds. And if this time is longer, then you will need to fully diagnose the systems. You need to know how to check the starter for performance.
The VAZ-2110, like most other cars, needs timely replacement of starter components. Brushes and bushings wear out under the influence of friction and high current and become covered with a layer of soot. Because of this, the current consumed by the windings increases several times.
Possible starter failures
There can be a large number of starter breakdowns, but most often they are all of the same type. Below are all the most common starter failures.
Brush wear
Starter brushes are a copper-graphite part that conducts electric current. The brushes are in direct contact with the starter armature and rub against its commutator, conducting electric current. During long-term use, brushes become unusable due to friction and must be replaced. This breakdown is not expensive or complicated; you just need to remove the starter and replace the brushes.
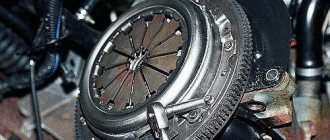
Bendix wedge
The Bendix is directly connected to the flywheel and quite often, wear appears inside it or on its gears due to high load, which makes it impossible to start the car from the starter. By design, Bendix is an overrunning clutch that rotates freely in one direction and is locked when rotating in the other direction. This part is sold separately and can be replaced as soon as possible.
Homemade device for determining turn circuits
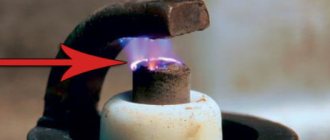
Let's make a choke with our own hands to check the interturn short circuit in the motor winding. We will need U-shaped transformer iron. It can be taken, for example, from the old vibration pump “Rucheek”, “Malysh”. We disassemble its lower part and heat it well. There are coils filled with epoxy resin.
We heat the epoxy and knock out the coils with the core. Using sandpaper or a grinder, we cut off the jaws of the core. These coils are wound just on the U-shaped transformer iron.
No need to respect angles. You need to make a place where a small and a large anchor can easily fall.
When processing, it is necessary to take into account that the iron is laminated. You cannot treat it in such a way that the stone lifts it. It is necessary to process in such a direction that the layers lie towards each other so that there are no scuffs. After processing, remove all chamfers and burrs, since you will have to work with enameled wire; it is not advisable to scratch it.
Now we need to make two coils for this core, which we will place on both sides. We measure the thickness and width of the core in the widest places, along the rivets. We take thick cardboard and mark it according to the size of the core. We take into account the size of the groove in the core between the coils. We run the non-sharp edge of the scissors along the bend points to make it easier to bend the cardboard. We cut out the blank for the coil frame. Fold along the fold lines. This creates the frame of the coil.
Now we make four covers for each side of the coils. We get two cardboard frames for the reels.
We calculate the number of turns of the coils using the formula for transformers.
13200: 7.56 = 1746 turns for two coils. This number is optional; a deviation of 10% in both directions will not play any role. Round up, 1800: 2 = 900 turns need to be wound on each coil. We have 0.16 mm wire, it will fit our coils just fine. You can wind it any way you like. 900 turns can be wound manually. If you make a mistake by 20-30 turns, then nothing bad will happen. Better to wind more. Before winding with an awl, we make holes along the edges of the frame for the output of the coil wires.
We put a heat shrink sleeve on the end of the wire. We insert the end of the wire into the hole, bend it, and begin winding the coil.
The filling turned out to be small, so you can wind it with thicker wire. We solder the wiring with a cambric to the other end and insert it into the hole. Do not wind the coil until the test has been carried out.
Both coils are wound. We put them on the core so that the wires go down and are on one side. The coils are wound exactly the same, the direction of the turns is in the same direction, the ends are brought out in the same way. Now you need to connect one end from one coil and one to the other, and apply 220 volts to the remaining two ends. The main thing is not to get confused and connect the correct wires. To understand the connection order, you need to mentally straighten our U-shaped core into one line, so that the turns in the coils are located in the same direction, moving from one coil to the second. We connect the two ends of the coils. We apply voltage to the two ends.
Let's compare a factory choke and a homemade one.
We check the factory choke with a metal plate for vibration in the place of turn short circuits of the motor armature and mark them with a marker. Now we do the same on our homemade throttle. The results were identical. Our new throttle is working fine.
We remove our coils from the core and secure the windings with electrical tape. We also insulate the solder with tape. We put the finished coils on the core, solder 220 V power to the ends of the wires. The inductor is ready for use.
The starter doesn't turn over
There are many reasons why the starter does not work, but first of all you need to check the most common reasons why the engine will not start.
Checking contacts on the battery
Often the reason when the starter does not turn is due to loose terminals on the battery or their oxidation. It is enough just to clean the oxidized terminals from chemical reactions and tighten them with a force that will ensure reliable contact.
Battery discharge
Quite often, especially in winter, after a period of inactivity, the car’s battery may discharge, and thickened oil during parking will not allow the weak battery to rotate the crankshaft with the starter. You can check the battery with a regular multimeter; in winter its voltage should not be less than 12V, in summer not less than 11V. This voltage is not an indicator of the battery charge; at such values it is better to charge the battery.
Egnition lock
In some cases, the contact part of the ignition switch may fail. This is due to aging or poor quality parts. In this case, when turning the key, the contacts will not close to turn on the starter.
Winding break
If the winding on the stator or rotor of the starter breaks, the magnetic field that rotates the armature will not appear and the starter armature will not move.
Rotor winding faults
The simplest way to check the serviceability of the starter is to apply current from the battery directly to the power contact, bypassing the traction relay. This will allow you to find out how the electric motor behaves and whether it shows any signs of life.
But before checking the functionality of the battery starter, try to use only thick copper stranded wires with good insulation.
If the rotor does not rotate, you will have to check it too. The following malfunctions most often occur:
- The lamellas, the contacts through which current is transmitted to the rotor winding, become dirty. To get rid of such damage, it is enough to clean the spaces between the contacts with a thin knife blade.
- A short circuit appears - the insulation of the winding is broken, as a result of which the wire is electrically connected to the metal rotor.
- An interturn short circuit appears - this is the most difficult fault to identify; for diagnosis it is necessary to use a megohmmeter. It is impossible to check with a multimeter.
The easiest way to make repairs is to install a new rotor. Rewinding the winding is problematic, since it is difficult to find a suitable wire.
Replacing the VAZ 2110 starter
To remove the starter, you need to prepare a tool that will be needed during the work process.
Required tool:
- Ratchet;
- Extension;
- Head 13mm;
- Open-end wrench 10mm;
- Open-end wrench 13mm;
Step-by-step instruction
- Disconnect the negative terminal from the battery
- We dismantle the air filter box together with the mass air flow sensor
- Unscrew the wires from the starter
- Unscrew the nuts securing the starter to the gearbox
- Removing the starter
Anchor
To monitor the serviceability of the armature, a voltage of 12 Volts from the battery is required. Power is supplied directly to the starter. If the device works, we can say that it is working properly. In case of failure, there is a problem with the brushes or the device itself. To understand the reasons, you need to disassemble the assembly and check each element with a multimeter.
The main faults of the armature include a breakdown in the winding, a short circuit between the turns or soldering of the leads. To check, use a multimeter, PCP or conventional inspection, respectively. A short circuit can be easily identified visually by a number of symptoms - the appearance of metal shavings and burning of lamellas. If nothing is done, more serious consequences are possible - damage to the brushes and starter malfunction. The depth between the grooves should be 0.5 mm and below.